Home>Events & Info>Podcast>How To Record A Podcast On Zoom


Podcast
How To Record A Podcast On Zoom
Modified: January 22, 2024
Learn how to record a professional podcast on Zoom with step-by-step instructions. Master the art of podcasting and produce high-quality content.
(Many of the links in this article redirect to a specific reviewed product. Your purchase of these products through affiliate links helps to generate commission for AudioLover.com, at no extra cost. Learn more)
Table of Contents
Introduction
Welcome to the era of podcasts – a platform where individuals and businesses can share their thoughts, stories, expertise, and more in an engaging audio format. Podcasts have gained immense popularity in recent years, with millions of people tuning in to listen to their favorite shows. If you’re interested in starting your own podcast, you’ll need to know how to record it effectively. One popular tool for recording podcasts is Zoom, a video conferencing platform that offers a range of features and flexibility.
In this article, we’ll walk you through the process of recording a podcast on Zoom, step by step. Whether you’re a seasoned podcaster or a newbie looking to venture into the world of podcasting, Zoom can be a great option for recording high-quality audio with multiple participants.
Before we dive into the specific steps, it’s essential to note that Zoom offers both free and paid plans. The features and limitations vary depending on the plan you choose. While the free version has its limitations, it can still be used effectively for podcast recording. Now, let’s get started on how to record a podcast on Zoom.
Step 1: Setting up Zoom
Before you can start recording your podcast on Zoom, you’ll need to set up an account and download the Zoom software. Here’s how:
- Visit the Zoom website at https://zoom.us/ and click on the “Sign Up, It’s Free” button.
- Fill in the required details, such as your email address, name, and password, and click on “Sign Up.”
- You will receive a confirmation email. Click on the link provided to activate your Zoom account.
- Once your account is activated, you can download the Zoom software by clicking on the “Download” tab on the top right corner of the website. Select the version suitable for your operating system (Windows, Mac, or Linux).
- Follow the installation instructions to complete the setup. Once installed, launch the Zoom application on your computer.
Now that you have set up Zoom on your computer, you are ready to start recording your podcast. In the next steps, we will guide you on how to adjust audio settings, invite podcast participants, and manage your podcast recordings.
Step 2: Adjusting audio settings
Ensuring optimal audio quality is crucial for a podcast recording. Here’s how you can adjust the audio settings in Zoom for a seamless recording experience:
- Open the Zoom application on your computer and sign in to your account.
- Click on the gear icon, also known as “Settings,” in the top right corner of the Zoom window.
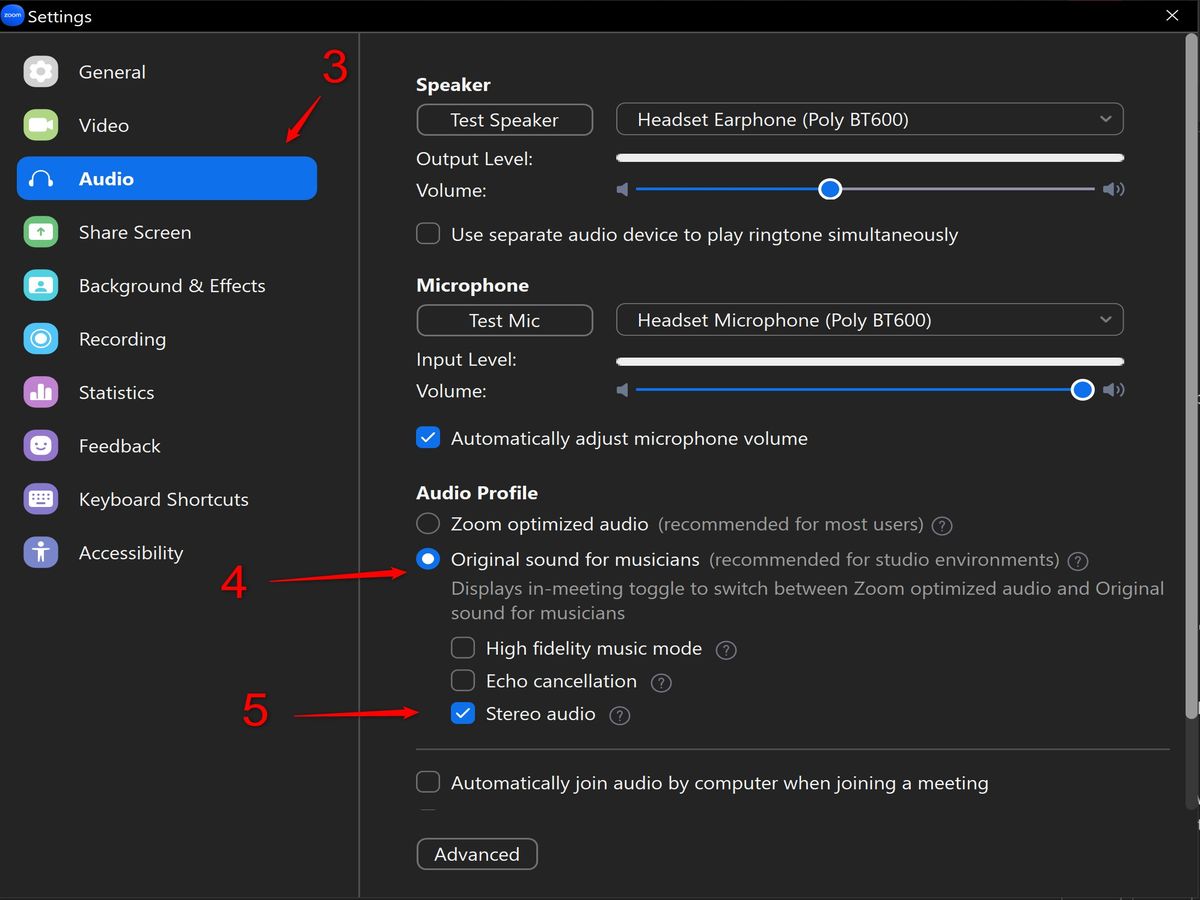
- In the “Settings” menu, navigate to the “Audio” tab.
- Under the “Microphone” section, select the audio input device you will be using for your podcast recording. It is recommended to use a dedicated microphone for better audio quality. Ensure that the microphone volume is set to an appropriate level and adjust accordingly.
- Below the microphone settings, you will find the “Speaker” section. Choose the audio output device through which you will be listening to your podcast participants. It can be your computer’s built-in speakers or headphones.
- Test the audio settings by speaking into your microphone and checking the green bar next to “Microphone.” The bar should move as you speak, indicating that your audio is being detected. Adjust the microphone volume if necessary.
- Next, click on the “Advanced” button located at the bottom right corner of the “Audio” tab to access additional audio settings.
- In the “Advanced Audio Settings” window, make sure the “Show in-meeting option to ‘Enable Original Sound'” box is checked. This option allows you to disable any audio enhancements or background noise suppression, ensuring a more natural and high-quality audio recording.
- Click “OK” to save your settings.
Now that you have adjusted the audio settings, you are ready to invite participants and start recording your podcast. In the next steps, we will guide you through the process of inviting participants, recording the podcast, and managing the recordings.
Step 3: Inviting podcast participants
Now that you have set up Zoom and adjusted your audio settings, it’s time to invite participants to join your podcast recording. Follow these steps:
- Open the Zoom application and sign in to your account if you haven’t already.
- Click on the “New Meeting” button on the home screen to start a new meeting. This will open a new meeting window.
- In the meeting window, you will find a toolbar at the bottom of the screen. Click on the “Invite” button located on the right side of the toolbar.
- A pop-up window will appear with various options to invite participants. You can choose to invite participants via email by entering their email addresses in the field provided, or you can copy the meeting invitation and share it via other communication channels such as messaging apps or social media.
- Once you have selected your preferred method of inviting participants, click on the “Send” button or simply share the meeting invitation link.
- Your podcast participants will receive the invitation and can join the meeting by clicking on the provided link. They will need to have Zoom installed on their devices as well.
- Once participants join the meeting, you can see their video feeds (if enabled) and communicate with them using the audio functionality of Zoom.
- Ensure that all participants have their microphones unmuted and are ready to record.
With your podcast participants in the virtual room, you are ready to move on to the next step: recording your podcast. We will guide you through this process in the following step.
Step 4: Recording the podcast
With your participants ready, it’s time to start recording your podcast on Zoom. Follow these steps:
- Ensure that all participants are present and their microphones are unmuted.
- In the meeting window, locate the toolbar at the bottom of the screen. On the right side of the toolbar, you will find a “Record” button. Click on it to start recording.
- Once the recording starts, a red indicator will appear at the top left corner of the screen, indicating that the meeting is being recorded.
- Engage in your podcast discussion, ensuring all participants speak clearly and audibly into their microphones.
- During the recording, you can use various Zoom features to enhance your podcast. For example, you can share your screen to show visual content or use the chat function to communicate with your participants.
- Continue your podcast until you have covered all desired topics or reached the desired length.
- To pause or stop the recording, click on the “Pause” or “Stop Recording” button on the toolbar respectively.
- Once you have stopped the recording, the Zoom application will automatically save the recording to your computer in the designated location.
Now that you have successfully recorded your podcast on Zoom, you can move on to the next step: managing your podcast recordings.
Step 5: Managing podcast recordings
After recording your podcast on Zoom, you might need to manage and edit the recording before publishing it. Here’s how you can manage your podcast recordings:
- Locate the recorded file on your computer. By default, Zoom saves the recordings in the Zoom folder, which is usually found in your Documents folder.
- To access your recorded files quickly, you can click on the “Meetings” tab in the Zoom application and navigate to the “Recorded” section. There you will find a list of your recorded meetings, and you can easily locate and access the desired recording.
- If you want to edit the recording, you can use third-party audio editing software, such as Audacity or Adobe Audition, to enhance the audio quality, remove any unwanted parts, or add music and sound effects.
- Remember to save your edited recording in a suitable audio format, such as MP3, WAV, or AAC, depending on your podcast distribution platform’s requirements.
- Once your recording is edited and saved, you can upload it to your podcast hosting platform or website to make it available to your audience.
- Additionally, you might consider transcribing your podcast episode for accessibility and SEO purposes. There are various transcription services available that can help convert your audio recording into written text.
By effectively managing your podcast recordings, you can ensure a professional and polished final product for your listeners to enjoy.
Now that you have managed your podcast recordings, let’s move on to the final step of ending the podcast recording.
Step 6: Ending the podcast recording
Once you have completed your podcast recording on Zoom, it’s important to properly end the recording and wrap up the session. Here’s how to effectively end the podcast recording:
- Inform your participants that the recording is coming to an end and thank them for their participation.
- Summarize the key points or highlights of the podcast and allow participants to share any final thoughts or concluding remarks.
- When you’re ready to end the recording, click on the “Stop Recording” button on the toolbar at the bottom of the Zoom meeting window.
- After stopping the recording, take a moment to save and locate the recorded file on your computer using the steps mentioned in the previous section.
- You may want to consider expressing your gratitude to your participants and inform them about the next steps, such as the editing and publishing process.
- Remember to confirm with your participants if they have any specific preferences regarding the usage and distribution of the recorded podcast episode.
By properly ending the podcast recording, you ensure a smooth transition to the post-production phase and maintain a positive and collaborative atmosphere with your podcast participants.
Congratulations! You have completed all the necessary steps to record your podcast on Zoom. Now it’s time for you to take your recorded podcast episode, edit it if needed, and share it with your audience. Whether you are a podcasting veteran or starting a new podcasting journey, Zoom provides a convenient and reliable platform for capturing high-quality audio recordings with multiple participants.
Remember to have fun, be creative, and explore different ways to engage and captivate your audience through the power of podcasting. Happy recording!
Conclusion
Recording a podcast on Zoom is an accessible and effective way to create high-quality audio content with multiple participants. By following the steps outlined in this article, you can confidently set up Zoom, adjust audio settings, invite podcast participants, record your podcast, and manage and edit your recordings.
Zoom offers a user-friendly interface and a range of features that make podcast recording a seamless process. Whether you’re a seasoned podcaster or just starting out, Zoom provides a reliable platform for capturing and preserving engaging conversations that will resonate with your audience.
Once you’ve recorded your podcast on Zoom, you can take advantage of editing software to refine your content and enhance the overall listening experience. Don’t forget to upload your finalized podcast episodes to a podcast hosting platform or website to make them accessible to your audience.
Remember to have clear communication with your podcast participants, express gratitude for their contribution, and ensure that everyone is on the same page regarding the usage and distribution of the recorded episode.
Now that you have the tools and knowledge to record a podcast on Zoom, it’s time to let your creativity shine. Discover your unique voice, share your insights and stories, and connect with listeners around the world through the power of podcasting. The possibilities are endless, and the world is waiting to hear what you have to say.
So, set up your Zoom account, gather your podcast participants, hit that record button, and let your podcast journey begin. Happy podcasting!


