Home>Production & Technology>Noise Cancellation>How To Reduce The Noise Cancellation In Voicemeeter
Noise Cancellation
How To Reduce The Noise Cancellation In Voicemeeter
Published: November 23, 2023
Learn how to reduce noise cancellation in Voicemeeter with these easy and effective techniques. Enhance your audio quality and eliminate unwanted background noise.
(Many of the links in this article redirect to a specific reviewed product. Your purchase of these products through affiliate links helps to generate commission for AudioLover.com, at no extra cost. Learn more)
Table of Contents
Introduction
Noise cancellation is a powerful feature that helps improve audio quality in various applications, including Voicemeeter. Voicemeeter is an advanced virtual audio mixer that allows users to manage and control audio inputs and outputs on their computers. It is commonly used by content creators, streamers, and podcasters to enhance their audio production. While noise cancellation can be beneficial in certain situations, there are times when it may be necessary to reduce the level of noise cancellation in Voicemeeter for a more natural and authentic sound.
In this article, we will explore the concept of noise cancellation in Voicemeeter and discuss the reasons why you might want to reduce it. We will also provide various methods and techniques to achieve this, allowing you to customize your audio settings to suit your specific needs.
Understanding how noise cancellation works in Voicemeeter is crucial to effectively adjusting and reducing it. Voicemeeter employs advanced audio algorithms and filters to analyze and suppress background noise, such as hisses, hums, and other unwanted sounds. By doing so, it helps improve audio clarity and minimizes distractions in your recordings or live streams.
While noise cancellation can be incredibly useful, there are instances when it may be overly aggressive, resulting in a loss of natural sound and artifacts in the audio. This can affect the authenticity and quality of your recordings, especially when it comes to vocals or instruments. By reducing noise cancellation in Voicemeeter, you can strike a balance between noise suppression and preserving the natural audio characteristics.
Now, let’s delve into the reasons why you might consider reducing the noise cancellation in Voicemeeter.
Understanding Noise Cancellation in Voicemeeter
Noise cancellation in Voicemeeter is a process that actively removes or reduces unwanted background noise in audio signals. It is achieved through the use of advanced algorithms and filters that analyze the incoming audio and suppress any noises that do not match the desired sound.
When you enable noise cancellation in Voicemeeter, it works by analyzing the audio signal and identifying frequencies that are consistent over time. These frequencies are often associated with background noise, such as hisses, fan noises, or electrical hums. Voicemeeter then applies a filter to actively reduce the volume of these frequencies, effectively minimizing the impact of the noise on the overall audio quality.
The purpose of noise cancellation in Voicemeeter is to enhance the listening experience by reducing distractions and improving the clarity of the desired audio. This is particularly crucial in situations where high-quality audio is crucial, such as live streaming, podcasting, or recording voice-overs.
However, it is worth noting that noise cancellation is not a foolproof solution and may have its limitations. In some cases, excessive noise cancellation can result in over-processing and artifacts, causing the audio to sound unnatural or distorted. This can be particularly noticeable with vocal recordings, where the subtle nuances and dynamics of the voice may be altered or lost.
While noise cancellation in Voicemeeter is generally effective, it is important to strike a balance between noise suppression and maintaining the natural characteristics of the audio. This is where reducing the noise cancellation on Voicemeeter comes into play.
By reducing the noise cancellation level, you can reduce the amount of processing applied to the audio signal, allowing for a more transparent and authentic sound. This can help preserve the dynamics and nuances of the voice, resulting in a more natural-sounding recording or live stream.
In the next section, we will explore some of the reasons why you might need to reduce noise cancellation in Voicemeeter.
Reasons to Reduce Noise Cancellation in Voicemeeter
While noise cancellation can be a valuable tool for improving audio quality, there are several reasons why you might want to reduce the level of noise cancellation in Voicemeeter. Let’s explore some of these reasons:
1. Preserve Natural Sound:
Excessive noise cancellation can sometimes remove not only unwanted background noise but also the subtle nuances and characteristics of the audio. This can result in a sterile and unnatural sound. By reducing noise cancellation, you can maintain the natural sound of the voice or instrument, providing a more authentic listening experience.
2. Retain Vocal Dynamics:
Vocals can be particularly sensitive to heavy noise cancellation. When noise cancellation is too aggressive, it can inadvertently remove the dynamic range and tonal variations of the voice. By reducing noise cancellation, you can maintain the vocal dynamics, enabling a more expressive and engaging performance.
3. Reduce Artifacts:
Aggressive noise cancellation can introduce artifacts or distortions into the audio signal, especially in complex or intricate recordings. These artifacts can be perceived as unwanted sounds or anomalies, detracting from the overall quality of the audio. By reducing noise cancellation, you can minimize the occurrence of these artifacts, resulting in a cleaner and more professional sound.
4. Blend Background Ambience:
In certain scenarios, such as recording podcasts or live streaming, maintaining some level of background ambience may be desirable. Excessive noise cancellation can eliminate the natural room tone, making the recording sound dry and artificial. By reducing noise cancellation, you can preserve a subtle amount of background ambience, creating a more immersive and realistic listening experience.
5. Enhance Sound Effects:
Reducing noise cancellation can be beneficial when working with sound effects or musical elements that contain deliberate noise or atmospheric sounds. By allowing some level of noise to remain, you can enhance the texture and depth of these elements, creating a more captivating and dynamic sonic experience.
It is important to note that the desired level of noise cancellation will vary depending on your specific requirements and preferences. Experimentation and fine-tuning are key to finding the optimal balance between noise suppression and preserving the natural characteristics of the audio in Voicemeeter.
In the following sections, we will explore different methods and techniques to effectively reduce noise cancellation in Voicemeeter.
Methods to Reduce Noise Cancellation in Voicemeeter
If you’re looking to reduce the level of noise cancellation in Voicemeeter, there are several methods and techniques you can employ. Let’s explore each of these options:
1. Adjusting Input Levels:
One of the simplest ways to reduce noise cancellation is to adjust the input levels in Voicemeeter. Lowering the input level can help reduce the overall processing applied to the audio signal, resulting in a more transparent sound. By finding the right balance between input level and noise cancellation, you can achieve a natural and authentic audio quality.
2. Tweaking Noise Gate Settings:
Noise gates are tools that allow you to set a threshold for signal activation. When the signal falls below the set threshold, the gate closes, effectively muting any background noise. In Voicemeeter, adjusting the noise gate settings can help reduce noise cancellation by allowing some ambient noise to pass through, preserving the natural sound. Experiment with different thresholds to find the optimal balance.
3. Utilizing Noise Reduction Filters:
Noise reduction filters in Voicemeeter can help reduce background noise without completely eliminating it. These filters target specific frequency ranges associated with noise and apply processing to reduce their impact. By fine-tuning the parameters of these filters, you can reduce noise cancellation while still maintaining a clean audio signal.
4. Using Equalization:
Equalization is a powerful tool that can be used to sculpt the sound of your audio. By adjusting the EQ settings, you can manipulate the frequencies in the audio signal to enhance desired elements while reducing unwanted noise. Experiment with adjusting the EQ to find the right balance between noise cancellation and preserving the natural audio characteristics.
5. Combining Noise Reduction Techniques:
Lastly, it’s important to explore the combination of different noise reduction techniques to achieve the desired result. For example, you can adjust input levels, apply noise reduction filters, and fine-tune the EQ settings simultaneously to find the perfect balance. Every audio setup is unique, so don’t hesitate to experiment and iterate to achieve the best results.
Remember, the goal is to reduce noise cancellation in Voicemeeter while maintaining a natural and authentic sound. Explore these methods, make adjustments, and listen critically to find the sweet spot that works for your specific audio setup.
In the next section, we will delve deeper into each method and provide more detailed instructions on how to implement them effectively.
Adjusting Input Levels
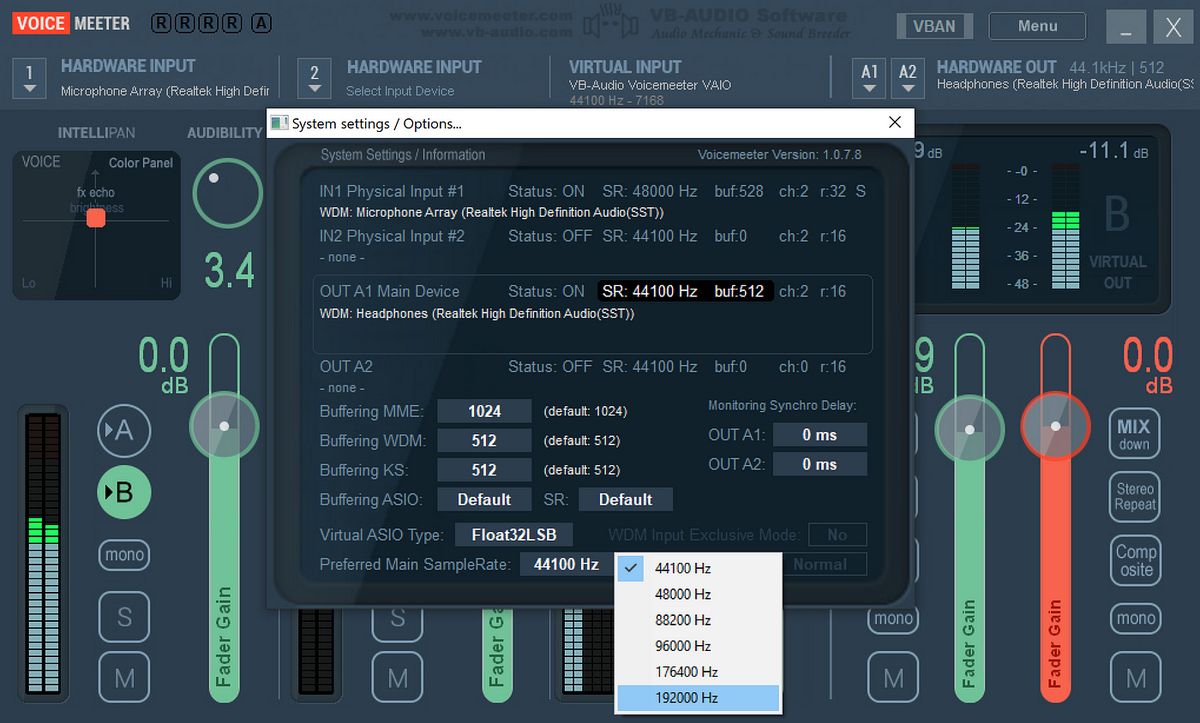
One of the most straightforward methods to reduce noise cancellation in Voicemeeter is by adjusting the input levels. By lowering the input levels, you can effectively reduce the amount of processing applied to the audio signal, resulting in a more natural and transparent sound. Here’s how you can adjust the input levels in Voicemeeter:
- Open Voicemeeter and locate the section for the input source you want to adjust. This could be your microphone or any other audio input device.
- Find the fader or the volume control associated with the input source. You can usually locate this by looking for a slider or knob labeled with the input source name.
- Gradually decrease the input level by moving the fader or turning the volume control knob in a counterclockwise direction. Take note of the changes in the audio level as you make adjustments.
- Test the audio by speaking or playing a sound through the input source. Listen and evaluate the audio quality to determine if the noise cancellation is at an acceptable level.
- Continue making adjustments to the input level until you achieve the desired balance between suppressing noise and preserving the natural sound of the audio.
It’s important to note that while lowering the input levels can help reduce noise cancellation, extreme adjustments may also result in a loss of desired audio elements. When adjusting the input levels, be mindful of maintaining a healthy signal-to-noise ratio and avoiding clipping or distortion.
Additionally, keep in mind that the optimal input level may vary depending on the specific audio source and the ambient noise present. Experimentation and careful listening are key in finding the perfect balance for your particular setup.
By adjusting the input levels in Voicemeeter, you can effectively reduce noise cancellation and achieve a more natural and authentic audio output. This method can be a good starting point in fine-tuning your audio settings to suit your needs.
In the next section, we will explore another method to reduce noise cancellation in Voicemeeter: tweaking noise gate settings.
Tweaking Noise Gate Settings
An effective method to reduce noise cancellation in Voicemeeter is by tweaking the noise gate settings. The noise gate helps control when the audio signal is allowed to pass through by setting a threshold. When the signal falls below the threshold, the gate closes, effectively muting any background noise. Here’s how you can tweak the noise gate settings in Voicemeeter:
- Open Voicemeeter and locate the section for the input source where you want to adjust the noise gate. This could be your microphone or any other audio input device.
- Look for the noise gate settings in the corresponding section. It is usually labeled as “Gate” or “Noise Gate.”
- Adjust the threshold of the noise gate. Start by setting it to a higher value so that only the louder sounds above that threshold pass through.
- Gradually lower the threshold until you find the right balance between suppressing unwanted noise and allowing the desired audio to come through. Take note of the changes in the audio as you make adjustments.
- Pay attention to the attack and release settings of the noise gate. These parameters control how quickly the gate opens when the audio signal rises above the threshold and how long it takes to close once the signal falls below the threshold. Adjusting these settings can help fine-tune the responsiveness of the noise gate.
- Test the audio by speaking or playing a sound through the input source. Listen and evaluate the audio quality to ensure that the noise gate is effectively reducing unwanted noise without affecting the desired audio.
- Continue tweaking the noise gate settings until you find the optimal balance between noise suppression and preserving the natural sound of the audio.
Remember that the ideal noise gate settings may vary depending on the specific audio source and the level of background noise present. It may require some experimentation and adjustment to achieve the best results for your particular setup.
Tweaking the noise gate settings in Voicemeeter can effectively reduce noise cancellation and allow for a more natural and unprocessed sound. It is a valuable method to consider when adjusting your audio settings.
In the next section, we will explore another method to reduce noise cancellation in Voicemeeter: utilizing noise reduction filters.
Utilizing Noise Reduction Filters
Another effective method to reduce noise cancellation in Voicemeeter is by utilizing noise reduction filters. These filters specifically target and suppress background noise frequencies, allowing you to achieve a cleaner and more natural sound. Here’s how you can utilize noise reduction filters in Voicemeeter:
- Open Voicemeeter and locate the section for the input source where you want to apply the noise reduction filter. This could be your microphone or any other audio input device.
- Look for the noise reduction filter settings in the corresponding section. It might be labeled as “Noise Reduction,” “Noise Suppression,” or something similar.
- Adjust the parameters of the noise reduction filter, such as the strength or threshold. Increasing the strength will result in more aggressive noise reduction, while decreasing it will preserve more of the original audio.
- Consider adjusting other parameters like attack and release time. These settings control how quickly the noise reduction filter reacts to changes in the audio signal. Tweaking these settings can help fine-tune the effectiveness of the filter.
- Test the audio by speaking or playing a sound through the input source. Listen and evaluate the audio quality to ensure that the noise reduction filter is effectively reducing the unwanted background noise without distorting the desired audio.
- Continuously fine-tune the noise reduction filter parameters until you achieve the optimal balance between noise suppression and preserving the natural sound of the audio.
It’s worth noting that different noise reduction filters may have slightly different parameter names or options. However, the general concept remains the same. Experimenting with the various settings and listening critically to the results will help you find the best configuration for your specific audio setup.
Utilizing noise reduction filters in Voicemeeter can greatly reduce the level of noise cancellation, enabling you to maintain a more natural and unprocessed sound. By specifically targeting and suppressing unwanted background noise frequencies, you can achieve a cleaner and more professional audio output.
In the next section, we will explore another method to reduce noise cancellation in Voicemeeter: using equalization.
Using Equalization
Equalization, commonly referred to as EQ, is a powerful tool that can be used to adjust the frequencies of an audio signal. By utilizing equalization in Voicemeeter, you can shape the sound and effectively reduce noise cancellation while preserving the natural audio characteristics. Here’s how you can use equalization to reduce noise cancellation:
- Open Voicemeeter and locate the section for the input source where you want to apply equalization. This could be your microphone or any other audio input device.
- Find the equalizer settings in the corresponding section. It may be labeled as “EQ” or “Equalization.”
- Adjust the EQ settings to emphasize or reduce specific frequency ranges. In the context of reducing noise cancellation, you’ll want to focus on the frequencies that are affected by the unwanted noise. Experiment with lowering the amplitude of those frequencies to minimize their impact.
- Consider utilizing the Q or bandwidth parameter to control the width of the affected frequency range. A narrower bandwidth can help target specific frequencies more precisely, while a wider bandwidth will affect a broader range of frequencies.
- Test the audio by speaking or playing a sound through the input source. Listen and evaluate the audio quality to ensure that the equalization settings are effectively reducing the unwanted noise while maintaining the natural sound.
- Make further adjustments to the equalization settings until you achieve a balanced result that reduces noise cancellation without excessively altering the desired audio characteristics.
It’s important to note that while equalization can be a useful tool in reducing noise cancellation, it should be used judiciously. Excessive equalization can introduce other artifacts or distortions to the audio. Aim to strike a balance between noise reduction and maintaining a natural and well-balanced sound.
By utilizing equalization in Voicemeeter, you can effectively reduce noise cancellation by targeting specific frequencies affected by unwanted noise. This method allows for a more nuanced and customizable approach to noise reduction while preserving the natural audio characteristics.
In the next section, we will conclude and summarize the various methods discussed to reduce noise cancellation in Voicemeeter.
Conclusion
Reducing noise cancellation in Voicemeeter is a valuable skill to master, as it allows you to achieve a more natural and authentic audio output. By understanding the concept of noise cancellation in Voicemeeter and the reasons to reduce it, you can make informed decisions to enhance the audio quality of your recordings, live streams, or other audio productions.
In this article, we explored various methods to reduce noise cancellation in Voicemeeter. Adjusting input levels can provide a straightforward way to achieve a more transparent sound, while tweaking noise gate settings allows for more control over the balance between noise suppression and the desired audio. Utilizing noise reduction filters specifically targets and suppresses background noise frequencies, and using equalization allows for finer adjustments to reduce noise cancellation while preserving the natural audio characteristics.
It’s important to note that the optimal settings and methods may vary depending on your specific audio setup and requirements. It often requires experimentation, careful listening, and fine-tuning to find the perfect balance for your particular situation.
By employing these methods effectively, you can find the sweet spot that reduces noise cancellation while maintaining the authenticity and quality of the audio. Whether you are a content creator, streamer, podcaster, or simply someone who values high-quality audio, mastering the art of reducing noise cancellation in Voicemeeter is a valuable skill that can greatly enhance your audio production.
Remember to continually evaluate and adjust your settings as your recording environment and needs may change over time. Embrace the opportunity to fine-tune your audio and strive for the best balance between noise suppression and natural sound.
With these insights and techniques, you are well-equipped to embark on your journey of reducing noise cancellation in Voicemeeter and achieving exceptional audio quality.