Home>Instruments>Piano>How To Label Your Piano
Piano
How To Label Your Piano
Modified: February 11, 2024
Learn how to properly label your piano to keep it organized and easily accessible. Discover the best methods for labeling your piano keys and other components.
(Many of the links in this article redirect to a specific reviewed product. Your purchase of these products through affiliate links helps to generate commission for AudioLover.com, at no extra cost. Learn more)
Table of Contents
Introduction
Learning to play the piano is a rewarding and enriching experience. However, for beginners, navigating the 88 keys can be a daunting task. To alleviate the initial confusion and facilitate a smoother learning process, labeling the keys can be incredibly beneficial. By clearly identifying the notes, beginners can develop a stronger understanding of piano theory and improve their playing skills.
In this comprehensive guide, we will explore the step-by-step process of labeling a piano keyboard. Whether you are a novice eager to embark on your musical journey or a parent seeking to support your child's piano education, this guide will equip you with the knowledge and techniques needed to effectively label a piano keyboard. From gathering the necessary materials to testing the labels, each step is designed to streamline the labeling process and enhance the overall learning experience.
By the end of this guide, you will have the confidence and expertise to accurately label the keys on your piano, setting the stage for a fulfilling and enjoyable musical endeavor. Let's embark on this insightful journey and unlock the potential of your piano playing skills.
Step 1: Gather the Necessary Materials
Before commencing the process of labeling your piano keys, it is essential to gather the required materials. By ensuring that you have all the necessary items at your disposal, you can streamline the labeling process and minimize interruptions. Here’s what you will need:
- Label stickers: These stickers will be used to mark the keys with their corresponding notes. Opt for clear and durable stickers that can be easily affixed to the keys without causing damage to the piano.
- Marker or pen: A fine-tipped marker or pen will be utilized to write the note names on the label stickers. Ensure that the marker produces legible and long-lasting markings.
- Cleaning supplies: It is advisable to have cleaning supplies on hand to thoroughly clean the keys before applying the labels. This will ensure that the stickers adhere firmly to the keys without any residue or dust affecting their adhesion.
- Reference materials: Whether it’s a piano chord chart, a musical notation book, or a digital piano app, having reference materials nearby can assist in verifying the accuracy of the labeled keys.
- Patience and precision: While not tangible materials, patience and precision are invaluable during the labeling process. Approach the task with a calm and focused mindset, ensuring that each label is accurately placed and aligned.
By assembling these materials, you are well-equipped to embark on the next steps of labeling your piano keys. With the necessary tools and a clear understanding of their functions, you are poised to create a labeled keyboard that will serve as a valuable learning aid in your musical journey.
Step 2: Identify the Keys on the Piano
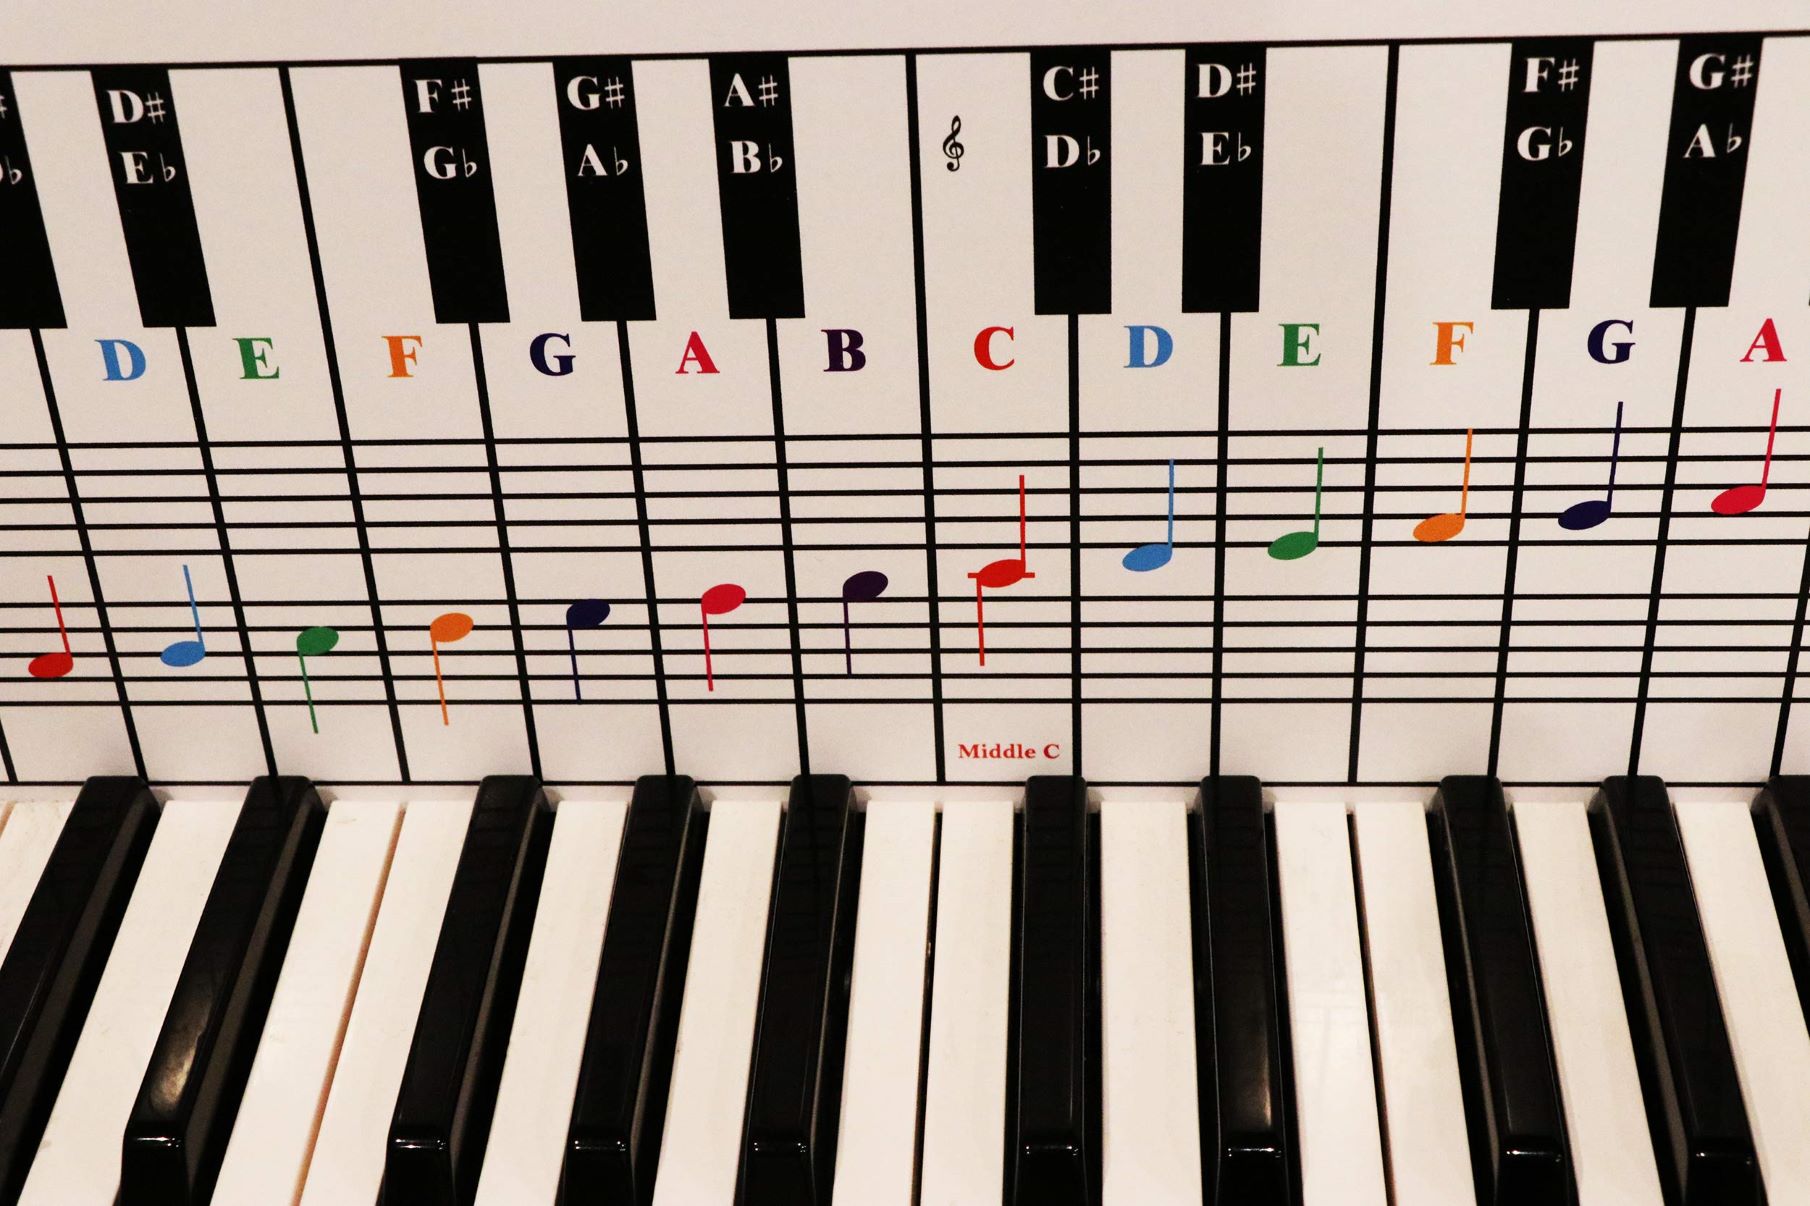
Before applying the labels, it’s crucial to familiarize yourself with the layout of the piano keys. The standard piano keyboard comprises 88 keys, including both white and black keys. Understanding the pattern of these keys is essential for accurate labeling. Here’s a brief overview:
The white keys on the piano represent the natural notes (A, B, C, D, E, F, G) in a repeating pattern. Starting from any note, the sequence of natural notes ascends in alphabetical order until it reaches the next occurrence of the same note at a higher pitch. This pattern continues across the entire keyboard.
Interposed between the white keys are the black keys, which represent the sharp and flat notes. These keys are positioned in groups of two and three, creating a visually distinct pattern across the keyboard. Understanding the arrangement of black keys in relation to the white keys is essential for accurately identifying and labeling each key.
As you familiarize yourself with the keys, take note of the grouping of black keys and their relationship to the adjacent white keys. This visual understanding will serve as a foundation for the precise placement of the labels in the subsequent steps. Additionally, take the time to play each key and listen to its sound, reinforcing your auditory recognition of the notes.
By taking the time to identify and understand the layout of the keys, you are laying the groundwork for a successful labeling process. This foundational knowledge will not only enhance your understanding of the piano keyboard but also ensure the accurate placement of labels in the upcoming steps.
Step 3: Label the Keys
With a clear understanding of the piano keyboard’s layout and the necessary materials at hand, it’s time to embark on the process of labeling the keys. Follow these steps to ensure accurate and effective labeling:
- Clean the Keys: Before applying the labels, gently clean the surface of each key using a soft cloth and a mild piano-friendly cleaner. This step removes any dust or residue, ensuring that the labels adhere firmly to the keys.
- Affix the Labels: Carefully peel the label stickers and affix them to the center of each key, aligning them evenly to ensure a consistent appearance across the keyboard. Take your time to avoid air bubbles or misalignment, which can affect the aesthetics and functionality of the labels.
- Write the Note Names: Using a fine-tipped marker or pen, legibly write the corresponding note names on each label. Ensure that the names are positioned prominently and clearly visible for easy reference while playing.
- Verify Accuracy: As you label each key, cross-reference the note names with a reliable source, such as a piano chord chart or a digital piano app. This verification step ensures the accuracy of the labeling and provides an opportunity to correct any errors.
- Consistency and Precision: Maintain a consistent approach to labeling, ensuring that the placement and appearance of each label adhere to a uniform standard. Precision in alignment and legibility contributes to a professional and functional result.
Throughout the labeling process, maintain a patient and meticulous approach, as accuracy and attention to detail are paramount. By following these steps diligently, you will create a labeled piano keyboard that serves as an invaluable visual aid in your musical endeavors.
Step 4: Test the Labels
After successfully labeling the keys on your piano, it’s essential to conduct a thorough testing phase to ensure the accuracy and functionality of the labels. Testing the labels involves both visual verification and practical application to validate their effectiveness. Follow these steps to comprehensively test the labeled keys:
- Visual Inspection: Begin by visually inspecting the labeled keys to ensure that the note names are legible and positioned accurately. Check for any smudges, fading, or inconsistencies in the labeling, and make any necessary adjustments to maintain clarity and precision.
- Play Each Labeled Key: Sit at the piano and systematically play each labeled key, confirming that the sound produced aligns with the corresponding note name. This hands-on approach reinforces your auditory recognition of the notes and validates the accuracy of the labels.
- Practice Exercises and Songs: Incorporate the labeled keys into practice exercises and beginner-friendly songs. Utilize the visual cues provided by the labels to strengthen your understanding of note locations and enhance your overall playing experience.
- Feedback and Refinement: Seek feedback from a music teacher, experienced pianist, or fellow learners regarding the usability and effectiveness of the labeled keys. Their insights can provide valuable perspectives for refinement and optimization.
- Long-Term Observation: Over an extended period, observe the durability and longevity of the labels. Assess their resilience to regular playing and environmental factors, ensuring that they remain intact and legible for sustained use.
By rigorously testing the labeled keys through visual inspection, practical application, and long-term observation, you can instill confidence in their reliability and utility as learning aids. The testing phase serves as a crucial validation of the labeling process, affirming its value in facilitating an enriching and efficient learning experience.
Conclusion
Labeling the keys of a piano is a transformative step that enhances the learning experience for beginners and facilitates a deeper understanding of musical theory. By following the comprehensive process outlined in this guide, you have acquired the knowledge and skills to effectively label your piano keyboard, paving the way for a more accessible and enriching musical journey.
From gathering the necessary materials to meticulously applying and testing the labels, each step contributes to the creation of a valuable visual aid that reinforces your understanding of note locations and fosters confidence in playing. The labeled keys serve as guiding markers, empowering you to navigate the keyboard with clarity and precision, ultimately accelerating your musical progress.
As you embark on your piano playing endeavors, embrace the labeled keys as valuable companions in your practice sessions and learning endeavors. Utilize them as reference points for chord progressions, scale exercises, and beginner repertoire, leveraging their visual cues to reinforce your musical knowledge and dexterity.
Remember that the labeling process is not merely a one-time task but an ongoing resource that evolves alongside your musical proficiency. Regularly engage with the labeled keys, incorporate them into your practice routines, and observe the positive impact they have on your musical fluency and confidence.
By investing the time and effort to label your piano keys, you have taken a proactive step toward enhancing your musical journey. Embrace the labeled keys as empowering tools that demystify the complexities of the piano keyboard, allowing you to embrace the joy of playing and mastering this timeless instrument.
With diligence, patience, and a spirit of exploration, your labeled piano keyboard will serve as a steadfast ally, guiding you toward greater musical accomplishments and a deeper appreciation of the art of piano playing.