Home>Instruments>Vocalist>How Does The Digitech Vocalist 3 Operate?
Vocalist
How Does The Digitech Vocalist 3 Operate?
Modified: February 22, 2024
Learn how the Digitech Vocalist 3 operates and enhances your vocals. Our comprehensive guide provides insights and tips for maximizing your vocal performances.
(Many of the links in this article redirect to a specific reviewed product. Your purchase of these products through affiliate links helps to generate commission for AudioLover.com, at no extra cost. Learn more)
Table of Contents
Introduction
The Digitech Vocalist 3 is a powerful and versatile vocal harmony processor that has become a staple in the music industry. Whether you’re a professional vocalist or an amateur musician looking to add depth and richness to your live performances or recordings, the Vocalist 3 is a valuable tool that can elevate your sound to a whole new level. This innovative device is designed to generate harmonies in real-time, offering a wide range of customizable options to suit your musical preferences.
With the Digitech Vocalist 3, you no longer need a backup singer or a complex computer setup to achieve harmonies in your vocals. This compact and user-friendly device can analyze the chords and notes you play on your instrument in real-time and generate harmonies that perfectly complement your voice. This means that whether you’re strumming a guitar, playing a keyboard, or even singing acapella, the Vocalist 3 will intelligently harmonize with you, enhancing your performance and giving it a professional and polished sound.
With its advanced technology and intuitive design, the Digitech Vocalist 3 offers a variety of harmony modes, allowing you to choose between different combinations of harmonies such as unison, 3rds, 5ths, and octaves. Additionally, it offers an array of built-in effects and presets, allowing you to add reverb, delay, chorus, and other effects to further enhance your vocal performance.
In this article, we will take a closer look at how the Digitech Vocalist 3 operates. We will explore its connectors and controls, discuss how to set it up for optimal performance, and dive into the various operating modes and features it offers. Whether you’re a beginner just starting to explore vocal harmonies or an experienced musician looking to upgrade your gear, this guide will provide you with the knowledge and insights you need to make the most of the Vocalist 3.
Overview of the Digitech Vocalist 3
The Digitech Vocalist 3 is a state-of-the-art vocal harmony processor that is widely regarded as one of the best in its class. It is packed with features and functionalities that allow singers and musicians to create harmonies in real-time, adding depth and richness to their performances. Whether you’re a solo performer, a band member, or a recording artist, the Vocalist 3 can greatly enhance your sound.
One of the standout features of the Vocalist 3 is its ability to analyze the chords and notes played on an instrument in real-time. This means that it can intelligently generate harmonies that are in perfect sync with the music being played. The Vocalist 3 is equipped with the advanced MusIQ technology, which ensures that the generated harmonies are accurate and authentic.
With the Vocalist 3, you have full control over the harmonies being created. You can choose from various harmony modes, including unison, 3rds, 5ths, and octaves. This allows you to create everything from subtle backing vocals to rich and complex harmonies. The Vocalist 3 also features a manual mode, where you can manually select the notes for the harmonies, giving you complete creative freedom.
Another standout feature of the Vocalist 3 is its vast library of presets. It comes loaded with a wide range of professionally programmed presets that cover various music genres and styles. This makes it incredibly easy to find the perfect harmony sound for your performance. Additionally, the Vocalist 3 allows you to save and recall your own custom presets, ensuring that you have quick access to your preferred settings.
Aside from its harmonizing capabilities, the Vocalist 3 offers a range of additional features that further enhance your vocal performance. It comes equipped with a built-in effects processor, allowing you to add reverb, delay, chorus, and other effects to your vocals. This can add depth, ambiance, and character to your sound, giving you a professional studio-quality sound on stage or in the studio.
The Vocalist 3 also features various connectors and controls that make it easy to integrate into your existing setup. It has XLR and 1/4″ jack inputs and outputs, allowing you to connect it to microphones, instruments, mixers, and PA systems. It also offers MIDI connectivity, enabling you to control it remotely using a MIDI controller or your computer.
In summary, the Digitech Vocalist 3 is a versatile and powerful vocal harmony processor that can take your performances to the next level. With its advanced technology, customizable harmonies, extensive preset library, and built-in effects, it offers everything you need to create professional-sounding harmonies and add depth and richness to your vocals.
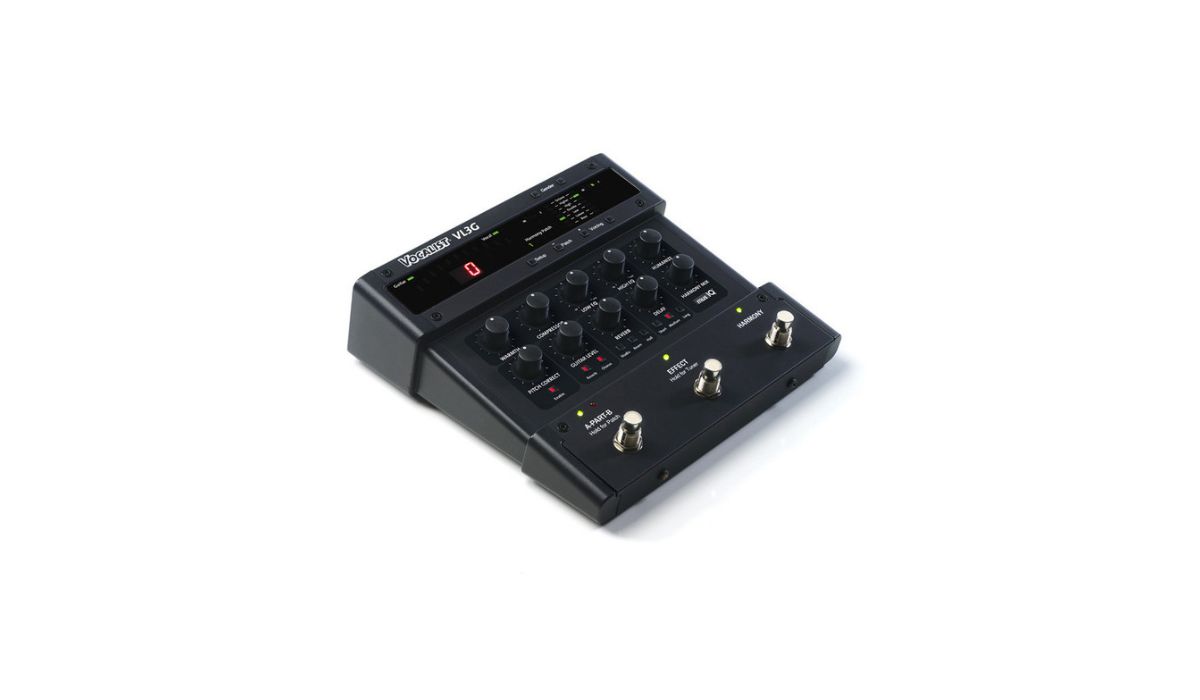
Connectors and Controls
The Digitech Vocalist 3 is equipped with a variety of connectors and controls that allow for seamless integration and easy operation. Understanding the connectors and controls is essential to get the most out of your Vocalist 3 and ensure optimal performance.
On the front panel of the Vocalist 3, you will find a clear and intuitive layout of controls. Starting from the left, there is the Input Level control, which allows you to adjust the input level of your microphone or instrument. This ensures that the Vocalist 3 accurately detects and analyzes the incoming audio signal.
Next is the Harmony Level control, which governs the volume level of the harmonies that the Vocalist 3 generates. By adjusting this control, you can set the perfect blend between your main vocal and the harmonies, achieving the desired balance in your performance.
The Edit knob is another important control on the Vocalist 3. It allows you to navigate through the various parameters and settings of the unit. By turning the Edit knob, you can access different menus and make adjustments to things like harmony modes, key settings, and effects controls.
Moving on to the rear panel of the Vocalist 3, you will find a variety of connectors. The unit features both XLR and 1/4″ jack inputs, giving you the flexibility to connect microphones or instruments depending on your specific needs. The XLR inputs are balanced and provide a professional level of audio quality, while the 1/4″ jack inputs accommodate instruments with line-level outputs.
On the output side, you have XLR and 1/4″ jack outputs. These outputs allow you to connect the Vocalist 3 to your sound system, mixer, or recording interface. The XLR outputs are balanced, offering a clean and noise-free signal transmission, while the 1/4″ jack outputs provide compatibility with a wide range of audio equipment.
The Vocalist 3 also features a MIDI input and output, which allows for MIDI control and synchronization. With MIDI connectivity, you can control the Vocalist 3 using an external MIDI controller or send MIDI signals to synchronize it with other MIDI-enabled devices.
In addition to the physical connectors and controls, the Vocalist 3 also features a clear and easy-to-read LCD display. This display provides valuable information such as the selected presets, key settings, and active parameters. It allows for intuitive navigation through the various menus and settings of the unit.
By familiarizing yourself with the connectors and controls of the Vocalist 3, you can easily set up and operate the unit. Whether you’re performing on stage or recording in the studio, having a clear understanding of these features will ensure a smooth and hassle-free experience with the Vocalist 3.
Setting Up the Digitech Vocalist 3
Setting up the Digitech Vocalist 3 is a straightforward process that involves a few simple steps. Whether you’re using it for live performances or in your home studio, following these guidelines will help you get your Vocalist 3 up and running quickly.
The first step is to connect your microphone or instrument to the appropriate input on the Vocalist 3. If you’re using a microphone, plug it into one of the XLR inputs. For instruments with line-level outputs, use the 1/4″ jack inputs. Make sure to check the input levels and adjust the Input Level control on the front panel of the Vocalist 3 accordingly to get the desired signal strength.
Next, connect the Vocalist 3 to your sound system, mixer, or recording interface. Use either the XLR or 1/4″ jack outputs on the rear panel of the unit, depending on the connections available on your equipment. Ensure that the output levels are set correctly to match the requirements of your setup.
Once your Vocalist 3 is connected to your audio equipment, it’s time to power it on. Plug in the power adapter and turn on the unit using the power switch. The Vocalist 3 will start up and display the main screen on the LCD display. Take a moment to familiarize yourself with the display and its various elements.
Now that your Vocalist 3 is powered on and connected, it’s time to set the key and harmony mode. Press the Edit knob on the front panel to access the Edit menu. Use the knob to scroll through the different options until you find the Key setting. Select the desired key by turning the Edit knob and press it to confirm your selection.
Next, navigate to the Harmony Mode setting and choose the harmonies you want to generate. The Vocalist 3 offers a range of options, including unison, 3rds, 5ths, and octaves. Experiment with different harmony modes to find the sound that best suits your performance.
In addition to the key and harmony mode settings, the Vocalist 3 allows you to further customize your sound. You can access the effects menu using the Edit knob and make adjustments to parameters such as reverb, delay, chorus, and more. These effects can add depth and character to your vocals, enhancing the overall performance.
Once you have set the key, harmony mode, and effects to your liking, it’s a good idea to save your settings as a preset. This way, you can easily recall them for future performances. To save a preset, navigate to the Preset menu in the Edit menu and select an empty preset slot. Follow the on-screen instructions to save your settings.
With the Vocalist 3 set up and your presets saved, you’re ready to start using it in your performances or recordings. Take some time to experiment with different settings and explore the full capabilities of the Vocalist 3. With its intuitive interface and powerful features, you’ll be able to create professional-sounding harmonies that elevate your music to new heights.
Operating the Vocalist 3 in Preset Mode
The Digitech Vocalist 3 offers a convenient preset mode that allows for quick and easy access to a wide variety of professionally programmed settings. Operating the Vocalist 3 in preset mode is perfect for situations where you need instant harmonies without the need for manual adjustments. Here’s how to navigate and utilize the preset mode effectively.
To enter preset mode, make sure that the Vocalist 3 is powered on and the main screen is displayed on the LCD. Use the Edit knob on the front panel to navigate through the menus until you reach the Preset menu. Here you will find a list of preset slots.
Scroll through the available presets using the Edit knob. You’ll notice that each preset is labeled with a name or number, indicating the type of harmony or sound it produces. Take your time to explore the different presets and get a feel for their characteristics.
When you find a preset that you’d like to use, simply select it by pressing the Edit knob. The Vocalist 3 will load the preset, and you’ll immediately hear the harmonies it generates. This gives you instant access to a wide range of harmonies and vocal effects, allowing you to enhance your performance without the need for extensive manual adjustments.
While operating in preset mode, you can further modify the preset to better suit your needs. You can adjust the harmony level using the Harmony Level control on the front panel to increase or decrease the volume of the generated harmonies. This allows you to blend the harmonies with your main vocal to achieve the desired balance.
Additionally, you can make real-time modifications to the effects parameters of the preset. Navigate to the effects menu using the Edit knob and tweak settings such as reverb, delay, chorus, and more. This gives you the flexibility to customize the preset to your specific preferences and the requirements of your performance.
If you come across a preset that you particularly like and would like to save it for future use, you can save it as a custom preset. Navigate to an empty preset slot in the Preset menu, and follow the on-screen instructions to save the current settings as your own custom preset.
Operating the Vocalist 3 in preset mode is a convenient way to quickly access and utilize a wide variety of harmonies and vocal effects. With the press of a button, you can instantly enhance your performances and achieve professional-sounding results. Take the time to explore the different presets and find the ones that complement your style and musical genre.
Experiment with various presets and combine them with your own vocal style to create unique and captivating performances. The preset mode of the Vocalist 3 makes it easy to add depth and dimension to your vocals, whether you’re performing live on stage or recording in the studio.
Operating the Vocalist 3 in Manual Mode
The Digitech Vocalist 3 offers a versatile manual mode that allows for precise control over the harmonies it generates. Operating the Vocalist 3 in manual mode is ideal for situations where you want complete creative freedom to select the specific notes for your harmonies. Here’s how to navigate and utilize the manual mode effectively.
To enter manual mode, ensure that the Vocalist 3 is powered on and the main screen is displayed on the LCD. Use the Edit knob on the front panel to navigate through the menus until you reach the Edit menu. Within the Edit menu, you’ll find various options for customizing the harmonies.
One of the first settings to consider in manual mode is the Key setting. This allows you to specify the key in which you’ll be performing. Navigate to the Key setting and use the Edit knob to select the appropriate key. This ensures that the Vocalist 3 generates harmonies that are in tune with your music.
Once you have set the key, you can start selecting the specific notes for the harmonies. The Vocalist 3 allows you to manually assign up to four harmony notes using the dedicated buttons on the front panel. These buttons represent musical intervals such as 3rds, 5ths, and octaves.
By pressing the corresponding harmony buttons, you can activate the selected harmony notes. You can mix and match different intervals to create complex and interesting harmonies. The Vocalist 3 will generate the harmonies based on the notes you have chosen.
While in manual mode, you also have the option to toggle between octaves using the Octave Up and Octave Down buttons. This allows you to add variation and depth to your harmonies, creating a more dynamic and captivating vocal performance.
Another key feature in manual mode is the ability to switch between different scale modes. The Vocalist 3 offers a range of scale options such as major, minor, and blues scales. Selecting the appropriate scale mode ensures that the generated harmonies are in line with the chosen musical style.
As you experiment and create your desired harmonies in manual mode, you can also adjust the level of the harmonies using the Harmony Level control on the front panel. This allows you to fine-tune the balance between your main vocal and the harmonies.
Operating the Vocalist 3 in manual mode gives you complete control over the harmonies, allowing for endless possibilities and creative exploration. You have the freedom to select specific notes, intervals, and scales to create unique harmonies that perfectly complement your music.
Whether you’re a seasoned musician or a beginner exploring vocal harmonies, the manual mode of the Vocalist 3 opens up a world of creative potential. Take the time to experiment, play with different intervals and scales, and discover the harmonies that best express your musical vision.
Using the Harmony and Effects Features
The Digitech Vocalist 3 offers a range of harmony and effects features that allow you to enhance and customize your vocal performance. Understanding how to effectively utilize these features can elevate your sound and add depth to your music. Here’s a closer look at how to use the harmony and effects features of the Vocalist 3.
The harmony feature of the Vocalist 3 allows you to generate harmonies in real-time, complementing your main vocal with additional voices. Whether you want subtle backing vocals or rich harmonies, the Vocalist 3 has you covered.
To start using the harmony feature, ensure that your Vocalist 3 is connected to your audio equipment and powered on. Then, navigate to the Harmony menu using the Edit knob on the front panel. Here, you can select the harmony intervals you want to generate, such as 3rds, 5ths, or octaves.
Experiment with different harmony intervals to find the desired sound for your performance. You can also adjust the level of the harmonies using the Harmony Level control on the front panel, allowing you to blend the harmonies with your main vocal and achieve the perfect balance.
In addition to the harmony feature, the Vocalist 3 offers a range of built-in effects that can further enhance your vocal performance. These effects include reverb, delay, chorus, and more.
To access the effects menu, use the Edit knob to navigate to the Effects menu. From there, you can adjust various parameters for each effect, such as the level, time, depth, and feedback.
Experiment with different combinations of effects to add depth, ambiance, and character to your vocals. The Vocalist 3 allows you to customize the effects settings to match the style and mood of your music.
Another useful feature of the Vocalist 3 is the ability to save and recall your custom harmony and effects settings. Once you’ve dialed in the desired harmonies and effects, navigate to the Save menu using the Edit knob and follow the instructions to save your settings as a custom preset.
This allows you to easily access your preferred vocal settings for future performances or recordings, saving you time and ensuring consistency in your sound.
Remember to always listen and experiment with different settings to find the harmonies and effects that best fit your vocal style and musical genre. The Vocalist 3 offers a wide range of options to cater to your individual preferences and creative vision.
Using the harmony and effects features of the Vocalist 3 can elevate your vocal performance to new heights. Whether you’re performing on stage or recording in the studio, these features allow you to add depth, richness, and personalization to your vocals, making your music stand out and capturing the attention of your audience.
Troubleshooting Common Issues
While the Digitech Vocalist 3 is a reliable and high-quality vocal harmony processor, occasional technical issues may arise. Here are some common issues you may encounter and troubleshooting steps to resolve them:
1. No sound: If you’re not getting any sound from your Vocalist 3, check the connections between the Vocalist 3 and your audio equipment. Ensure that all cables are securely plugged in and that the input and output settings are properly configured. Also, check the input levels and volume controls on your audio equipment.
2. Intermittent or distorted sound: If you’re experiencing intermittent or distorted sound, first check the input levels. Make sure the input signals are not too hot, as this can cause distortion. Additionally, check the output levels to ensure they are not too high and causing clipping or distortion. If the issue persists, try using different cables or connecting to a different audio device to isolate the issue.
3. Unresponsive controls: If the controls on the Vocalist 3 are unresponsive, ensure that the unit is powered on and properly connected. Try disconnecting and reconnecting the power source and check for any loose connections. If the issue persists, contact the Digitech customer support for further assistance.
4. Error messages: If you encounter error messages on the Vocalist 3 LCD display, refer to the user manual which typically provides a list of error codes and possible solutions. Follow the instructions to troubleshoot the specific error message you’re seeing.
5. Incorrect harmonies: If the Vocalist 3 is generating incorrect harmonies, check the key setting and ensure it matches the key of the music you’re playing. If the harmonies still sound incorrect, try adjusting the Harmony Level control to fine-tune the balance between your main vocal and the harmonies. You can also experiment with different harmony modes and intervals to find the desired sound.
6. Unstable harmonies: If the harmonies generated by the Vocalist 3 are unstable or not tracking correctly, check the input levels and adjust them to ensure a strong and clean signal. Inaccurate tracking can also occur if you’re playing complex chords or fast passages, so try simplifying your playing or slowing down to see if that improves the tracking performance.
If you’re unable to resolve any technical issues with your Vocalist 3, refer to the user manual for further troubleshooting steps or contact Digitech customer support for assistance. They can provide you with specialized guidance and support to help you resolve any persistent issues.
By following these troubleshooting steps and ensuring proper setup and configuration, you can resolve common issues with the Vocalist 3 and enjoy a smooth and reliable vocal harmony processing experience.
Conclusion
The Digitech Vocalist 3 is a powerful and versatile vocal harmony processor that offers musicians and vocalists a wide range of creative possibilities. Whether you’re a professional performer or an aspiring musician, the Vocalist 3 can elevate your vocal performances and recordings to new heights.
With its advanced technology and intuitive controls, the Vocalist 3 allows you to generate harmonies in real-time, perfectly complementing your main vocal with additional voices. The harmonies can be customized to suit your musical preferences, offering a range of intervals and scales to create the desired sound.
In addition to its harmonizing capabilities, the Vocalist 3 also features built-in effects such as reverb, delay, and chorus. These effects can add depth, ambiance, and character to your vocals, enhancing the overall sound of your performance. The Vocalist 3 gives you full control over these effects, allowing you to customize them to match your musical style and artistic vision.
Setting up and operating the Vocalist 3 is a straightforward process, thanks to its intuitive interface and clear controls. Whether you choose to use the preset mode for quick harmonies or explore the manual mode for complete creative freedom, the Vocalist 3 offers flexibility and convenience.
While occasional technical issues may arise, troubleshooting common problems with the Vocalist 3 is usually straightforward. By following the troubleshooting steps and referring to the user manual or contacting customer support when necessary, you can quickly resolve any issues and continue enjoying the benefits of the Vocalist 3.
In conclusion, the Digitech Vocalist 3 is a reliable and powerful tool for vocalists and musicians seeking to enhance their vocal performances. With its harmonizing capabilities, effects options, and user-friendly interface, the Vocalist 3 empowers you to create professional-sounding harmonies, adding depth and richness to your music. Whether you’re performing live on stage or recording in the studio, the Vocalist 3 is a valuable companion that can take your vocals to the next level.