Home>Production & Technology>Metronome>How To Secure A Metronome On The Music Stand
Metronome
How To Secure A Metronome On The Music Stand
Published: January 13, 2024
Learn how to securely attach a metronome to your music stand, ensuring it stays in place while you practice. Improve your rhythm with ease!
(Many of the links in this article redirect to a specific reviewed product. Your purchase of these products through affiliate links helps to generate commission for AudioLover.com, at no extra cost. Learn more)
Table of Contents
Introduction
If you’re a musician, you understand the importance of practice and precision. A metronome is a valuable tool that helps you develop a strong sense of timing and rhythm. Whether you’re a beginner learning to stay in tempo or an experienced musician looking to refine your skills, a metronome can be your best friend.
However, keeping a metronome secure on your music stand can be a challenge. The last thing you want is for your metronome to fall off or distract you during a performance or practice session. Thankfully, there are several simple and effective methods for securing a metronome to your music stand.
In this article, we will guide you through the step-by-step process of securing your metronome on the music stand, ensuring it stays in place and allows you to focus on your music. We will cover various techniques, from using rubber bands and clamps to tape or Velcro. Additionally, we will address common issues and provide troubleshooting tips to help you overcome any challenges you may encounter.
By implementing these strategies, you can maintain a stable and secure position for your metronome, giving you the freedom to concentrate on honing your musical abilities. So let’s dive in and explore how to secure a metronome on your music stand!
Step 1: Choosing the Right Metronome
The first step in securing your metronome on the music stand is to choose the right metronome for your needs. There are various types of metronomes available, ranging from traditional mechanical ones to digital and app-based options. Here are a few factors to consider when selecting a metronome:
- Size and weight: Opt for a metronome that is compact and lightweight. A smaller metronome will be easier to secure on your music stand and less likely to take up too much space.
- Stability: Look for a metronome with a sturdy base or a clamp attachment. This will help ensure that it stays in place even during vigorous practice sessions.
- Visibility: Choose a metronome with a clear, easily readable display. This is particularly important if you need to see the tempo settings from a distance while performing.
- Functionality: Consider the features that are important to you. Some metronomes offer additional functions like rhythm patterns, accenting beats, or programmable options. Evaluate these features based on your specific needs.
By taking these factors into account, you can select a metronome that suits your preferences and requirements for securing it on your music stand. This will ensure a better user experience and make it easier to apply the securing techniques discussed in the following steps.
Step 2: Preparing Your Music Stand
Before securing your metronome, it’s essential to prepare your music stand to provide a stable base for it. Here are a few steps to follow:
- Clean and adjust: Ensure that your music stand is clean and free from any dust or debris that may affect the adhesive or grip of the securing method you choose. Also, adjust the height and angle of the stand to a comfortable position for easy viewing of your metronome.
- Add a grip: If your music stand has a smooth surface that may not provide enough friction to hold the metronome, consider adding a grip material such as non-slip shelf liner or rubber matting. This will help prevent the metronome from sliding or moving on the stand.
- Check stability: Ensure that your music stand is sturdy and properly balanced. Tighten any loose screws or knobs to avoid any wobbling or shaking during practice sessions.
By following these steps, you can create a stable and secure foundation for your metronome. This will help prevent any accidental movements or disruptions while you focus on playing or practicing your instrument.
Step 3: Using Rubber Bands
One of the simplest and most effective methods for securing a metronome on your music stand is by using rubber bands. Rubber bands provide a flexible and adjustable solution that can securely hold your metronome in place. Here’s how you can use rubber bands to secure your metronome:
- Wrap two rubber bands around the music stand, placing them parallel to each other, but with enough space in between for the metronome to fit snugly.
- Slide the metronome into the space between the rubber bands, ensuring that it sits securely against the music stand.
- Adjust the tension of the rubber bands to hold the metronome firmly in place. Be careful not to make them too tight, as it may affect the stability of the stand.
If needed, you can add additional rubber bands to provide extra support and prevent any unwanted movement. The advantage of using rubber bands is that they are easily adjustable and can accommodate different-sized metronomes. Additionally, they are inexpensive and widely available.
Remember to periodically check the rubber bands for wear and tear. Over time, they may lose elasticity and need to be replaced to maintain a secure hold on your metronome.
Using rubber bands is a straightforward and reliable method for securing a metronome on your music stand. It offers stability and ensures that your metronome remains in the desired position throughout your practice or performance.
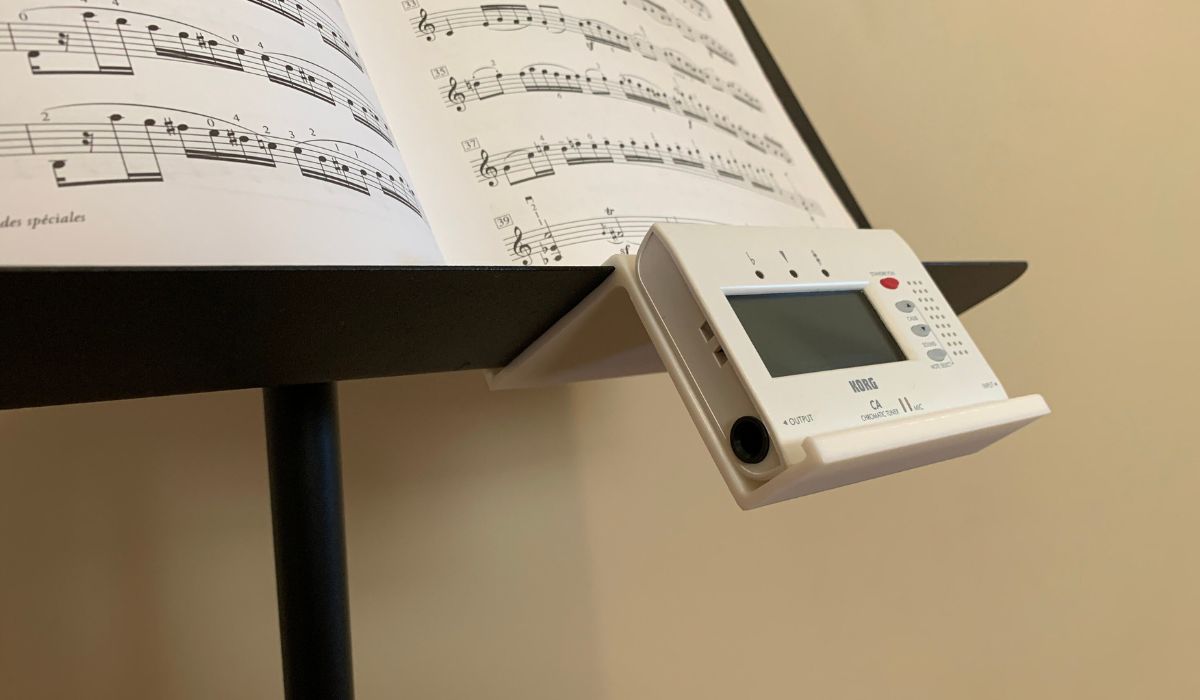
Step 4: Using Clamps or Clips
If you prefer a more secure and permanent solution for securing your metronome, using clamps or clips can provide a reliable method. Clamps and clips offer a strong grip and ensure that your metronome stays in place, even during intense musical sessions. Here’s how you can use clamps or clips to secure your metronome:
- Choose a clamp or clip that is compatible with your music stand. Some clamps attach directly to the stand, while others clip onto the edge of the stand.
- Attach the clamp or clip to the desired location on your music stand.
- Place the metronome in the clamp or clip, ensuring that it fits securely and tightly.
- If necessary, adjust the angle or position of the clamp or clip to align the metronome for optimal visibility and accessibility.
Clamps and clips are commonly made from durable materials such as metal or plastic, providing a sturdy grip and long-lasting performance. They are available in various sizes and designs to accommodate different metronome shapes and sizes, allowing for a customized and secure fit.
Keep in mind that when using clamps or clips, it’s essential to ensure that they do not obstruct your view of the sheet music or interfere with your playing. Adjust the placement as needed to maintain a comfortable and unobstructed setup while keeping your metronome securely in position.
By using clamps or clips, you can achieve a secure and fixed attachment for your metronome, eliminating the risk of accidental displacement and providing you with peace of mind during your musical endeavors.
Step 5: Using Tape or Velcro
If you prefer a temporary and adhesive-free method for securing your metronome, using tape or Velcro can be an effective solution. These materials provide flexibility, allowing you to easily remove and reposition your metronome when needed. Here’s how you can use tape or Velcro to secure your metronome:
- Cut a small piece of double-sided tape or Velcro.
- Attach one side of the tape or Velcro to the back of your metronome.
- If using tape, carefully stick the other side of the tape to the music stand at the desired location. If using Velcro, attach the corresponding Velcro piece to the music stand.
- Press the metronome firmly against the tape or Velcro, ensuring a secure hold.
Tape or Velcro provides a quick and customizable method for attaching your metronome to the music stand. They are easily adjustable and allow you to reposition the metronome without leaving residue or damaging the surface of the stand.
It’s important to note that the adhesive strength of tape or Velcro may vary depending on the quality and brand. Consider using a stronger adhesive option if your metronome is heavier or if you anticipate vigorous movements during your playing sessions.
Regularly check the adherence of the tape or Velcro to ensure that it remains secure. Over time, the adhesive may weaken, requiring replacement or reapplication to maintain a reliable hold.
Using tape or Velcro offers convenience and flexibility, making it an excellent choice for musicians who frequently adjust their metronome’s position on the music stand.
Step 6: Balancing Your Metronome
Once your metronome is securely attached to your music stand, it’s important to ensure that it is balanced properly. A well-balanced metronome will maintain its position and stability, allowing you to focus on your music without any distractions. Here are some tips for balancing your metronome:
- Check the weight distribution: Ensure that the weight of the metronome is evenly distributed. If your metronome has an adjustable arm or a weighted base, make any necessary adjustments to achieve balance.
- Reposition if necessary: If your metronome seems unstable or leans to one side, try repositioning it slightly until it sits evenly on the music stand.
- Test stability: Gently tap the music stand to simulate vibrations or accidental bumps during play. Check if the metronome stays in place and remains stable. If it moves or wobbles, reevaluate the securing method or adjust the balance.
By ensuring that your metronome is properly balanced, you minimize the risk of it falling off or causing distractions in the middle of your practice or performance. A balanced metronome will allow you to play confidently and focus on your music with ease.
Step 7: Troubleshooting Common Issues
While securing your metronome on the music stand, you may encounter some common issues that can affect its stability or performance. Here are a few troubleshooting tips to help you overcome these issues:
- Slipping or sliding: If your metronome is slipping or sliding despite your securing method, try adding additional grip material such as adhesive-backed foam or rubber pads to increase friction between the metronome and the music stand.
- Interference with sheet music: If your metronome is obstructing your view of the sheet music, try positioning it to the side or above the music stand. You can also use a stand extension or a separate attachment to elevate the metronome without affecting your sheet music visibility.
- Limited space: If you have limited space on your music stand, consider using a smaller metronome model or opting for a clamp or clip attachment that takes up less horizontal space.
- Compatibility issues: Some music stands and metronomes may not be fully compatible due to size or design differences. In such cases, explore alternative securing methods or consider investing in a music stand or metronome that is specifically designed for compatibility.
- Metronome sound vibration: If the sound from your metronome is causing vibrations that affect its positioning, consider using a metronome with a lower volume setting or using a sound-isolating platform or stand attachment to minimize vibrations and prevent disruptions.
Remember, troubleshooting is about finding the best solution that works for your specific circumstances. Experiment with different techniques and combinations to address any issues you encounter and ensure a secure and functional setup for your metronome.
With these troubleshooting tips in mind, you can overcome common challenges and enjoy a hassle-free experience with your metronome.
Conclusion
Securing your metronome on your music stand is crucial for maintaining focus, precision, and consistency in your practice sessions and performances. By following the steps outlined in this article, you can ensure that your metronome remains securely in place, allowing you to concentrate on your music without any interruptions or distractions.
Choosing the right metronome that fits your needs and preferences is the first step. Considering factors such as size, stability, visibility, and functionality will help you make an informed decision. Once you have the right metronome, preparing your music stand by ensuring cleanliness and stability is essential.
Using various methods, such as rubber bands, clamps or clips, and tape or Velcro, offers different levels of security and adjustability. Take into account factors like the weight and size of your metronome, the surface of your music stand, and your personal preferences to determine which method works best for you.
Additionally, remembering to balance your metronome and troubleshooting common issues will help you maintain its stability and functionality over time. By addressing slipping or sliding, interference with sheet music, limited space, compatibility issues, and metronome sound vibrations, you can refine your setup and minimize any potential problems.
Remember to periodically check the quality and condition of the securing method you choose, replacing worn-out materials or readjusting as necessary. And always prioritize your comfort and visibility while ensuring the metronome remains in a secure position.
By adhering to these steps and tips, you can confidently rely on your metronome to assist you in honing your timing, rhythm, and musical skills. Stay consistent, disciplined, and have patience in your practice, and soon you’ll see the positive impact of using a well-secured metronome on your musical journey.