Home>Production & Technology>Noise Cancellation>How To Apply Noise Cancellation In Obs
Noise Cancellation
How To Apply Noise Cancellation In Obs
Modified: January 22, 2024
Learn how to apply noise cancellation in OBS to enhance your audio quality and improve the clarity of your streams. Implement effective noise cancellation techniques with this easy-to-follow guide.
(Many of the links in this article redirect to a specific reviewed product. Your purchase of these products through affiliate links helps to generate commission for AudioLover.com, at no extra cost. Learn more)
Table of Contents
Introduction
Welcome to the world of noise cancellation in OBS! Whether you’re a podcaster, a streamer, or a content creator, dealing with background noise can be a major headache. Thankfully, OBS (Open Broadcaster Software) provides a powerful, built-in solution to help you achieve crystal-clear audio quality by implementing noise cancellation filters.
Before diving into the technical details, let’s first understand what noise cancellation is and why it matters. Noise cancellation refers to the process of reducing or eliminating unwanted sounds that occur alongside the primary audio source. These unwanted sounds can include ambient room noise, fan hums, keyboard clicks, or any other background disturbances that can detract from the overall audio experience.
By applying noise cancellation techniques, you can improve the clarity and professionalism of your audio recordings or live streams. This can greatly enhance the immersion for your audience, making it easier for them to focus on your content.
The key to effective noise cancellation lies in understanding the unique features and capabilities of OBS. OBS is a free and open-source software, widely used for live streaming and recording various multimedia content. It offers a range of advanced features and customizable options, including the ability to apply filters to your audio sources.
In this guide, we will explore how to apply noise cancellation in OBS through the use of filters. These filters work by analyzing the audio signal and intelligently suppressing or eliminating unwanted background noise. By following the steps outlined in this article, you will be able to achieve professional-grade audio quality in your OBS recordings or live streams.
So, let’s get started on our journey to a noise-free audio experience in OBS. Get ready to impress your audience with crystal-clear sound that keeps them engaged and focused on your content!
Understanding Noise Cancellation
Before we dive into the nitty-gritty of applying noise cancellation in OBS, it’s important to have a solid understanding of what noise cancellation actually is and how it works.
Noise cancellation is a technique used to reduce or eliminate unwanted background noise that interferes with the desired audio signal. It is particularly useful in environments where ambient sounds, such as air conditioners, fans, or traffic, can cause distractions and degrade the overall audio quality.
There are two primary types of noise cancellation: passive and active. Passive noise cancellation involves physically blocking out external noise through the use of materials like earplugs or noise-isolating headphones. Active noise cancellation, on the other hand, uses electronic processing to analyze incoming audio and generate an inverted sound wave that cancels out the unwanted noise.
In the context of OBS, we are primarily concerned with active noise cancellation techniques. OBS achieves noise cancellation by applying filters to the audio sources. These filters analyze the audio signal in real-time and suppress or eliminate unwanted background noise, resulting in a cleaner audio output.
OBS offers two main noise cancellation filters: noise gate and noise suppression.
The noise gate filter works by setting a threshold level below which the audio will be muted or reduced. This is useful for cutting off low-level background noise, such as microphone hiss or keyboard clicks, but it can also inadvertently cut off parts of the desired audio signal if not properly configured.
The noise suppression filter, on the other hand, is designed to attenuate or remove constant background noise, such as hums or air conditioner noise. It does this by analyzing the audio signal and reducing the volume of frequencies that match the characteristics of the background noise.
Understanding these filters and when to use them is crucial in achieving optimal noise cancellation results. By intelligently combining these filters and adjusting their settings, you can effectively remove unwanted background noise while preserving the clarity and integrity of your desired audio source.
Now that we have a solid understanding of noise cancellation and how it works, let’s explore the key features of OBS and how we can take advantage of them to apply noise cancellation in our recordings and live streams.
Key Features of OBS
To effectively apply noise cancellation in OBS, it’s important to familiarize yourself with the key features and capabilities of the software. OBS offers a wide range of tools and options that allow you to customize your audio sources and enhance your overall recording or streaming experience.
Here are some key features of OBS that are relevant to noise cancellation:
- Audio Sources: OBS allows you to configure various audio sources, such as microphones, audio interfaces, and desktop audio. These sources can be individually adjusted and filtered to achieve the desired noise cancellation effect.
- Filters: OBS provides a variety of filters that can be applied to your audio sources. These filters include noise gate, noise suppression, equalizer, compressor, and more. By leveraging these filters, you can fine-tune your audio settings and achieve optimal noise cancellation.
- Customizable Settings: OBS offers extensive customization options, allowing you to adjust parameters such as threshold levels, attack and release times, EQ settings, and more. These settings can be tailored to your specific audio environment and preferences, ensuring the best possible noise cancellation results.
- Real-Time Monitoring: OBS provides real-time audio monitoring, allowing you to listen to your audio sources while applying noise cancellation filters. This enables you to make immediate adjustments and ensure that the desired audio quality is achieved before going live or recording.
- Scene Switching: OBS allows you to organize your audio sources into different scenes, which can be switched seamlessly during a live stream or recording. This feature is particularly useful for managing multiple microphone inputs or switching between different noise cancellation settings based on the content being presented.
By understanding and utilizing these key features of OBS, you can take full advantage of the software’s capabilities and achieve professional-grade noise cancellation in your audio recordings and live streams. Now, let’s move on to the step-by-step process of applying noise cancellation in OBS.
Step 1: Configuring Audio Sources
Before applying noise cancellation filters in OBS, it’s important to properly configure your audio sources. This involves selecting the appropriate microphone or audio input device and ensuring that the audio levels are set correctly.
Here’s how you can configure your audio sources in OBS:
- Launch OBS: Open the OBS software on your computer. Ensure that your microphone or audio interface is connected and recognized by your system.
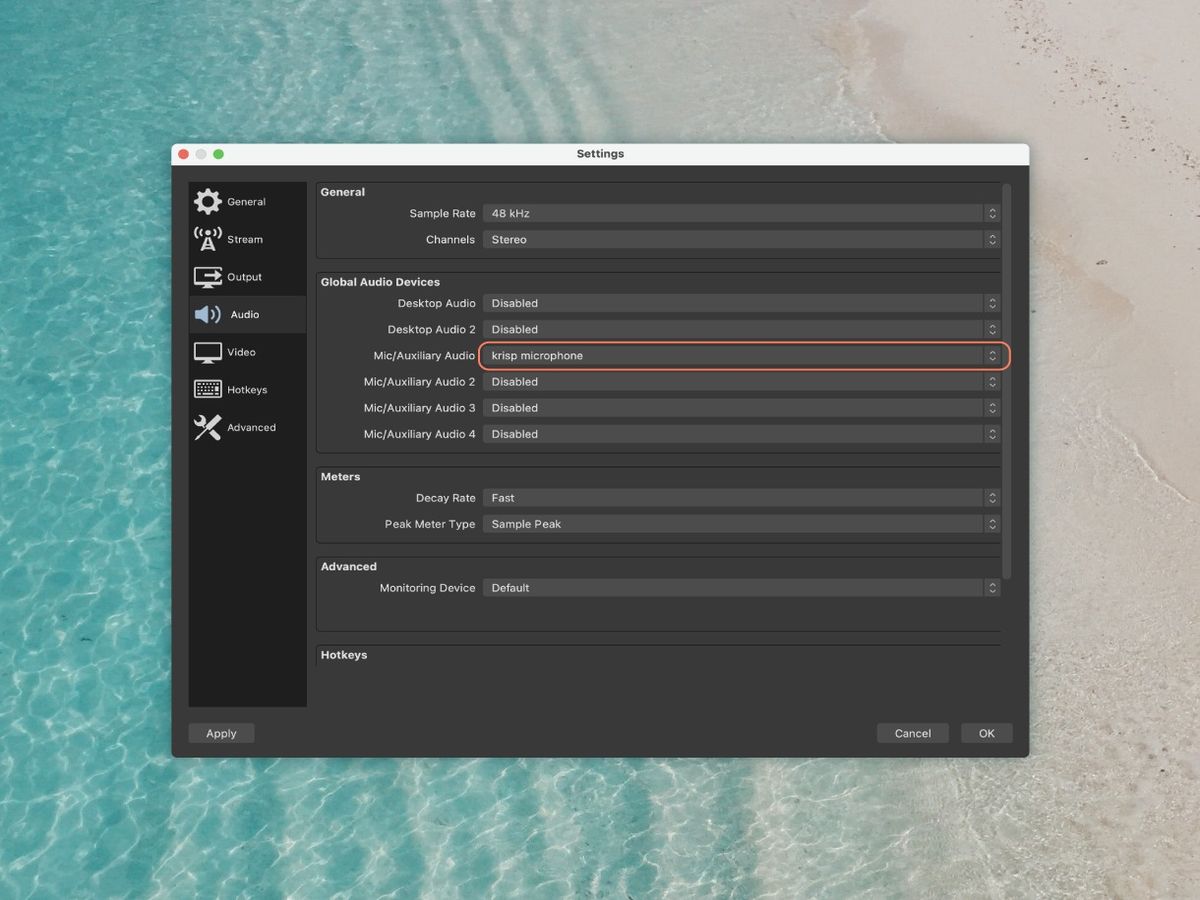
- Access Audio Settings: Click on the “Settings” button in the bottom-right corner of the OBS interface. This will open the settings window.
- Select Audio Tab: In the settings window, click on the “Audio” tab located on the left-hand side. This will display the audio settings options.
- Configure Microphone: Under the “Mic/Auxiliary Audio” section, select the appropriate microphone from the dropdown menu. If you are using an external audio interface, choose the corresponding input source. Adjust the microphone volume slider to set the desired audio level.
- Enable Monitoring: To monitor your audio in real-time, check the box next to “Monitor” under the microphone settings. This will allow you to hear your audio while applying noise cancellation filters.
- Configure Desktop Audio: If you want to include desktop audio in your recording or live stream, ensure that the appropriate audio device is selected under the “Desktop Audio” section. Adjust the desktop audio volume slider to set the desired level.
Once you have correctly configured your audio sources, you are ready to move on to the next step of applying noise cancellation filters in OBS. In the next section, we will focus on the noise gate filter and how it can help reduce unwanted background noise.
Step 2: Applying Noise Gate Filter
The noise gate filter is a powerful tool that allows you to control when your microphone audio is audible and when it is muted or reduced. It helps eliminate low-level background noise, such as microphone hiss or keyboard clicks, by setting a threshold level below which the audio is muted or reduced.
Here’s how you can apply the noise gate filter in OBS:
- Access Filters: In the OBS main window, right-click on the microphone audio source in the “Sources” panel and select “Filters” from the context menu. This will open the filters settings window.
- Add Noise Gate Filter: In the filters settings window, click on the “+” button at the bottom-left corner and select “Noise Gate” from the dropdown menu. A new noise gate filter will be added to the list.
- Adjust Threshold: In the noise gate filter settings, adjust the “Close Threshold” slider to set the level below which the audio will be muted or reduced. Start by setting it slightly above the ambient noise level to avoid cutting off desired audio. Fine-tune this threshold to mitigate unwanted noise while ensuring your desired audio is not affected.
- Tweak Attack and Release Times: The attack time determines how quickly the noise gate opens when your audio exceeds the threshold, while the release time determines how quickly it closes when the audio falls below the threshold. Adjust these settings to achieve seamless noise suppression without abrupt audio cuts.
- Test and Adjust: With the noise gate filter applied, it’s important to test your audio and make adjustments as necessary. Speak or make sounds into the microphone to ensure that the desired audio is consistently audible while background noise is effectively suppressed or muted.
By applying the noise gate filter and configuring the parameters to suit your needs, you can significantly reduce unwanted background noise while maintaining the clarity and integrity of your desired audio. However, it’s important to note that aggressive noise gate settings may result in undesired audio cutting, so finding the right balance is key.
Now that you’ve successfully applied the noise gate filter, let’s move on to the next step: applying the noise suppression filter. This filter helps further eliminate constant background noise to enhance your audio quality. Stay tuned!
Step 3: Applying Noise Suppression Filter
After configuring the noise gate filter to effectively reduce low-level background noise, it’s time to further enhance your audio quality by applying the noise suppression filter in OBS. This filter is specifically designed to attenuate or remove constant background noise, such as hums or air conditioner noise.
Here’s how you can apply the noise suppression filter in OBS:
- Access Filters: In the OBS main window, right-click on the microphone audio source in the “Sources” panel and select “Filters” from the context menu. This will bring up the filters settings window.
- Add Noise Suppression Filter: In the filters settings window, click on the “+” button at the bottom-left corner and choose “Noise Suppression” from the dropdown menu. A new noise suppression filter will be added to the list.
- Adjust Level: In the noise suppression filter settings, you will find a slider to adjust the level of noise suppression. Drag the slider to the right to increase the level of suppression. It’s important to strike a balance as excessive suppression may affect the overall audio quality and make the sound appear unnatural.
- Fine-Tune Settings: Depending on your environment and the specific characteristics of the background noise you want to suppress, you may need to fine-tune additional settings. OBS provides additional options like “Method” and “dB” settings to customize the behavior of the filter. Experiment with these settings to achieve the best noise suppression results.
- Test and Adjust: Once the noise suppression filter is applied, test your audio by speaking or making sounds into the microphone. Listen carefully to ensure that the desired audio remains clear while background noise is significantly reduced or eliminated.
By applying the noise gate and noise suppression filters together, you can effectively reduce both low-level and constant background noise, resulting in a cleaner and more professional audio output.
Now that you’ve successfully applied the noise suppression filter, it’s time to move on to the final step: testing and adjusting the settings to ensure optimal noise cancellation. Let’s proceed to the next section to fine-tune your audio setup in OBS.
Step 4: Testing and Adjusting the Settings
Once you have applied the noise gate and noise suppression filters in OBS, it’s important to thoroughly test and adjust the settings to ensure optimal noise cancellation performance. This step allows you to fine-tune your audio setup and make any necessary tweaks to achieve the best possible audio quality.
Here’s how you can test and adjust the settings in OBS:
- Perform a Sound Check: Begin by performing a sound check to evaluate the effectiveness of the noise cancellation filters. Speak or make sounds into the microphone while closely monitoring the audio output. Pay attention to any remaining background noise or distortion and note any areas that require improvement.
- Refine Threshold Levels: In the noise gate filter settings, adjust the threshold levels to ensure that the desired audio is consistently audible while cutting off unwanted background noise. Fine-tune the levels based on your specific environment and the characteristics of the background noise you want to eliminate.
- Tweak Attack and Release Times: As you continue testing the noise gate filter, adjust the attack and release times to maintain a seamless audio experience. Ensure that the noise gate opens and closes smoothly without any audible artifacts or abrupt cuts in your desired audio.
- Optimize Noise Suppression Level: Evaluate the effectiveness of the noise suppression filter by analyzing the audio output during different scenarios. Adjust the suppression level as needed to strike a balance between noise reduction and preserving the natural quality of your desired audio.
- Reposition Microphone and Modify Gain: If you are still experiencing background noise issues, consider repositioning the microphone to minimize interference or adjusting the microphone gain settings. Experiment with different microphone placements and gain levels to achieve the best audio capture while minimizing background noise.
- Continuously Test and Iterate: The process of testing and adjusting your noise cancellation settings should be an ongoing process. Take the time to regularly review and fine-tune your audio setup as you encounter new recording environments or encounter specific background noise challenges.
By dedicating time to thoroughly test and adjust your noise cancellation settings, you can ensure that your audio output is clean, professional, and free from distracting background noise. Remember, achieving optimal noise cancellation may require some trial and error, so be patient and persistent in your testing and adjustment process.
Now that you have completed the four steps of applying noise cancellation in OBS, take a moment to appreciate the improved audio quality you have achieved. With these techniques, you can deliver top-notch audio content that captivates your audience and enhances their overall experience.
Conclusion
Congratulations! You have successfully learned how to apply noise cancellation in OBS to achieve crystal-clear audio quality in your recordings and live streams. By understanding the concepts of noise cancellation, configuring audio sources, and applying filters like noise gate and noise suppression, you can greatly enhance the professionalism of your content and create a more immersive experience for your audience.
Throughout this guide, we explored the key features of OBS that are crucial for effective noise cancellation. We discussed the importance of configuring audio sources, setting appropriate threshold levels, adjusting attack and release times, and optimizing noise suppression levels. These steps allow you to fine-tune your settings and achieve the best possible noise cancellation results for your specific audio environment.
Remember, noise cancellation is not a one-size-fits-all solution. It requires experimentation, testing, and continuous adjustment to find the optimal settings that suit your unique needs and recording environment. By monitoring and refining your setup, you can ensure that your audio remains clear and free from distractions, creating a more engaging experience for your listeners or viewers.
As you continue to explore the world of noise cancellation in OBS, don’t hesitate to keep experimenting with different setups and techniques. Each recording environment is different, and what works well in one scenario may need to be adjusted for another. By continuously refining your noise cancellation settings and staying informed about new features and updates in OBS, you can stay at the cutting edge of audio quality and deliver content that stands out.
So, now armed with the knowledge and skills to apply noise cancellation in OBS, go forth and create amazing content with impeccable audio quality. Keep experimenting, refining, and perfecting your noise cancellation setup, and enjoy the enhanced audio experience that will impress your audience and set your content apart.