Home>Production & Technology>Sheet Music>How To Convert Sheet Music To Guitar Tab
Sheet Music
How To Convert Sheet Music To Guitar Tab
Modified: February 15, 2024
Learn how to convert sheet music to guitar tab with our step-by-step guide. Easily transform your favorite songs into playable guitar tabs.
(Many of the links in this article redirect to a specific reviewed product. Your purchase of these products through affiliate links helps to generate commission for AudioLover.com, at no extra cost. Learn more)
Table of Contents
- Introduction
- Understanding Sheet Music
- Understanding Guitar Tabs
- Techniques to Convert Sheet Music to Guitar Tab
- Method 1: Using a Conversion Software
- Method 2: Manual Conversion with Musical Knowledge
- Step 1: Analyzing the Sheet Music
- Step 2: Identifying the Melody Notes
- Step 3: Transferring Melody Notes to the Guitar Tab
- Step 4: Adding Chords and Accompaniment
- Step 5: Refining and Editing the Guitar Tab
- Conclusion
Introduction
Welcome to the world of sheet music and guitar tabs! If you’re a musician or an aspiring guitarist, understanding how to convert sheet music to guitar tabs can be a valuable skill. Sheet music is a traditional notation system that represents musical notes and rhythms, while guitar tabs provide a simple and visual way to communicate how to play specific music on the guitar. By converting sheet music to guitar tabs, you can easily learn and play your favorite songs on the guitar.
In this article, we will explore the process of converting sheet music to guitar tabs, discussing various methods and techniques. Whether you have no prior experience with sheet music or guitar tabs, or if you’re looking to enhance your existing musical knowledge, this article will guide you through the process step by step.
Understanding sheet music and guitar tabs can be a bit overwhelming at first, but with a little practice and patience, you’ll be able to make the transition smoothly. We’ll begin by providing an overview of sheet music and guitar tabs, ensuring that we’re all on the same page before diving into the conversion process. So, let’s get started by exploring the fundamentals of sheet music and guitar tabs.
Understanding Sheet Music
Sheet music is a written or printed document that represents musical notation. It provides a detailed and precise representation of the music, including the pitch, rhythm, dynamics, and other musical elements. Sheet music is commonly used by musicians, composers, and music educators as a means to communicate and reproduce music accurately.
The foundation of sheet music lies in the use of musical staffs, which consist of horizontal lines and spaces. These lines and spaces represent specific pitches or notes. The higher the note is positioned on the staff, the higher the pitch. Conversely, the lower the note is positioned, the lower the pitch. Indications such as clefs, key signatures, time signatures, and various symbols are used to further specify the musical elements within the sheet music.
Sheet music also includes other important elements such as tempo markings, dynamics (indicating the volume or intensity of the music), articulations (showing how the notes should be played), and phrasing (indicating the musical expression and interpretation).
When converting sheet music to guitar tabs, it is essential to have a basic understanding of these elements in order to accurately represent the music on the guitar. By analyzing the sheet music and identifying the melody, rhythm, and other musical components, you can effectively convert the music into a format that is easily playable on the guitar.
Now that we have a grasp on what sheet music entails, let’s move on to understanding guitar tabs and how they differ from traditional sheet music.
Understanding Guitar Tabs
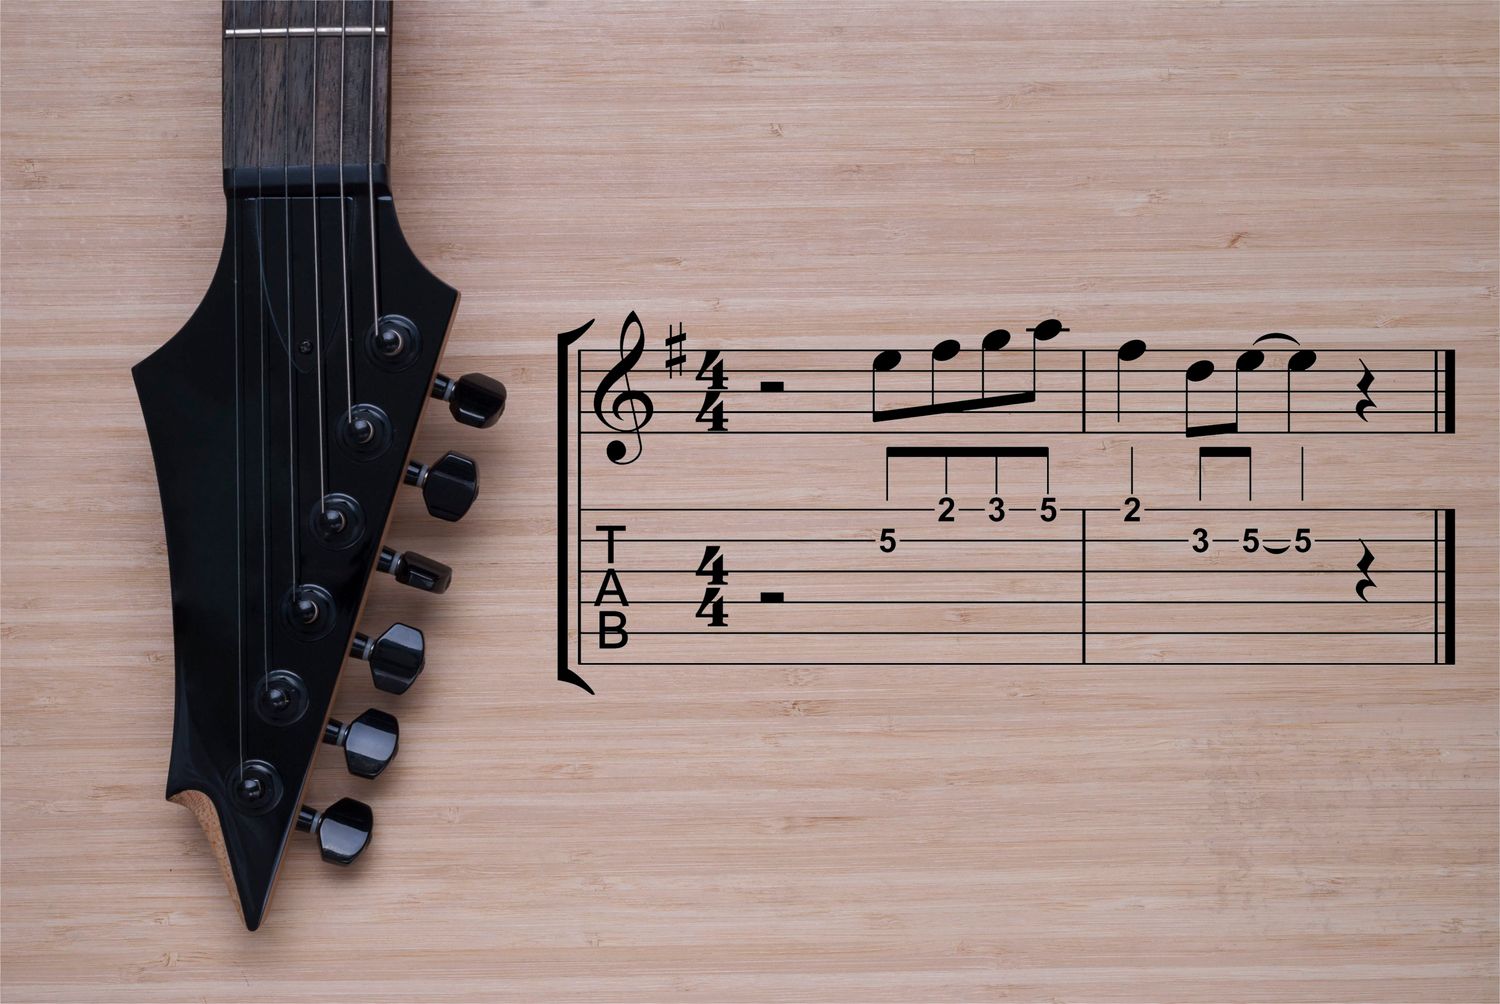
Guitar tabs, also known as tablature, are a simplified and visual representation of how to play music on the guitar. Unlike sheet music, which requires a deep understanding of musical notation, guitar tabs use a more intuitive and accessible system. They consist of a series of numbers, lines, and symbols that indicate which strings and frets to play on the guitar.
Each string of the guitar is represented by a horizontal line, with the top line representing the highest-pitched string (usually the thinnest string) and the bottom line representing the lowest-pitched string (usually the thickest string). The numbers placed on these lines indicate the fret number to play on that specific string. For example, a “0” indicates an open string, where the string is played without pressing down any frets, while a “3” would indicate that you should press down the string on the third fret.
In addition to the numbers representing specific frets, guitar tabs also utilize symbols to indicate various techniques or indications. For example, a “h” represents a hammer-on, where you play a note by quickly pressing down on a higher fret with your finger, while an “x” indicates that a particular string should not be played.
Guitar tabs provide a visual map of the guitar fretboard, allowing players to easily read and play music without the need for musical notation knowledge. They are widely used by guitarists of all skill levels and are particularly popular in genres such as rock, pop, and blues.
It’s important to note that guitar tabs may not provide as much information as sheet music in terms of rhythm, dynamics, and other musical elements. They primarily focus on indicating which notes to play, leaving it up to the player’s familiarity with the song to interpret the timing, strumming patterns, and other nuances. However, with a combination of your musical knowledge and listening skills, you can overcome these limitations and create a comprehensive and accurate guitar tab.
Now that we have a good understanding of both sheet music and guitar tabs, let’s explore different techniques to convert sheet music to guitar tab effectively.
Techniques to Convert Sheet Music to Guitar Tab
Converting sheet music to guitar tabs requires a systematic approach and a combination of musical knowledge and practical skills. There are several techniques and methods you can employ to make the conversion process smoother and more accurate. Let’s explore two common techniques: using a conversion software and manual conversion with musical knowledge.
Method 1: Using a Conversion Software: There are various software programs and online tools available that can automatically convert sheet music into guitar tabs. These tools use advanced algorithms to analyze the sheet music and create a corresponding tablature. While this method can save time and effort, it may not always produce accurate results, especially for complex pieces of music. It is important to review and edit the generated tabs to ensure their accuracy and playability.
Method 2: Manual Conversion with Musical Knowledge: This method involves analyzing the sheet music, understanding the melody, and translating it onto the guitar fretboard. It requires a solid understanding of notation, scales, chords, and guitar playing techniques.
Now, let’s dive into the step-by-step process of manually converting sheet music to guitar tab.
Method 1: Using a Conversion Software
If you’re looking for a quick and automated way to convert sheet music to guitar tabs, using a conversion software can be a convenient option. There are various software programs and online tools available that can analyze the sheet music and generate a corresponding guitar tablature. Here’s how you can use a conversion software:
- Choose a Reliable Conversion Software: Research and select a reputable conversion software or online tool that is known for providing accurate results. Look for user reviews and ratings to ensure its reliability.
- Upload or Enter the Sheet Music: Depending on the software, you may be able to upload a PDF or image file of the sheet music, or you might need to manually enter the musical notes and symbols.
- Analyze the Sheet Music: The software will analyze the sheet music and recognize the musical elements such as notes, rhythms, dynamics, and other markings.
- Review and Edit the Generated Tabs: Once the software generates the guitar tabs, carefully review them for accuracy. Some software tools allow you to make edits and adjustments to ensure the tabs are playable and reflect the original music accurately.
- Refine and Customize the Tabs: If desired, you can further refine and customize the generated tabs, adding fingerings, picking patterns, and other specific notations that suit your playing style.
- Play and Practice the Tabs: Once you are satisfied with the generated tabs, start practicing them on your guitar. Play along with the original sheet music or audio recording to ensure the tabs align with the melody and rhythm.
While using a conversion software can be a time-saving option, it is important to note that the accuracy of the generated tabs may vary depending on the complexity of the music and the capabilities of the software. Therefore, it’s recommended to double-check and make any necessary manual adjustments to ensure the tabs accurately represent the original sheet music.
Now that we’ve explored the use of a conversion software, let’s delve into the process of manually converting sheet music to guitar tabs, using your musical knowledge and skills.
Method 2: Manual Conversion with Musical Knowledge
If you prefer a more hands-on approach and have a solid understanding of musical notation and guitar playing, manual conversion with your musical knowledge can be a highly effective method to convert sheet music to guitar tabs. Here’s a step-by-step process to guide you through the manual conversion:
- Analyze the Sheet Music: Begin by thoroughly examining the sheet music. Look for the melody line and any chords or accompaniment markings. Familiarize yourself with the key signature, time signature, and other musical indications.
- Identify the Melody Notes: Focus on the melody line and identify the individual notes. Pay attention to the pitch and rhythm of each note. It could be helpful to play the melody on a piano or another instrument to get a better understanding.
- Transfer Melody Notes to the Guitar Tab: Starting with the low E string (the thickest string) and moving upwards, notate the melody notes on the appropriate strings and frets. Use the numbers on the guitar tab to indicate the fret number to play on each string.
- Add Chords and Accompaniment: If the sheet music includes chord symbols or accompaniment markings, incorporate them into the guitar tab. Place the chord symbols above the relevant measures and determine the appropriate voicings and fingerings for each chord.
- Refine and Edit the Guitar Tab: Once you have transferred the melody and chords to the guitar tab, review and refine the tab to ensure its accuracy and playability. Consider factors such as fingerings, picking patterns, and strumming techniques to make the tab more practical for guitarists to play.
Throughout the manual conversion process, it’s important to rely on your musical knowledge and experience. Pay attention to articulations, dynamics, and phrasing to accurately reflect the original sheet music on the guitar. Additionally, remember that guitar tabs may not convey the exact rhythm as sheet music does, so refer to the original recording or use your understanding of the song to interpret the timing and feel.
By manually converting sheet music to guitar tabs, you have the flexibility to customize the tab to your playing style and preferences. It allows you to add nuances and personal touches, making the tab more expressive and enjoyable to play.
Now that you’re familiar with both conversion methods, it’s time to choose the approach that best suits your skills and preferences. Whether you opt for a conversion software or manual conversion, practice and experimentation will help refine your ability to convert sheet music to guitar tabs accurately.
Step 1: Analyzing the Sheet Music
Before you can begin converting sheet music to guitar tabs, it’s essential to analyze the sheet music thoroughly. This step will help you understand the structure, melody, chords, and other musical elements present in the piece. Here’s how you can effectively analyze the sheet music:
- Read the Staff and Clef: Familiarize yourself with the musical staff and determine the clef used in the sheet music. The most common clefs are the treble clef (used for higher-pitched instruments like the guitar) and the bass clef (used for lower-pitched instruments like the piano). Understanding the clef will help you interpret the pitch of the notes correctly.
- Identify the Key Signature: Look for sharps or flats at the beginning of each staff line. These symbols indicate the key of the piece and influence the choice of chords and notes used throughout. Make note of the key signature so you can accurately transpose the music onto the guitar.
- Study the Time Signature: The time signature appears at the beginning of the sheet music and indicates the rhythmic structure of the piece. Pay attention to the top and bottom numbers of the time signature, which represent the number of beats per measure and the type of note that receives one beat, respectively.
- Examine the Melody Line: Pinpoint the melody line within the sheet music. The melody is typically represented by the notes written on the staff lines, accompanied by various notations, such as note durations, rests, and dynamic markings.
- Look for Chord Symbols: Check if the sheet music includes chord symbols above the staff. Chord symbols indicate when to play specific chords while performing the piece. These symbols will guide you in incorporating chords into the guitar tab to accompany the melody.
- Take Note of Other Musical Elements: Pay attention to any additional musical elements present in the sheet music, such as dynamics (indicating the volume and intensity), articulations (e.g., staccato, legato markings), and phrasing indications. These elements contribute to the musical expression and should be considered during the conversion process.
Analyzing the sheet music in detail will provide you with a comprehensive understanding of the musical components within the piece. This understanding will form the foundation for accurately converting the sheet music into guitar tabs. Once you’ve thoroughly analyzed the sheet music, you can move on to the next step and begin identifying the melody notes.
Step 2: Identifying the Melody Notes
Once you have analyzed the sheet music, the next step in converting sheet music to guitar tabs is to identify the melody notes. The melody is the main theme or tune of the piece, and it will serve as the foundation for your guitar tab. Here’s how you can efficiently identify the melody notes:
- Focus on the Staff Lines: Locate the melody line within the sheet music. Typically, the melody notes will be written on the staff lines, represented by the position of the note on the staff. Pay close attention to the noteheads and their position on the lines or spaces of the staff.
- Reference the Treble Clef: If you are converting sheet music written in the treble clef, familiarize yourself with the corresponding notes on the guitar. Each note on the treble clef staff corresponds to a specific string and fret on the guitar. This understanding will help you effectively translate the melody onto the guitar tab.
- Consider Key Signature and Accidentals: Take into account the key signature and any accidentals (sharps or flats) present in the sheet music. These notations will affect the pitch of the melody notes.
- Look for Repeated Patterns and Phrases: Pay attention to any repeated patterns or phrases within the melody. If a particular sequence of notes recurs throughout the piece, you can use that information to streamline the process of converting the melody to the guitar tab.
- Play the Melody: If you have access to an instrument like a piano or a digital keyboard, visually identify the melody notes on the sheet music, and play them on the instrument. This step will help solidify your understanding of the melody and allow you to hear the notes as you work on transferring them to the guitar.
Remember to take your time and be careful when identifying the melody notes. Accuracy is crucial in order to produce a guitar tab that faithfully represents the original sheet music. Once you have successfully identified the melody notes, you can proceed to the next step and start transferring them to the guitar tab.
Step 3: Transferring Melody Notes to the Guitar Tab
Now that you have identified the melody notes from the sheet music, it’s time to transfer them to the guitar tab. This step involves mapping the melody notes to specific strings and frets on the guitar. Here’s how you can efficiently transfer the melody notes to the guitar tab:
- Familiarize Yourself with the Guitar Tab: Ensure you understand the basics of reading and interpreting guitar tabs. Familiarize yourself with the six strings of the guitar, and understand how numbers on the lines of the tab represent the fret numbers to play on those strings.
- Start with the Lowest-Pitched String: Begin transferring the melody notes to the guitar tab by locating the lowest-pitched note. This note will be played on the lowest-pitched string, typically the E string (thickest string) on a standard-tuned guitar.
- Consider the Note’s Pitch: Take into account the pitch of the note and its position on the staff. A higher-pitched note on the staff will correspond to a higher fret on the guitar, while a lower-pitched note will correspond to a lower fret.
- Place the Number on the Corresponding Fret: Place the number representing the fret to play on the appropriate string and position it vertically on the corresponding line of the tab. This is where the note is played on the guitar.
- Continue Transferring the Melody: Move through the sheet music, transferring each subsequent melody note to the guitar tab in the same manner. Ensure that each note is accurately represented in terms of its pitch, string, and fret position.
- Use Open Strings and Higher Octaves: If a melody note falls on an open string (played without pressing down any frets), represent it with a “0” on the appropriate string. Additionally, if a melody note is too high on the staff to be comfortably played on the guitar, consider using a higher octave on a different string.
Remember that the accuracy of the transferred melody notes is crucial to ensure the guitar tab represents the original sheet music. Take your time, refer back to the sheet music, and check for any potential mistakes or omissions in the transfer process. Once you have transferred all the melody notes to the guitar tab, you can proceed to the next step and add chords and accompaniment to the tab.
Step 4: Adding Chords and Accompaniment
Now that you have transferred the melody notes to the guitar tab, it’s time to enhance your tab by adding chords and accompaniment. This step will provide a fuller and more complete representation of the original sheet music. Here’s how you can effectively add chords and accompaniment to your guitar tab:
- Refer to the Chord Symbols: Look for chord symbols written above the staff in the sheet music. These symbols indicate when to play specific chords while performing the piece.
- Determine the Chord Voicings: Decide on the appropriate chord voicings and fingerings that best fit the progression and the melody notes in your guitar tab. Experiment with different chord shapes to find voicings that sound good and are practical to play.
- Place Chord Symbols Above the Tab: As you determine the chords, incorporate them into your guitar tab. Indicate the chord symbols above the relevant measures, aligning them with the corresponding notes and beats in the melody.
- Add Strumming or Picking Patterns: Consider the rhythm and feel of the song, and determine the appropriate strumming or picking patterns to accompany the melody. This will add texture and dynamics to your guitar tab.
- Include Accompaniment Techniques: If the sheet music suggests specific accompaniment techniques, such as arpeggios, palm muting, or fingerpicking, incorporate them into your tab. These techniques can further enhance the overall sound and playability of your guitar arrangement.
- Balance Melody and Accompaniment: While adding chords and accompaniment, ensure that the melody remains prominent and clear. Adjust the volume levels of the melody notes and chords as needed to maintain a balanced and harmonious sound.
Adding chords and accompaniment to your guitar tab will provide a fuller musical experience and allow you to play the piece in a more expressive and dynamic way. Take your time to experiment with different chord voicings and accompaniment techniques to find the best combination that suits the style and feel of the song.
Once you have completed this step, you can move on to the refining and editing phase to further polish your guitar tab.
Step 5: Refining and Editing the Guitar Tab
After adding the melody notes, chords, and accompaniment to your guitar tab, it’s time to refine and edit the tab to ensure its accuracy, playability, and reflect the original sheet music as closely as possible. Here are some essential steps to follow during the refining and editing phase:
- Play the Tab: Start by playing through the guitar tab while referring to the original sheet music or recording. This step will help you identify any discrepancies or errors that need to be addressed.
- Make Corrections: If you encounter any mistakes, inaccuracies, or inconsistencies, make the necessary corrections on the tab. Pay attention to note durations, rhythms, and any indicators of pauses or rests in the sheet music.
- Consider Fingerings and Positions: Evaluate the fingerings you have assigned to each note and make adjustments if needed. Consider the most practical and efficient fingerings for smooth transitions and comfortable playability.
- Refine Notations and Expressive Markings: Pay attention to expressive markings such as dynamics, accents, and articulations. Ensure that they accurately reflect the original sheet music and appropriately convey the intended expression and emotion in your tab.
- Simplify Complex Passages: Some sheet music may contain complex passages that may be challenging to play on the guitar. Simplify these passages without sacrificing the essence of the melody and accompaniment. Find alternative fingerings or techniques that maintain the musicality while making it more manageable.
- Check for Playability: Review the overall playability of the guitar tab. Consider if the fingerings, chord progressions, and accompaniment patterns flow smoothly and logically. Make adjustments to ensure a comfortable and enjoyable playing experience.
- Seek Feedback: Share your guitar tab with fellow musicians or guitarists and ask for their feedback. They may offer valuable suggestions or insights that can help improve the tab and ensure its clarity and accuracy.
It’s important to remember that refining and editing is an iterative process. Continuously play and test your guitar tab, making adjustments as needed, until you are satisfied with the final result. The goal is to create a guitar tab that accurately represents the original sheet music and provides an enjoyable playing experience.
Once you have completed the refining and editing phase, your guitar tab is ready to be played and shared with others. Enjoy the process of converting sheet music to guitar tabs and the satisfaction of being able to play your favorite songs on the guitar!
Conclusion
Congratulations! You have now learned how to convert sheet music to guitar tabs. Whether you chose to use a conversion software or manually converted the music with your musical knowledge, the process required careful analysis, precise identification of melody notes, and thoughtful consideration of chords and accompaniment.
Converting sheet music to guitar tabs opens up a whole new world of possibilities for guitarists. It allows you to play your favorite songs, create your own arrangements, and explore a wide range of musical genres. Additionally, it enhances your understanding of music theory, notation, and guitar technique.
Throughout the conversion process, remember to approach the task creatively and expressively. While the objective is to accurately represent the original sheet music, infusing your personal style and interpretation will make your guitar tab unique and captivating.
Practice and experimentation are key to becoming proficient in converting sheet music to guitar tabs. Continuously refine your tabs, seek feedback from others, and challenge yourself with different pieces of music. With time and dedication, you will gain confidence in converting even complex compositions to guitar tabs.
So, grab your guitar, gather your sheet music, and let the journey of converting sheet music to guitar tabs begin. Embrace the joy of playing music and sharing your guitar tabs with others. Happy playing!