Home>Production & Technology>Noise Cancellation>Audacity Noise Cancellation When Recording
Noise Cancellation
Audacity Noise Cancellation When Recording
Modified: January 22, 2024
Enhance your recordings with Audacity's noise cancellation feature. Eliminate unwanted background noise for crystal-clear audio quality.
(Many of the links in this article redirect to a specific reviewed product. Your purchase of these products through affiliate links helps to generate commission for AudioLover.com, at no extra cost. Learn more)
Table of Contents
- Introduction
- Understanding Noise Cancellation
- Importance of Noise Cancellation in Recording
- Audacity: An Overview
- Noise Cancellation Feature in Audacity
- Setting up Audacity for Noise Cancellation
- Steps to Enable Noise Cancellation in Audacity
- Adjusting Noise Cancellation Settings
- Tips for Effective Noise Cancellation in Audacity
- Common Challenges and Troubleshooting Tips
- Conclusion
Introduction
Welcome to the world of noise cancellation in recording! Whether you are a professional musician, a podcaster, or a content creator, achieving crystal-clear audio quality is essential for producing high-quality recordings. However, environmental noise can often pose a significant challenge in achieving that goal. This is where noise cancellation technology comes to the rescue. In this article, we will explore the world of noise cancellation in the context of recording, with a specific focus on using Audacity – a popular and powerful audio editing software.
Noise cancellation refers to the process of reducing or eliminating unwanted background noise from an audio signal. This technology works by analyzing the incoming signal and identifying frequencies that do not match the desired audio source. By applying specific algorithms, noise cancellation technology can attenuate or remove these unwanted frequencies, resulting in a cleaner and more focused audio recording.
The importance of noise cancellation in recording cannot be overstated. Background noise, such as room ambience, electrical hum, or external disturbances, can significantly degrade the overall quality of an audio recording. It can distract listeners, make voices or instruments less audible, and even introduce unwanted artifacts. By utilizing noise cancellation techniques, you can improve the intelligibility, clarity, and overall professionalism of your recordings.
One popular and user-friendly tool for noise cancellation in audio editing is Audacity. Audacity is a free, open-source software that offers a wide range of features for recording, editing, and enhancing audio. It provides users with a straightforward interface and powerful tools, making it an excellent choice for beginners and professionals alike.
In the next sections, we will dive deeper into Audacity’s noise cancellation feature, explaining how to set it up and make the most of its capabilities. We will also explore some best practices and troubleshooting tips to help you achieve optimal noise cancellation results. So, let’s get started on our journey to achieve pristine audio recordings using Audacity’s noise cancellation feature.
Understanding Noise Cancellation
Before delving into the noise cancellation feature in Audacity, it’s important to have a clear understanding of how noise cancellation works. Noise cancellation technology operates based on the principle of destructive interference, where unwanted noise is canceled out by generating an equal and opposite sound wave.
Noise can be categorized into two types: continuous noise and impulsive noise. Continuous noise, also known as steady-state noise, includes sounds like background hum, air conditioning noise, or traffic noise. Impulsive noise, on the other hand, refers to sudden, sharp sounds like clicks or pops.
There are two primary approaches to noise cancellation: active noise cancellation and passive noise cancellation. Active noise cancellation utilizes a combination of microphones, integrated circuits, and speakers to detect and counteract external noise. Passive noise cancellation, on the other hand, relies on physical barriers, such as closed-back headphones or soundproofing materials, to block out noise naturally.
Active noise cancellation is the technique most commonly used in audio recording. It involves capturing the external noise using one or more microphones, analyzing its frequency and amplitude, and generating an anti-noise waveform with the same frequency and opposite phase to cancel out the unwanted noise.
During the noise cancellation process, the anti-noise waveform is combined with the original audio signal, effectively canceling out the unwanted noise while preserving the desired audio. This is achieved through a process known as superposition, where the anti-noise and the original audio waves are combined, resulting in destructive interference and the cancellation of the noise frequencies.
It is important to note that while noise cancellation techniques can significantly reduce unwanted noise, they might not completely eliminate all background noise. Factors such as the quality of the noise cancellation equipment, the efficiency of the algorithms used, and the specific characteristics of the noise itself can affect the effectiveness of the noise cancellation process.
Understanding the basics of noise cancellation will help you make informed decisions when using Audacity’s noise cancellation feature. By leveraging this knowledge, you can effectively reduce unwanted noise and enhance the overall quality of your recordings. In the next section, we will explore Audacity’s noise cancellation feature in detail.
Importance of Noise Cancellation in Recording
Noise cancellation plays a crucial role in achieving high-quality recordings. Whether you are recording vocals, instruments, or podcasts, unwanted background noise can significantly impact the overall clarity and professionalism of your audio. Here are some key reasons why noise cancellation is important in the recording process:
1. Improved Audio Quality: A clean and noise-free recording allows the listener to focus on the intended audio content without any distractions. Noise cancellation helps eliminate unwanted background noise, resulting in a clearer, more professional-sounding recording.
2. Enhanced Intelligibility: Background noise can make it difficult for listeners to understand speech or discern individual sounds or words. By reducing or removing these unwanted noise elements, noise cancellation helps improve the intelligibility of recorded speech and enhances the overall listening experience.
3. Better Sound Isolation: Noise cancellation can help isolate the desired audio source from other sounds in the recording environment. This is particularly useful in settings where multiple audio sources are present, such as recording a live band or capturing vocals in a noisy room. By reducing external noise, noise cancellation allows for greater control and clarity of the recorded audio.
4. Professionalism: Background noise can give the impression of a low-quality recording, irrespective of the actual content. Noise cancellation helps create a polished and professional audio product, making a positive impact on listeners and reflecting the attention to detail and quality in your work.
5. Post-Production Flexibility: When unwanted noise is present in a recording, it can be challenging to remove it during the editing process without affecting the desired audio. By employing noise cancellation techniques during the recording stage, you minimize the need for extensive post-production editing, saving valuable time and maintaining the integrity of the original recording.
Overall, noise cancellation significantly contributes to the overall quality and professionalism of recordings. It helps create a seamless and enjoyable listening experience for your audience by eliminating distractions and enhancing the clarity and intelligibility of the desired audio. Now that we understand the importance of noise cancellation, let’s explore how Audacity, with its built-in noise cancellation feature, can help us achieve these goals.
Audacity: An Overview
Audacity is a popular free and open-source audio editing software that provides users with a wide range of tools and features to create, edit, and enhance audio recordings. With its user-friendly interface and powerful capabilities, Audacity has become a go-to choice for many musicians, podcasters, and content creators.
One of the standout features of Audacity is its flexibility and compatibility across different operating systems. It is available for Windows, macOS, and Linux, making it accessible to a broad user base. This cross-platform capability ensures that users can utilize Audacity regardless of their preferred operating system.
Audacity offers a range of features that cater to various audio editing needs. It supports multi-track editing, allowing for the arrangement and manipulation of multiple audio tracks simultaneously. This feature is particularly useful for adding background music, sound effects, or multiple voice recordings to a project.
With Audacity, users have precise control over audio editing. It provides a range of editing tools like cut, copy, paste, and trim, allowing for precise selection and manipulation of audio segments. Additionally, Audacity supports various audio file formats, ensuring compatibility and flexibility when working with different types of audio content.
Another noteworthy aspect of Audacity is its extensive plugin support. Users can enhance the functionality of Audacity by installing plugins, adding features such as additional effects, format support, and integration with other software or hardware. This plugin ecosystem extends the capabilities of Audacity and allows users to customize their audio editing experience.
One of the standout features of Audacity is its built-in noise cancellation functionality. This feature enables users to reduce or remove background noise from their recordings, improving the overall quality and clarity of the audio. Whether it’s removing hums, clicks, or other unwanted noise, Audacity’s noise cancellation feature can help achieve cleaner and more professional-sounding recordings.
In addition to noise cancellation, Audacity offers a range of audio effects and filters such as equalization, compression, reverb, and more. These effects allow users to modify and enhance audio recordings, adding depth, dynamics, and creativity to their projects.
As a free and open-source software, Audacity continues to evolve and improve through the contributions of its vibrant community. Regular updates and bug fixes ensure that Audacity remains a reliable and feature-rich tool for audio editing needs.
Now that we have a broad understanding of Audacity and its capabilities let’s dive deeper into its noise cancellation feature and learn how to maximize its potential to achieve the best possible audio quality in the next section.
Noise Cancellation Feature in Audacity
Audacity is equipped with a built-in noise cancellation feature that allows users to reduce or remove unwanted background noise from their audio recordings. This feature utilizes advanced algorithms to analyze the audio signal and apply specific filters to eliminate or attenuate noise frequencies effectively.
The noise cancellation feature in Audacity is particularly useful for cleaning up recordings that have been affected by common background noise, such as electrical hum, room ambience, or computer fan noise. By reducing these unwanted noise elements, users can achieve clearer and more professional-sounding audio recordings.
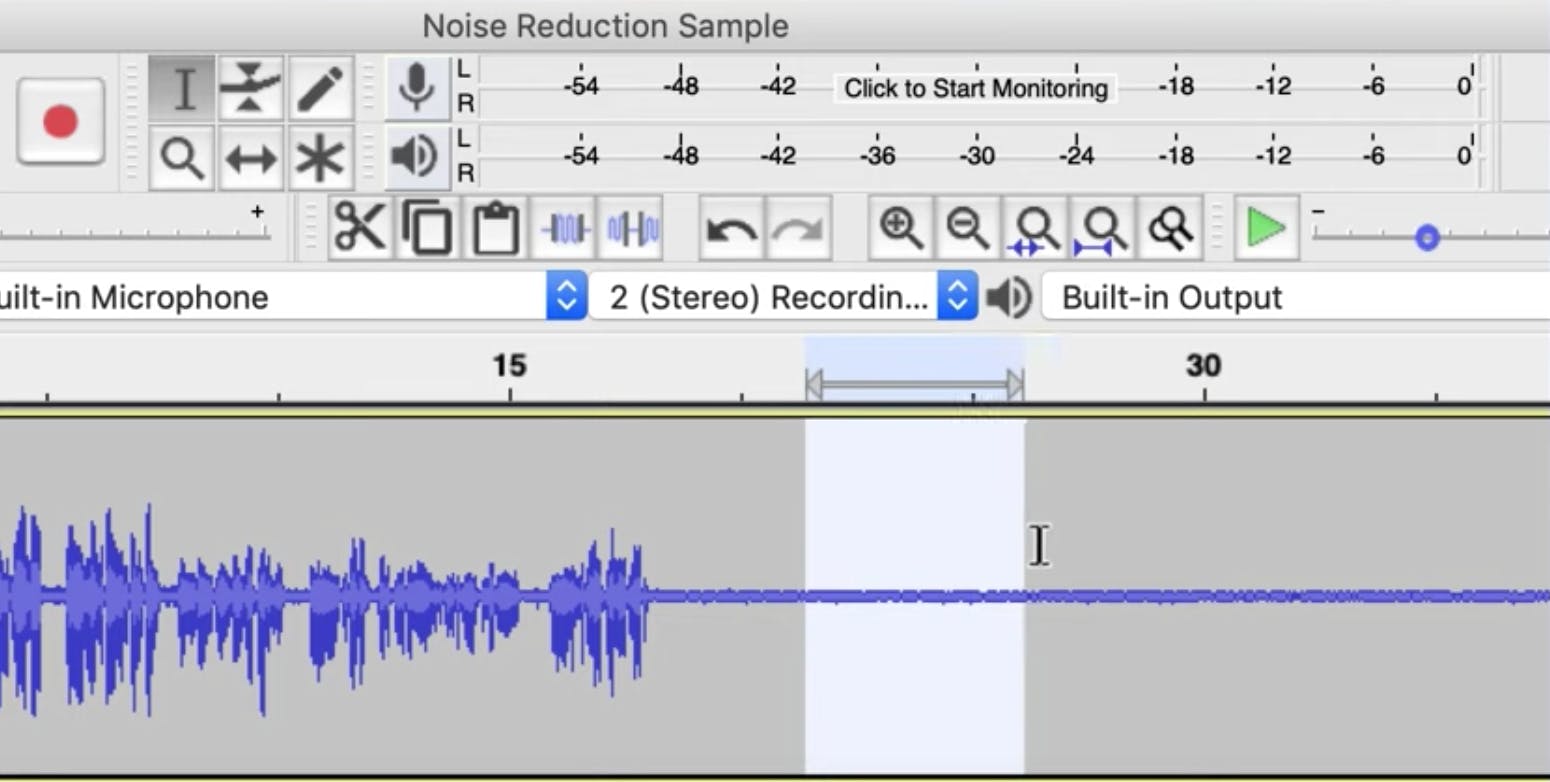
By default, Audacity uses the Noise Reduction effect to perform noise cancellation. This effect uses a three-step process to identify the characteristics of the noise, create a noise profile, and apply the noise reduction filters to the audio signal.
First, users need to select a portion of the audio recording that contains only the background noise. This sample will be used to create a noise profile, which captures the characteristics of the noise to be removed. It’s important to ensure that the selected sample represents only the noise and not the desired audio.
Once the noise profile is created, users can apply the noise reduction effect to the entire recording or specific sections. Audacity will use the noise profile to identify and reduce the frequencies that match the noise characteristics, resulting in a cleaner audio signal.
It is worth noting that the noise reduction process in Audacity is a delicate balance. Applying too much noise reduction can result in unnatural artifacts or sound degradation, while using too little might not effectively reduce the unwanted noise. It is recommended to experiment with different noise reduction settings and listen to the result to find the optimal balance for your specific recording.
While Audacity’s noise cancellation feature is effective for reducing common background noise, it is important to remember that it may not be suitable for removing more complex or impulsive noises, such as sudden clicks, pops, or microphone handling noise. In such cases, additional editing techniques or specialized tools may be required to address these specific issues.
Overall, Audacity’s noise cancellation feature is a valuable tool for enhancing the audio quality of your recordings. By reducing or removing unwanted background noise, you can create cleaner, more professional-sounding audio content. In the next section, we will explore how to set up Audacity for noise cancellation and enable the noise reduction effect.
Setting up Audacity for Noise Cancellation
Before diving into the noise cancellation process in Audacity, it’s important to ensure that you have the necessary setup and configurations in place. Here is a step-by-step guide on how to set up Audacity for optimal noise cancellation:
1. Install Audacity: If you haven’t already, download and install Audacity on your computer. The software is available for Windows, macOS, and Linux operating systems, ensuring compatibility with a wide range of users.
2. Connect Your Recording Device: Ensure that your microphone or recording device is properly connected to your computer. This step is crucial to ensure accurate noise detection and cancellation. Make sure your device is recognized and selected in the Audacity preferences.
3. Set Recording Levels: Open Audacity and adjust your recording levels. Set the input volume level to an appropriate level to capture your desired audio source without introducing distortions or clipping. This step is essential to ensure a clean recording before applying noise cancellation.
4. Select the Noise Profile: Locate a section within your recording that contains only the background noise you want to remove. Select this section and go to the “Effect” menu in Audacity. Choose “Noise Reduction” and then select “Get Noise Profile.” This step enables Audacity to analyze the selected noise and create a noise profile for further noise reduction.
5. Apply Noise Reduction Effect: With the noise profile created, select the entire recording or specific sections that you want to apply noise cancellation to. Go to the “Effect” menu again and choose “Noise Reduction.” Adjust the noise reduction settings based on your preferences and the specific characteristics of your recording. It’s recommended to strike a balance between removing noise and preserving the desired audio quality.
6. Preview and Adjust: After applying the noise reduction effect, preview the changes by playing back the recording. Listen carefully to ensure that the noise reduction settings have achieved the desired outcome without introducing any artifacts or distortion. If necessary, make further adjustments to the noise reduction settings until you achieve the desired result.
By following these steps, you can set up Audacity for noise cancellation and begin the process of reducing or removing unwanted background noise from your recordings. The next section will provide a detailed guide on how to enable noise cancellation and adjust the settings in Audacity for optimal results.
Steps to Enable Noise Cancellation in Audacity
Enabling noise cancellation in Audacity involves a few simple steps that allow you to reduce or remove unwanted background noise from your recordings. Here’s a step-by-step guide on how to enable noise cancellation in Audacity:
Step 1: Open Audacity: Launch Audacity on your computer to begin the noise cancellation process.
Step 2: Import or Record Audio: Import the audio file you want to edit by going to the “File” menu and selecting “Import” or use the built-in recording function to capture new audio. Ensure that your microphone or recording device is properly connected and configured.
Step 3: Select Noise Profile: Locate a section in the audio file that contains only the background noise you want to remove. Click and drag to highlight this section.
Step 4: Capture Noise Profile: With the noise section selected, go to the “Effect” menu and choose “Noise Reduction.” Click on “Get Noise Profile” to capture the characteristics of the selected noise and create a noise profile.
Step 5: Apply Noise Reduction Effect: Once the noise profile is obtained, select the entire audio file or specific sections that you want to apply noise cancellation to. Go back to the “Effect” menu and choose “Noise Reduction” again.
Step 6: Adjust Noise Reduction Settings: In the Noise Reduction window, you’ll find several sliders and options to adjust the noise reduction settings. The “Noise Reduction” slider controls the overall amount of noise reduction applied. The “Sensitivity” and “Frequency Smoothing” sliders allow you to fine-tune the noise detection and reduction parameters. Experiment with these settings to find the optimal balance between noise removal and audio quality.
Step 7: Preview and Apply: Click the “Preview” button to hear a preview of the noise reduction effect before applying it to the entire audio file. Adjust the settings as needed to achieve the desired outcome. Once satisfied, click “OK” to apply the noise reduction effect to the selected sections.
Step 8: Save the Edited Audio: After applying noise cancellation, you can save the edited audio file in your preferred format by going to the “File” menu and selecting “Export.” Choose the desired file format, specify a file name, and save the edited audio to your desired location.
By following these steps, you can easily enable noise cancellation in Audacity and significantly improve the quality of your recordings by removing or reducing unwanted background noise. In the next section, we will provide some additional tips and best practices for effective noise cancellation in Audacity.
Adjusting Noise Cancellation Settings
When using noise cancellation in Audacity, adjusting the settings appropriately is crucial to achieve the desired outcome of reducing or eliminating unwanted background noise. Here are some key settings you can adjust in Audacity to fine-tune your noise cancellation:
Noise Reduction: The “Noise Reduction” slider determines the overall amount of noise reduction applied to the audio. Moving the slider to the right increases the intensity of noise reduction, but be cautious not to overdo it, as excessive reduction can lead to artifacts or a muffled sound. It’s best to find a balance where the noise is significantly reduced without affecting the desired audio quality.
Sensitivity: The “Sensitivity” slider controls how sensitive Audacity is in detecting and reducing noise. Increasing the sensitivity can help in capturing even lower levels of noise, but it may also result in reducing desired audio content or introducing artifacts. Adjust this setting cautiously to strike a balance between noise reduction and preserving the desired audio.
Frequency Smoothing: The “Frequency Smoothing” slider determines the level of smoothing applied to the noise reduction. Higher values result in more subtle noise reduction, preserving the character of the original audio, but they may not eliminate noise as effectively. Lower values provide stronger noise reduction but can introduce some distortion. Experiment with this setting to find the appropriate level of smoothing for your specific recording.
Attack and Release Time: These settings control the speed at which Audacity applies the noise reduction effect. The “Attack Time” determines how quickly the noise reduction effect is applied when a noise is detected, while the “Release Time” determines how quickly the effect is removed when no noise is present. Adjust these settings based on the characteristics of the noise and the desired audio to achieve a natural and seamless noise reduction effect.
Preview and Fine-Tuning: After adjusting the noise cancellation settings, it is essential to preview the effect by selecting a representative section of the audio and clicking the “Preview” button in the “Noise Reduction” window. Listen attentively to ensure that the noise reduction is effective without introducing unwanted artifacts or affecting the desired audio quality. If necessary, make further adjustments to the settings until you achieve the desired result.
Remember that the exact settings required for noise cancellation may vary depending on the specific characteristics of your recording, the type of noise you are dealing with, and your personal preferences. Take the time to experiment and fine-tune these settings to achieve the best noise cancellation results for your audio recordings.
In the next section, we will provide some additional tips and best practices to help you achieve optimal noise cancellation results in Audacity.
Tips for Effective Noise Cancellation in Audacity
When using noise cancellation in Audacity, there are several tips and best practices you can follow to achieve optimal results. Here are some helpful tips to enhance the effectiveness of your noise cancellation efforts:
Select a Representative Noise Sample: When capturing the noise profile, ensure that the selected section in your recording represents the background noise you want to remove accurately. Avoid including any desired audio content in the noise sample, as it may affect the noise cancellation process.
Capture Multiple Noise Profiles: If your recording environment has varying types of background noise, consider capturing multiple noise profiles. This can help address different noise sources more effectively and produce cleaner results.
Avoid Overly Aggressive Noise Reduction: Be cautious not to apply excessive noise reduction, as it can lead to unnatural-sounding audio or introduce artifacts. Experiment with different levels of noise reduction and find a balance between reducing noise and preserving the desired audio quality.
Listen carefully during Preview: Always listen to the preview of the noise reduction effect before applying it to the entire recording. Pay attention to any changes in the audio quality, clarity, or the presence of unwanted artifacts. Adjust the noise reduction settings accordingly to achieve the desired outcome.
Work with a High-Quality Recording: Start with a high-quality audio recording to minimize the impact of noise. Ensure proper microphone placement, adjust recording levels, and reduce room echo or reverberation to capture a clean audio signal from the start.
Combine Noise Cancellation with Other Techniques: Noise cancellation may not completely eliminate all types of unwanted noise. Consider combining noise cancellation with other editing techniques such as equalization, dynamic range compression, or audio repair tools to achieve optimal results.
Save a Backup of the Original Recording: Before applying noise reduction effects, consider saving a backup copy of the original recording. In case you are not satisfied with the noise cancellation results, you can always revert back to the unedited version and make adjustments as needed.
Regularly Update Audacity: Audacity continues to evolve with regular updates and bug fixes. Stay up to date with the latest version of Audacity to take advantage of any improvements or enhancements to the noise cancellation feature.
By following these tips and incorporating best practices into your noise cancellation workflow in Audacity, you can achieve cleaner and more professional audio recordings. Remember to experiment, listen critically, and adjust the settings to find the optimal balance between noise reduction and audio quality for your specific project.
In the next section, we will address some common challenges and provide troubleshooting tips to overcome them in the noise cancellation process with Audacity.
Common Challenges and Troubleshooting Tips
While noise cancellation in Audacity can greatly improve the quality of your audio recordings, it’s not without its challenges. Here are some common issues you may encounter during the noise cancellation process and troubleshooting tips on how to address them:
Ineffective Noise Reduction: If you find that the noise reduction effect is not effectively reducing the background noise, try capturing a new noise profile from a more representative noise sample. Ensure that the noise sample accurately reflects the noise you want to remove, and adjust the noise reduction settings accordingly.
Overly Aggressive Noise Reduction: If the noise reduction effect is removing too much of the desired audio content, consider reducing the sensitivity or the noise reduction level. Finding the right balance is important to preserve the audio quality while effectively reducing the background noise.
Introducing Artifacts or Distortion: If you notice the presence of artifacts or distortion in the audio after applying noise reduction, it may be an indication that the noise reduction settings are too aggressive. Try reducing the noise reduction level or adjusting the frequency smoothing to achieve a more natural and artifact-free result.
Inconsistent Noise Reduction: In some cases, the noise reduction may be inconsistent throughout the recording, leading to noticeable fluctuations in audio quality. This can occur if there are variations in the noise profile throughout the recording. Consider segmenting the recording and applying noise reduction separately to address different sections with varying noise characteristics.
Impulsive Noises: Audacity’s noise cancellation feature primarily targets continuous background noise. If your recording contains impulsive noises like clicks, pops, or microphone handling sounds, additional editing techniques or specialized tools may be necessary to address these specific issues. Consider using the “Click Removal” or “Repair” functions in Audacity or explore external plugins designed for handling impulsive noise.
Background Noise Masking: In certain cases, the background noise might be too loud or persistent, making it challenging to completely remove. If the desired audio content is heavily masked by the noise, consider re-recording in a quieter environment or utilizing physical soundproofing techniques to minimize the noise during the recording stage.
When facing any challenges during the noise cancellation process, it’s important to experiment and adjust your techniques based on the specific characteristics of your recording. Each recording has its own unique qualities and noise profiles, so finding the right approach may require some trial and error.
By following these troubleshooting tips and adapting your techniques as needed, you can overcome common challenges and achieve the best possible noise cancellation results in Audacity.
In the final section, we will conclude our exploration of noise cancellation in Audacity and summarize the key points discussed throughout the article.
Conclusion
Noise cancellation is a crucial aspect of achieving high-quality audio recordings, and Audacity proves to be a powerful tool in this regard. By effectively reducing or eliminating unwanted background noise, you can enhance the clarity, professionalism, and overall listening experience of your recordings.
In this article, we explored the world of noise cancellation and its importance in the recording process. We provided an overview of Audacity, a versatile and user-friendly audio editing software that offers a built-in noise cancellation feature. We examined the steps to enable noise cancellation in Audacity, as well as techniques to adjust the settings for optimal results.
We also discussed tips and best practices for effective noise cancellation, such as selecting representative noise samples, avoiding excessive noise reduction, and regularly updating Audacity. Additionally, we addressed common challenges that may arise during the noise cancellation process and offered troubleshooting tips to overcome them.
While Audacity’s noise cancellation feature is a valuable asset, it’s important to note that noise cancellation may not completely eliminate all types of unwanted noise, especially impulsive noises. These may require additional editing techniques or specialized tools to address effectively.
By following the tips and best practices outlined in this article and experimenting with the noise cancellation settings in Audacity, you can achieve cleaner and more professional audio recordings. Remember to listen carefully during the preview and adjust the settings to find the optimal balance between noise reduction and audio quality.
Ultimately, with a combination of technical knowledge, creativity, and patience, you can leverage the noise cancellation feature in Audacity to elevate the quality of your recordings and provide a superior audio experience for your audience.
So, go ahead and dive into the world of noise cancellation in Audacity. Explore its capabilities, embrace the power of noise reduction, and unlock your potential to create outstanding audio content.