Home>Production & Technology>Sound Effects>How To Make Realtek Sound Effects Work With Microphone Output
Sound Effects
How To Make Realtek Sound Effects Work With Microphone Output
Modified: January 22, 2024
Learn how to make Realtek sound effects work with microphone output and enhance your audio experience with the power of sound effects.
(Many of the links in this article redirect to a specific reviewed product. Your purchase of these products through affiliate links helps to generate commission for AudioLover.com, at no extra cost. Learn more)
Table of Contents
Introduction
Sound effects are an essential component of any audio experience, adding depth and immersion to music, movies, and even video games. They enhance our auditory perception and make us feel more connected to what we are watching or listening to. Realtek Sound Effects is a popular software tool that allows users to customize their audio output and apply various effects to enhance their sound experience even further.
However, many users often encounter difficulties when attempting to make Realtek Sound Effects work with microphone output. This can be frustrating, especially for content creators, gamers, or individuals who rely on clear and high-quality microphone recording.
In this article, we will delve into the world of Realtek Sound Effects and provide a comprehensive guide on how to troubleshoot and configure it with microphone output. We will explore different techniques to ensure that your microphone output is properly integrated with Realtek Sound Effects, allowing you to enjoy the full potential of this incredible sound customization tool.
Whether you’re a podcaster, streamer, musician, or simply someone who wants to improve their audio quality, this article is your go-to resource for making Realtek Sound Effects work seamlessly with microphone output. So let’s dive in and unlock the power of sound effects combined with microphone recording!
Understanding Realtek Sound Effects
Realtek Sound Effects is a software tool developed by Realtek Semiconductor Corp. that allows users to fine-tune and customize their audio output in real-time. It provides a wide range of audio effects and enhancements, giving users the ability to modify the sound to their personal preferences and adapt it to different content types.
Realtek Sound Effects offers a plethora of features, including equalization, environment effects, pitch shifting, and virtual surround sound. Each of these features can significantly enhance the audio experience, making it more immersive and enjoyable.
Equalization allows users to adjust the frequency response of their audio output by boosting or attenuating specific bands. This feature is particularly useful for improving the overall audio balance and compensating for deficiencies in particular frequencies.
Environment effects simulate different acoustic environments, such as concert halls, theaters, or stadiums. By applying these effects, users can create a more realistic and immersive audio environment, making them feel as if they are in a different location.
Pitch shifting modifies the pitch of the audio, either raising or lowering it. This feature is commonly used in music production to adjust the key of a song or create unique vocal effects.
Virtual surround sound is another powerful feature provided by Realtek Sound Effects. It creates a spatial audio experience using stereo speakers or headphones, giving the perception of sound coming from different directions. This can greatly enhance the immersion and realism of movies, games, and virtual reality experiences.
Realtek Sound Effects can be accessed through the Realtek HD Audio Manager, a software interface that allows users to configure and manage audio settings on their computer. It is important to note that the availability of certain features may vary depending on the specific audio hardware and driver version.
Now that we have a basic understanding of Realtek Sound Effects, we can move on to troubleshooting and configuring it with microphone output.
Troubleshooting Microphone Output Issues
When using Realtek Sound Effects with microphone output, you may encounter various issues that can affect the quality and functionality of your microphone recordings. Here are some common problems and their potential solutions:
- No sound from the microphone: If you’re not getting any sound from your microphone, first ensure that it is properly connected to your computer. Check the physical connections and make sure the microphone is not muted or disabled in the audio settings. Additionally, verify that the correct microphone is selected as the default recording device in the Realtek HD Audio Manager.
- Poor audio quality: If your microphone recordings sound distorted, muffled, or have excessive background noise, there are a few steps you can take to improve the audio quality. First, try adjusting the microphone volume level in the Realtek HD Audio Manager. Lowering the volume can help reduce distortion caused by input overload. Additionally, consider using a noise-cancelling microphone or placing a windscreen or pop filter over the microphone to reduce unwanted noise.
- Echo or feedback: If you’re experiencing echo or feedback issues, it could be due to your microphone picking up audio from your speakers. To resolve this, try decreasing the speaker volume or using headphones instead. You can also adjust the microphone sensitivity to cancel out any feedback loops by accessing the microphone settings in the Realtek HD Audio Manager.
- Compatibility issues: Sometimes, certain applications or games may not work well with Realtek Sound Effects. In this case, you may experience issues with microphone output. To troubleshoot compatibility issues, try disabling Realtek Sound Effects temporarily or switching to a different audio driver provided by your hardware manufacturer.
If you have tried the above troubleshooting steps and are still experiencing issues with your microphone output in conjunction with Realtek Sound Effects, it’s recommended to update your audio drivers to the latest version. You can visit the official website of your computer or motherboard manufacturer to download and install the latest audio drivers specifically designed for your hardware.
Now that we have addressed some common microphone output issues, let’s move on to configuring Realtek Sound Effects with microphone output to optimize your sound experience even further.
Configuring Realtek Sound Effects with Microphone Output
Configuring Realtek Sound Effects with microphone output is essential to ensure that your audio recordings are of the highest quality. Follow these steps to optimize your sound settings:
- Open Realtek HD Audio Manager: Launch the Realtek HD Audio Manager by right-clicking on the volume icon in the system tray and selecting “Realtek HD Audio Manager” or by searching for it in the Start menu.
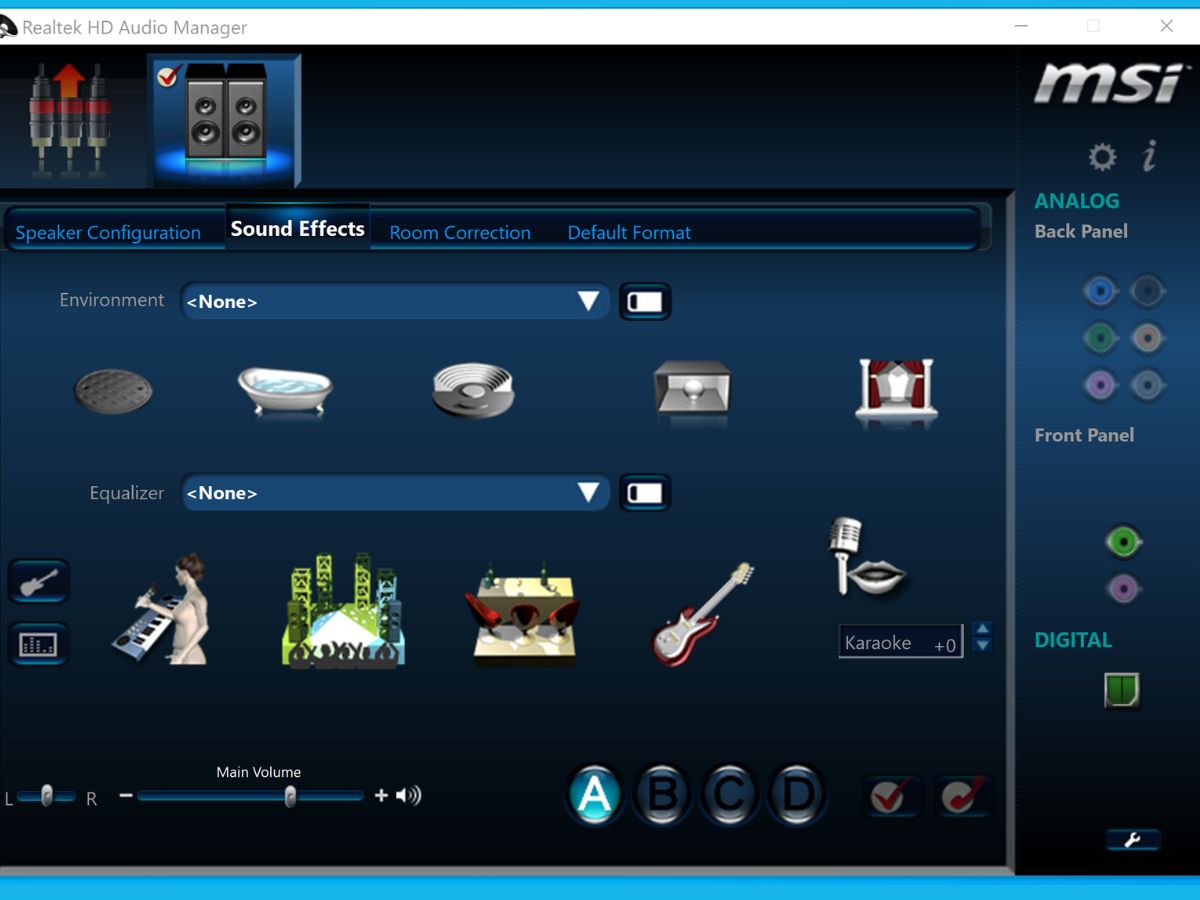
- Navigate to the Sound Effects tab: Once the Realtek HD Audio Manager is open, click on the “Sound Effects” tab. Here, you will find a variety of settings and options for configuring your audio output and microphone.
- Select the microphone: Ensure that the correct microphone is selected as the input device. Click on the dropdown menu under the “Microphone” section and choose the desired microphone from the available options.
- Adjust microphone volume: Use the slider or volume control provided to adjust the microphone volume level. Set it to an appropriate level that matches your preferences and the requirements of your recording application or activity.
- Enable noise suppression and echo cancellation: To minimize background noise and echo in your microphone recordings, check if your Realtek HD Audio Manager provides options for noise suppression and echo cancellation. Enable these features to enhance the clarity and quality of your microphone output.
- Experiment with effects: Realtek Sound Effects offers a range of effects that you can apply to your microphone output. Experiment with features such as equalization, environment effects, or pitch shifting to find the settings that suit your needs. Make adjustments and test your microphone recordings to determine the optimal configuration.
- Save and apply settings: Once you have adjusted the settings to your satisfaction, click on the “OK” or “Apply” button to save and apply the changes. These settings will now be active for your microphone output.
Take the time to explore other features and settings within Realtek Sound Effects to further customize your microphone output. Remember to regularly test your recordings to ensure that the configured settings are producing the desired results.
With Realtek Sound Effects properly configured with microphone output, you can now enjoy high-quality audio recordings and a more immersive audio experience.
Testing and Verifying Sound Effects with Microphone Output
After configuring Realtek Sound Effects with your microphone output, it’s essential to test and verify the sound effects to ensure they are working as desired. Follow these steps to effectively test and verify the sound effects:
- Choose a suitable testing environment: Find a quiet location where you can focus on recording and listening to your microphone output without any interruptions or distractions. This will help you accurately evaluate the sound effects applied.
- Record a sample: Use a recording software or app of your choice to record a sample of your microphone output. Speak or perform as you would typically do to capture a natural representation of your voice or desired audio input.
- Play back the recording: Once you’ve completed the recording, play it back using a media player or the same recording software. Listen carefully to the sound effects applied to your microphone output. Pay attention to the enhancements, such as equalization, environment effects, or pitch shifting, and evaluate their impact on the overall sound quality.
- Adjust settings as necessary: If you are not satisfied with the sound effects or believe that further adjustments are needed, go back to the Realtek HD Audio Manager and make the necessary changes. Tweak the equalization, experiment with different environment effects, or adjust the microphone volume to achieve the desired sound quality.
- Re-record and retest: After making adjustments, repeat the recording and playback process to compare the results with your previous recording. Assess whether the changes have positively impacted the sound quality and if the desired sound effects are now present.
- Seek feedback: Share your recordings with others, such as colleagues, friends, or online communities, to gather feedback on the sound effects applied to your microphone output. Consider their perspectives and suggestions to further fine-tune your settings or explore different sound effects for different applications.
Testing and verifying sound effects with microphone output is an iterative process. It may take some time and experimentation to find the perfect balance and configuration that suits your preferences and requirements.
Remember to document your settings and keep track of the adjustments you make. This will not only help you replicate your desired sound effects in the future but also serve as a reference point for troubleshooting or optimizing your setup if needed.
Continue to refine and adjust your sound effects as you gain more experience and understand how specific enhancements can enhance your microphone output. With time and practice, you will achieve the perfect audio experience tailored to your needs.
Conclusion
Configuring Realtek Sound Effects with microphone output can significantly enhance your audio recordings and provide a more immersive sound experience. By troubleshooting any issues, adjusting settings, and testing the sound effects, you can optimize the quality and customization of your microphone output.
In this article, we explored the fundamentals of Realtek Sound Effects and the various features it offers, such as equalization, environment effects, pitch shifting, and virtual surround sound. We also addressed common microphone output issues and provided troubleshooting tips to resolve them.
Furthermore, we provided step-by-step instructions for configuring Realtek Sound Effects with microphone output and discussed the importance of testing and verifying the applied sound effects. Through thorough testing, adjusting settings, and seeking feedback, you can fine-tune your sound effects to achieve the desired sound quality and enhance your audio recordings.
Remember, the optimal configuration may vary depending on your specific preferences, recording environment, and use case. Continuously experiment, refine, and adjust your sound effects to achieve the best results.
So, go ahead and unlock the power of Realtek Sound Effects with microphone output. Take your audio recordings to the next level, whether you’re a content creator, gamer, or someone who appreciates high-quality sound. Enjoy the enhanced audio experience and immerse yourself in a world of crystal-clear sound!