Home>Production & Technology>Treble>How To Draw A Treble Clef Worksheet
Treble
How To Draw A Treble Clef Worksheet
Published: November 26, 2023
Learn how to draw a treble clef with this helpful worksheet. Perfect for musicians and music enthusiasts.
(Many of the links in this article redirect to a specific reviewed product. Your purchase of these products through affiliate links helps to generate commission for AudioLover.com, at no extra cost. Learn more)
Table of Contents
Introduction
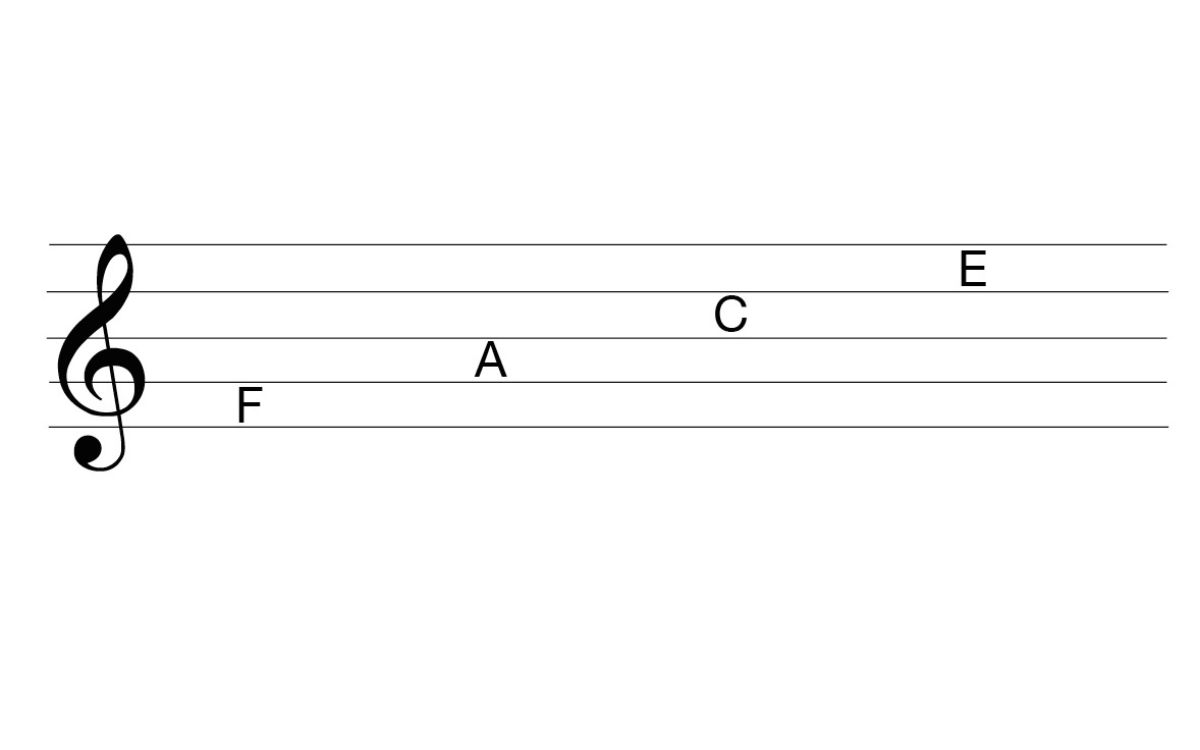
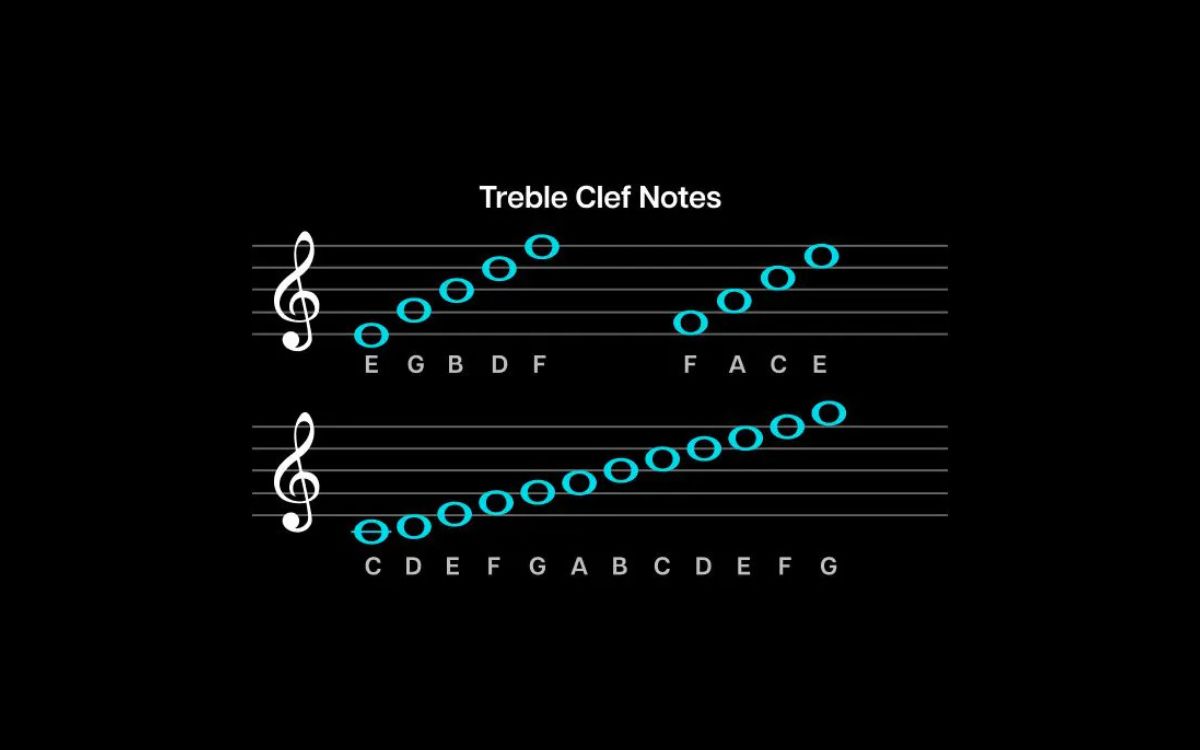
The treble clef, also known as the G clef, is one of the most recognizable symbols in music notation. It signifies the range of notes to be played by instruments such as the piano, violin, flute, and many more. Understanding how to draw a treble clef is not only a valuable skill for musicians, but it can also be a fun and rewarding activity.
In this step-by-step guide, we will walk you through the process of drawing a treble clef. Whether you are a music enthusiast, a student learning to read sheet music, or simply someone who wants to try their hand at sketching, this tutorial will provide you with clear instructions to create a beautiful treble clef.
Before we begin, it’s important to note that drawing a treble clef requires precision and attention to detail. We recommend using a pencil and eraser so that you can easily make adjustments if needed. So let’s gather our materials and get started on our artistic journey!
Materials Needed
To draw a treble clef, you will need a few essential materials. Here’s what you’ll need before you start:
- Pencil: A pencil will allow you to sketch the lines lightly, making it easier to erase any mistakes or make adjustments as you go.
- Eraser: An eraser is essential for removing any unwanted lines or marks without smudging the rest of your drawing.
- Paper: Choose a smooth, blank sheet of paper that is suitable for drawing. A clean canvas will allow your treble clef to stand out.
- Ruler: While not necessary, a ruler can be helpful for creating straight lines and ensuring accuracy in your drawing.
Having these materials ready will ensure a smoother and more enjoyable drawing experience. Now that we have everything we need, let’s move on to the step-by-step process of drawing a treble clef.
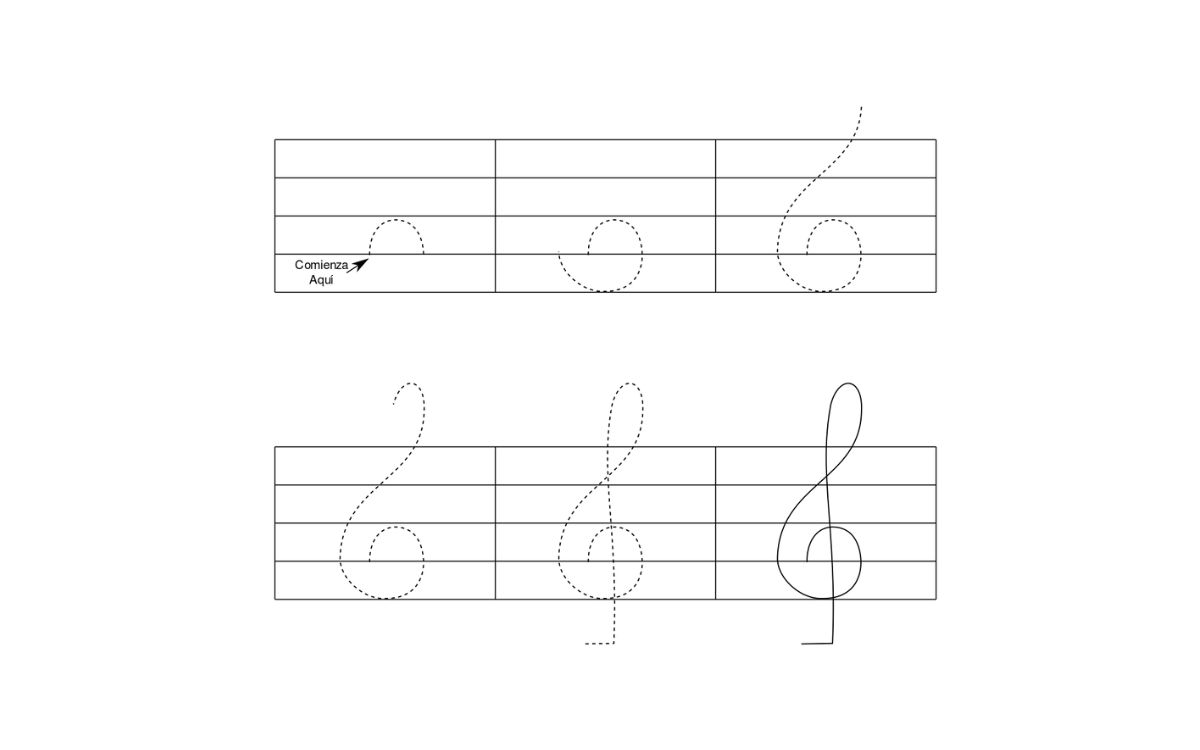
Step 1: Start with a Vertical Line
The first step in drawing a treble clef is to start with a vertical line. This line will serve as the foundation for the rest of the clef. Begin by placing your pencil at the top of the paper and lightly draw a straight vertical line downwards. The length of this line depends on the size of the treble clef you want to create, so you can adjust it accordingly.
Keep in mind that the bottom of the vertical line will serve as the starting point for the loop of the treble clef. Therefore, make sure to leave enough space below the line for the loop to be added later. It’s better to have a bit more space than needed, as you can always adjust it later.
Once you have drawn the vertical line, take a moment to assess its placement and adjust it if necessary. Remember, this line will set the tone for the entire treble clef, so it’s important to get it right. Use light, gentle strokes with your pencil, as you will be refining and adding details in the subsequent steps.
Now that you have your vertical line as the foundation, it’s time to move on to the next step and add the loop to complete the treble clef shape.
Step 2: Add the Loop
In this step, we will add the loop to the treble clef. The loop is the iconic swirling shape that gives the treble clef its distinctive look. To create the loop, start at the bottom of the vertical line and curve your pencil in a clockwise motion towards the right.
The size and shape of the loop can vary depending on personal preference or the style of the treble clef you want to draw. Traditionally, the loop of the treble clef extends slightly above the top of the vertical line. Aim for a smooth and flowing curve as you draw the loop, keeping it proportional to the rest of the clef.
While drawing the loop, pay attention to the pressure you apply on the pencil. Light, gentle strokes will give you more control and allow for adjustments later. Remember, you can always go over the line and darken it once you are satisfied with the shape.
Once you have drawn the loop, take a step back and evaluate the overall shape of the treble clef. Make any necessary adjustments to the loop to ensure it has a symmetrical and pleasing appearance. Don’t worry about erasing any overlapping lines from the loop just yet; we will clean up the drawing in later steps.
With the loop added, the treble clef is starting to take shape. Now, let’s move on to the next step and continue refining the top line of the clef.
Step 3: Curve the Top Line
In this step, we will focus on curving the top line of the treble clef. The top line is the horizontal line that sits on top of the loop and completes the shape of the clef. To create a smooth curve, start at the endpoint of the loop and gently curve your pencil upwards and to the right.
The curve of the top line is crucial in ensuring that the treble clef looks balanced and aesthetically pleasing. Be mindful of the angle and curvature you apply as you draw this line. Aim for a graceful arc that complements the loop and flows seamlessly.
As you draw the top line, you may notice that it intersects with the loop. Don’t worry about this overlapping for now; we will refine and clean up those areas in the later steps. Focus on getting the general shape and curvature of the line correct first.
Take a step back and evaluate the treble clef as you progress. Compare the proportions of the loop and the top line with your reference image or mental image of a treble clef. Make any necessary adjustments to ensure symmetry and balance. Remember to use light strokes initially and darken the line once you are satisfied with the shape.
With the top line curved, the treble clef is starting to come together. In the next step, we will complete the bottom line of the clef, so let’s move on and continue refining our drawing.
Step 4: Complete the Bottom Line
In this step, we will complete the bottom line of the treble clef. The bottom line is a short, horizontal stroke that connects the loop to the vertical line at the bottom. It serves as a finishing touch to the overall shape of the treble clef.
To create the bottom line, start at the endpoint of the loop and draw a short horizontal line towards the right, intersecting with the vertical line at the bottom. This line should be parallel to the top line and positioned slightly below it. The length of the bottom line can vary, but it should be shorter than the top line and loop.
As you draw the bottom line, pay attention to its placement and ensure that it aligns properly with the rest of the treble clef. Take a moment to evaluate the proportions and symmetry of the shape. If needed, make adjustments to the curve of the top line or the position of the bottom line to achieve the desired look.
Once you are satisfied with the position and shape of the bottom line, you can darken the lines to make them more prominent. Use smooth, confident strokes with your pencil to define the lines and give the treble clef a finished appearance.
With the bottom line added, our treble clef is almost complete. In the next step, we will add the final touch – the dot. So let’s move on and give our treble clef its finishing detail.
Step 5: Add the Dot
In this final step, we will add the dot to our treble clef. The dot is a small circular shape that is positioned above the top line of the loop. It is a distinctive feature of the treble clef and adds the finishing touch to our drawing.
To draw the dot, place it slightly above the top line of the loop, towards the right side. The size of the dot can vary, but it should be small enough to fit within the space above the loop. Use a light touch with your pencil to create a delicate and precise dot.
Ensure that the dot is centered and aligned with the rest of the treble clef. Take a step back and assess the overall appearance and balance of the clef. Make any necessary adjustments to the position or size of the dot to achieve harmony within the drawing.
Once you are satisfied with the dot, you can darken it to make it more visible. Use a bit more pressure on your pencil to create a solid and defined dot. Be careful not to smudge any of the surrounding lines while darkening the dot.
With the dot added, our treble clef is complete! Take a moment to admire your creation and compare it with reference images or other treble clefs. If needed, you can erase any stray lines or smudges to clean up the drawing and enhance its crispness.
Congratulations! You have successfully drawn a treble clef. With practice, you can further refine your technique and create beautiful treble clefs with ease. Now, you can enjoy the process of drawing this iconic symbol and showcase your newfound skill.
Remember, drawing is all about expressing your creativity and enjoying the journey. So keep exploring and experimenting with different styles and variations of the treble clef. Let your imagination soar and have fun with this musical art form!
Thank you for joining us in this step-by-step guide. We hope you found it helpful and inspiring. Happy drawing!
Conclusion
Drawing a treble clef may seem like a challenging task at first, but with the step-by-step instructions provided in this guide, you have learned how to create this iconic symbol with ease. By following the simple yet precise process, you can now confidently sketch a treble clef and showcase your artistic skills.
Remember, practice is key to improving your drawing technique. The more you practice drawing treble clefs, the more comfortable and proficient you will become. Experiment with different sizes, styles, and variations to add your unique touch to this musical symbol.
Drawing a treble clef not only enhances your artistic abilities, but it also deepens your connection to music. As you create this symbol, you gain a greater appreciation for the significance of the treble clef in representing the melody and higher pitches in sheet music.
So, whether you are a musician, a music enthusiast, or simply someone with a passion for drawing, mastering the art of drawing a treble clef opens up a world of creative possibilities. You can use your skills to create personalized sheet music, decorate musical instruments, or even create beautiful artwork inspired by music.
In conclusion, drawing a treble clef is a rewarding and enjoyable activity that allows you to combine your love for music and art. With practice and dedication, you can continue to refine your skills and create stunning treble clefs that truly represent your artistic vision. So go ahead, grab your pencil, and let your creativity flow as you embark on this musical drawing adventure!