Home>Devices & Equipment>Earbuds>How To Put On Beats Earbuds
Earbuds
How To Put On Beats Earbuds
Modified: January 22, 2024
Learn how to properly put on Beats earbuds and enjoy superior sound quality. Step-by-step guide and tips for a comfortable fit. Best practices for maximizing your listening experience.
(Many of the links in this article redirect to a specific reviewed product. Your purchase of these products through affiliate links helps to generate commission for AudioLover.com, at no extra cost. Learn more)
Table of Contents
- Introduction
- Step 1: Unboxing the Beats Earbuds
- Step 2: Familiarizing with the Earbud Components
- Step 3: Preparing the Earbuds for Use
- Step 4: Inserting the Earbuds into Your Ears
- Step 5: Adjusting the Fit and Comfort
- Step 6: Connecting the Earbuds to a Device
- Step 7: Pairing and Troubleshooting
- Step 8: Listening to Music with Beats Earbuds
- Step 9: Maintaining and Cleaning the Earbuds
- Conclusion
Introduction
Welcome to the world of Beats earbuds, where high-quality sound meets sleek design and comfort. If you’ve recently purchased a pair of Beats earbuds or are considering buying one, this article will guide you through the process of putting them on and enjoying your favorite tunes in no time.
Beats earbuds have become a popular choice for music enthusiasts and audiophiles around the world. Created by the renowned audio company Beats by Dre, these earbuds offer a premium listening experience with their powerful audio output, deep bass, and impressive sound clarity.
Whether you’re a seasoned earbud user or new to the world of personal audio, properly putting on your Beats earbuds is essential for optimal sound delivery and comfort. This article will walk you through the step-by-step process of unboxing your earbuds, understanding their components, and using them with ease.
By the end of this guide, you’ll not only know how to wear your Beats earbuds properly but also how to pair them with your device, troubleshoot common issues, and maintain them for lasting performance.
So, get ready to immerse yourself in a world of unparalleled sound quality and convenience as we explore how to put on Beats earbuds.
Step 1: Unboxing the Beats Earbuds
The first step to enjoying your Beats earbuds is unboxing them with excitement and anticipation. The unboxing experience sets the tone for your journey into the world of immersive audio. Follow these simple steps to unbox your Beats earbuds:
- Locate the packaging: Your Beats earbuds will come in a stylish box that bears the iconic Beats logo. Look for the box that contains your earbuds.
- Open the box: Carefully slide off the packaging sleeve and lift the box cover to reveal the contents inside.
- Take out the earbud case: Inside the box, you’ll find a compact and sturdy case that holds your Beats earbuds. Gently lift it out and set it aside.
- Inspect the case: Take a moment to examine the earbud case. It is designed to protect and store your earbuds when not in use. You may notice a magnetic closure or a zipper to keep the case securely shut.
- Remove the plastic wrapping: If there is any plastic wrapping around the earbud case, carefully remove it. This will unveil the polished and sleek appearance of your Beats earbuds.
- Open the earbud case: Now, it’s time to open the case and reveal the earbuds. Some cases may have a latch or button to release the lid, so find the mechanism and open it up.
- Admire your new earbuds: As you open the case, you’ll see your Beats earbuds nestled inside. Take a moment to appreciate their design and craftsmanship.
Unboxing your Beats earbuds is an exciting experience that builds anticipation for the exceptional audio quality they’re known for. Once you’ve completed this step, you’re ready to move on to the next one: familiarizing yourself with the earbud components.
Step 2: Familiarizing with the Earbud Components
Before you put on your Beats earbuds, it’s important to understand the different components that make up these high-performance audio devices. Familiarizing yourself with the earbud components will not only ensure a proper fit but also help you navigate the controls effortlessly. Follow these steps to get acquainted with the various parts of your Beats earbuds:
- Earbud housing: The earbud housing is the main body of the earbuds. It houses the drivers, which are responsible for producing the sound. The housing may also have built-in controls, such as volume adjustment buttons or a multifunction button.
- Eartips: Eartips are the small silicone or foam attachments that fit into your ear canal. They come in various sizes to provide a comfortable and secure fit. Choose the eartips that best suit your ear size for optimal sound delivery and noise isolation.
- Earbud cable: The cable connects the earbuds and allows you to wear them comfortably. It typically has an inline remote that lets you control volume, play/pause music, and answer calls. Some models may have a tangle-resistant flat cable design, ensuring hassle-free use.
- In-line remote: The in-line remote is a small control module located on the earbud cable. It allows you to adjust volume, skip tracks, and answer calls without reaching for your device. Familiarize yourself with the buttons and functions of the in-line remote for seamless navigation.
- Microphone: Many Beats earbuds have a built-in microphone that enables hands-free calling. This microphone is strategically placed on the cable or on the in-line remote, allowing you to have crystal-clear conversations without needing to remove your earbuds.
- Connector: The connector is where you plug in the earbuds to your audio device. Beats earbuds often use a 3.5mm audio jack, which is compatible with most smartphones, tablets, and audio players. Some models also offer wireless connectivity options, eliminating the need for a physical connector.
By understanding the different components of your Beats earbuds, you’ll have a better understanding of how to use them effectively. Now that you’re familiar with the earbud components, it’s time to move on to preparing the earbuds for use.
Step 3: Preparing the Earbuds for Use
Now that you’re familiar with the components of your Beats earbuds, it’s time to prepare them for use. This step involves ensuring they are charged (if wireless), untangling the cable (if applicable), and choosing the right eartips for a comfortable fit. Follow these steps to prepare your Beats earbuds:
- Charge your wireless earbuds (if applicable): If you have a wireless model of Beats earbuds, it’s essential to ensure they are sufficiently charged before use. Locate the charging port on the earbuds or the charging case and connect them to a power source using the provided cable.
- Untangle the cable (if applicable): If your Beats earbuds have a wired connection, gently untangle the cable to ensure smooth usage. Avoid excessive pulling or twisting to prevent any damage to the cable.
- Select the right eartips: Choose the eartips that provide a secure and comfortable fit in your ears. Each person’s ear size may vary, so it’s important to test out different sizes to find the one that suits you best. The right eartips should seal your ear canal, providing optimal sound isolation and bass response.
- Attach the eartips: Once you’ve selected the appropriate eartips, carefully attach them to the earbud housing. Ensure they are firmly in place to prevent them from falling off during use.
- Inspect the cable and connectors: Take a quick look at the cable and connectors of your Beats earbuds. Check for any visible damage, fraying, or loose connections. If you notice any issues, it’s best to get them repaired or replaced to ensure optimal performance.
By following these steps to prepare your Beats earbuds, you’ll ensure that they are ready for use and provide the best possible audio experience. With your earbuds now prepared, it’s time to move on to the next step: inserting them into your ears.
Step 4: Inserting the Earbuds into Your Ears
Now that your Beats earbuds are ready to use, it’s time to properly insert them into your ears. Achieving a secure and comfortable fit is crucial for optimal sound quality and noise isolation. Follow these steps to ensure a proper fit:
- Hold the earbud housing: Pick up the earbud by holding the housing between your thumb and index finger. Make sure not to press any buttons on the housing while doing this.
- Orient the earbud correctly: Align the earbud with the ear canal, ensuring that it is positioned correctly for a snug fit. The eartips should be pointing towards your ear canal entrance.
- Gently insert the earbud: Slowly insert the earbud into your ear canal. Be careful not to push it in too forcefully or insert it at an angle, as this can cause discomfort or affect the audio quality.
- Twist and adjust: Once the earbud is in place, gently twist it slightly to secure the fit. This helps to create a seal that enhances both bass response and noise isolation. You can also adjust the angle of the earbud slightly to find the most comfortable position for your ears.
- Repeat for the other earbud: Follow the same steps to insert the other earbud into your other ear. Ensure the fit and comfort are consistent for both earbuds.
It’s important to note that everyone’s ears are unique, and it may take a bit of trial and error to find the most comfortable and secure fit with your Beats earbuds. Experiment with different eartip sizes and adjustments to achieve the best results.
Once you have successfully inserted both earbuds into your ears, you’re ready to move on to the next step: adjusting the fit and comfort.
Step 5: Adjusting the Fit and Comfort
After inserting your Beats earbuds into your ears, it’s crucial to ensure a proper fit and comfortable wearing experience. Adjusting the fit not only enhances your comfort but also improves sound quality and noise isolation. Follow these steps to adjust the fit and comfort of your earbuds:
- Check for a secure fit: Gently tug on the cable to make sure the earbuds stay in place. They shouldn’t easily come loose or fall out with slight movements. If they feel loose, adjust the eartips or try a different size to achieve a more secure fit.
- Test for sound isolation: Play some music or audio to test the level of noise isolation. The eartips should create a seal that blocks out external sounds and allows you to fully enjoy your music without distractions. If you hear too much background noise, try adjusting the fit or trying different eartip sizes.
- Check for comfort: Pay attention to any discomfort or pressure points in your ears. The earbuds should feel snug but not cause any pain or discomfort during extended use. If you experience discomfort, try adjusting the angle or position of the earbuds slightly.
- Perform a movement test: Move your head and jaw around to see if the earbuds stay secure and comfortable. They should not shift or fall out with normal movements. If they feel loose or uncomfortable during certain activities, such as running or exercising, you may need to customize the fit further.
- Take breaks if needed: If you’re new to wearing earbuds or are using them for extended periods, it’s important to take breaks. Occasionally removing the earbuds allows your ears to rest and prevents discomfort or fatigue.
Remember that finding the perfect fit and comfort may take some time and experimentation. Don’t hesitate to try different eartip sizes, adjust the angle or position, and take breaks as needed. Prioritizing comfort will ensure an enjoyable experience with your Beats earbuds.
With the fit and comfort adjusted to your liking, it’s time to move on to the next step: connecting your Beats earbuds to a device.
Step 6: Connecting the Earbuds to a Device
Now that your Beats earbuds are properly fitted and comfortable, it’s time to connect them to a device to start enjoying your favorite music or audio content. Whether it be a smartphone, tablet, or audio player, the process of connecting your earbuds is straightforward. Follow these steps to connect your Beats earbuds to a device:
- Power on your device: Ensure that the device you wish to connect your Beats earbuds to is powered on and in the Bluetooth pairing mode (if using wireless earbuds).
- For wired earbuds:
- Locate the audio jack: If your Beats earbuds have a wired connection, locate the 3.5mm audio jack on your device.
- Plug in the earbuds: Insert the headphone connector into the audio jack, ensuring a secure connection.
- For wireless earbuds:
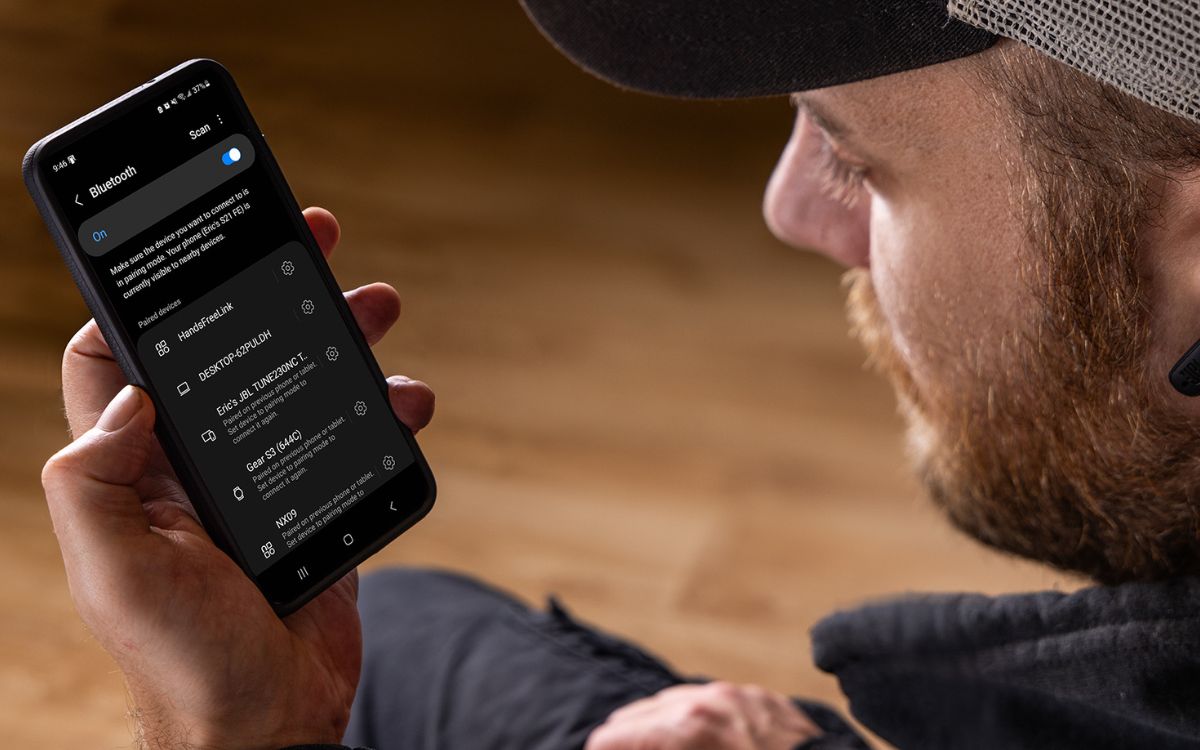
- Activate Bluetooth: Make sure your device’s Bluetooth functionality is turned on.
- Pair your earbuds: Put your Beats earbuds in pairing mode by following the instructions provided in the user guide. This typically involves holding down a button or switch until the LED indicator on the earbuds starts blinking.
- Select your earbuds: On your device, navigate to the Bluetooth settings and scan for available devices. Select your Beats earbuds from the list of options.
- Complete the pairing process: Follow any on-screen prompts to complete the pairing process. Once connected, you will see a confirmation message or the LED indicator on your earbuds will stop blinking.
- Test the connection: Play a sample audio file or music track on your device to ensure that the audio is coming through the Beats earbuds. Adjust the volume using the in-line remote or device controls as needed.
Connecting your Beats earbuds to a device is an easy process and allows you to experience the remarkable sound quality they offer. Whether you’re using wired or wireless earbuds, be sure to follow the manufacturer’s instructions for seamless connectivity.
Once your earbuds are successfully connected, you’re ready to move on to the next step: pairing and troubleshooting, if necessary.
Step 7: Pairing and Troubleshooting
After connecting your Beats earbuds to your device, it’s time to pair them and troubleshoot any potential issues that may arise. Pairing refers to the process of establishing a stable connection between your earbuds and your device, while troubleshooting helps resolve any connectivity or audio-related problems. Follow these steps to ensure a smooth pairing process and troubleshoot any issues:
- Ensure proper pairing mode: If you’re using wireless Beats earbuds, make sure they are in pairing mode. Refer to the user manual for specific instructions on how to activate pairing mode.
- Restart your device: If the earbuds are not appearing in the list of available devices for pairing, restart your device and try again. Restarting can often resolve minor connectivity issues.
- Forget and re-pair: If you have previously connected your Beats earbuds to a device but are experiencing connection problems, try “forgetting” the earbuds from the device’s Bluetooth settings and then re-pairing them as a new device.
- Ensure sufficient battery life: For wireless earbuds, make sure both the earbuds and your device have sufficient battery life. Low battery levels can cause connectivity issues. Charge your earbuds if needed.
- Reset the earbuds (if necessary): If you’re still experiencing pairing issues, consult the user manual for instructions on how to reset the earbuds. Resetting may help resolve any internal software conflicts.
- Check for audio settings: If you’re not getting any sound or the audio quality is poor, check the audio settings on your device. Ensure that the audio output is set to the connected Beats earbuds and adjust the volume as needed.
- Contact customer support: If you have followed the troubleshooting steps and are still facing persistent issues, reach out to Beats customer support or refer to the product warranty for further assistance.
Paying attention to the pairing process and troubleshooting early on will help you enjoy a seamless audio experience with your Beats earbuds. Remember to refer to the specific user manual for your model for detailed instructions and troubleshooting tips.
With your earbuds successfully paired and any troubleshooting steps taken, it’s time to move on to the next step: listening to music and enjoying the immersive sound that Beats earbuds are known for.
Step 8: Listening to Music with Beats Earbuds
Now that your Beats earbuds are connected and paired to your device, it’s time to immerse yourself in your favorite music. Whether you’re a casual listener or an audiophile, these earbuds deliver impressive sound quality that enhances your music experience. Follow these steps to make the most out of your listening session with Beats earbuds:
- Select your desired music app: Open the music app of your choice on your device. Whether it’s a streaming service or a local music player, ensure that your desired music app is installed and ready to use.
- Browse or search for your favorite songs: Explore your music library or search for specific songs, artists, albums, or playlists within your selected music app. This allows you to easily find the music that suits your mood or preferences.
- Adjust the volume: Use the in-line remote on your Beats earbuds or the volume controls on your device to set the desired volume level. Start at a comfortable level and adjust as needed to customize your listening experience.
- Experiment with EQ settings (if available): Some devices or music apps offer equalizer (EQ) settings that allow you to adjust the audio frequencies to your liking. Explore these settings to enhance specific aspects of the sound, such as bass or treble.
- Sit back and enjoy: Once you’ve chosen your music and made any necessary adjustments, sit back, relax, and let the powerful sound of your Beats earbuds take you on a musical journey. Appreciate the rich bass, crystal-clear vocals, and detailed audio that these earbuds offer.
Remember to take breaks during extended listening sessions to give your ears a rest and prevent discomfort. Additionally, make sure to follow any recommended volume guidelines to protect your hearing.
Whether you’re enjoying your Beats earbuds on a peaceful afternoon or using them during a workout, these steps will help you make the most of your music-listening experience. Indulge in the immersive sound that Beats earbuds provide and let yourself be transported by the music.
With the knowledge of how to listen to music with your Beats earbuds, it’s time to move on to the final step: maintaining and cleaning your earbuds to ensure their longevity and performance.
Step 9: Maintaining and Cleaning the Earbuds
To ensure the longevity and optimal performance of your Beats earbuds, it’s important to maintain and clean them regularly. Over time, earwax, dirt, and debris can accumulate on the eartips and housing, affecting both the audio quality and hygiene. Follow these steps to properly maintain and clean your earbuds:
- Remove eartips for cleaning: Gently remove the eartips from the earbud housing. Some eartips can be easily twisted off, while others may require a slight pull.
- Clean the eartips: Rinse the eartips under warm water to remove any debris or earwax. Use a mild soap if necessary. Avoid using any harsh cleaners or excessive force that may damage the eartips.
- Dry the eartips thoroughly: After cleaning, pat the eartips dry with a clean towel or allow them to air dry completely before reattaching them to the earbud housing. Moisture can affect the fit and performance of the eartips.
- Clean the earbud housing: Use a soft, dry cloth or cotton swab to gently wipe the earbud housing and cable. Be careful not to push any debris further into the housing.
- Disinfect if needed: If desired, you can use disinfecting wipes or isopropyl alcohol to sanitize the eartips and earbud housing. Make sure to follow the manufacturer’s guidelines and allow them to dry completely before use.
- Store your earbuds properly: When not in use, store your Beats earbuds in their case or a clean and dry pouch to protect them from dust and potential damage. Avoid leaving them tangled or in a crowded bag where they can get strained.
- Avoid extreme temperatures: Keep your Beats earbuds away from extreme temperatures, as exposure to heat or cold for prolonged periods can damage delicate components.
- Regularly inspect for damage: Periodically check the cable, connectors, and earbud housing for any signs of wear, fraying, or damage. If you notice any issues, get them repaired or replaced promptly.
By following these maintenance and cleaning steps, you can keep your Beats earbuds in optimal condition and prolong their lifespan. Regular cleaning ensures a hygienic and enjoyable listening experience.
Congratulations! You’ve successfully learned how to put on your Beats earbuds, familiarize with their components, prepare them for use, connect them to a device, adjust the fit and comfort, pair and troubleshoot, listen to music, and maintain and clean them. Enjoy your Beats earbuds and indulge in the immersive sound they offer!
If you have any further questions or need additional assistance, refer to the user manual or reach out to Beats customer support for expert guidance.
Conclusion
Congratulations on mastering the art of putting on Beats earbuds! By following the step-by-step guide, you’ve learned how to unbox your earbuds, familiarize yourself with their components, prepare them for use, insert them into your ears, adjust the fit and comfort, connect them to a device, pair and troubleshoot, listen to music, and maintain and clean them for optimal performance.
Beats earbuds offer not only exceptional sound quality but also a stylish and comfortable listening experience. The attention to detail in their design and the advanced audio technology they employ make them a favorite choice among music enthusiasts and audio lovers.
Remember, finding the perfect fit and comfort may require some experimentation with different eartip sizes and adjustments. Take the time to customize the fit to your ears, ensuring a secure fit that allows you to fully enjoy the immersive sound and noise isolation that Beats earbuds provide.
Maintaining and cleaning your earbuds regularly is essential for preserving their performance and longevity. By following the cleaning steps and storing them properly, you can enjoy your Beats earbuds for years to come.
Now it’s time to sit back, relax, and let the remarkable sound of your Beats earbuds transport you to a world of pure audio bliss. Whether you’re enjoying your favorite music, podcasts, or any other audio content, your Beats earbuds are designed to deliver an immersive and captivating listening experience.
Thank you for taking the time to learn how to put on and care for your Beats earbuds. We hope this guide has been helpful to you. So go ahead, put on your Beats earbuds, and embark on an auditory journey like no other!