Home>Devices & Equipment>Turntable>How To Put On A Turntable Belt
Turntable
How To Put On A Turntable Belt
Modified: January 22, 2024
Learn how to properly put on a turntable belt with step-by-step instructions and expert tips. Upgrade the performance of your turntable with ease.
(Many of the links in this article redirect to a specific reviewed product. Your purchase of these products through affiliate links helps to generate commission for AudioLover.com, at no extra cost. Learn more)
Table of Contents
Introduction
Welcome to the world of vinyl records, where the warm sound and nostalgic feeling of spinning records on a turntable reign supreme. Whether you’re a seasoned audiophile or a newcomer to the vinyl scene, at some point you may need to replace the belt on your turntable. The turntable belt, also known as the drive belt, is a crucial component that connects the motor to the platter, allowing it to rotate at the correct speed.
Over time, turntable belts can wear out, become stretched, or even break, resulting in issues with speed stability and accuracy. Replacing the turntable belt is a common maintenance task that can help restore optimal performance and ensure a smooth and consistent playback experience.
In this comprehensive guide, we’ll walk you through the step-by-step process of putting on a turntable belt. We’ll cover everything you need to know, from gathering the necessary tools to installing the new belt and reassembling your turntable.
But before we dive into the nitty-gritty, let’s briefly discuss why it’s important to properly maintain your turntable. Taking care of your equipment not only prolongs its lifespan but also ensures that you get the best possible sound quality from your vinyl collection.
A well-maintained turntable, with a properly functioning belt, will spin your records at the correct speed, reducing any pitch variations or fluctuations. This means you’ll be able to enjoy your favorite albums without compromising their original sound. Additionally, a properly aligned and tensioned turntable belt ensures smooth operation and minimizes any unwanted noise or vibrations.
Whether you’re a novice or an experienced vinyl enthusiast, this guide will provide you with the knowledge and confidence to replace your turntable belt with ease. So let’s get started on this journey to restore your beloved turntable to its full glory!
Step 1: Gather the necessary tools
Before diving into the process of putting on a turntable belt, it’s essential to gather all the necessary tools and materials. Having everything you need on hand will make the process smoother and more efficient. Here’s a list of the tools you’ll need:
- Turntable belt replacement: Make sure to identify the correct replacement belt for your specific turntable model. You can find this information in the user manual or by consulting the manufacturer’s website. It’s important to get the right size and type of belt to ensure proper functioning.
- Screwdriver: Depending on the design and construction of your turntable, you may need a screwdriver to remove the platter or access the belt. It’s advisable to have both a flathead and a Phillips head screwdriver on hand to cover different types of screws.
- Cotton swabs or microfiber cloth: These will be used to clean the turntable belt and remove any dust or debris that may have accumulated over time. It’s crucial to have a clean and debris-free belt to ensure smooth operation.
- Isopropyl alcohol: This is an optional but useful tool for cleaning the belt. It helps remove dirt, grime, and oils that may be present on the surface. Use it sparingly and ensure that it does not come into contact with other parts of the turntable.
- Latex gloves: While not necessary, wearing latex gloves can help prevent oil and dirt from your fingers from transferring onto the belt or other delicate components of the turntable. This will help maintain the cleanliness of the setup.
By gathering these tools in advance, you’ll save time and frustration during the belt replacement process. Now that you have everything ready, it’s time to move on to the next step: removing the platter.
Step 2: Remove the platter
Now that you have all the necessary tools ready, it’s time to remove the platter from your turntable. The platter is the circular disc that spins the record, and it needs to be removed to access the turntable belt. Here’s a step-by-step guide:
- Power off the turntable: Before starting any maintenance or removal process, always ensure that your turntable is powered off and unplugged from the wall outlet. This will prevent any accidental damage or injury.
- Locate the platter: The platter is usually located at the center of your turntable. It may be covered by a dust cover or housed within a plinth or chassis.
- Remove the dust cover (if applicable): If your turntable has a removable dust cover, carefully lift it off and set it aside. This will expose the platter.
- Identify the platter securing mechanism: Different turntables may have different mechanisms to secure the platter. The most common methods include a locking clip, a rubber grommet, or a spindle nut. Refer to your turntable’s user manual for specific instructions.
- Unlock or remove the platter securing mechanism: Depending on the type of mechanism, use your screwdriver or fingers to unlock or remove it. If it’s a locking clip, gently push or pull it to release. If it’s a rubber grommet, carefully lift it up and off the spindle. If it’s a spindle nut, use your screwdriver to turn it counterclockwise and loosen it.
- Lift off the platter: With the securing mechanism removed or unlocked, carefully lift the platter straight up. Be mindful of any wires or cables that may be connected to the underside of the platter.
- Set aside the platter: Once the platter is removed, set it aside in a safe and clean location. Avoid placing it on a surface that may scratch or damage it.
By following these steps, you should now have the platter removed from your turntable, providing you access to the turntable belt. In the next step, we’ll explore how to clean the turntable belt effectively.
Step 3: Clean the turntable belt
With the platter removed, you now have access to the turntable belt. Over time, dust and debris can collect on the surface of the belt, affecting its performance and causing issues with playback. Cleaning the turntable belt is an important step in maintaining optimal performance. Here’s how to clean the turntable belt:
- Inspect the turntable belt: Before cleaning the belt, visually inspect it for any visible signs of damage, such as cracks or stretching. If you notice any significant damage, it’s recommended to replace the belt entirely.
- Prepare a clean workspace: Find a clean and well-lit area to work on. Lay down a soft cloth or towel to prevent any scratches or damage to the turntable or the belt.
- Use cotton swabs or a microfiber cloth: Gently wipe the surface of the turntable belt with cotton swabs or a microfiber cloth. Start at one end of the belt and slowly work your way to the other end, applying light pressure to remove any dust or debris. Be careful not to stretch or twist the belt during the cleaning process.
- Optional: Use isopropyl alcohol: If the turntable belt is particularly dirty or sticky, you can dampen the cotton swab or cloth with a small amount of isopropyl alcohol. Make sure to use it sparingly and avoid letting it come into contact with other parts of the turntable.
- Allow the belt to dry: After cleaning the turntable belt, allow it to air dry completely before moving on to the next steps. This will ensure that no moisture or residue remains on the belt.
Cleaning the turntable belt helps remove any dirt, grime, or oils that may have accumulated over time, enabling smoother and more reliable operation. However, if you notice significant damage or wear on the belt during the cleaning process, it’s recommended to replace it with a new one. Cleaning alone may not be sufficient to resolve issues with speed stability or accuracy.
Now that the turntable belt is clean, it’s time to move on to the next step: identifying the correct replacement belt for your turntable.
Step 4: Identify the correct replacement belt
Before you can install a new turntable belt, it’s important to identify the correct replacement belt for your specific turntable model. Each turntable has unique specifications, and using the wrong belt can result in improper performance and potential damage to your equipment. Here are the steps to identify the correct replacement belt:
- Consult the user manual: The user manual that came with your turntable is the best place to start. It often provides detailed information about the turntable model, including the specific belt you need. Look for a section on belt replacement or parts list to find the correct part number or size.
- Visit the manufacturer’s website: If you don’t have the user manual or couldn’t find the necessary information, the manufacturer’s website is another valuable resource. Most manufacturers have customer support sections on their websites where you can search for your turntable model and find information about replacement parts.
- Online turntable belt retailers: There are numerous online retailers that specialize in turntable accessories and replacement parts. They often have searchable databases where you can enter your turntable model number or manufacturer to find the correct belt. These websites usually provide detailed descriptions and specifications as well.
- Turntable forums and communities: Turntable enthusiasts and online forums can also provide valuable insights and recommendations for finding the correct replacement belt. Joining these communities and asking for help can help you access the knowledge and experience of fellow vinyl lovers.
- Measure the old belt (if available): If you have the old belt, you can measure its length, width, and thickness using a measuring tape or ruler. This measurement can serve as a reference when searching for a replacement belt.
By following these steps, you should be able to identify the correct replacement belt for your turntable. Once you have the correct belt in hand, you can proceed to the next step: installing the new turntable belt.
Step 5: Install the new turntable belt
Now that you have the correct replacement belt for your turntable, it’s time to install it. Installing a new turntable belt may vary in method depending on your specific turntable model, so it’s important to consult the user manual for exact instructions. However, here’s a general guide to help you through the process:
- Power off and unplug the turntable: Before starting any installation or maintenance, ensure that your turntable is powered off and unplugged from the wall outlet. Safety should always be a top priority.
- Access the belt area: Refer to your turntable’s user manual to determine the correct access point for installing the new belt. This may involve removing a cover, a platter mat, or other components to expose the belt area.
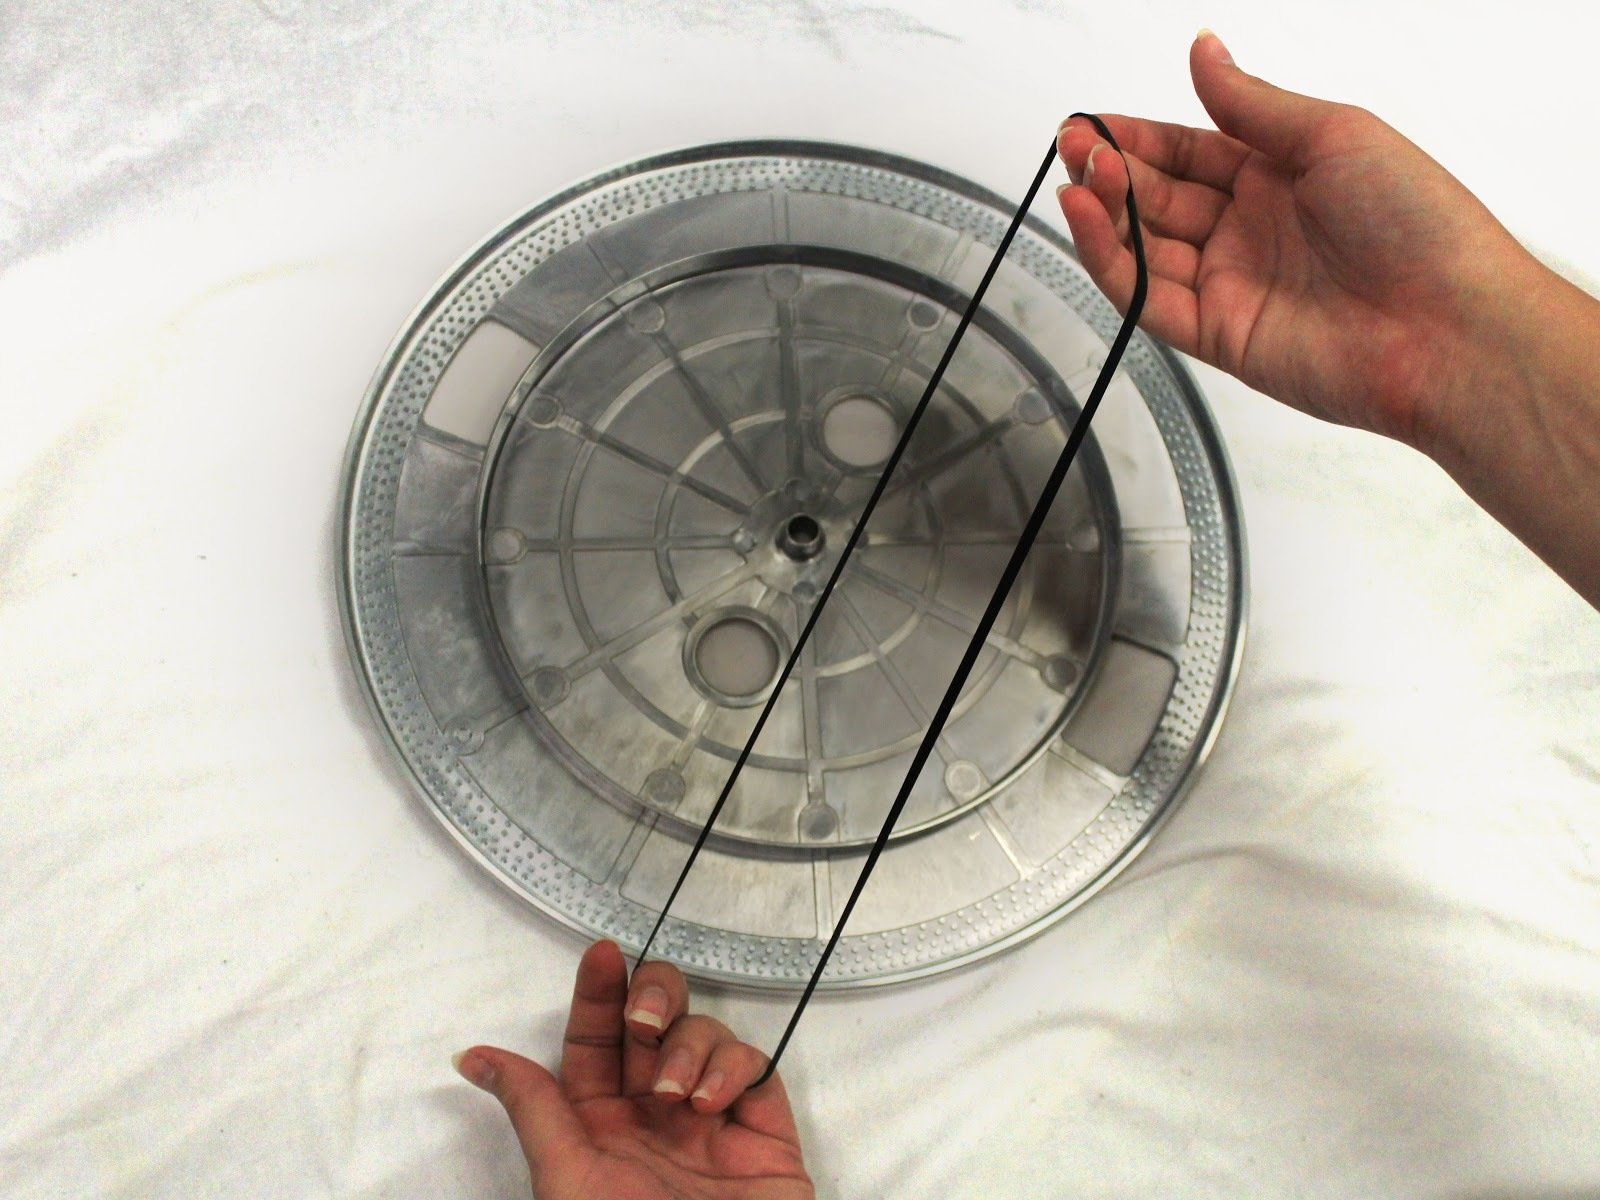
- Remove the old belt (if applicable): If you still have the old belt on the turntable, carefully lift it off and set it aside. Take note of how it was threaded around the motor and the platter as this will guide you during the installation of the new belt.
- Thread the new belt around the motor spindle: Place one end of the new belt around the motor spindle, ensuring a snug fit. The belt should be positioned so that it will rotate the platter at the correct speed.
- Thread the new belt around the platter: Carefully thread the other end of the belt around the outer rim of the platter. Be gentle to avoid stretching or damaging the belt.
- Tension the belt: Depending on your turntable model, there may be a method to adjust the tension of the belt. Follow the instructions in the user manual to ensure the belt has the correct tension for proper performance.
- Rotate the platter: Slowly rotate the platter by hand to ensure that the belt is properly seated and aligned. Check that it is running smoothly and is not slipping off or rubbing against any other components.
It’s important to note that the exact installation process may differ depending on your specific turntable model, so always refer to the user manual for any specific instructions or tips provided by the manufacturer.
With the new turntable belt installed, you’re ready to move on to the final step: reassembling your turntable.
Step 6: Reassemble the turntable
With the new turntable belt installed, it’s time to reassemble your turntable. This step involves putting back the components you removed earlier in the process, such as the platter and any covers or accessories. Here’s how to reassemble your turntable:
- Ensure the turntable is still powered off and unplugged from the wall outlet for safety reasons.
- If you removed a dust cover, carefully position it back onto the turntable. Ensure that it sits properly and does not interfere with the movement of the platter or the tonearm.
- Place the platter back onto the spindle, ensuring that it aligns properly with the drive mechanism. Take care not to disturb the newly installed belt during this process.
- Secure the platter: Depending on your turntable model, there may be a locking clip, rubber grommet, or spindle nut that needs to be reattached to secure the platter. Use your screwdriver or fingers to lock or tighten it, following the instructions provided in the user manual.
- Double-check the alignment: Once the platter is secured, double-check that it spins freely without any interference. Give it a gentle spin by hand to ensure smooth rotation.
- Connect any cables or wires: If you disconnected any cables or wires during the disassembly process, carefully reconnect them to their respective ports or terminals.
- Power on the turntable: Finally, plug the turntable back into a power source and power it on. Listen for any abnormal sounds or vibrations during startup, as these may indicate a misalignment or other issue that requires further adjustment.
Once you’ve completed the reassembly process, take a moment to celebrate! You have successfully put on a new turntable belt and reassembled your turntable. With proper maintenance and care, your turntable is now ready to deliver hours of high-quality vinyl playback experiences.
Remember, always refer to your turntable’s user manual for specific instructions and consult a professional if you encounter any difficulties or concerns during the process.
Congratulations on completing this comprehensive guide, and happy listening!
Conclusion
Congratulations! You’ve reached the end of this comprehensive guide on how to put on a turntable belt. By following the step-by-step instructions provided, you have successfully learned how to gather the necessary tools, remove the platter, clean the turntable belt, identify the correct replacement belt, install the new belt, and reassemble your turntable. Maintaining and replacing the turntable belt is an essential part of caring for your vinyl records and ensuring optimal performance from your turntable.
Remember, proper maintenance and care are key to preserving the life and sound quality of your vinyl collection. Regularly clean your turntable, keep it dust-free, and handle it with care. This will help prevent any issues with your turntable belt, such as stretching or breakage, and ensure a smooth and enjoyable listening experience.
If you encounter any difficulties during the process or have concerns about your specific turntable model, don’t hesitate to consult the user manual or seek assistance from a professional technician. They can provide tailored guidance and support to ensure that your turntable is operating at its best.
Now that you have the knowledge and confidence to put on a turntable belt, it’s time to enjoy the warm sound and nostalgia of your vinyl collection. Revel in the crackling of the needle on the record, immerse yourself in the album artwork, and rediscover the joy of vinyl music.
Thank you for taking the time to learn about turntable belt replacement. We hope this guide has been valuable in assisting you with maintaining and improving your vinyl playback setup. Happy spinning!