Home>Devices & Equipment>Microphone>How To Use Yeti Microphone On Mac
Microphone
How To Use Yeti Microphone On Mac
Published: February 17, 2024
Learn how to use a Yeti microphone on your Mac with our step-by-step guide. Get the best out of your microphone for clear and crisp audio recordings.
(Many of the links in this article redirect to a specific reviewed product. Your purchase of these products through affiliate links helps to generate commission for AudioLover.com, at no extra cost. Learn more)
Table of Contents
Introduction
Welcome to the world of professional-grade audio recording with the Yeti Microphone on your Mac! Whether you’re a podcaster, musician, voice-over artist, or simply someone who values high-quality sound, the Yeti Microphone is a powerful tool that can elevate your audio production to the next level. In this comprehensive guide, we’ll walk you through the process of setting up and using the Yeti Microphone on your Mac, along with valuable tips for optimizing its performance.
The Yeti Microphone, developed by Blue Microphones, has gained widespread acclaim for its exceptional sound quality, versatility, and user-friendly design. With its multiple recording patterns, such as cardioid, bidirectional, omnidirectional, and stereo, the Yeti is suitable for a wide range of recording applications, from solo vocal performances to group discussions and musical instrument recordings. Its plug-and-play functionality makes it an accessible choice for both beginners and experienced audio enthusiasts, while its durable construction ensures reliability for long-term use.
By the end of this guide, you’ll have a solid understanding of how to set up, configure, and maximize the potential of your Yeti Microphone on your Mac, empowering you to unleash your creativity and achieve professional-grade audio recordings from the comfort of your own workspace. Let’s dive in and explore the exciting world of audio recording with the Yeti Microphone!
Setting up the Yeti Microphone
Before diving into the recording process, it’s crucial to set up your Yeti Microphone correctly to ensure optimal performance. The initial setup involves connecting the microphone to your Mac and configuring it for use with your preferred recording software.
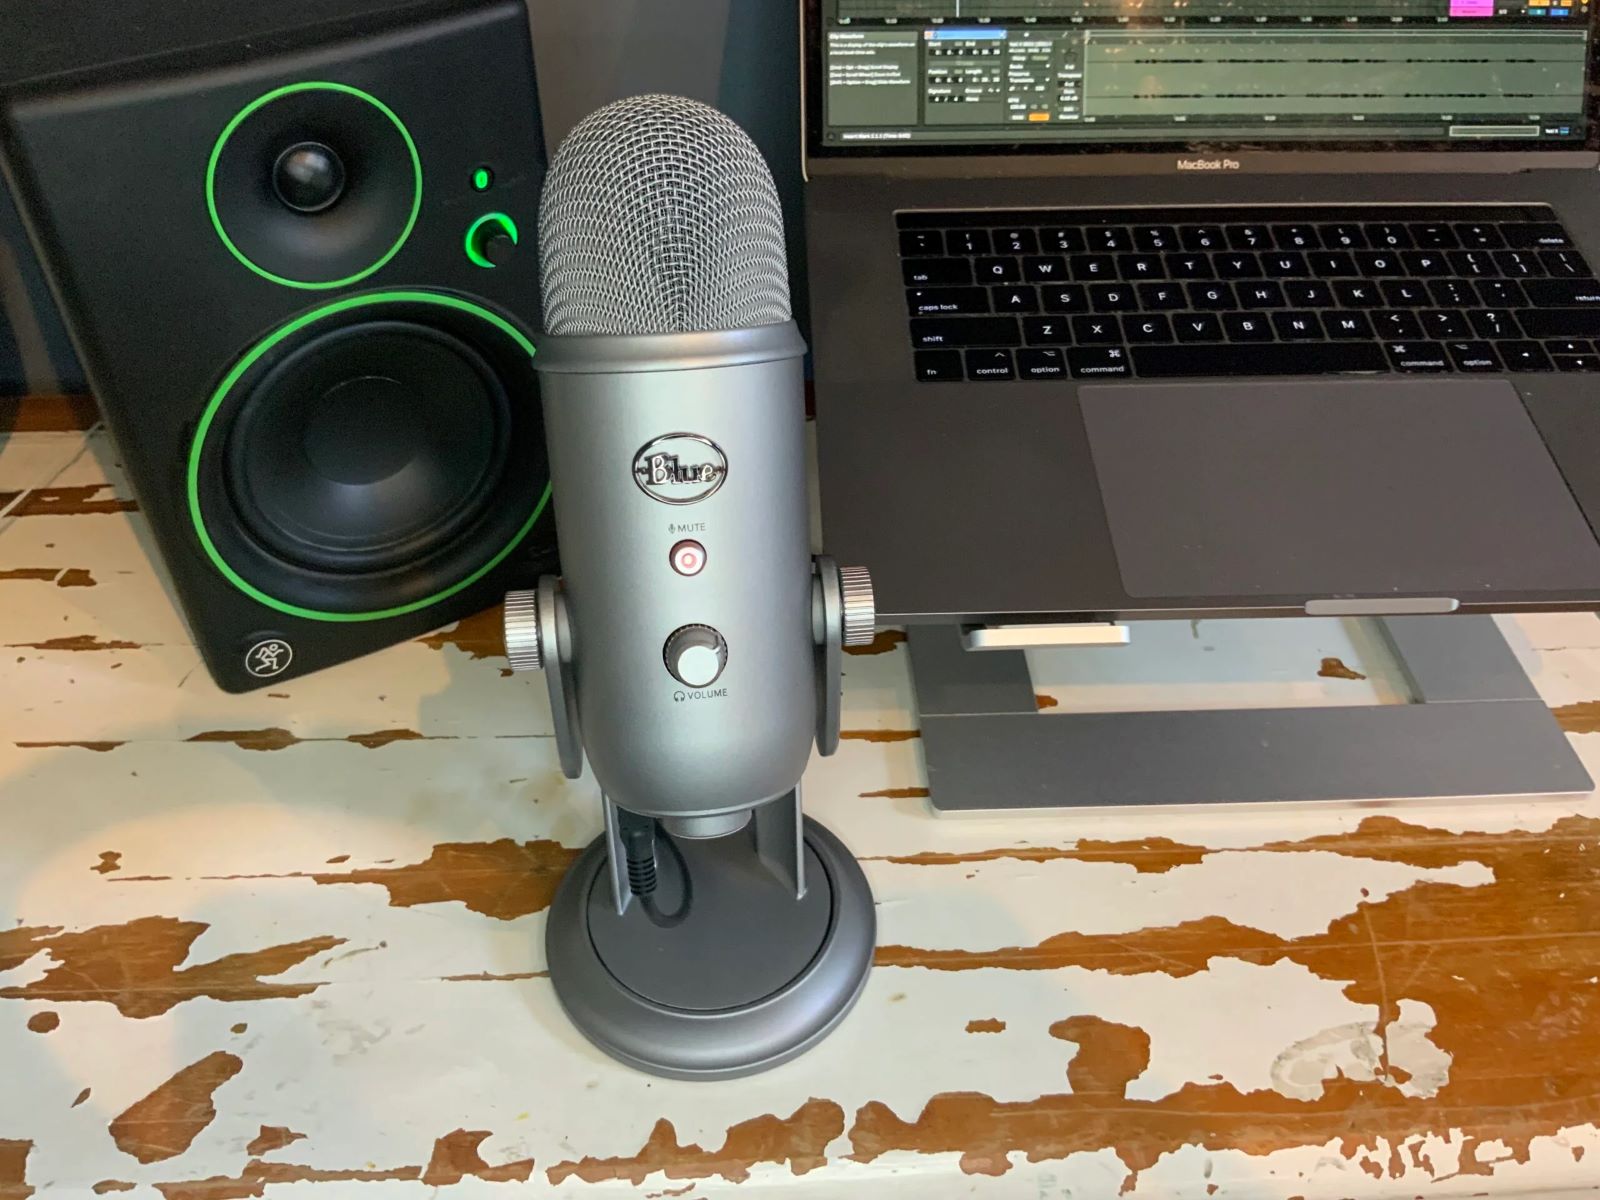
To begin, unpack the Yeti Microphone from its packaging and locate the USB cable included in the box. Connect one end of the USB cable to the micro-USB port on the Yeti Microphone and the other end to an available USB port on your Mac. Once connected, your Mac should automatically detect the microphone, and you’ll be ready to proceed with the configuration.
Upon connecting the Yeti Microphone, it’s advisable to visit Blue Microphones’ official website to download and install the latest version of the Yeti software. This software provides additional features and customization options for your microphone, allowing you to fine-tune its performance according to your specific recording needs.
Once the software is installed, you can proceed to adjust the physical settings of the Yeti Microphone. The microphone features a gain control knob, which allows you to adjust the input volume. It’s recommended to start with the gain control set to the midpoint and make further adjustments based on your recording environment and the sound source’s proximity to the microphone.
Additionally, the Yeti Microphone offers selectable polar patterns, which determine the directionality of the microphone’s audio capture. Depending on your recording scenario, you can choose between cardioid, bidirectional, omnidirectional, and stereo patterns to achieve the desired audio capture characteristics. Understanding the unique attributes of each pattern will enable you to make informed decisions regarding the most suitable pattern for your specific recording application.
With the physical and software setup complete, your Yeti Microphone is now primed and ready to deliver exceptional audio quality on your Mac. In the next section, we’ll delve into the process of adjusting the microphone settings on your Mac to ensure seamless integration with your recording software.
Adjusting Microphone Settings on Mac
After successfully setting up your Yeti Microphone, it’s essential to configure the microphone settings on your Mac to optimize its performance and compatibility with your preferred recording software. By fine-tuning the system settings, you can ensure that the microphone operates seamlessly and captures audio with the desired clarity and precision.
To begin, access the System Preferences on your Mac and navigate to the “Sound” settings. Within the “Input” tab, you should see the Yeti Microphone listed as an available input device. Select the Yeti Microphone from the list of input devices to designate it as the primary audio input source for your Mac.
Once the Yeti Microphone is selected as the input device, you can further refine its settings by adjusting the input volume level. It’s advisable to perform a test recording while monitoring the input volume levels to ensure that the audio signal remains within an optimal range, avoiding distortion or excessively low levels. By making subtle adjustments to the input volume, you can achieve a balanced audio input level that suits your recording requirements.
Depending on your recording environment and the nature of your audio projects, you may also need to configure additional settings, such as the sample rate and bit depth. These settings determine the quality and resolution of the audio captured by the microphone. Higher sample rates and bit depths can enhance the fidelity of the recorded audio, making them ideal for professional-grade recordings. However, it’s important to ensure that your recording software and Mac hardware support the selected sample rate and bit depth settings to avoid compatibility issues.
Furthermore, if you intend to use the Yeti Microphone for real-time monitoring or live streaming applications, you can enable the “Play through” or “Monitoring” feature within the microphone settings. This functionality allows you to hear the microphone’s input signal directly through your headphones or speakers, providing real-time feedback during recording sessions.
By customizing the microphone settings on your Mac, you can harness the full potential of the Yeti Microphone and tailor its performance to suit your specific recording preferences. With the microphone settings optimized, you’re now poised to embark on your recording journey and capture exceptional audio with confidence and precision.
Recording with the Yeti Microphone
Now that your Yeti Microphone is set up and its settings are adjusted on your Mac, you’re ready to embark on the exciting process of recording high-quality audio. Whether you’re engaging in podcasting, music production, voice-over work, or any other audio-related endeavor, the Yeti Microphone offers a versatile and reliable platform for capturing professional-grade sound on your Mac.
Before initiating the recording process, it’s important to select the appropriate recording software that best aligns with your specific audio production needs. There are numerous recording applications available for Mac, ranging from entry-level options to professional digital audio workstations (DAWs). Depending on your requirements, you can choose from popular software such as GarageBand, Logic Pro, Pro Tools, Audacity, or Adobe Audition, among others.
Once you’ve chosen the recording software, ensure that the Yeti Microphone is recognized as the designated input device within the software’s settings. This step is crucial for establishing a seamless connection between the microphone and the recording application, allowing you to commence recording without any technical hitches.
When positioning the Yeti Microphone for recording, consider the optimal placement based on the microphone’s selected polar pattern and the nature of the audio source. For solo vocal recordings or instrument performances, the cardioid pattern is commonly recommended to capture sound directly in front of the microphone while minimizing ambient noise from the surroundings. Conversely, for group discussions or ambient recordings, the omnidirectional or bidirectional patterns may be more suitable, depending on the desired audio capture characteristics.
Prior to commencing the actual recording, conduct a brief sound check to ensure that the microphone is capturing audio at the desired level and clarity. Adjust the input volume and microphone positioning as needed to achieve an optimal sound quality that aligns with your creative vision for the recording project.
Once you’re satisfied with the microphone setup and sound check, initiate the recording process within your chosen software and begin capturing the audio content. Whether you’re delivering a captivating vocal performance, laying down instrumental tracks, or conducting engaging interviews, the Yeti Microphone empowers you to capture the nuances and subtleties of sound with remarkable fidelity and precision.
Throughout the recording session, monitor the audio levels and performance of the Yeti Microphone to ensure consistent quality and adherence to your creative objectives. By leveraging the microphone’s versatile features and your Mac’s recording software, you can unleash your artistic potential and produce captivating audio content that resonates with your audience.
Troubleshooting Common Issues
While the Yeti Microphone is renowned for its exceptional performance and user-friendly design, encountering occasional technical issues is not uncommon. By familiarizing yourself with common troubleshooting strategies, you can swiftly address potential challenges and ensure a seamless recording experience with your Yeti Microphone on your Mac.
One prevalent issue that users may encounter is distorted or muffled audio during recordings. If you notice that the recorded audio exhibits distortion or lacks clarity, it’s advisable to revisit the microphone’s gain control settings. Adjust the gain knob to reduce the input volume and prevent the audio signal from peaking, thereby mitigating distortion and preserving the integrity of the recorded sound.
Intermittent connectivity issues between the Yeti Microphone and your Mac can also arise, leading to disruptions in the recording process. If you experience connectivity issues, such as the microphone disconnecting or failing to be recognized by your Mac, consider troubleshooting the USB connection. Try using a different USB cable or connecting the microphone to an alternative USB port on your Mac to determine if the issue is related to the cable or port connectivity.
Inconsistent audio capture or erratic microphone behavior may stem from outdated or incompatible drivers and software. To address this, ensure that you have installed the latest version of the Yeti software and that your Mac’s operating system is updated to the compatible software version. Additionally, periodically checking for firmware updates for the Yeti Microphone can help resolve potential software-related issues and improve overall performance.
If you encounter latency or synchronization issues while monitoring the microphone’s input signal during real-time recording, consider adjusting the buffer settings within your recording software. Modifying the buffer size can optimize the audio processing latency, minimizing delays between the microphone input and the audio output, thus enhancing the real-time monitoring experience.
Occasionally, environmental factors such as electromagnetic interference or ambient noise can impact the microphone’s performance. If you notice unwanted hums, buzzing, or background noise in your recordings, ensure that the microphone is positioned away from potential sources of interference, such as electrical devices or wireless routers. Additionally, utilizing acoustic treatment in your recording space can help minimize ambient noise and enhance the microphone’s signal-to-noise ratio.
By familiarizing yourself with these troubleshooting techniques and proactively addressing potential issues, you can optimize the performance of your Yeti Microphone on your Mac and ensure a seamless recording experience, empowering you to unleash your creativity and achieve exceptional audio results with confidence.