Home>Devices & Equipment>Subwoofer>How To Reduce Subwoofer Vibration Through Floor
Subwoofer
How To Reduce Subwoofer Vibration Through Floor
Modified: February 18, 2024
Learn how to minimize subwoofer vibrations through the floor with our expert tips and tricks. Enhance your audio experience without disturbing your neighbors!
(Many of the links in this article redirect to a specific reviewed product. Your purchase of these products through affiliate links helps to generate commission for AudioLover.com, at no extra cost. Learn more)
Table of Contents
Introduction
Welcome to the world of subwoofers, where powerful bass and immersive sound experiences reign supreme. Whether you’re a music lover, movie enthusiast, or gaming aficionado, a subwoofer can elevate your audio setup to new heights. However, along with the powerful bass comes the issue of subwoofer vibration.
Subwoofer vibration occurs when the low-frequency energy produced by the subwoofer causes the surrounding surfaces to resonate and vibrate. This can lead to unwanted rattling noises, distortion, and even structural damage if not addressed properly. The key to reducing subwoofer vibration is by effectively isolating the subwoofer from its surroundings.
In this article, we will explore various techniques and strategies to minimize subwoofer vibration through the floor. We’ll discuss the importance of choosing an appropriate subwoofer location, preparing the floor for installation, using isolation pads or feet, creating a subwoofer platform, and implementing additional soundproofing measures.
By implementing these techniques, you can enjoy powerful bass without the unwanted side effects of excessive subwoofer vibration. Whether you live in an apartment, a house, or any other living space, these steps can help you achieve a cleaner, more immersive audio experience.
So buckle up and get ready to dive into the world of subwoofers as we uncover the secrets to reducing subwoofer vibration through the floor!
Understanding Subwoofer Vibration
Before we delve into the techniques to reduce subwoofer vibration, it’s important to understand how and why it occurs. Subwoofer vibration is a result of the physical movement generated by the subwoofer’s speaker cone when it reproduces low-frequency sounds.
When the subwoofer produces deep bass, it creates powerful vibrations that can transfer to the surrounding surfaces, such as the floor. These vibrations cause the floor to resonate, resulting in unwanted rattling noises and even structural movements. This can be particularly problematic in apartments or shared spaces where minimizing noise and disturbances is crucial.
Subwoofer vibration can not only be bothersome but also impact the overall quality and clarity of sound produced by the subwoofer. If the subwoofer is in direct contact with a surface, the vibrations can be transmitted through it, causing distortion and muddying the bass response. Therefore, it’s crucial to find effective solutions to isolate the subwoofer and minimize its interaction with the floor.
Now that we have a better understanding of subwoofer vibration, we can explore the various methods to reduce its impact. In the following sections, we’ll discuss different techniques that can be employed to achieve cleaner, more immersive bass while maintaining a vibration-free environment.
Choosing an Appropriate Subwoofer Location
The location of your subwoofer plays a crucial role in minimizing vibrations and optimizing the overall sound quality. To choose the best spot for your subwoofer, consider the following factors:
- Room size and layout: Take into account the size and layout of the room where you plan to place the subwoofer. The dimensions and shape of the room can greatly affect the bass response and potential vibration issues.
- Bass nulls and peaks: Experiment with different locations within the room to find areas where bass nulls (quiet spots) and peaks (louder spots) are less prominent. This can help minimize uneven bass distribution and potential vibration issues.
- Distance from walls and corners: Ideally, position the subwoofer away from walls and corners to prevent excessive bass buildup, which can lead to increased vibration. Leave a sufficient gap between the subwoofer and any nearby surfaces.
- Furniture and objects: Avoid placing the subwoofer on or near furniture that may resonate or vibrate when exposed to the low-frequency energy. Similarly, keep the subwoofer away from fragile objects that could be damaged by vibrations.
- Accessibility: Consider the practicality of accessing the subwoofer for adjustments or maintenance. Ensure that the chosen location allows easy access to the controls and connections.
By carefully selecting an appropriate subwoofer location, you can minimize the potential for floor vibrations and create a more balanced and immersive audio experience. Take the time to experiment with different positions within the room to find the sweet spot that maximizes audio quality while minimizing vibration issues.
Preparing the Floor for Subwoofer Installation
Once you have chosen the ideal location for your subwoofer, it’s essential to prepare the floor to minimize vibrations. Here are some steps you can take to ensure a solid foundation:
- Clean the floor: Start by ensuring that the floor surface is clean and free from any debris that could potentially cause vibrations or rattling noises.
- Secure loose floorboards: If your flooring consists of loose floorboards, it’s crucial to secure them properly. Loose floorboards can vibrate and generate unwanted noise when the subwoofer is in operation. Consider nailing or screwing down any loose floorboards to minimize movement.
- Use carpet or rugs: If you have a hard or resonant floor surface, such as tile or hardwood, you can use carpet or rugs to help dampen vibrations. These soft materials provide additional insulation and absorb some of the energy transmitted by the subwoofer.
- Consider floor padding: For particularly problematic floors, you may want to use specialized floor padding or underlayment. These materials help reduce vibrations and isolate the subwoofer from the floor surface.
- Inspect the structural integrity: Before installing the subwoofer, check the floor for any signs of weakness or structural issues. It’s important to ensure that the floor can support the weight of the subwoofer and withstand any vibrations without causing damage.
By taking these steps to prepare the floor, you create a stable and vibration-resistant surface for your subwoofer. This not only helps reduce unwanted noise and rattling but also ensures that your subwoofer can deliver the best possible audio performance.
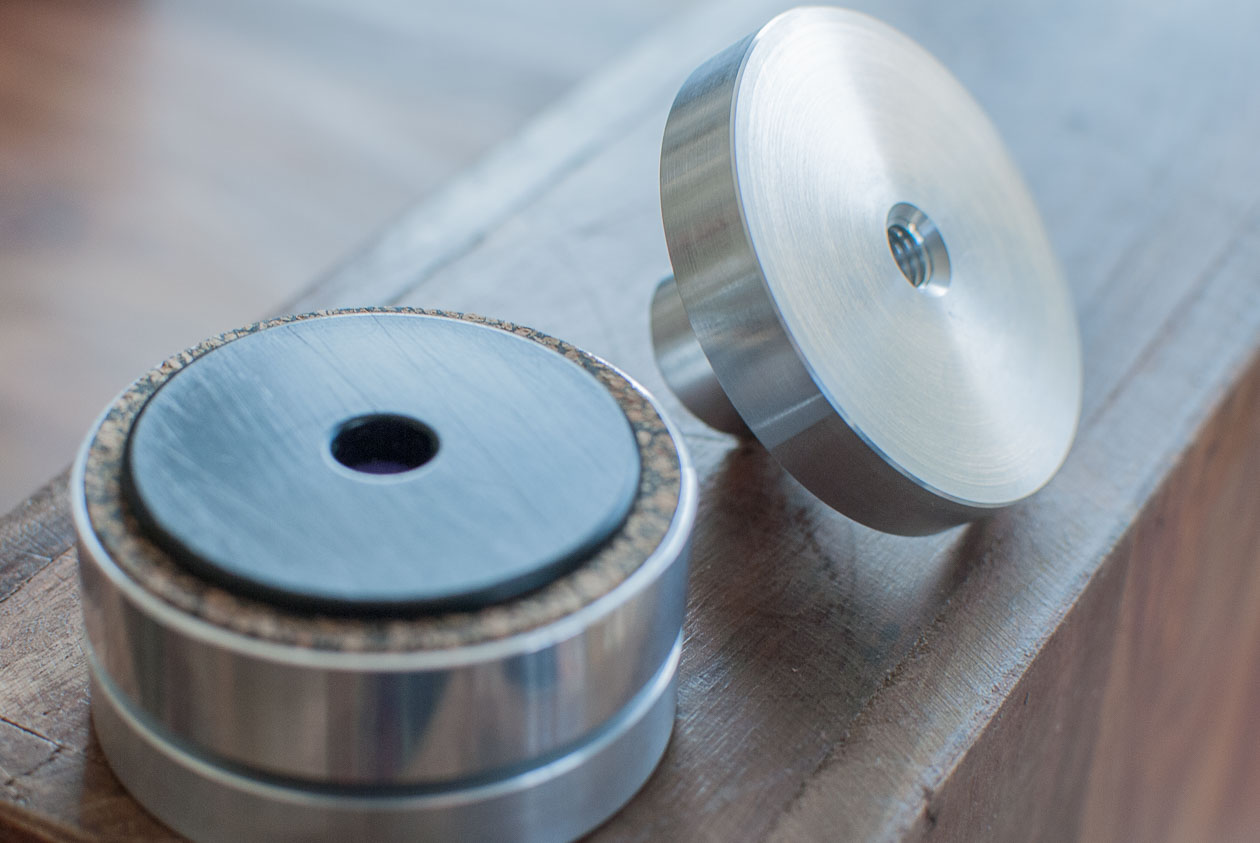
Using Isolation Pads or Feet
Isolation pads or feet are effective tools in reducing subwoofer vibrations and isolating it from the floor. These specialized pads or feet are designed to absorb and dampen vibrations, preventing them from transferring to the floor and causing unwanted noise. Here’s how you can use isolation pads or feet:
- Select the right type: Choose isolation pads or feet specifically designed for subwoofers. Look for materials that have excellent vibration-damping properties, such as rubber or neoprene.
- Check weight capacity: Ensure that the chosen isolation pads or feet can support the weight of your subwoofer. Consider the maximum weight capacity specified by the manufacturer.
- Place under the subwoofer: Gently lift the subwoofer and place the isolation pads or feet underneath it. Ensure that the pads or feet are positioned evenly and securely to distribute the weight and vibrations effectively.
- Level the subwoofer: Use a level tool to ensure that the subwoofer is leveled properly. This helps maintain stability and reduces the risk of excessive vibrations.
- Experiment with different configurations: Depending on your subwoofer and room setup, you may find that using a combination of isolation pads and feet yields the best results. Don’t be afraid to try different configurations to find what works best for your specific setup.
Isolation pads or feet provide a physical barrier between the subwoofer and the floor, effectively minimizing vibrations and reducing the potential for rattling or distorted sound. They are a relatively simple and affordable solution that can make a significant difference in achieving a cleaner and more enjoyable listening experience.
Creating a Subwoofer Platform
Another effective method to minimize subwoofer vibrations is by creating a dedicated platform for your subwoofer. A subwoofer platform helps further isolate the subwoofer from the floor, reducing the transmission of vibrations and enhancing audio performance. Here’s how you can create a subwoofer platform:
- Choose the platform material: Select a sturdy and vibration-resistant material for the platform, such as MDF (Medium-Density Fiberboard) or plywood. These materials provide stability and help absorb vibrations.
- Measure and cut the platform: Measure the dimensions of your subwoofer and mark them onto the selected material. Use a saw or appropriate cutting tool to carefully cut out the platform according to the measurements.
- Apply anti-vibration pads: Once you have the platform cut out, attach anti-vibration pads or foam to the bottom surface of the platform. These pads further isolate the platform and prevent vibrations from transferring to the floor.
- Place the subwoofer on the platform: Gently lift the subwoofer and place it on the created platform. Ensure that it is centered and positioned securely on the platform.
- Adjust the subwoofer position: Experiment with the placement of the subwoofer on the platform to find the optimal position. This may involve moving it forward or backward to achieve the best bass response and vibration reduction.
- Secure the subwoofer to the platform: Depending on the design of your subwoofer and platform, you may want to secure the subwoofer to the platform using screws or other fasteners. This adds an extra level of stability and prevents any potential movement during operation.
A dedicated subwoofer platform provides a solid base for your subwoofer, effectively minimizing vibrations and delivering cleaner and more precise bass. It’s a popular choice for audio enthusiasts who want to optimize their subwoofer’s performance and minimize any unwanted disruptions caused by vibrations.
Isolating the Subwoofer from the Floor
In addition to using isolation pads or a platform, there are other methods you can employ to further isolate your subwoofer from the floor. These techniques can make a significant difference in reducing subwoofer vibrations and enhancing audio performance. Here’s how you can isolate your subwoofer from the floor:
- Use decoupling devices: Decoupling devices, such as specialized isolation platforms or stands, are designed to separate the subwoofer from the floor, minimizing vibrations. These devices use materials like rubber or sorbothane to absorb vibrations and prevent them from transferring to the floor.
- Consider a subwoofer isolation cabinet: For maximum vibration reduction, you might want to explore the option of a subwoofer isolation cabinet. These cabinets are specifically designed to isolate the subwoofer and provide a controlled environment for optimal bass performance.
- Suspend the subwoofer: In some cases, suspending the subwoofer from the ceiling using appropriate mounts or brackets can effectively isolate it from the floor. This technique eliminates direct contact with the floor, minimizing vibrations.
- Employ mechanical decoupling: Mechanical decoupling involves using mechanical devices, such as springs or rubber mounts, to physically separate the subwoofer from the floor. These devices absorb vibrations and prevent them from propagating through the floor.
- Invest in subwoofer isolation accessories: There are various subwoofer isolation accessories available in the market, including specialized footers, spikes, or dampeners. These accessories help reduce vibrations and provide a more stable and isolated subwoofer setup.
By employing these isolation techniques, you can significantly reduce subwoofer vibrations and minimize the impact on your listening experience. The specific method you choose will depend on your budget, available space, and personal preferences, but any of these solutions can contribute to a cleaner and more immersive audio environment.
Using Additional Soundproofing Measures
While isolating the subwoofer from the floor helps minimize vibrations, implementing additional soundproofing measures can further enhance the listening experience and reduce noise leakage. Here are some techniques to consider:
- Soundproof the room: Apply soundproofing materials to the walls, ceilings, and floors of the room where the subwoofer is installed. Acoustic panels, soundproof curtains, and thick carpets can help absorb sound waves and prevent them from escaping the room.
- Seal gaps and cracks: Inspect the room for any gaps, cracks, or air leaks that may allow sound to escape. Use weatherstripping, caulk, or acoustic sealant to seal these areas and create a more soundproof environment.
- Use bass traps: Bass traps are acoustic treatment devices designed to absorb low-frequency sound waves. Placing bass traps in the corners of the room can help reduce bass buildup and minimize vibrations.
- Consider double drywall or mass-loaded vinyl: Installing double layers of drywall or using mass-loaded vinyl on walls and ceilings can provide an additional barrier to sound transmission and help contain the bass vibrations.
- Utilize bookshelves or storage units: Placing bookshelves or storage units filled with books or other dense materials against walls can help absorb sound and reduce reflections, creating a more controlled audio environment.
- Use sound isolation enclosures: If maximum soundproofing is required, consider using a sound isolation enclosure specifically designed for subwoofers. These enclosures create a sealed environment, minimizing sound leakage and vibrations.
Implementing these additional soundproofing measures can significantly improve the overall audio experience by reducing unwanted noise and creating a more immersive listening environment. Depending on your specific needs and budget, you can choose one or a combination of these techniques to achieve the desired level of sound isolation and quality.
Conclusion
Subwoofer vibration can be a nuisance, causing unwanted rattling noises, distortion, and even structural damage. However, by implementing the right techniques, you can significantly minimize subwoofer vibration through the floor and enhance your audio experience. In this article, we have explored various methods to achieve this goal.
Choosing an appropriate subwoofer location is the first step in reducing vibrations. Considering factors such as room size, bass nulls and peaks, and distance from walls and corners can help optimize the bass response and minimize vibration issues. Preparing the floor by cleaning it, securing loose floorboards, and using carpet or rugs can further dampen vibrations and prevent rattling sounds.
Using isolation pads or feet can effectively isolate the subwoofer from the floor and reduce vibrations. Additionally, creating a subwoofer platform provides a stable base and further minimizes vibrations. Alternatively, utilizing decoupling devices or suspending the subwoofer can isolate it from the floor.
To enhance soundproofing and reduce noise leakage, implementing additional measures such as soundproofing the room, sealing gaps and cracks, and using bass traps can make a significant difference. Double drywall or mass-loaded vinyl can provide added sound insulation, while bookshelves or storage units can absorb sound reflections.
By incorporating these techniques, you can create a controlled and immersive audio environment, enjoying powerful bass without the disturbances caused by subwoofer vibration. Experiment with different approaches to find the best combination that suits your specific requirements and budget.
So, take the necessary steps to reduce subwoofer vibration through the floor and elevate your audio experience to new heights!