Home>Devices & Equipment>Subwoofer>How To Fix Subwoofer Distortion

Subwoofer
How To Fix Subwoofer Distortion
Modified: February 18, 2024
Learn how to fix subwoofer distortion and enhance your audio experience. Our expert tips and troubleshooting techniques will help you resolve issues with your subwoofer for optimal sound quality.
(Many of the links in this article redirect to a specific reviewed product. Your purchase of these products through affiliate links helps to generate commission for AudioLover.com, at no extra cost. Learn more)
Table of Contents
- Introduction
- Understanding Subwoofer Distortion
- Common Causes of Subwoofer Distortion
- Identifying the Distorted Sound
- Steps to Fix Subwoofer Distortion
- Checking Audio Connections
- Adjusting the Subwoofer Level
- Setting the Crossover Frequency
- Testing Different Positions for Subwoofer Placement
- Updating Subwoofer Firmware
- Troubleshooting Other Possible Causes
- Conclusion
Introduction
Welcome to the world of subwoofers! These powerful speakers are designed to deliver deep bass frequencies, adding a whole new dimension to your audio experience. However, like any audio equipment, subwoofers can sometimes encounter issues, and one of the most common problems is distortion. If you’ve noticed a buzzing, rattling, or muddy sound coming from your subwoofer, don’t worry – you’re not alone.
Subwoofer distortion can be frustrating, as it can significantly impact the quality of your audio playback. Fortunately, there are steps you can take to troubleshoot and resolve this issue. In this article, we’ll explore the common causes of subwoofer distortion and provide you with practical solutions to fix it.
This guide is suitable for both beginners and seasoned audiophiles. Whether you have just purchased a new subwoofer or have been using one for years, understanding the causes of distortion and knowing how to address them will help you optimize your audio setup.
Before we dive into the solutions, let’s take a moment to understand what causes subwoofer distortion in the first place. By understanding the root causes, you’ll be better equipped to tackle the problem head-on.
Understanding Subwoofer Distortion
Subwoofer distortion occurs when the sound produced by the subwoofer deviates from its original, intended signal. Instead of delivering clean and accurate bass frequencies, you may experience unwanted artifacts such as buzzing, rattling, or muddiness in the audio. This distortion can be caused by various factors, including the subwoofer itself or external influences.
One of the primary causes of subwoofer distortion is overdriving the speaker. When a subwoofer is pushed beyond its limits, the speaker cone may start to distort, resulting in a loss of fidelity. This often happens when the volume is turned up too high, or the subwoofer is trying to reproduce frequencies that it cannot handle.
Another common cause of distortion is an improper crossover frequency setting. The crossover frequency determines the range of frequencies that the subwoofer handles. If the crossover frequency is set too high, the subwoofer may struggle to reproduce lower frequencies, resulting in distortion. On the other hand, if the crossover frequency is set too low, the subwoofer may try to produce frequencies that it cannot handle, leading to distortion as well.
Room acoustics can also contribute to subwoofer distortion. Factors such as the size and shape of the room, as well as the placement of the subwoofer, can affect the way low-frequency sound waves propagate. Reflections, resonances, and standing waves can interfere with the subwoofer’s performance, causing distortion in the audio playback.
Lastly, it’s important to note that subwoofer distortion can also be caused by problems in the audio source itself. Issues like clipping or distortion in the signal being fed to the subwoofer can result in distorted output.
By understanding the various causes of subwoofer distortion, you’ll be better equipped to troubleshoot and resolve the issue. In the next section, we’ll walk you through the process of identifying the distorted sound, which is a crucial step in the troubleshooting process.
Common Causes of Subwoofer Distortion
Subwoofer distortion can be caused by several factors, and understanding these common causes is essential in diagnosing and resolving the issue. Let’s take a closer look at some of the most frequent culprits:
- Overdriving the subwoofer: One of the primary causes of distortion is pushing the subwoofer beyond its limits. When the volume is turned up too high or when the subwoofer is asked to reproduce frequencies it cannot handle, the speaker cone may start to distort, resulting in a loss of audio clarity.
- Improper crossover frequency settings: The crossover frequency setting determines the range of frequencies that the subwoofer handles. If the crossover frequency is set too high, the subwoofer may struggle to reproduce lower frequencies accurately, leading to distortion. Conversely, if the crossover frequency is set too low, the subwoofer may try to produce frequencies outside its capability, resulting in distorted sound.
- Room acoustics: The size, shape, and furnishings of a room can significantly impact the audio experience. Issues like reflections, resonances, and standing waves can interfere with the performance of the subwoofer, causing distortion in the sound. Room treatments like acoustic panels and bass traps can help improve the acoustic environment and minimize distortion.
- Faulty audio connections: Incorrect or loose connections between the subwoofer, amplifier, and audio source can introduce noise and interference, leading to distorted sound. It is important to ensure that all audio connections are secure and properly plugged in.
- Clipping in the audio signal: Clipping occurs when the audio signal exceeds the maximum limit that the amplifier or subwoofer can handle. This can result in distorted output, as the amplifier tries to reproduce the clipped portions of the signal. Lowering the volume or adjusting the gain settings can help prevent clipping and reduce distortion.
By considering these common causes, you can begin to narrow down the possible sources of distortion in your subwoofer. In the next section, we’ll discuss how to identify the distorted sound, which will further assist you in troubleshooting the issue.
Identifying the Distorted Sound
Before addressing subwoofer distortion, it’s crucial to correctly identify the distorted sound and determine its cause. By doing so, you can refine your troubleshooting efforts and target the specific issue more effectively. Here are a few steps to help you identify the distorted sound:
- Listen closely: Pay attention to the audio playback and try to discern any unusual sounds. Distorted subwoofer output may manifest as buzzing, rattling, or muddy bass frequencies. Take note of when the distortion occurs, such as during specific songs or at certain volume levels.
- Isolate the subwoofer: Disconnect all other speakers in your audio setup temporarily. This will allow you to focus solely on the subwoofer’s performance and isolate any potential distortion sources from other speakers or audio equipment.
- Test different audio sources: Play audio from various sources, such as CDs, streaming platforms, or different audio files. This can help determine if the distortion is specific to a particular source or consistent across all audio playback.
- Adjust the subwoofer settings: Take note of the current subwoofer settings, including volume level, crossover frequency, and phase. Make small adjustments to these settings and listen for any changes in the distorted sound. This can help narrow down the possible causes and guide your troubleshooting process.
- Utilize a sound meter or audio analysis software: If available, use a sound meter or audio analysis software to measure the sound levels and frequency response of your subwoofer. This can provide objective data and help identify any irregularities in the subwoofer’s output.
By following these steps, you can gain a better understanding of the nature and source of the subwoofer distortion. Once you have identified the distorted sound and potential causes, you can proceed to take the necessary steps to fix the issue, which we will explore in the next section.
Steps to Fix Subwoofer Distortion
Now that you have identified the distorted sound and have a clearer understanding of its potential causes, it’s time to take the necessary steps to fix subwoofer distortion. Follow these steps to address the issue and optimize your subwoofer performance:
- Check audio connections: Ensure that all audio connections between the subwoofer, amplifier, and audio source are secure and properly plugged in. Loose or faulty connections can introduce noise and interference, leading to distorted sound. Reconnect or replace any faulty cables to eliminate this possibility.
- Adjust subwoofer level: Fine-tune the volume level of the subwoofer. Start by setting the volume to a moderate level and gradually increase it until the sound is clear and free from distortion. Be mindful of not overdriving the subwoofer, as this can cause further distortion.
- Set the crossover frequency: Determine the appropriate crossover frequency for your audio system. This setting depends on the capabilities of your speakers and subwoofer. Start with a higher crossover frequency and gradually lower it until you achieve a smooth transition between the main speakers and the subwoofer. Avoid setting the crossover frequency too high or too low to prevent distortion.
- Experiment with subwoofer placement: Test different positions for your subwoofer in the room. Placing the subwoofer in a corner or against a wall can help enhance bass response, but it may also introduce additional distortion due to room acoustics. Try positioning the subwoofer in different locations to find the optimal spot that offers balanced bass and minimizes distortion.
- Update subwoofer firmware: Check for firmware updates for your subwoofer model. Manufacturers often release firmware updates to address performance issues or improve compatibility. Refer to the user manual or the manufacturer’s website for instructions on how to update the firmware correctly.
- Troubleshoot other possible causes: If the above steps do not resolve the distortion issue, consider other potential causes such as amplifier problems, faulty subwoofer components, or issues with the audio source. Consult the user manual, contact customer support, or seek professional assistance to troubleshoot and resolve these more complex issues.
By following these steps, you can effectively tackle subwoofer distortion and enhance your audio experience. Remember, patience and experimentation may be required to find the optimal settings and configuration for your specific setup. In the next sections, we will delve deeper into some of these steps to provide you with more detailed instructions on how to address specific aspects of subwoofer distortion.
Checking Audio Connections
One of the first steps in troubleshooting subwoofer distortion is to ensure that all audio connections are properly established. Loose or faulty connections can introduce unwanted noise and interference, leading to distorted sound. Follow these steps to check and secure your audio connections:
- Inspect the cable connections: Begin by visually inspecting the audio cables connecting the subwoofer to the amplifier and audio source. Look for any visible damage or loose connections. If you notice any issues, replace the cables with high-quality ones.
- Unplug and reconnect the cables: Carefully unplug and reconnect the audio cables at both ends. Ensure that the plugs fit securely into the corresponding ports. Use gentle pressure to make a firm connection, but avoid using excessive force that could damage the connectors.
- Test alternative audio cables: If possible, try using different audio cables to rule out the possibility of a faulty cable. Swap the existing cables with known-working ones to see if the distortion issue persists. This step can help identify whether the distortion is caused by a faulty cable.
- Ensure correct connections: Double-check that each cable is plugged into its designated port. For example, the cable from the amplifier’s subwoofer output should be connected to the corresponding input on the subwoofer. Consult the user manual for your specific equipment if you’re unsure about the correct connections.
- Verify power connections: Ensure that the subwoofer is properly connected to a power source and turned on. Check the power cable for any signs of damage and make sure it is securely plugged into a functioning power outlet.
- Eliminate potential sources of interference: Keep audio cables away from other electrical cables, power adapters, or sources of electromagnetic interference, as these can introduce unwanted noise into the audio signal. If necessary, use cable management solutions or separate the cables to minimize interference.
Once you have checked and secured the audio connections, test the audio playback to see if the subwoofer distortion issue has been resolved. If you still experience distortion, proceed to the next step in the troubleshooting process.
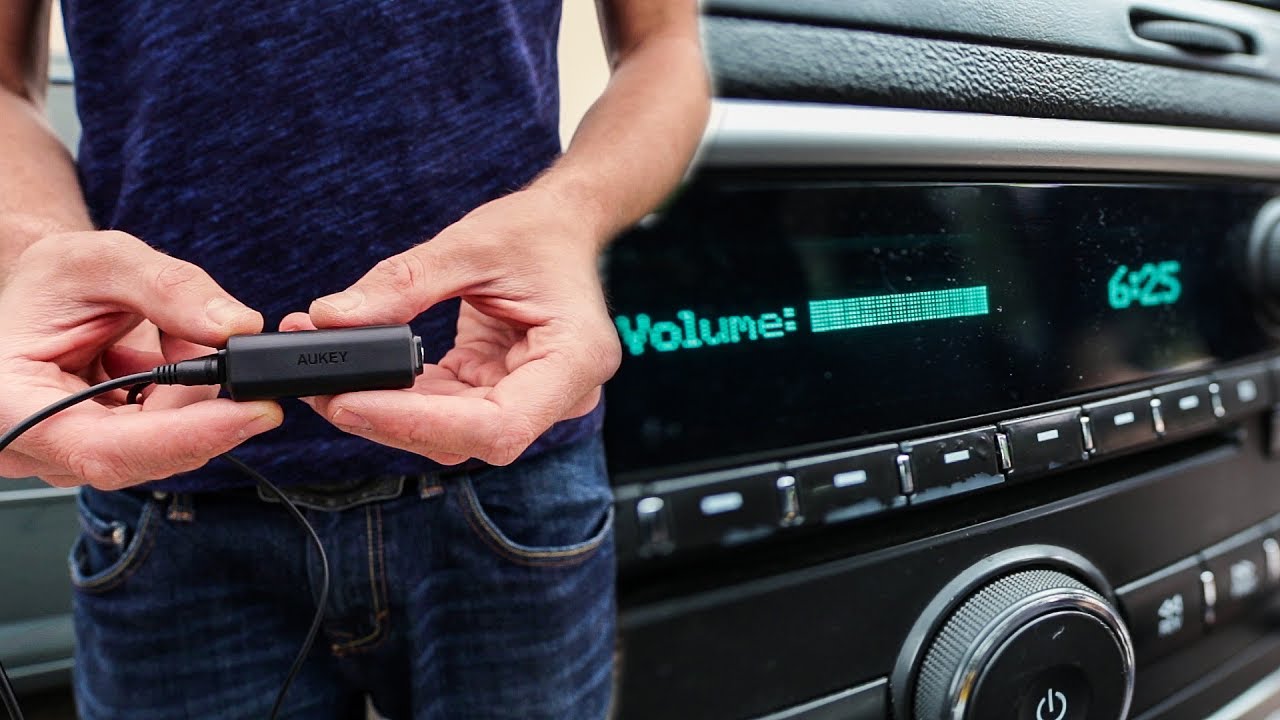
Adjusting the Subwoofer Level
Another important step in fixing subwoofer distortion is adjusting the level of the subwoofer. The volume level of the subwoofer plays a significant role in achieving a balanced and distortion-free audio experience. Follow these steps to properly adjust the subwoofer level:
- Set the subwoofer at a moderate volume: Start by setting the subwoofer volume at a moderate level. This allows you to make precise adjustments without overdriving the subwoofer.
- Play a variety of audio sources: Test your subwoofer with different types of audio, such as music with diverse bass frequencies, movies with intense sound effects, or audio tracks specifically designed for testing subwoofers. This will help you assess the subwoofer’s performance across a range of sounds and identify any distortion or imbalance.
- Listen for clarity and balance: Pay close attention to the bass produced by the subwoofer. Does it sound clear and well-defined, or does it sound muffled or distorted? Adjust the subwoofer level up or down until you achieve a balanced and distortion-free bass response.
- Compare subwoofer volume to the main speakers: Ensure that the subwoofer volume is properly balanced with the main speakers. The subwoofer should add depth and impact to the overall audio without overpowering the other speakers. Aim for a smooth integration between the subwoofer and the main speakers.
- Experiment with small adjustments: Fine-tune the subwoofer level in small increments. Gradually increase or decrease the volume level and listen for changes in the audio. Take your time to find the ideal level that provides a full, rich bass without any distortion.
- Take note of the recommended range: Refer to the user manual or manufacturer’s specifications for the recommended operating range of the subwoofer volume. Staying within this range ensures optimal performance and can help prevent distortion.
Remember, each audio system and room configuration may require different subwoofer levels. It’s important to trust your ears and make adjustments based on your personal preferences and the characteristics of your equipment. By properly adjusting the subwoofer level, you can enhance the overall audio experience and minimize distortion for a more enjoyable sound output.
Setting the Crossover Frequency
Configuring the crossover frequency is a crucial step in optimizing the performance of your subwoofer and preventing distortion. The crossover frequency determines the point at which the subwoofer takes over the reproduction of lower frequencies from the main speakers. Follow these steps to properly set the crossover frequency:
- Understand the capabilities of your speakers and subwoofer: Consult the user manual or manufacturer’s specifications to determine the recommended frequency range for your speakers and subwoofer. Knowing the frequency response of your audio equipment will help you make informed decisions when setting the crossover frequency.
- Start with a higher crossover frequency: Begin by setting the crossover frequency on the higher end of the recommended range. For example, if your speakers are rated to handle frequencies down to 80Hz, you can initially set the crossover frequency around 80Hz.
- Play audio with a mix of bass and midrange content: Choose audio tracks that contain a combination of bass and midrange frequencies to properly evaluate the subwoofer’s performance. This can include music with prominent basslines or movie soundtracks with deep rumbling effects.
- Listen for a smooth transition: Pay close attention to the audio playback and listen for a seamless transition between the main speakers and the subwoofer. There should be no noticeable gaps or inconsistency in the frequency response as the sounds move from the main speakers to the subwoofer.
- Gradually lower the crossover frequency: If the sound doesn’t blend smoothly or you notice distortion in the bass, gradually lower the crossover frequency in small increments (e.g., 5Hz or 10Hz at a time). Test the audio playback after each adjustment to find the optimal frequency that provides a seamless integration and avoids distortion.
- Consider room acoustics: Keep in mind that room acoustics can influence the optimal crossover frequency. Large rooms or those with significant sound reflection may require a slightly higher crossover frequency to compensate for the additional bass decay. Experiment with different crossover settings to find the best balance between room acoustics and subwoofer performance.
Setting the proper crossover frequency ensures that the subwoofer handles the low-frequency content effectively, preventing distortion and allowing for a more accurate and balanced audio reproduction. Take your time to find the ideal crossover frequency that works harmoniously with your speakers and room acoustics for an enhanced listening experience.
Testing Different Positions for Subwoofer Placement
The placement of your subwoofer plays a significant role in its performance and the prevention of distortion. The position in which you place your subwoofer can greatly impact its ability to reproduce low-frequency sounds accurately. By experimenting with different placements, you can find the optimal position that minimizes distortion and enhances the overall audio experience. Follow these steps to test different positions for subwoofer placement:
- Start with the manufacturer’s recommendations: Consult the user manual or the manufacturer’s recommendations for general guidelines on subwoofer placement. This will provide you with a starting point for testing different positions.
- Place the subwoofer near the listening area: Begin by placing the subwoofer close to the main listening area. This can be next to or near the front or center speaker setup. Position it at ear level or slightly above for the best sound distribution.
- Play familiar audio content: Choose audio content that you are familiar with, such as music or movies, that contains a mix of bass frequencies. This will allow you to better evaluate the impact of the subwoofer’s placement on the overall sound quality.
- Test different placements around the room: Move the subwoofer to different locations around the room while keeping the same listening position. Start by placing the subwoofer along the front wall, then gradually move it around to different corners, sidewalls, or even at the back of the room.
- Listen for changes in bass response: As you move the subwoofer, pay close attention to any changes in the bass response. Listen for any increase or decrease in bass impact, clarity, or potential distortion. Take note of the specific placements that result in the best bass performance.
- Consider room acoustics: Keep in mind that room acoustics can influence subwoofer performance. Large rooms or those with hard, reflective surfaces may cause bass reflections that can lead to distortion. Experiment with subwoofer placement to find the position that minimizes these reflections and produces the most even bass response.
- Utilize bass traps and acoustic treatments: If you encounter issues with bass distortion or uneven response, consider using bass traps and other acoustic treatments. These products can help absorb excess bass energy and improve the overall sound quality in the room.
Through this experimentation process, you will be able to identify the ideal placement for your subwoofer that delivers clear and distortion-free bass. Remember that each room is unique, and the best placement may vary depending on the room size, shape, and furnishings. Patience and careful listening will help you find the perfect spot for your subwoofer that optimizes its performance and minimizes distortion.
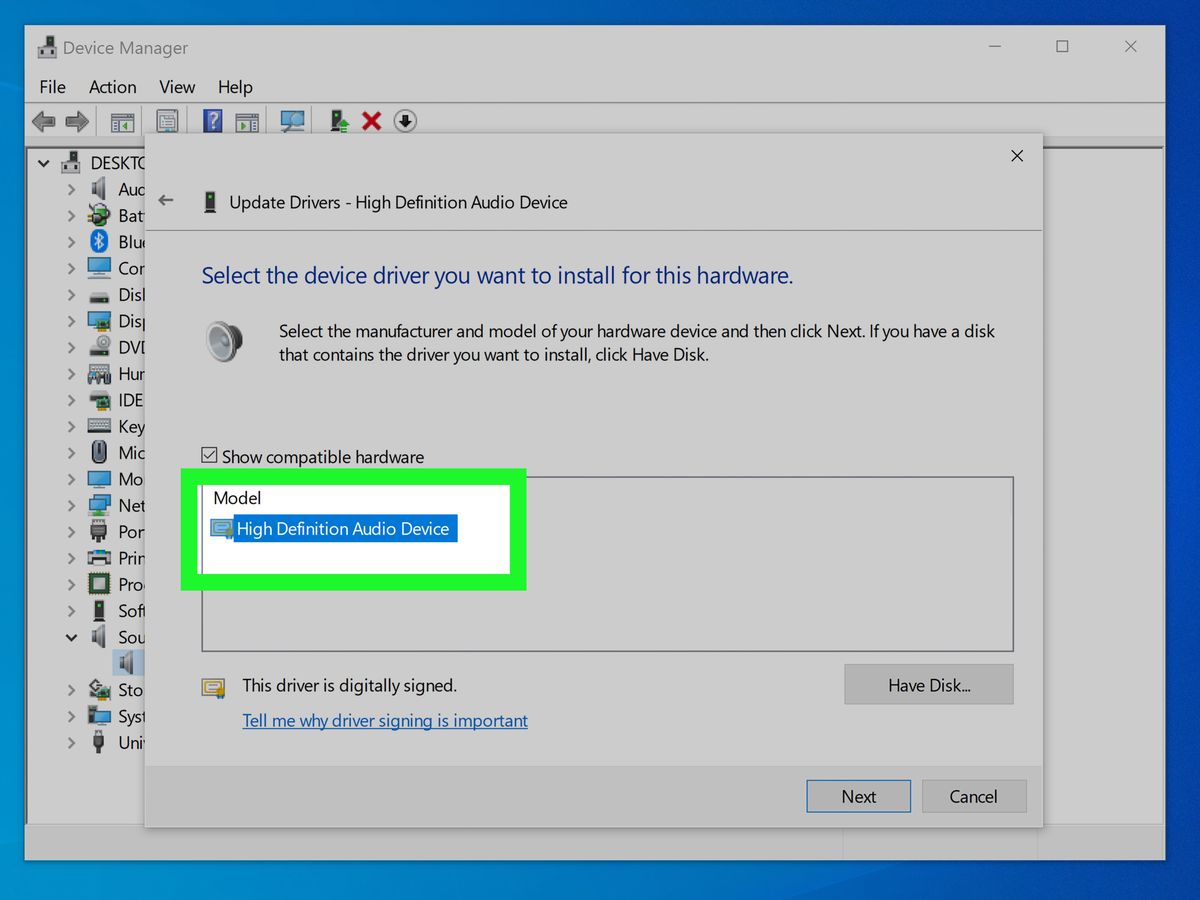
Updating Subwoofer Firmware
Updating the firmware of your subwoofer is an essential step in troubleshooting subwoofer distortion. Manufacturers often release firmware updates to address performance issues, improve compatibility with audio sources, and enhance overall functionality. Here’s a guide on how to update your subwoofer firmware:
- Check the manufacturer’s website: Visit the manufacturer’s website to check if there are any available firmware updates for your specific subwoofer model. Look for a support or downloads section where you can find the latest firmware version.
- Download the firmware: Locate and download the firmware file that corresponds to your subwoofer model. Ensure that you download the correct firmware version to avoid compatibility issues.
- Read the instructions carefully: Most manufacturers provide detailed instructions on how to update the firmware. It’s important to read and understand these instructions thoroughly before proceeding with the update process.
- Prepare the subwoofer: Make sure the subwoofer is powered on and properly connected to your audio system. Check that the subwoofer is in a stable condition and not in use during the firmware update process.
- Connect the subwoofer to your computer: Depending on the manufacturer’s instructions, you may need to connect your subwoofer to your computer using a USB cable or another designated connection method. Follow the specific instructions provided to establish the connection.
- Run the firmware update software: Open the firmware update software that you downloaded from the manufacturer’s website. Follow the on-screen instructions to initiate the firmware update process. This may involve selecting the firmware file you downloaded and following any prompts or warnings provided.
- Wait for the firmware update to complete: Allow the firmware update to proceed without interruption. The update process may take a few minutes, during which the subwoofer may display various indicators or notifications. Avoid turning off the power or disconnecting the subwoofer during the update process to prevent any firmware corruption.
- Restart the subwoofer: Once the firmware update is complete, follow any additional instructions provided by the firmware update software or the manufacturer. This may include restarting the subwoofer or disconnecting and reconnecting it to the audio system.
- Test for improved performance: After updating the firmware, play audio content and listen for any improvements in the subwoofer’s performance. Monitor for any reduction in distortion or other issues that may have been addressed by the firmware update.
Regularly checking for firmware updates and keeping your subwoofer’s firmware up to date can help maintain optimal performance, prevent potential issues, and reduce distortion. Be sure to follow the manufacturer’s instructions carefully and exercise caution during the firmware update process to ensure a successful update without any complications.
Troubleshooting Other Possible Causes
If you have followed the previous steps and are still experiencing subwoofer distortion, it’s important to consider and troubleshoot other potential causes. While the most common issues have been addressed, there may be other factors contributing to the distortion. Here are some additional troubleshooting steps to help you address any persistent distortion:
- Check the amplifier: Ensure that the amplifier driving the subwoofer is functioning correctly. Examine all the connections, settings, and controls on the amplifier. Test the subwoofer with a different amplifier or audio system to determine if the distortion is specific to the amplifier.
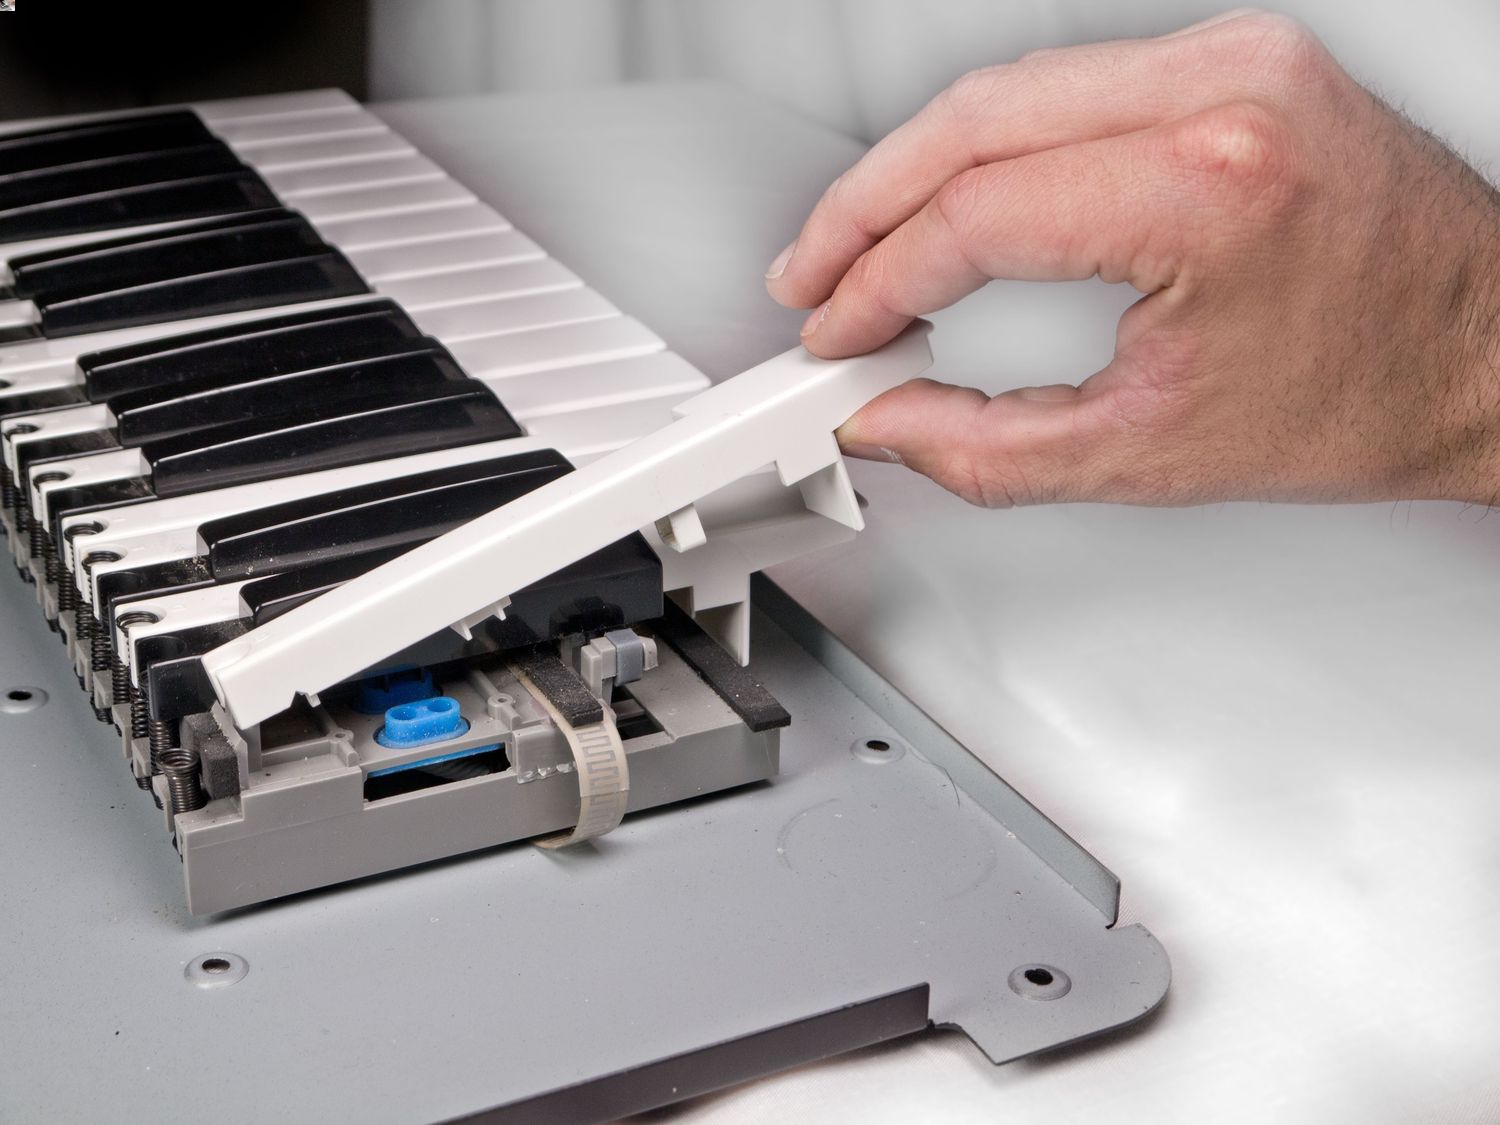
- Inspect the subwoofer components: Carefully examine the subwoofer’s cone, surround, and voice coil for any visible signs of damage. A damaged subwoofer component can lead to distortion. If you notice any issues, consider contacting the manufacturer for repair or replacement options.
- Test with different audio sources: Try connecting the subwoofer to different audio sources such as a different audio system, receiver, or music player. This will help identify if the distortion is specific to a particular audio source or if it persists across different sources.
- Verify audio settings: Double-check all audio settings on your audio source, receiver, or amplifier. Ensure that equalization, bass management, or other audio enhancement features are appropriately configured and not introducing distortion or altering the subwoofer’s performance.
- Seek professional assistance: If you have exhausted all possible troubleshooting steps and the subwoofer distortion persists, it may be advisable to seek professional assistance. Contact the manufacturer’s customer support, a trusted audio technician, or a knowledgeable audio specialist who can diagnose the issue more accurately and provide specialized guidance.
Remember, each audio setup is unique, and subwoofer distortion can have multiple causes. Applying these additional troubleshooting steps will help you identify and resolve any underlying issues that may be contributing to the distortion. Persistence and careful examination of all potential causes will lead to a better understanding of the problem and increase the likelihood of finding a resolution.
Conclusion
Subwoofer distortion can be frustrating, but with the right troubleshooting steps, you can overcome this issue and fully enjoy the powerful bass that subwoofers offer. By understanding the common causes of subwoofer distortion, such as overdriving the speaker or improper crossover settings, you can pinpoint the specific problem and take targeted actions to fix it.
Throughout the troubleshooting process, it’s crucial to test and assess the distorted sound, check audio connections, adjust the subwoofer level, set the appropriate crossover frequency, experiment with different subwoofer placements, and even update the subwoofer firmware if necessary. These steps will help optimize your subwoofer’s performance, minimize distortion, and provide a more immersive audio experience.
In some cases, troubleshooting may not completely resolve the distortion issue. When this happens, it may be beneficial to seek professional assistance. An audio technician or manufacturer’s customer support can provide expert guidance and ensure that all potential causes have been thoroughly explored.
Remember that each audio system and room configuration are unique, so patience and experimentation are key. By following the troubleshooting steps in a systematic and methodical manner, you will be able to diagnose and resolve subwoofer distortion, bringing out the full potential of your audio setup.
Now, armed with this knowledge and understanding, you can confidently address subwoofer distortion and enjoy a rich, distortion-free bass experience that enhances your audio playback. Happy listening!