Home>Events & Info>Acapella>How To Turn A Song Acapella

Acapella
How To Turn A Song Acapella
Published: January 3, 2024
Learn how to turn any song into an acapella masterpiece using simple techniques and tools. Transform your favorite tracks into captivating acapella renditions and showcase your musical talent.
(Many of the links in this article redirect to a specific reviewed product. Your purchase of these products through affiliate links helps to generate commission for AudioLover.com, at no extra cost. Learn more)
Table of Contents
Introduction
Have you ever wondered how to transform your favorite song into an acapella version? Acapella music, with its enchanting harmonies and raw vocals, has a captivating and unique appeal. Whether you’re an aspiring musician or simply enjoy experimenting with audio, learning how to turn a song into an acapella can be a rewarding experience.
In this article, we will take you through a step-by-step guide on how to turn a complete song into an acapella masterpiece. From choosing the right song to isolating the vocals and applying audio effects, we’ll cover all the essential techniques to help you achieve professional-sounding results.
But first, let’s clarify what acapella actually means. Acapella music refers to vocal performances without any instrumental accompaniment. It allows the listener to focus on the raw talent of the singers and the intricate harmonies they create. Turning a full song into an acapella version requires separating the vocals from the rest of the audio and enhancing them to create a standalone vocal track.
Whether you’re looking to create your own acapella covers, remixes, or simply enjoy immersing yourself in the beauty of vocal harmonies, this guide is here to help you turn your musical vision into reality. So, let’s dive in and discover how to transform a regular song into an extraordinary acapella masterpiece!
Step 1: Choose a Song
The first step in transforming a song into an acapella version is selecting the right track. It’s crucial to choose a song that will lend itself well to being stripped down to just vocals. Here are some factors to consider when selecting a song:
- Clear Vocals: Look for songs with clear and distinct vocals that stand out from the instrumental parts. This will make it easier to isolate the vocals later on in the process.
- Simple Instrumentation: Opt for songs that have relatively simple instrumental arrangements. Complex arrangements with intricate layering of instruments may make it more difficult to isolate the vocals effectively.
- Familiarity: Choose a song that you are familiar with and enjoy. Working on a song that you love will make the process more enjoyable and inspire you to put in the necessary effort.
- Variety: Experiment with different genres and styles to explore the versatility of acapella music. From pop and rock to R&B and jazz, there are endless possibilities for transforming songs into acapella versions.
Once you have a song in mind, make sure you have a high-quality audio file of the original version. This will ensure better results when isolating the vocals in the subsequent steps. Look for high-resolution audio files or lossless formats like WAV or FLAC for the best outcome.
Remember, the process of turning a song into an acapella requires precision and patience. So take your time in selecting the perfect song and setting yourself up for success in the next steps.
Step 2: Find the Instrumental Version
After choosing the song for your acapella project, the next step is to find the instrumental version of that song. The instrumental version is a track that contains all the original music elements without any vocals. Here’s how you can find the instrumental version:
- Check Official Releases: Start by checking if the artist or the record label has released an official instrumental version of the song. Many artists release instrumental versions of their tracks, especially for promotional purposes. Look for official music releases, special editions, or remixes that include instrumentals.
- Search Online Databases: If you can’t find the official instrumental version, search online databases, such as music streaming platforms, forums, or websites dedicated to acapella music. These platforms often have user-contributed instrumental tracks that you can download or use for your acapella project.
- Remake the Instrumental: If you can’t find the instrumental version anywhere, you can try to recreate it yourself. Listen closely to the original song and try to identify the different instruments and their melodies. Then, using music production software or instruments, recreate the instrumental elements of the song.
Remember to choose the instrumental version that closely matches the original song. It should have the same tempo, key, and overall sound to ensure a seamless transition when combining it with the vocals later on. Pay attention to the quality of the instrumental version as well, ensuring that it is clear, without any distortion or noise.
Finding the instrumental version may take some effort, but it’s an essential step in the process. Having the instrumental track ready will allow you to isolate and extract the vocals effectively in the subsequent steps.
Step 3: Isolate the Vocals
Once you have the instrumental version of the song, it’s time to isolate the vocals from the original track. This step involves separating the vocals from the rest of the audio to create a standalone vocal track. Here’s how you can isolate the vocals:
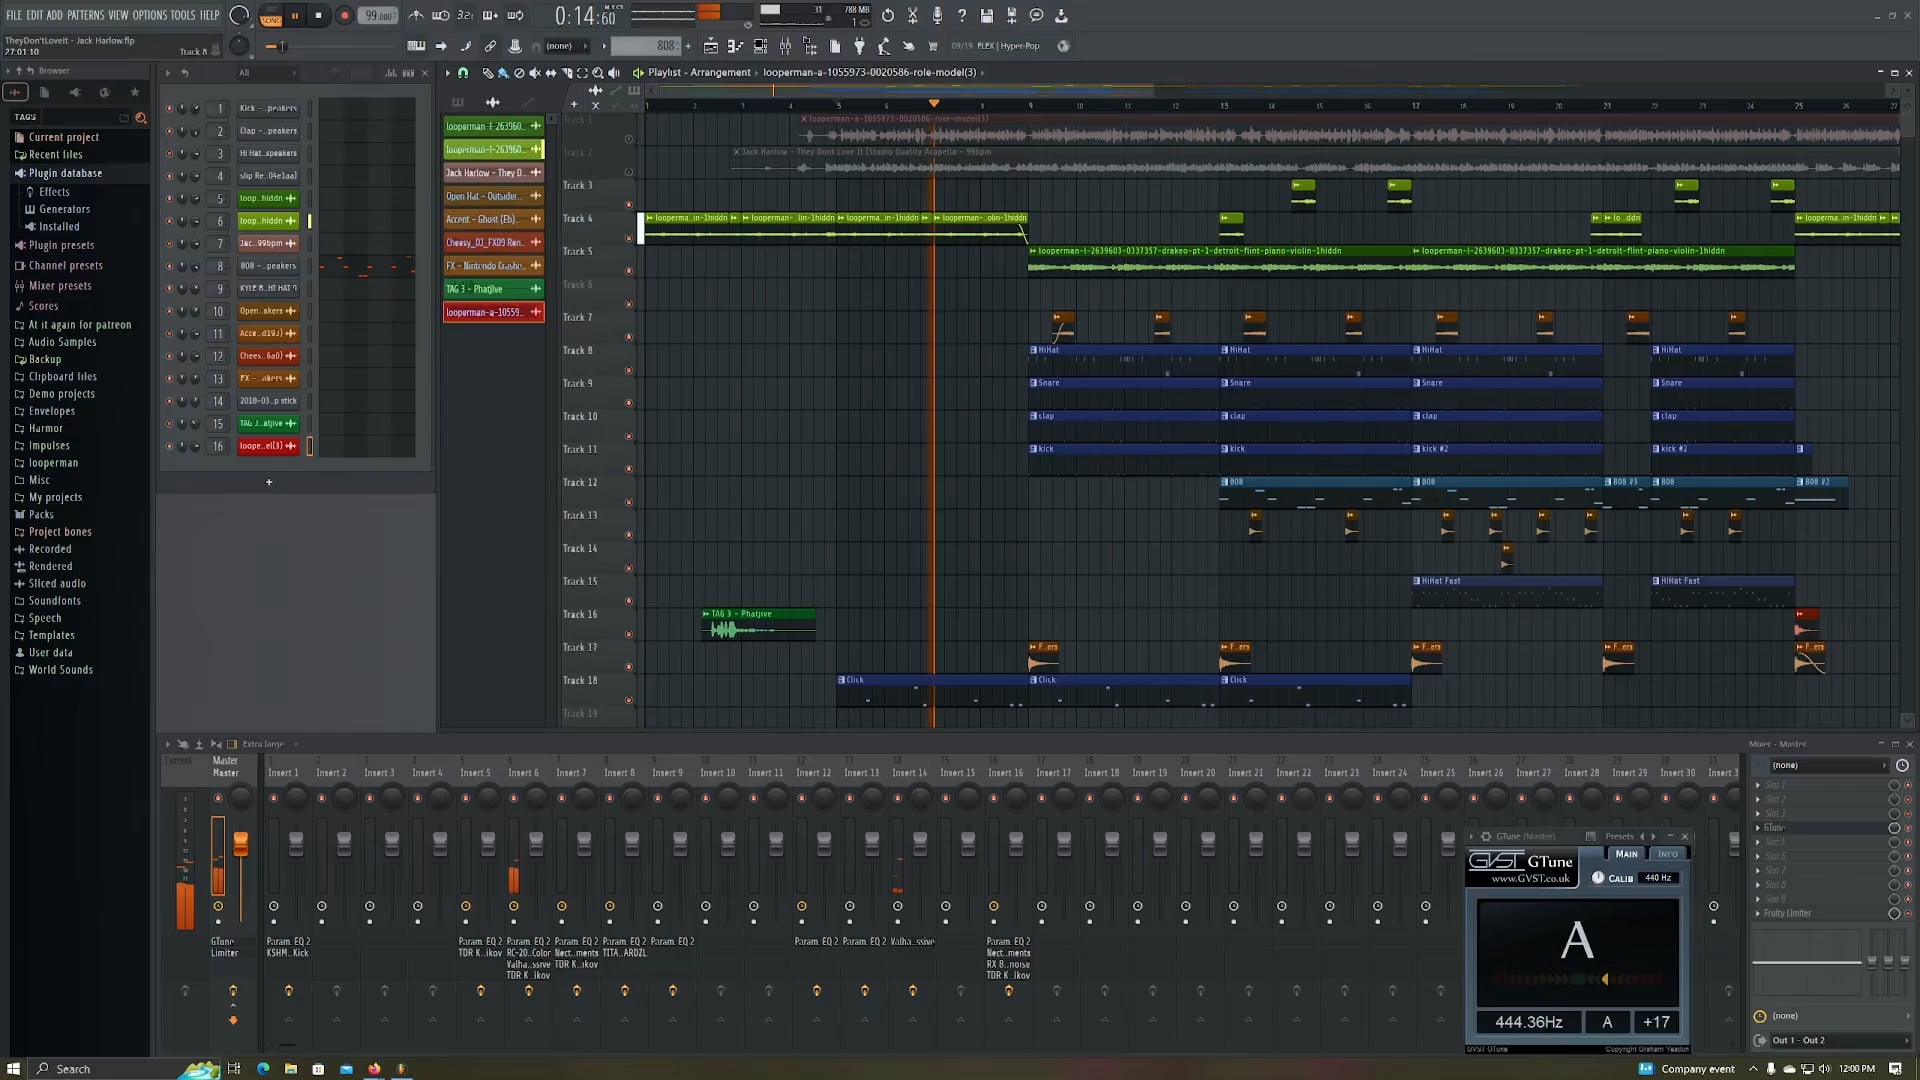
- Import the Tracks: Open a digital audio workstation (DAW) software like Ableton Live, Logic Pro, or FL Studio. Import both the original song and the instrumental track into the DAW as separate audio tracks.
- Invert the Phase: In your DAW, select the instrumental track and use an audio effect/plugin that allows you to invert the phase of the track. This can be found in the audio effects section under “Phase Invert” or “Invert Polarity.” This technique will cancel out the instrumental elements that exist in both the original track and the instrumental version, leaving behind only the vocals.
- Adjust the Volume: Play the instrumental track and the original song simultaneously. Adjust the volume of the instrumental track until the instrumental elements are completely canceled out, and all you can hear is the isolated vocals. This may require some trial and error to get the right balance.
- Export the Vocals: Once you’ve isolated the vocals, you can export them as a separate audio file. Trim the beginning and end of the vocal track to ensure a clean start and finish. Export the vocals in a high-quality audio format like WAV or FLAC.
It’s important to note that isolating vocals can be a challenging task, especially if the original song has complex instrumental arrangements or if there are overlaps between the vocals and other instruments. In some cases, complete isolation may not be achievable, and there may be remnants of the instrumental elements present in the isolated vocals.
However, with practice and patience, you can achieve satisfactory results in isolating the vocals. Remember to regularly listen and check the quality of the isolated vocals to ensure they are clear and free from artifacts or artifacts introduced during the isolation process.
Now that you have successfully isolated the vocals, you’re one step closer to creating your acapella masterpiece!
Step 4: Remove Background Noise
After isolating the vocals, it’s common to have some background noise or unwanted artifacts present in the vocals. To achieve a clean and professional-sounding acapella, it’s essential to remove or minimize these distractions. Here’s how you can remove background noise from the isolated vocals:
- Identify the Noise: Listen closely to the isolated vocals and identify any background noise, such as hissing, humming, or clicks. Pay attention to sections where the vocals are not present, as those are good indicators of the noise.
- Use Noise Reduction Plugins: In your DAW, apply noise reduction plugins or tools to target and reduce the identified background noise. These plugins analyze the audio and suppress unwanted noise while preserving the integrity of the vocals. Experiment with different noise reduction settings to find the optimal balance between noise removal and vocal clarity.
- Manually Edit: If the noise reduction plugins aren’t sufficient, you can manually edit the vocal track. Use the audio editing tools in your DAW to zoom in on the waveform and remove or reduce specific noise frequencies. Be careful not to overdo it and affect the overall sound quality of the vocals.
- Audition the Results: After applying noise reduction techniques, carefully listen to the vocals to ensure that the noise levels have been adequately reduced without introducing any unwanted artifacts or affecting the vocal performance. Make any necessary adjustments to achieve the desired result.
Removing background noise is crucial in creating a clean and polished acapella version of the song. It helps enhance the overall listening experience and enables the vocals to shine without any distractions. However, be mindful not to compromise the quality and natural nuances of the vocals during the noise removal process.
Remember that noise removal is an iterative process, and it may take some trial and error to achieve the best results. Take your time and listen attentively to the vocals to ensure a pristine acapella track.
Step 5: Apply Audio Effects
Once you have isolated and cleaned up the vocals, it’s time to enhance and polish them further by applying audio effects. Audio effects can add depth, character, and uniqueness to the vocals, making your acapella version stand out. Here are some audio effects you can consider applying:
- Equalization (EQ): Use EQ to adjust the frequency balance of the vocals. Boost or cut specific frequencies to enhance clarity and remove any harsh or muddy tones. Experiment with different EQ settings to find the best sound for the vocals, taking into account factors like the genre of the song and the specific characteristics of the vocals.
- Reverb: Reverb adds space and ambience to the vocals, giving them a sense of depth. Experiment with different reverb settings to find the right balance between a dry, upfront sound and a more spacious, atmospheric feel. Be mindful not to overdo it, as excessive reverb can muddy the vocals.
- Compression: Compression helps even out the dynamics of the vocals by reducing the difference between the loudest and softest parts. It can add sustain and make the vocals sound more polished and controlled. Adjust the compression settings to achieve a balanced and consistent sound without squashing the vocals.
- Delay: Delay creates echoes and repeats of the vocals, adding a sense of depth and movement. Experiment with different delay settings to find creative ways to enhance the vocals and add a unique touch to your acapella version.
- Pitch Correction: If needed, you can use pitch correction tools to correct any pitch inaccuracies in the vocals. This ensures that the vocals are in tune and match the key of the song. Use pitch correction subtly to maintain the natural sound and emotional expression of the vocals.
When applying audio effects, it’s important to listen carefully and make subtle adjustments. The goal is to enhance the vocals without overpowering or altering their original character. Remember to regularly preview and compare the effects to the dry vocal track to ensure that the enhancements are serving the overall sound of the acapella version.
Experiment with different combinations of effects and settings to achieve the desired sound for your acapella. Each song and vocal performance is unique, so trust your ears and unleash your creativity to make the vocals shine.
Step 6: Fine-tune the Acapella
After applying audio effects to the vocals, it’s time to fine-tune the acapella to ensure that it sounds seamless and polished. This step involves making subtle adjustments to enhance the overall performance and cohesiveness of the vocals. Here’s how you can fine-tune your acapella:
- Volume Balancing: Adjust the volume levels of different sections of the acapella to create a smooth and balanced sound. Make sure that no part of the vocals is too soft or too loud compared to the rest.
- Panning: Use panning techniques to place the vocals in the stereo field. Experiment with panning the vocals slightly to the left or right to create a sense of space and width. Be mindful of maintaining a centered and focused sound for the lead vocal.
- Timing & Alignment: Check the timing and alignment of the vocals to ensure that they sync perfectly with the instrumental track. Use your DAW’s editing tools to nudge or quantize the vocals if needed, ensuring that they are perfectly in time with the music.
- Editing Breaths and Imperfections: Remove any noticeable breaths, background noises, or unwanted imperfections that may distract from the vocals. Carefully edit out these elements between phrases or during pauses to maintain a clean and seamless acapella track.
- Double-tracking or Harmonizing: If desired, consider double-tracking or harmonizing certain sections of the vocals to add depth and texture. This technique can create a richer and more dynamic sound, especially during choruses or key moments in the song.
During the fine-tuning process, it’s important to listen critically and make subtle adjustments. Pay attention to the details and nuances of the vocals, aiming for a professional and captivating performance. Regularly compare the acapella with the original version of the song to ensure that it captures the essence and emotion of the original while having its own unique charm.
Take your time during this step and don’t hesitate to make multiple passes to get the acapella to its best possible state. The attention to detail and the care you put into fine-tuning will greatly contribute to the overall quality of your acapella masterpiece.
Step 7: Save the Acapella Version
After all the hard work you’ve put into transforming the song into an acapella version, it’s time to save and export your final masterpiece. Saving the acapella version properly will ensure that you have a high-quality audio file ready to share or use in your creative projects. Here’s how you can save the acapella version:
- Choose the File Format: Select the appropriate file format for your acapella. Lossless formats like WAV or FLAC are ideal for maintaining the highest audio quality. However, if you need a smaller file size, consider using compressed formats like MP3 or AAC.
- Set the Bitrate and Sample Rate: Adjust the bitrate and sample rate settings according to your needs. Higher bitrates and sample rates ensure better audio fidelity, but they also result in larger file sizes. Strike a balance between audio quality and file size based on your intended use for the acapella.
- Normalize the Volume: Apply volume normalization to ensure that the peak amplitude of the acapella doesn’t exceed the limits or sound significantly louder or softer than other tracks. This will help maintain consistency when combining it with other audio files.
- Include Metadata: Add relevant metadata to the acapella file, such as artist name, song title, and album information. This will help you organize and identify the acapella version easily in your music library.
- Save and Export: Choose a destination folder on your computer or external storage device and save the acapella version with an appropriate and recognizable file name.
When exporting the acapella, consider creating multiple versions with different file formats or quality settings to cater to various needs and platforms. This will allow you to have a versatile acapella file that can be used in different scenarios without compromising audio quality.
Once the acapella version is saved, it’s essential to back up your files to prevent any accidental loss or damage. Make duplicates of the acapella and store them in secure locations to ensure you always have access to your hard work.
Congratulations! You have successfully turned a song into an acapella version and saved it for future use. Now you can share your acapella masterpiece with the world, use it in remixes or covers, or simply cherish the satisfaction of creating something unique and beautiful.
Conclusion
Transforming a song into an acapella version can be a rewarding and creative process. By following the steps outlined in this guide, you have learned how to choose the right song, find the instrumental version, isolate the vocals, remove background noise, apply audio effects, fine-tune the acapella, and save the final version. With each step, you have honed your skills in audio editing and brought the vocals to the forefront, creating a captivating acapella masterpiece.
Remember that practice and experimentation are key to achieving the best results. As you continue to explore the world of acapella music, you’ll discover new techniques and creative possibilities. Embrace the uniqueness of each song and give it your personal touch to create truly outstanding acapella versions.
Whether you use your acapella versions for covers, remixes, or simply to appreciate the raw beauty of vocal harmonies, enjoy the process and let your creativity soar. Share your creations with others, collaborate with fellow musicians, and continue to refine your skills as you embark on your acapella journey.
Now it’s time to unleash your creativity, express your musicality, and let your acapella versions shine. Happy acapella-ing!