Home>Events & Info>Acapella>How To Make A Song Acapella In Audition
Acapella
How To Make A Song Acapella In Audition
Published: January 3, 2024
Learn how to create an acapella version of any song using Adobe Audition. Transform your favorite tracks into captivating vocal-only renditions with ease.
(Many of the links in this article redirect to a specific reviewed product. Your purchase of these products through affiliate links helps to generate commission for AudioLover.com, at no extra cost. Learn more)
Table of Contents
- Introduction
- Step 1: Importing the Song into Adobe Audition
- Step 2: Isolating the Vocals using the Center Channel Extractor
- Step 3: Adjusting the Vocal Track using Effects and Filters
- Step 4: Removing Background Noise using Noise Reduction Techniques
- Step 5: Fine-Tuning the Acapella Vocals using Equalizers and Compressors
- Step 6: Saving the Acapella Version of the Song
- Conclusion
Introduction
Creating an acapella version of a song can be a rewarding and engaging process for any musician or music producer. This technique allows you to isolate the vocals from a track, removing all instrumental elements and leaving only the pure, unadulterated voice. Acapella versions are often used in remixes, mashups, and live performances, offering a unique and stripped-down perspective on a familiar tune.
With the help of modern digital audio editing software, such as Adobe Audition, making an acapella version of a song has become more accessible than ever. In this article, we will guide you through the step-by-step process of transforming a regular song into an acapella masterpiece using Adobe Audition.
By following these steps, you can uncover the intricate nuances of the vocals, explore the raw emotions behind the lyrics, and create an entirely new sonic experience. So, let’s dive into the world of acapella music production and discover how to make a song acapella in Adobe Audition.
Step 1: Importing the Song into Adobe Audition
The first step in creating an acapella version of a song is to import the original track into Adobe Audition. Here’s how you can do it:
- Launch Adobe Audition software on your computer and create a new session.
- Click on “File” in the menu bar and select “Import”.
- Choose the song file you want to work with and click “Open”.
Once you’ve imported the song into Adobe Audition, you’ll see the track waveform displayed in the editing window. This waveform represents the audio data of the entire song, including both the instrumental and vocal parts.
It’s essential to ensure that you have a high-quality audio file of the song for the best results. Look for lossless or high-bitrate audio formats like WAV or FLAC to maintain the integrity of the vocals during the acapella extraction process.
Before moving on to the next step, take a moment to listen to the song and familiarize yourself with its structure and arrangement. This will help you in later steps when it comes to isolating the vocals and removing unwanted elements.
Now that you have successfully imported the song into Adobe Audition, you’re ready to proceed to the next step: isolating the vocals using the Center Channel Extractor.
Step 2: Isolating the Vocals using the Center Channel Extractor
Once you have imported the song into Adobe Audition, the next step is to isolate the vocals using the Center Channel Extractor tool. Here’s how you can do it:
- Select the audio track containing the song in the multitrack editor.
- Click on the “Effects” tab in the top menu and navigate to “Special” > “Center Channel Extractor”.
- In the Center Channel Extractor window, adjust the settings to extract the vocals. Play around with the options to find the best balance between preserving the vocals and reducing the instrumental elements.
- Preview the changes in real-time by listening to the output in the Audition Playhead.
- Once you are satisfied with the vocal isolation, click “Apply” to save the changes.
The Center Channel Extractor tool works by examining the stereo separation of the audio tracks and extracting the vocals from the center channel. By adjusting the parameters in the tool, you can fine-tune the extraction process to achieve the desired outcome.
It’s important to note that the effectiveness of the vocal isolation depends on the original recording quality and the mix of the song. Some tracks may have more pronounced separation, making it easier to isolate the vocals, while others may require additional processing techniques.
After isolating the vocals with the Center Channel Extractor, take a moment to listen to the extracted vocal track and assess the quality and clarity. You may need to tweak the settings further or move on to additional steps to enhance the acapella version.
With the vocals now extracted, you’re ready to move on to the next step: adjusting the vocal track using effects and filters to enhance the overall sound.
Step 3: Adjusting the Vocal Track using Effects and Filters
Once you have successfully isolated the vocals using the Center Channel Extractor in Adobe Audition, it’s time to fine-tune and enhance the vocal track using various effects and filters. Here’s how you can do it:
- Select the vocal track in the multitrack editor.
- Click on the “Effects” tab in the top menu and explore the different audio effects and filters available.
- Experiment with effects like EQ (Equalization), reverb, delay, compression, and more to enhance the sound of the vocals.
- Adjust the parameters of each effect to achieve the desired sound. For example, use EQ to boost or cut certain frequencies to make the vocals stand out.
- Preview the changes in real-time by listening to the output in the Audition Playhead.
- Once you are satisfied with the adjustments, click “Apply” to save the changes.
Using effects and filters on the vocal track allows you to shape the sound, add depth and character, and remove any imperfections. However, it’s important to apply these effects subtly and judiciously to maintain the naturalness of the vocals.
Additionally, keep in mind the overall aesthetic of the acapella version you want to create. Consider the genre, mood, and intended use of the final acapella track, and tailor the effects accordingly.
Be sure to regularly listen to the adjusted vocal track to ensure that it still sounds cohesive with the rest of the song. You may need to readjust the effects or move on to the next step to further refine the acapella version.
Once you have fine-tuned the vocal track, you’re ready to proceed to the next step: removing background noise using noise reduction techniques.
Step 4: Removing Background Noise using Noise Reduction Techniques
One common challenge when working with vocals is the presence of background noise or unwanted artifacts. To create a clean and professional acapella version, it’s important to remove these distractions. Here’s how you can do it using noise reduction techniques in Adobe Audition:
- Select the vocal track in the multitrack editor.
- Click on the “Effects” tab in the top menu and navigate to “Noise Reduction/Restoration” > “Noise Reduction (process)”.
- In the Noise Reduction window, use the “Capture Noise Print” button to sample a portion of the audio that only contains the background noise.
- Adjust the noise reduction settings to reduce the unwanted background noise without negatively impacting the vocals.
- Preview the changes in real-time by listening to the output in the Audition Playhead.
- Once you are satisfied with the noise reduction, click “Apply” to save the changes.
The Noise Reduction tool in Adobe Audition allows you to identify and attenuate specific frequencies associated with the background noise, resulting in a cleaner vocal track. Be careful not to remove too much noise, as it may affect the naturalness of the vocals.
In addition to the Noise Reduction tool, you can also explore other restoration effects available in Adobe Audition, such as click/pop removal or hum removal, if necessary. These tools can help address specific types of noises or disturbances in the vocal track.
After removing background noise, take the time to listen to the vocal track to ensure that the unwanted artifacts are minimized or eliminated. If there are still noticeable issues, you may need to revisit the noise reduction settings or consider additional processing techniques.
With the background noise removed, you’re ready to move on to the next step: fine-tuning the acapella vocals using equalizers and compressors.
Step 5: Fine-Tuning the Acapella Vocals using Equalizers and Compressors
Now that you have a clean vocal track free from background noise, it’s time to fine-tune the acapella vocals using equalizers and compressors. These tools will help you shape and enhance the overall sound of the vocals, ensuring they stand out in the acapella version. Here’s how you can do it in Adobe Audition:
- Select the vocal track in the multitrack editor.
- Click on the “Effects” tab in the top menu and navigate to “Filter and EQ” > “Parametric Equalizer” or “Graphic Equalizer”.
- Use the equalizer to adjust the frequencies of the vocals to achieve optimal clarity and presence. Boost or cut specific frequency ranges as needed to enhance the desired characteristics of the vocals.
- Next, apply a compressor to the vocal track to control dynamic range and achieve a more consistent volume level. Adjust the gain, threshold, and ratio settings to attain a balanced sound.
- Preview the changes in real-time by listening to the output in the Audition Playhead.
- Once you are satisfied with the adjustments, click “Apply” to save the changes.
The equalizer allows you to boost or cut frequencies to shape the vocals. Pay attention to the presence of sibilance or harshness in the vocals and address them with careful equalization adjustments. The compressor helps control the dynamic range of the vocals, ensuring a more even volume level throughout the acapella track.
Remember to use these tools subtly and adjust settings based on the specific qualities of the vocals and the desired sound you want to achieve. Regularly listen to the acapella vocals to ensure they blend harmoniously and sound natural.
Once you have fine-tuned the vocals using equalizers and compressors, take a moment to listen to the acapella version as a whole. If necessary, go back and make further adjustments or move on to the final step: saving the acapella version of the song.
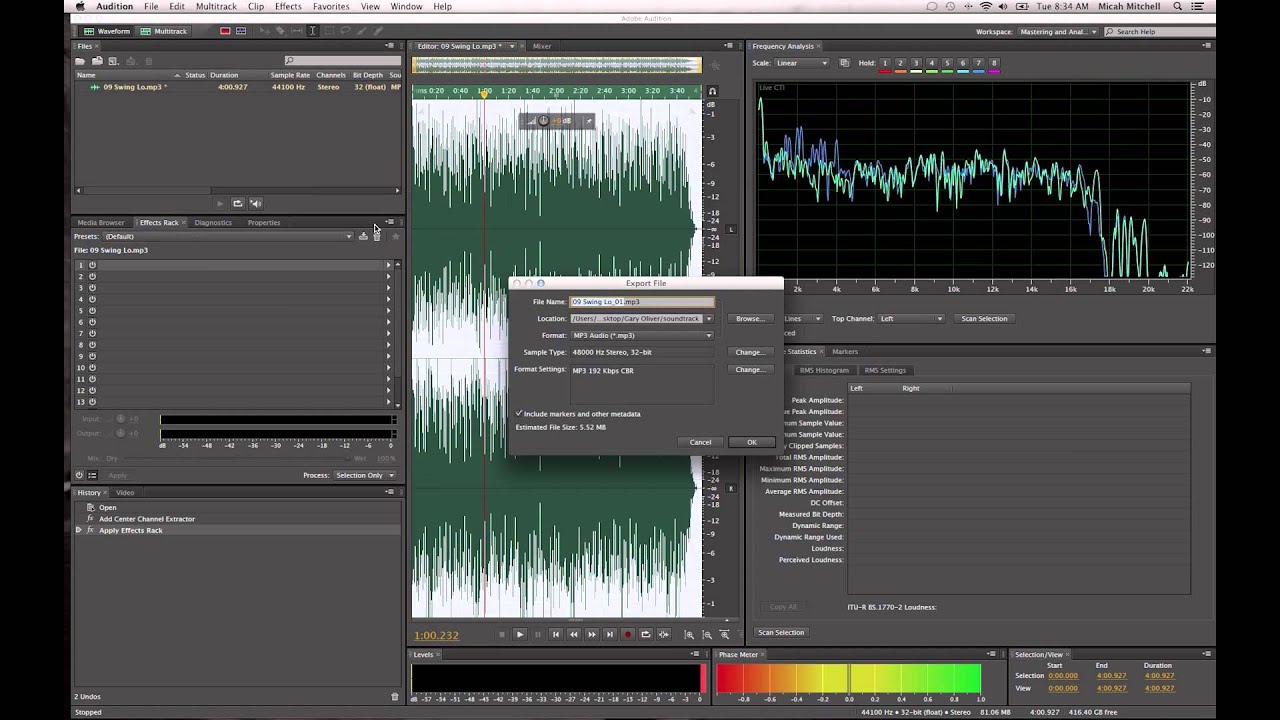
Step 6: Saving the Acapella Version of the Song
After perfecting the acapella vocals using various techniques in Adobe Audition, it’s time to save your final acapella version of the song. Here’s how you can do it:
- Select the vocal track in the multitrack editor.
- Click on “File” in the menu bar and select “Export” > “Multitrack Mixdown” or “Export Selected Tracks”.
- In the Export Settings window, choose your desired format (such as WAV or MP3) and specify the destination folder to save the file.
- If needed, adjust the sample rate, bit depth, and other export settings based on your project requirements.
- Click “Export” to save the acapella version of the song in the chosen format and location.
When saving the acapella version, consider using a lossless format like WAV to maintain the highest audio quality. However, if you need to reduce file size or make it compatible with specific platforms, you can choose a compressed format like MP3.
It’s essential to name and organize your files properly to avoid confusion later on. Consider adding “acapella” or a similar identifier to the file name for easy identification.
Once the acapella version is saved, it’s a good idea to listen to it outside of Adobe Audition to ensure it sounds as intended. Test it on different playback systems to ensure the vocals are clear and well-balanced.
Congratulations! You have successfully created an acapella version of the song using Adobe Audition. Now, you can use this acapella track for remixes, live performances, or further production purposes.
Remember, creating an acapella version requires careful attention to detail and an artistic ear. Keep experimenting, honing your skills, and exploring different techniques to achieve the best results.
Thanks for following this step-by-step guide. Enjoy creating your own acapella masterpieces!
Conclusion
Creating an acapella version of a song can be an exciting and rewarding process, allowing you to dive deep into the vocals and uncover the true essence of a track. With the help of Adobe Audition and the step-by-step process outlined in this guide, you can transform any song into a captivating acapella experience.
Throughout the journey, you learned how to import the song into Adobe Audition, isolate the vocals using the Center Channel Extractor, adjust the vocal track using effects and filters, remove background noise, fine-tune the acapella vocals with equalizers and compressors, and save the final acapella version of the song.
Remember that each song may present unique challenges and require customized adjustments. Experimentation, careful listening, and attention to detail are key to creating high-quality acapella tracks.
Once you have your acapella version, the possibilities are endless. You can use it for remixing, mashups, live performances, or as a starting point to create entirely new musical compositions. The power of the human voice, when showcased in an acapella format, can evoke new emotions and highlight the essence of a song in unexpected ways.
So, go ahead and unleash your creativity. Take your favorite songs and transform them into acapella wonders using Adobe Audition. With practice, patience, and a keen ear, you can create breathtaking acapella versions that captivate listeners and showcase the beauty of the human voice.