Home>Events & Info>Ballet>How To Sew Elastic On Ballet Shoes
Ballet
How To Sew Elastic On Ballet Shoes
Modified: January 22, 2024
Learn how to sew elastic on ballet shoes with this easy step-by-step guide. Securely attach elastic to ensure snug and comfortable fit for ballet dancers.
(Many of the links in this article redirect to a specific reviewed product. Your purchase of these products through affiliate links helps to generate commission for AudioLover.com, at no extra cost. Learn more)
Table of Contents
Introduction
Welcome to the world of ballet, where grace, precision, and elegance combine to create a breathtaking art form. Ballet dancers glide across the stage, showcasing their incredible strength and artistry. Behind every stunning performance is a dancer who has undergone years of rigorous training and practice.
One essential tool for ballet dancers is their ballet shoes. These specialized shoes provide the necessary support and flexibility needed to execute the intricate dance moves with ease. However, ballet shoes alone are not enough; they need to be properly fitted with elastic straps to ensure a secure and comfortable fit.
In this article, we will guide you through the process of sewing elastic on ballet shoes. Whether you are a ballet dancer, a parent of a ballet enthusiast, or simply curious about the art of ballet, this guide will equip you with the knowledge to properly attach elastic straps to ballet shoes.
By following our step-by-step instructions, you’ll be able to ensure a perfect fit, preventing any slips or discomfort during your ballet routines. So let’s get started and dive into the world of ballet shoe elastic sewing!
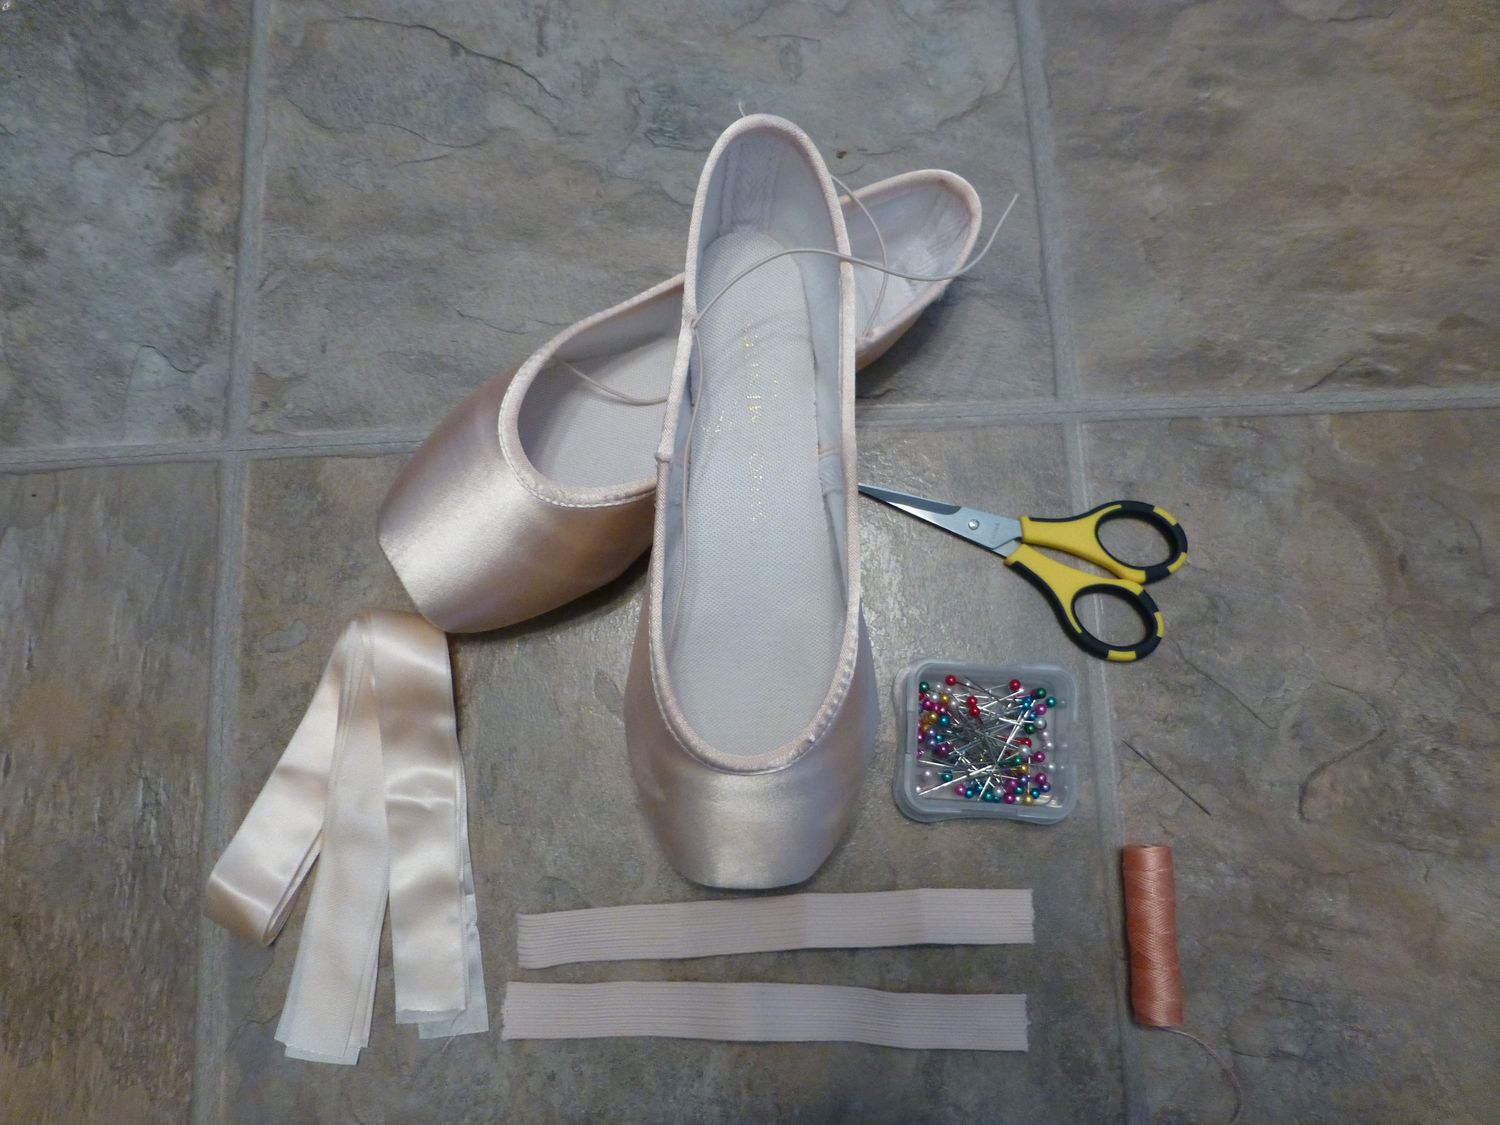
Step 1: Preparing the Ballet Shoes
Before you can begin sewing elastic onto your ballet shoes, you need to prepare them properly. This step is crucial for ensuring a secure and long-lasting attachment of the elastic straps.
First, start by inspecting your ballet shoes for any signs of wear and tear. Look for any loose threads, frayed edges, or damaged areas. If you spot any issues, it’s important to address them before proceeding with the elastic sewing process.
Next, you’ll want to clean the surface of your ballet shoes. This ensures that the elastic will adhere well to the fabric without any obstructions. Use a cloth dampened with mild soap and water to gently wipe down the shoes, removing any dirt or debris.
If your ballet shoes are new or have been freshly cleaned, it’s a good idea to roughen up the area where you will be attaching the elastic. This helps create a better grip for the elastic to hold onto. You can use sandpaper or an emery board to lightly roughen the fabric in the desired area.
Lastly, carefully measure and mark the position where you will attach the elastic straps on each ballet shoe. The most common placement is across the arch of the foot, just above the heel. However, the exact placement may vary depending on personal preference and the specific needs of the dancer.
By properly preparing your ballet shoes, you are setting the foundation for a successful elastic sewing process. Taking the time to inspect, clean, roughen, and mark your shoes will ensure a secure and professional-looking attachment of the elastic straps.
Step 2: Positioning the Elastic Straps
Once your ballet shoes are prepared, it’s time to position the elastic straps. This step is crucial in achieving a comfortable and secure fit that will support your feet during ballet movements.
Start by cutting two pieces of elastic, each measuring approximately 6-8 inches long. This length can be adjusted based on personal preference, but it’s important to ensure that the elastic is not too tight or too loose when attached to the shoes.
Take one piece of elastic and hold it against the inside of the ballet shoe, just above the marked position. The elastic should be positioned horizontally, spanning from one side of the shoe to the other.
Using a fabric pen or pencil, mark the points on the shoe where the elastic intersects with the edge. These marks will serve as your reference points for sewing the elastic onto the shoe.
Repeat the process with the second piece of elastic on the other shoe, ensuring that the positioning is symmetrical.
It’s important to note that some ballet dancers prefer to have the elastic criss-cross at the back of the shoe for added support. If you choose to do this, simply adjust the positioning accordingly.
By carefully positioning the elastic straps, you are ensuring that they will provide the necessary support and security during your ballet movements. Taking the time to measure and mark the position of the elastic will result in a comfortable and professional-looking finish.
Step 3: Sewing the Elastic onto the Ballet Shoes
Now that you have positioned the elastic straps on your ballet shoes, it’s time to sew them in place. Sewing the elastic securely ensures that it will withstand the demands of your ballet movements.
Start by threading a needle with a strong, matching thread. You can double the thread for added strength if desired.
Begin sewing at one of the marked points on the shoe. Insert the needle from the inside edge of the shoe, through the elastic, and back into the shoe, creating a small loop with the elastic held in place.
Continue stitching around the edge of the elastic, creating small, even stitches. It’s important to sew through both the elastic and the shoe fabric, ensuring a secure attachment.
As you sew, make sure to maintain tension on the elastic. This will ensure a snug fit without being too tight and uncomfortable.
Continue stitching until you reach the other marked point on the shoe. Make a few extra stitches for reinforcement and then tie off the thread securely.
Repeat the sewing process on the other shoe, ensuring symmetry in the placement and stitching.
When sewing the elastic onto the ballet shoes, it’s important to maintain a neat and even stitching pattern. This not only ensures a secure attachment but also adds to the professional appearance of the finished product.
Take your time and sew carefully, paying attention to the tension and alignment of the elastic. With a little practice, you’ll be able to sew the elastic onto your ballet shoes with confidence and precision.
Step 4: Securing the Elastic Ends
Now that you have sewn the elastic onto your ballet shoes, it’s time to secure the ends for a clean and professional finish. Securing the elastic ends ensures that they won’t fray or come undone during your ballet practices and performances.
To secure the elastic ends, you have a few options:
- Option 1: Hand Sewing: Thread your needle with a matching thread and knot the end. Starting from one end of the elastic, sew a few small stitches to secure the end. Then, sew along the edge of the elastic, stitching it down to the shoe fabric. Repeat this process on the other end of the elastic.
- Option 2: Machine Sewing: If you have access to a sewing machine, you can secure the elastic ends by using a small zigzag stitch. Place the elastic end under the presser foot and sew back and forth a few times to secure it in place. Repeat this process on the other end of the elastic.
- Option 3: Elastic Band: Another option is to use a small elastic band or hair tie to secure the ends. Simply loop the elastic band around the end of the elastic, then pull it back over the shoe fabric and tuck it securely. This provides a quick and hassle-free way to secure the elastic ends.
Choose the option that works best for you and provides the level of security and durability required for your ballet activities.
Securing the elastic ends not only enhances the longevity of your ballet shoes but also gives a polished and professional look to the overall appearance. Take the time to ensure that the ends are well-secured, and you’ll be ready to dance with confidence.
Step 5: Double Checking the Elastic Fit
After sewing the elastic onto your ballet shoes and securing the ends, it’s important to double-check the fit to ensure comfort and functionality. The elastic should provide a snug yet comfortable support to keep your shoes securely in place during your ballet movements.
Put on your ballet shoes and move around, paying attention to how they feel on your feet. Walk, point, flex, and perform some basic ballet movements to gauge if the elastic is too tight or too loose. If it feels uncomfortable or restricts your movement, adjustments may be needed.
If the elastic feels too tight, you can carefully remove the stitches and reposition it slightly looser. On the other hand, if the elastic feels too loose, you may need to tighten it by sewing another row of stitches closer to the shoe fabric.
It’s important to remember that everyone’s feet are unique, and what works for one dancer may not work for another. Experiment with the elastic placement and tension until you find the perfect fit that provides both support and freedom of movement.
Once you are satisfied with the elastic fit, take a moment to admire your well-attached and properly fitted ballet shoes. With the elastic securely sewn and adjusted to your liking, you can dance confidently, knowing that your shoes will stay in place throughout your ballet routines.
Remember, the fit of your ballet shoes may change over time, so it’s a good idea to periodically check and adjust the elastic as needed. The key is to find a balance between a snug fit and comfort, allowing you to focus on your dancing without any distractions.
Conclusion
Congratulations! You have successfully learned how to sew elastic onto ballet shoes. This essential skill ensures that your ballet shoes provide the necessary support, security, and comfort for your dance performances and practices.
By properly preparing the ballet shoes, positioning the elastic straps, sewing them securely, and double-checking the fit, you have taken the necessary steps to create a professional and functional attachment.
Remember, the fit of your ballet shoes is crucial for executing your dance movements with ease and grace. By taking the time to sew elastic onto your shoes properly, you can ensure that they stay in place and provide the necessary support throughout your ballet routines.
As you become more experienced with sewing elastic on ballet shoes, you will develop your own preferences and techniques. Don’t be afraid to experiment and adjust the placement and tension of the elastic to suit your unique needs and foot shape.
Lastly, maintaining the elasticity of the elastic is important for its long-term usability. Keep an eye on the elastic over time and replace it when it becomes worn or stretched out.
Now, armed with the knowledge and skills you have learned, it’s time to put your ballet shoes on and take to the stage or studio with confidence. Embrace the beauty of ballet and enjoy every moment of your dancing journey!
Happy sewing and happy dancing!