Home>Production & Technology>Noise Cancellation>How To Add Noise Cancellation To Mic

Noise Cancellation
How To Add Noise Cancellation To Mic
Modified: January 22, 2024
Learn how to add noise cancellation to your microphone and improve the quality of your audio recordings. Enhance your sound with our step-by-step guide!
(Many of the links in this article redirect to a specific reviewed product. Your purchase of these products through affiliate links helps to generate commission for AudioLover.com, at no extra cost. Learn more)
Table of Contents
- Introduction
- What is Noise Cancellation?
- Understanding Microphones
- Types of Noise
- Types of Microphone Noise Cancelling Technologies
- Passive Noise Cancellation
- Active Noise Cancellation
- How to Add Noise Cancellation to a Microphone
- Step 1: Choose the Right Microphone
- Step 2: Select a Noise Cancellation Technology
- Step 3: Install the Noise Cancellation Circuitry
- Step 4: Test and Fine-tune the Noise Cancellation
- Conclusion
Introduction
Welcome to the world of noise cancellation! In a world filled with buzzing, humming, and background noise, wouldn’t it be nice to have the ability to eliminate unwanted sounds and focus on what truly matters? This is where noise cancellation technology comes in. Whether you’re a content creator, a musician, or someone who uses a microphone for daily communication, adding noise cancellation to your microphone can greatly enhance the audio quality and overall experience.
Noise cancellation is the process of reducing or eliminating unwanted sounds from an audio signal, allowing the desired sound to be heard more clearly. It’s like having a magic wand that can strip away the distractions and immerses you in a world of pure, uninterrupted sound. From reducing background noise during a virtual meeting or live stream to enhancing the audio quality of your recordings, noise cancellation technology has become an invaluable tool in many industries.
Before we dive into the process of adding noise cancellation to a microphone, let’s take a moment to understand the different types of microphones and the types of noise they can encounter. This knowledge will help us choose the right noise cancellation technology and ensure optimal performance.
What is Noise Cancellation?
Noise cancellation is a technology that aims to reduce or eliminate unwanted sounds from an audio signal. It works by utilizing complex algorithms and signal processing techniques to identify and suppress specific frequencies or patterns of noise. By doing so, it allows the desired sound to stand out more prominently, resulting in a cleaner and clearer audio experience.
There are two main types of noise cancellation: passive and active. Passive noise cancellation works by physical means, such as using sound-absorbing materials or creating a physical barrier to block out external noise. On the other hand, active noise cancellation relies on electronic components and advanced algorithms to analyze and counteract unwanted sounds.
So, why is noise cancellation important? In a world filled with constant noise pollution, having the ability to reduce or eliminate unwanted sounds is essential for various applications. For example, in communication settings such as conference calls or live streaming, noise cancellation can help improve speech intelligibility by removing background noise. In music production, it can enhance the recording quality by minimizing the influence of environmental factors. In everyday life, it can provide a more immersive and enjoyable listening experience.
Noise cancellation technology has come a long way over the years, thanks to advancements in digital signal processing and the availability of powerful microprocessors. Today, you can find noise cancellation in a wide range of devices, from headphones and earphones to smartphones and even home appliances. It has become an integral part of many industries, including telecommunications, audio engineering, and consumer electronics.
Now that we have a basic understanding of noise cancellation, let’s explore the world of microphones and the types of noise they can encounter.
Understanding Microphones
Before delving into noise cancellation for microphones, it’s important to have a solid understanding of how microphones work and the different types available. Microphones are transducers that convert sound waves into electrical signals. They capture audio by sensing variations in air pressure and converting them into voltage fluctuations.
There are several types of microphones commonly used: dynamic, condenser, ribbon, and lavalier, to name a few. Each type has its own unique characteristics, making them suitable for different applications and environments.
Dynamic microphones are sturdy and versatile, making them ideal for live performances and recording loud sources such as vocals and instruments. They are less sensitive to noise and have a high tolerance for rough handling, making them suitable for on-stage use.
Condenser microphones, on the other hand, are more sensitive and produce a higher quality sound. They require an external power source, called phantom power, and are commonly used in studio recordings and broadcast settings. Condenser microphones are known for their accuracy and ability to capture subtle details.
Ribbon microphones, although less common, are prized for their warm and vintage sound. They use a thin metal ribbon suspended between magnets to generate the electrical signal. Ribbon microphones are delicate and sensitive to handling, typically used in controlled studio environments.
Lavalier microphones, also known as lapel or clip-on microphones, are small and discreet. They are commonly used in broadcasting, presentations, and interviews where hands-free operation and minimal visibility are desired. Lavalier microphones are available in both wired and wireless configurations.
Now that we have a basic understanding of different microphone types, it’s important to be aware of the various types of noise that can affect microphone recordings.
Types of Noise
Noise can be defined as any unwanted sound that interferes with the desired audio signal. It can originate from various sources and manifest in different forms. Understanding the types of noise is crucial when it comes to implementing effective noise cancellation techniques for microphones.
1. Ambient Noise: This is the background noise present in any given environment. It can include sounds such as traffic, air conditioning, or people talking. Ambient noise is omnipresent and can vary in intensity depending on the location and time of recording.
2. Wind Noise: When recording outdoors, wind can create a disruptive noise due to its interaction with the microphone diaphragm or other objects in the microphone’s path. This noise is characterized by a rushing or rumbling sound.
3. Electrical Noise: This type of noise is generated by electrical interference from various sources, such as power lines, electrical appliances, or faulty cables. It can manifest as a buzzing, humming, or crackling sound.
4. Handling Noise: Handling noise occurs when the microphone picks up mechanical vibrations transferred through its housing or stand. It can be caused by factors like tapping the microphone or moving it around. Handling noise is commonly associated with handheld microphones.
5. EMI/RFI Noise: Electromagnetic interference (EMI) and radio frequency interference (RFI) are caused by electromagnetic waves emitted by nearby electronic devices. These waves can introduce unwanted signals into the microphone’s audio output, resulting in a buzzing or static-like noise.
6. Pop and Plosive Noise: These are sudden bursts of air hitting the microphone diaphragm, typically caused by words starting with “p” or “b.” Pop filters or windshields are often used to mitigate this type of noise.
Understanding the specific types of noise that can affect your microphone recordings is essential for implementing effective noise cancellation techniques. In the next section, we will explore the different technologies available for noise cancellation in microphones.
Types of Microphone Noise Cancelling Technologies
When it comes to noise cancellation in microphones, there are two main technologies that are commonly used: passive noise cancellation and active noise cancellation.
1. Passive Noise Cancellation:
Passive noise cancellation is achieved through physical means, without the need for any electronic components. This technology focuses on minimizing external noise by using materials and designs that absorb, isolate, or block sound waves. Some common methods of passive noise cancellation include:
– Acoustic Insulation: Using materials that absorb sound waves, such as foam or rubber, to reduce the transmission of external noise.
– Microphone Enclosures: Using a physical barrier, such as a windshield or soundproof housing, to isolate the microphone from ambient noise.
– Directional Microphones: Using microphone designs that pick up sound primarily from specific directions, allowing better rejection of unwanted noise from other directions.
2. Active Noise Cancellation:
Active noise cancellation takes the noise reduction process a step further by incorporating electronic components into the microphone. This technology uses advanced algorithms and signal processing techniques to actively analyze the incoming audio signal and generate an anti-noise signal to cancel out the unwanted noise. Active noise cancellation typically involves the following steps:
– Microphone Pickup: The microphone captures the desired audio signal, along with the background noise.
– Noise Analysis: The captured audio signal is analyzed to identify the characteristics of the noise.
– Anti-Noise Generation: An anti-noise signal is generated, precisely matching the identified noise characteristics but with an opposite phase.
– Mixing: The anti-noise signal is mixed with the original audio signal, effectively canceling out the unwanted noise.
Active noise cancellation can significantly improve audio quality in noisy environments by reducing background noise and enhancing the clarity of the desired sound. It is commonly used in microphones for applications such as voice recording, podcasting, online meetings, and broadcasting.
Now that we have explored the different technologies available for noise cancellation in microphones, let’s move on to the steps involved in adding noise cancellation to a microphone.
Passive Noise Cancellation
Passive noise cancellation is a method of reducing unwanted noise in a microphone without the use of electronic components. It relies on physical means to minimize or block out external noise, resulting in improved audio quality and clarity.
There are several techniques used in passive noise cancellation:
1. Acoustic Insulation: This method involves using materials that absorb sound waves, such as foam or rubber, to reduce the transmission of external noise. The microphone is surrounded by these materials, which absorb the unwanted noise before it reaches the microphone element. Acoustic insulation is commonly used in studio environments or for microphones that require a higher level of noise reduction.
2. Microphone Enclosures: Another approach to passive noise cancellation is the use of microphone enclosures or shields. These can be in the form of windscreens or pop filters that are placed in front of the microphone to reduce wind noise and plosive sounds. The enclosures act as a physical barrier, preventing excessive air movement and reducing the impact of sudden bursts of sound that can distort the audio.
3. Directional Microphones: Directional microphones are designed to pick up sound primarily from specific directions, allowing for better rejection of unwanted noise from other directions. This is achieved through the use of specific microphone capsule designs, such as cardioid or supercardioid patterns, which are more sensitive to sound coming from the front and less sensitive to sound coming from the sides or rear. Directional microphones are commonly used in live performances, broadcasting, and other scenarios where background noise needs to be minimized.
By utilizing passive noise cancellation techniques, unwanted noise can be effectively minimized or eliminated, resulting in clearer and more focused audio. It is important to choose the right passive noise cancellation method based on the specific noise environment and intended use of the microphone.
In the next section, we will explore active noise cancellation, which takes noise reduction to the next level by employing electronic components and advanced signal processing algorithms to actively counteract unwanted noise.
Active Noise Cancellation
Active noise cancellation (ANC) is an advanced technology that goes beyond passive methods to actively reduce or eliminate unwanted noise in a microphone. It utilizes electronic components and sophisticated algorithms to analyze the audio signal and generate an anti-noise signal that cancels out the specific frequencies of the noise.
The process of active noise cancellation involves several key steps:
1. Microphone Pickup: The microphone captures both the desired audio signal and the background noise.
2. Noise Analysis: The captured audio signal is analyzed to identify the characteristics and frequencies of the noise. This analysis can be done through digital signal processing techniques.
3. Anti-Noise Generation: Once the noise is identified, an anti-noise signal is generated. This signal is designed to have the same amplitude as the noise but with an opposite phase. By combining the anti-noise and the noise together, they cancel each other out, reducing or eliminating the unwanted noise.
4. Mixing: The anti-noise signal is mixed with the original audio signal coming from the microphone. This mixing process combines the two signals together, effectively canceling out the unwanted noise while preserving the desired audio.
Active noise cancellation is particularly effective in reducing constant, predictable noise sources, such as humming or background noise in a controlled environment. It works best when the noise pattern remains relatively consistent, allowing the algorithms to accurately generate the anti-noise signal.
Active noise cancellation is widely used in various applications, including high-quality headphones, conference room microphones, and recording equipment. It greatly enhances the audio experience by providing clearer, more intelligible sound and minimizing distractions from external noise.
It is worth noting that active noise cancellation may not completely eliminate all types of noise, especially sudden or transient sounds. In such cases, a combination of active and passive noise cancellation methods can be used for more effective noise reduction.
Now that we understand the concept of active noise cancellation, let’s explore how to add noise cancellation to a microphone in the next section.
How to Add Noise Cancellation to a Microphone
If you want to enhance the noise cancellation capabilities of your microphone, there are certain steps you can take to add noise cancellation technology. These steps will help you achieve better audio quality and reduce unwanted background noise. Here’s a general outline of the process:
Step 1: Choose the Right Microphone
Start by selecting a microphone that is suitable for your specific needs and environment. Consider factors such as microphone type, sensitivity, and directional characteristics. Different microphones excel in different scenarios, so choose one that matches your intended use.
Step 2: Select a Noise Cancellation Technology
Determine the type of noise cancellation technology you want to incorporate. You can opt for passive noise cancellation methods, active noise cancellation, or a combination of both. Consider the specific noise environment and the level of noise reduction required.
Step 3: Install the Noise Cancellation Circuitry
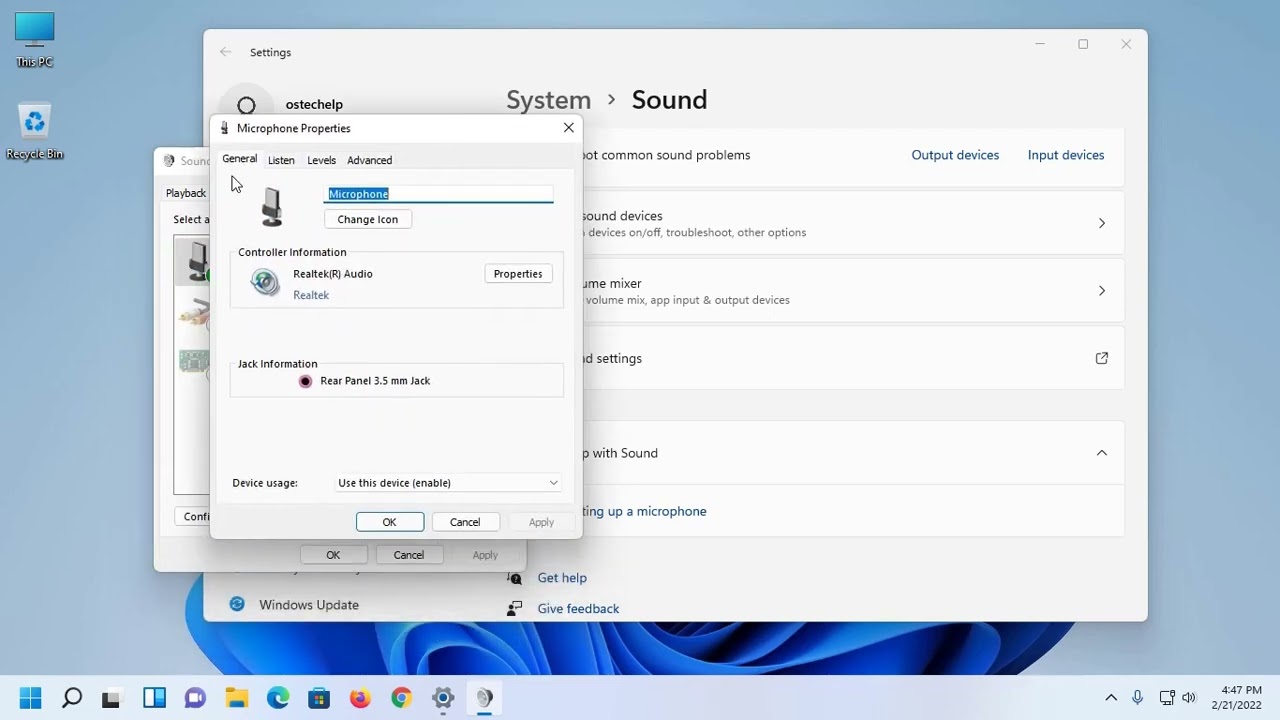
If you choose to implement active noise cancellation, you will need to install the necessary circuitry. This typically involves integrating digital signal processing (DSP) chips, microcontrollers, and a power supply into the microphone. Consult the microphone’s specifications and seek professional guidance if needed.
Step 4: Test and Fine-tune the Noise Cancellation
Once the noise cancellation technology is installed, thoroughly test the microphone in different noise conditions. Monitor the audio output and make adjustments as needed. Fine-tune the noise cancellation parameters, such as frequency ranges and filter settings, to optimize the cancellation effectiveness.
It’s important to note that adding noise cancellation to a microphone may require technical expertise and proper equipment. If you aren’t familiar with electronics or microphone modifications, it’s advisable to seek assistance from professionals or consult the manufacturer for guidance.
By following these steps, you can enhance the noise cancellation capabilities of your microphone, resulting in improved audio quality and reduced background noise. Remember to choose the right microphone, select the appropriate noise cancellation technology, install the necessary circuitry, and fine-tune the settings for optimal performance.
Now that you know how to add noise cancellation to a microphone, you can enjoy a more immersive audio experience with enhanced clarity and reduced distractions from unwanted noise.
Step 1: Choose the Right Microphone
When it comes to adding noise cancellation to a microphone, selecting the right microphone is crucial. The microphone you choose should be well-suited for your specific needs and the intended environment. Here are some key factors to consider in this process:
1. Microphone Type: There are various types of microphones available, including dynamic, condenser, ribbon, and lavalier. Each type has its own characteristics and is suitable for different applications. Consider the nature of your recordings or performances to determine which microphone type will best capture the desired audio while effectively canceling out background noise.
2. Sensitivity: The sensitivity of the microphone refers to how responsive it is to sound. A highly sensitive microphone can capture even subtle sounds but may also pick up more ambient noise. For noise cancellation purposes, you may want to select a microphone with lower sensitivity to minimize the pickup of unwanted noise sources.
3. Directional Characteristics: Different microphones have varying directional patterns, such as cardioid, omnidirectional, or supercardioid. These patterns determine how the microphone picks up sound from different directions. For noise cancellation, consider using microphones with directional characteristics that focus on capturing sound from the desired source while reducing the pickup of ambient noise coming from other directions.
4. Noise Floor: The noise floor is the inherent level of background noise that is present in any audio recording. When adding noise cancellation to a microphone, it’s important to consider the microphone’s noise floor. A microphone with a lower noise floor will provide a cleaner audio signal, allowing the noise cancellation technology to work more effectively.
5. Durability and Build Quality: Depending on your intended use, consider the durability and build quality of the microphone. This is especially important if you plan to use the microphone in rugged environments or for live performances where it may be subject to rough handling. A sturdy and well-built microphone will withstand the demands of frequent use and maintain its noise cancellation capabilities over time.
6. Budget: Lastly, consider your budget. The cost of microphones can vary significantly based on factors such as brand, features, and intended use. Determine a budget range that aligns with your requirements and research microphones within that range to find the best balance between quality and price.
By carefully considering these factors, you can choose a microphone that is best suited for noise cancellation. Understanding the specific requirements of your recordings or performances and selecting the appropriate microphone type, sensitivity, directional characteristics, noise floor, and build quality will pave the way for successful noise cancellation implementation in the subsequent steps.
Step 2: Select a Noise Cancellation Technology
After choosing the right microphone, the next step in adding noise cancellation is selecting the appropriate noise cancellation technology. Depending on your specific requirements and the level of noise reduction desired, there are different technologies available to consider:
1. Passive Noise Cancellation: Passive noise cancellation involves physical methods to minimize or block external noise from reaching the microphone. This can include using materials that absorb sound waves, such as foam or rubber, to reduce noise transmission, or utilizing microphone enclosures or shields to isolate the microphone from ambient noise. Passive noise cancellation is effective in reducing certain types of noise, but it may not be sufficient for environments with high levels of background noise.
2. Active Noise Cancellation: Active noise cancellation takes noise reduction a step further by incorporating electronic components and algorithms. It analyzes the incoming audio signal, identifies the specific frequencies of the noise, and generates an anti-noise signal to cancel out those frequencies. Active noise cancellation is particularly effective in reducing constant or predictable noise sources and can provide significant noise reduction in challenging environments.
3. Hybrid Noise Cancellation: Some microphone models employ a combination of passive and active noise cancellation technologies to provide enhanced noise reduction. This hybrid approach combines the benefits of both methods to reduce a wide range of noise sources effectively. It can be particularly useful in scenarios where a high level of noise reduction is required, such as professional recording studios or noisy event environments.
When selecting a noise cancellation technology, it is important to consider factors such as the specific noise environment, the level of noise reduction required, and the intended use of the microphone. Passive noise cancellation is often suitable for environments with lower ambient noise levels, while active or hybrid noise cancellation may be necessary for environments with high levels of background noise.
Additionally, consider the compatibility and integration of the chosen noise cancellation technology with your microphone. Research different technologies, read reviews, and consult with professionals or vendors to determine the most suitable option that meets your requirements and fits your budget.
By carefully selecting the appropriate noise cancellation technology, you can ensure that your microphone is equipped to effectively reduce unwanted noise and provide high-quality audio with minimal distractions.
Step 3: Install the Noise Cancellation Circuitry
Once you have chosen the right microphone and selected the noise cancellation technology, the next step is to install the necessary circuitry to incorporate noise cancellation into your microphone. This step requires technical expertise and an understanding of electronic components. Here’s an overview of the installation process:
1. Research and Consultation: Before proceeding with the installation, conduct thorough research on the specific noise cancellation technology you have chosen. Understand its requirements, specifications, and compatibility with your microphone. If needed, consult with experts or professionals who have experience in noise cancellation circuitry installation.
2. Obtain the Required Components: Gather the necessary components for the noise cancellation circuitry. This may include digital signal processing (DSP) chips, microcontrollers, filters, amplifiers, and power supply components. Ensure that you have the correct components based on the specifications provided by the noise cancellation technology manufacturer.
3. Circuit Design and Soldering: Design the circuit layout based on the instructions provided by the noise cancellation technology manufacturer or seek professional assistance. This involves soldering the components onto a circuit board, following proper soldering techniques and safety precautions. Ensure precise connections and proper insulation to prevent any unwanted noise or interference.
4. Integration and Connection: Integrate the noise cancellation circuitry into the microphone. This may involve disassembling the microphone, identifying the appropriate points for connecting the circuitry, and making the necessary connections. Pay close attention to the instructions provided by the noise cancellation technology manufacturer to ensure accurate integration.
5. Power Supply: If the noise cancellation technology requires power, ensure that the circuitry is properly connected to a power supply. This may involve connecting batteries or incorporating power input from an external source. Follow the manufacturer’s guidelines to provide the appropriate voltage and ensure a stable power supply for optimal noise cancellation performance.
6. Testing and Calibration: Once the circuitry is installed, thoroughly test the microphone in different noise conditions to evaluate the effectiveness of the noise cancellation. Use audio monitoring equipment or software to assess the noise reduction capabilities and make any required adjustments or calibrations. Follow the manufacturer’s guidelines for testing and fine-tuning the noise cancellation parameters, such as frequency ranges and filter settings, to optimize the performance.
It is important to note that installing noise cancellation circuitry requires advanced technical knowledge and skills. If you are not confident or experienced in electronics and circuitry, it is recommended to seek assistance from professionals or consult with the manufacturer for guidance. Improper installation can lead to subpar noise cancellation performance or even damage to the microphone.
By carefully installing the noise cancellation circuitry, you can fully incorporate the chosen technology into your microphone, allowing for effective noise reduction and improved audio quality.
Step 4: Test and Fine-tune the Noise Cancellation
After installing the noise cancellation circuitry in your microphone, the next step is to thoroughly test and fine-tune the noise cancellation to ensure optimal performance. This step is crucial for achieving the best possible noise reduction and audio quality. Here’s how you can approach this process:
1. Setting up Test Environment: Find a quiet environment to conduct your tests. This allows you to focus on the microphone’s performance without interference from external noise sources. Make sure the test environment is controlled and free from any additional noise that could affect the results.
2. Test Various Noise Conditions: Test the microphone under different noise conditions that mimic real-world scenarios in which you will use the microphone. This can include background noise from fans or air conditioning, ambient noise in a crowded room, or other specific noise sources you want to eliminate. Record audio samples or use audio monitoring equipment to assess the noise cancellation performance in each scenario.
3. Evaluate Noise Reduction: Listen to the recorded audio samples or analyze the output from audio monitoring equipment. Assess the level of noise reduction achieved by the noise cancellation circuitry. Pay attention to the desired audio signal, the level of residual noise, and any artifacts introduced by the noise cancellation process. Take notes of any specific areas where improvement is needed.
4. Adjust Noise Cancellation Parameters: If your noise cancellation technology allows for parameter adjustments, such as frequency ranges or filter settings, take advantage of this flexibility to fine-tune the noise cancellation. Make small adjustments and re-test the microphone’s performance to evaluate the impact of the changes. Aim for a balance between effective noise reduction and preserving the quality and clarity of the desired audio signal.
5. Iterate and Optimize: Continue testing, adjusting, and re-testing until you are satisfied with the noise cancellation performance. It may take several iterations to achieve the desired results. Be patient and persistent in your optimization efforts, making small refinements as needed.
6. Document the Settings: Once you have found the optimal noise cancellation settings, document them for future reference. This will ensure consistency and ease of adjustment if needed in the future. Keep track of the specific parameters and any calibration processes involved in fine-tuning the noise cancellation to maintain a consistent and reliable performance over time.
Regularly re-evaluate and re-test the noise cancellation performance to ensure it remains effective and aligned with your expectations. Changes in the recording environment or microphone usage may require adjustments to maintain optimal noise reduction.
By meticulously testing and fine-tuning the noise cancellation, you can maximize the performance of your microphone and achieve the best possible noise reduction and audio quality.
Conclusion
Noise cancellation technology has become an essential tool for anyone looking to improve audio quality and reduce unwanted background noise in their microphone recordings. By following the steps outlined in this guide, you can effectively add noise cancellation to your microphone and enjoy a more immersive and clear audio experience.
Starting with choosing the right microphone for your specific needs and environment, you can ensure that the microphone is well-suited to capture the desired audio while minimizing the pickup of unwanted noise. Then, selecting the appropriate noise cancellation technology, whether it be passive, active, or a hybrid approach, will further enhance the noise reduction capabilities.
Installing the noise cancellation circuitry requires technical expertise and attention to detail. Properly integrating the circuitry into the microphone and ensuring a stable power supply are crucial for optimal performance. Be sure to consult experts or professionals if needed to ensure accurate installation.
Thoroughly testing the microphone and fine-tuning the noise cancellation parameters is key to achieving the best noise reduction and audio quality. Continuously evaluating the performance and making adjustments as needed will help maintain consistent and effective noise cancellation over time.
Remember, adding noise cancellation to a microphone requires careful consideration, technical knowledge, and attention to detail. If you’re unsure or uncomfortable with the installation process, it’s always advisable to seek assistance from professionals or consult with the manufacturer for guidance.
With noise cancellation technology, you can elevate your microphone recordings by reducing unwanted background noise, enhancing speech intelligibility, and enjoying a more immersive audio experience. Whether you’re a content creator, musician, or someone who uses a microphone for daily communication, noise cancellation can significantly improve the quality of your recordings and communications.
So, dive into the world of noise cancellation and unleash the full potential of your microphone. Embrace crystal-clear sound, eliminate distractions, and captivate your audience with professional-quality audio.


