Home>Devices & Equipment>Subwoofer>What Is Subwoofer Pre-Out
Subwoofer
What Is Subwoofer Pre-Out
Modified: January 22, 2024
Learn what a subwoofer pre-out is and how it enhances your audio experience. Explore the benefits of connecting a subwoofer to your audio system and enjoy deeper, more powerful bass.
(Many of the links in this article redirect to a specific reviewed product. Your purchase of these products through affiliate links helps to generate commission for AudioLover.com, at no extra cost. Learn more)
Table of Contents
Introduction
Welcome to the world of deep bass and immersive audio! If you’re a music lover or a movie enthusiast, you understand the importance of a well-balanced audio system. And when it comes to rich, low-frequency sounds, a subwoofer is an essential component.
But have you heard of a subwoofer pre-out? It’s a feature that not only enhances the performance of your subwoofer but also allows for greater control and customization of your audio setup. In this article, we’ll delve into the world of subwoofer pre-out and explore its benefits, how it works, and how to connect it effectively.
Whether you’re a seasoned audiophile or a beginner looking to level up your audio experience, understanding subwoofer pre-out will empower you to make informed buying decisions, optimize your sound system, and enhance your overall listening pleasure.
So, let’s dive in and explore the exciting world of subwoofer pre-out!
Understanding Subwoofer Pre-Out
Before we dive into the technicalities, let’s start by understanding what a subwoofer pre-out actually is. In simple terms, a subwoofer pre-out is a dedicated output on an audio receiver or amplifier that specifically sends low-frequency signals to a subwoofer.
Think of it as a specialized connection that enables your subwoofer to receive and play back low-end frequencies with precision. By utilizing a subwoofer pre-out, you can ensure that the bass frequencies are handled separately, allowing for better control and optimization of your audio system.
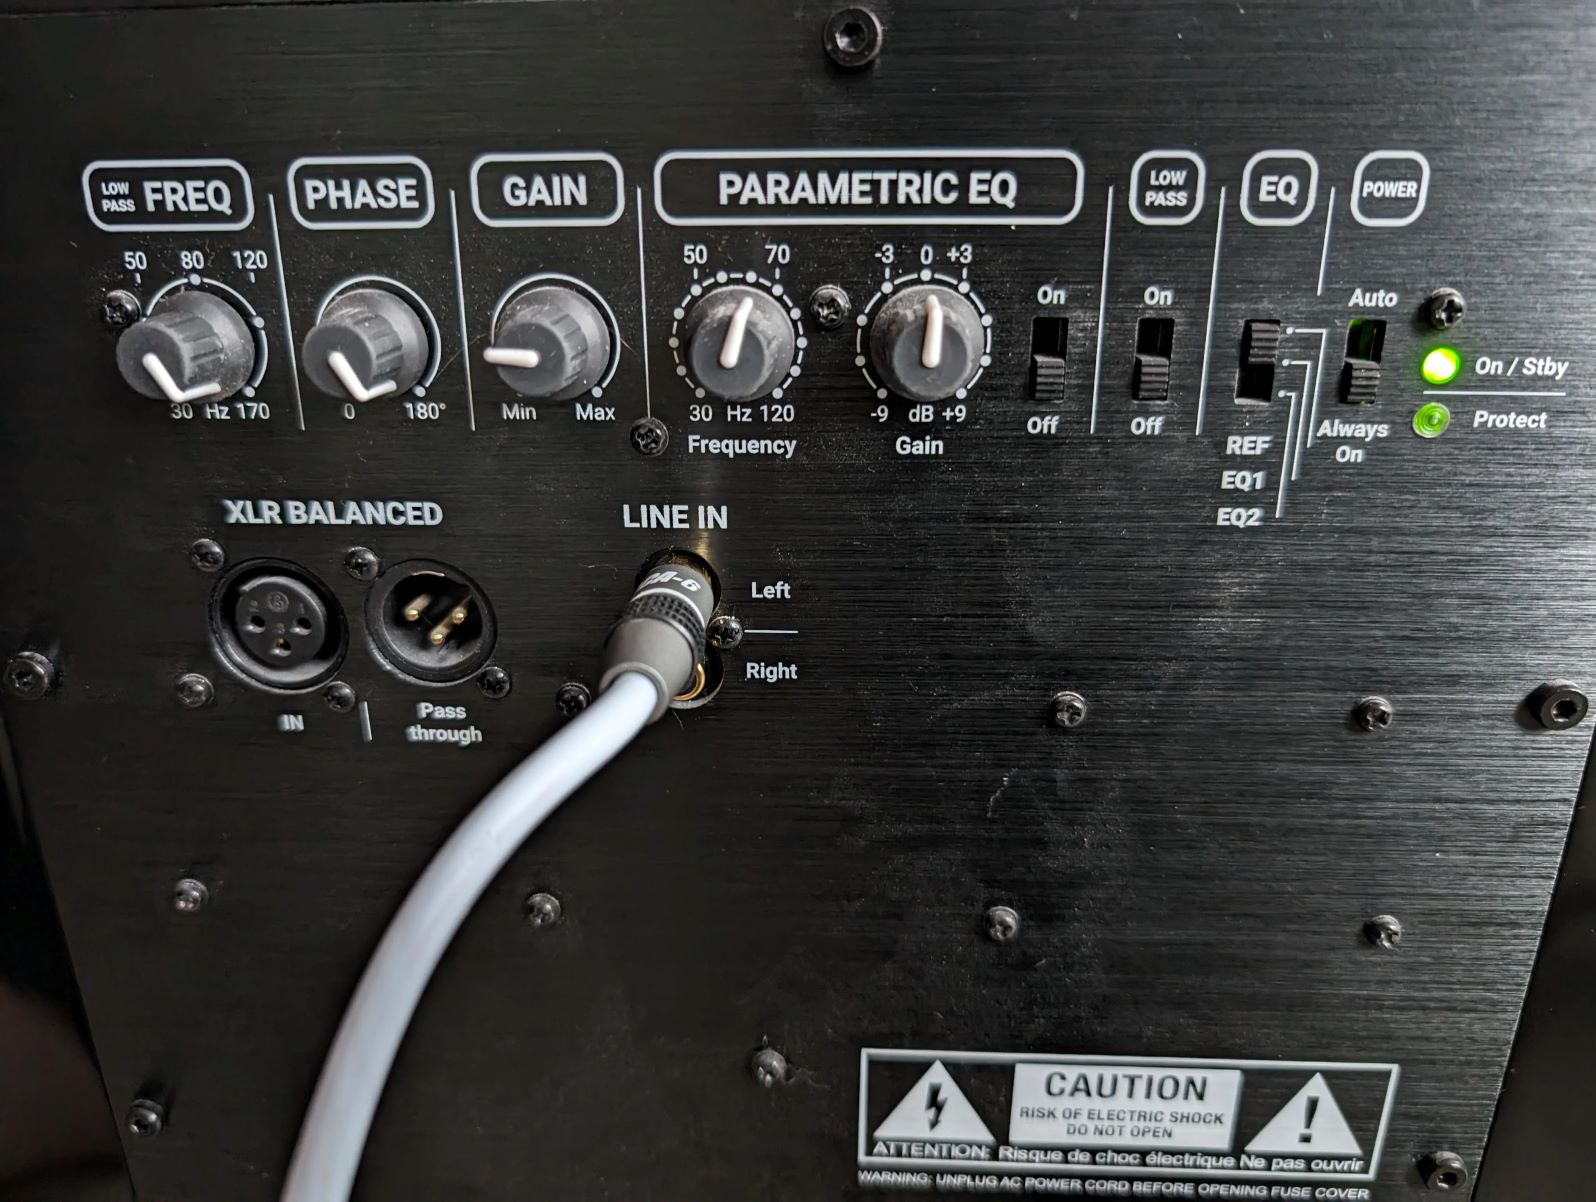
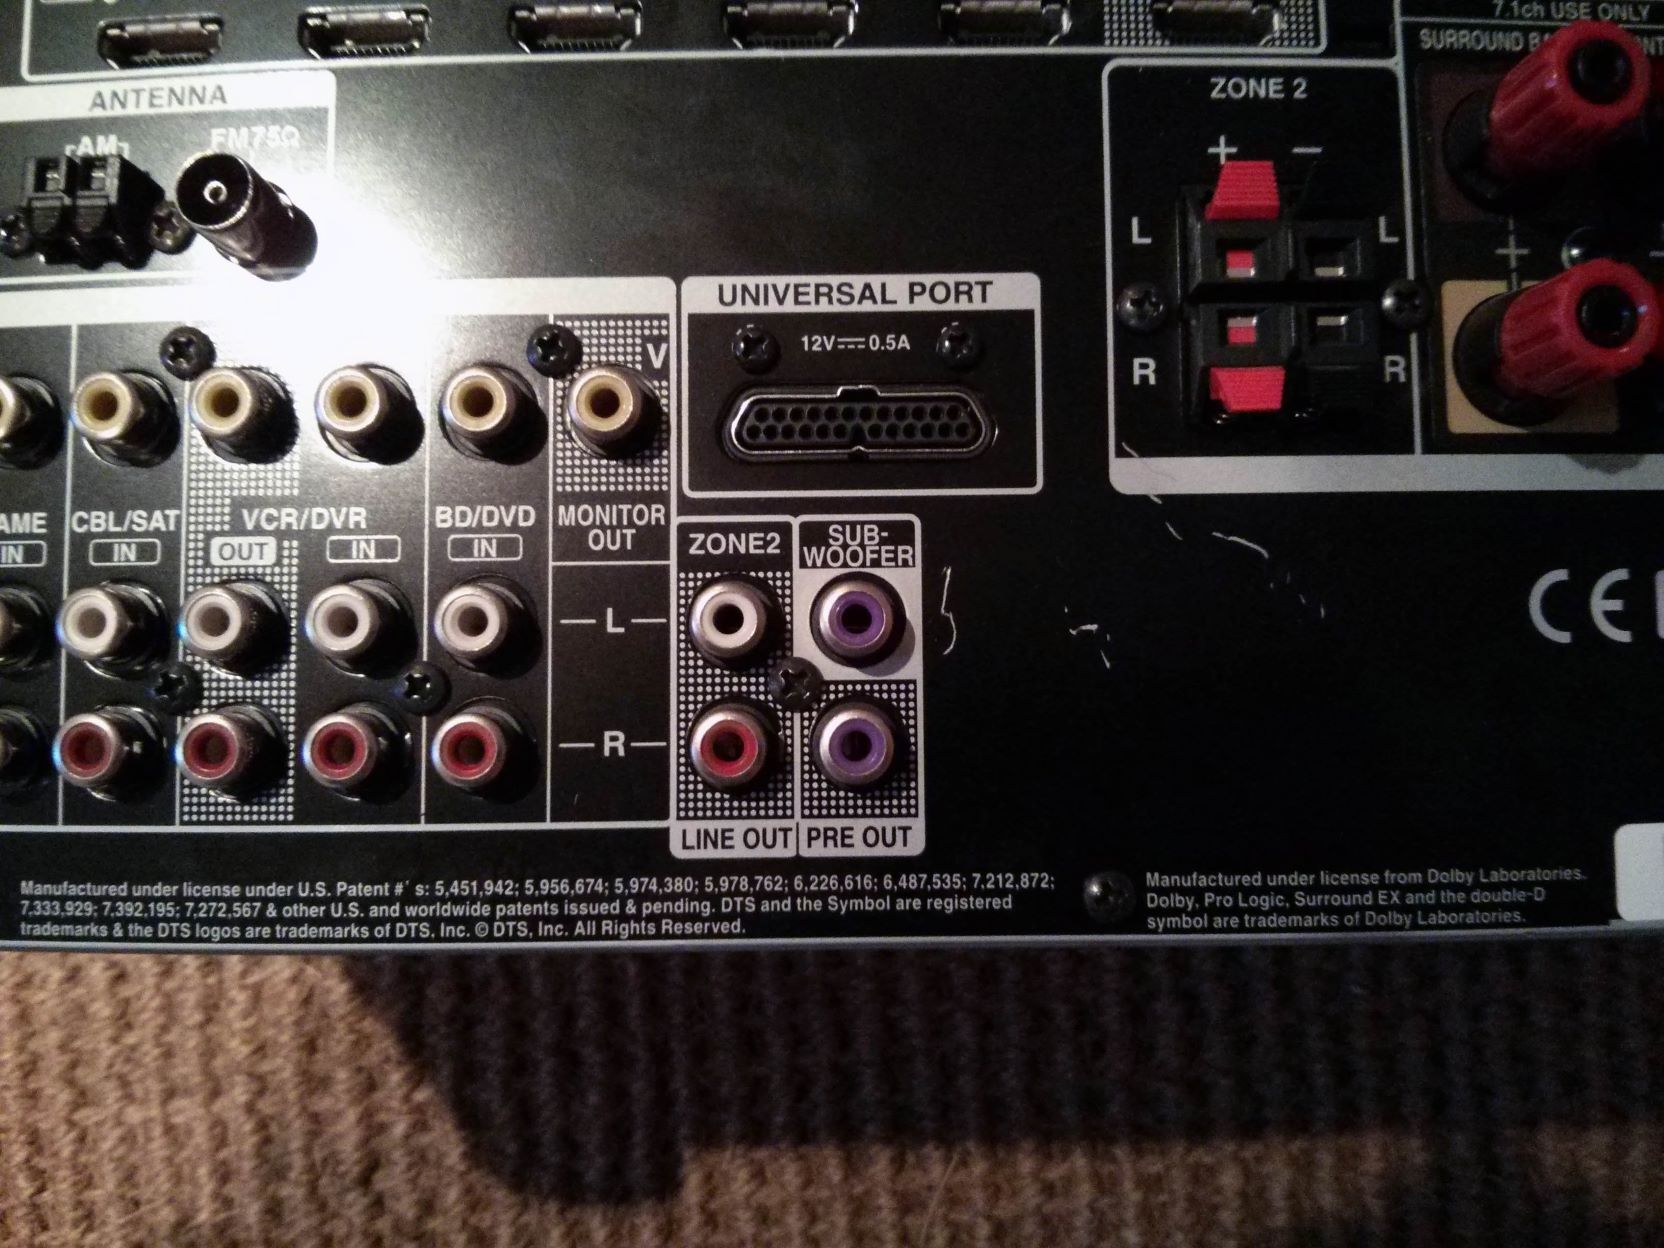
Subwoofer pre-out is typically found on audio receivers or amplifiers and can be identified by a dedicated RCA (phono) output labeled “Subwoofer” or “Pre-Out.” This output is specifically designed to provide the necessary power and signal for the subwoofer to reproduce deep bass accurately.
It’s important to note that not all audio receivers or amplifiers have a subwoofer pre-out. Some budget-friendly models may lack this feature, which means you’ll have to rely on alternative methods, such as speaker-level connections, to integrate your subwoofer.
However, if your audio device does have a subwoofer pre-out, you can take advantage of its numerous benefits to elevate your audio experience to new heights. Let’s explore the advantages of using a subwoofer pre-out in the next section.
Benefits of Subwoofer Pre-Out
Using a subwoofer pre-out offers several significant benefits that can greatly enhance your audio system’s performance. Let’s take a closer look at some of these advantages:
- Improved Bass Response: One of the primary benefits of utilizing a subwoofer pre-out is the enhanced bass response. By connecting your subwoofer directly to the dedicated output, you can ensure that the deep bass frequencies are reproduced with accuracy and clarity, delivering a more immersive audio experience.
- Greater Control: A subwoofer pre-out provides you with greater control over your audio system. With a separate output for the subwoofer, you can adjust the volume, crossover settings, and phase control for the low-frequency range, allowing you to fine-tune the bass to your liking.
- Reduced Interference: By using a subwoofer pre-out, you can minimize interference and noise in your audio system. Separating the bass frequencies from the main speakers’ output helps to isolate and amplify the low-end sounds, resulting in cleaner and more accurate bass reproduction.
- Flexibility in Speaker Setup: A subwoofer pre-out provides you with the flexibility to add multiple subwoofers to your audio system. This is particularly useful for larger rooms or home theaters, where multiple subwoofers can help distribute bass more evenly and create a more balanced sonic experience.
- Preserving Amplifier Power: With a subwoofer pre-out, the task of handling the low-frequency signals is taken off the main amplifier. This allows the amplifier to focus on driving the midrange and high-frequency speakers more efficiently, maximizing their performance and power handling capabilities.
These are just a few of the benefits that a subwoofer pre-out brings to your audio system. The ability to fine-tune the bass, reduce interference, and add multiple subwoofers gives you more control and customization options, resulting in a more immersive and engaging listening experience.
How Subwoofer Pre-Out Works
To understand how a subwoofer pre-out works, we need to delve into the technical aspects of audio signal processing. When you play audio through your receiver or amplifier, the sound signal is divided into different frequency ranges: high frequencies, midrange frequencies, and low frequencies (bass).
In an audio system with a subwoofer pre-out, the low-frequency sounds are directed specifically to the subwoofer output. This separation of frequencies allows for more precise and dedicated handling of the bass frequencies, ensuring optimal performance.
The subwoofer pre-out sends a line-level signal (usually in the form of an RCA or phono output) to the subwoofer. This line-level signal carries only the bass frequencies, typically ranging from 20Hz to 200Hz or lower, depending on the crossover settings.
Once the line-level signal reaches the subwoofer, the built-in amplifier in the subwoofer takes over and powers the subwoofer driver(s) to produce deep, impactful bass. The subwoofer’s amplifier is designed specifically to handle the low-frequency signals, delivering accurate and powerful bass reproduction.
By utilizing a subwoofer pre-out, you can bypass the main amplifier’s need to handle the power-hungry bass frequencies, allowing it to focus on driving the midrange and high-frequency speakers more efficiently. This distribution of power ensures that each speaker receives the necessary power to reproduce its respective frequency range optimally.
Additionally, subwoofer pre-outs often come with adjustable settings such as crossover frequency and phase control. The crossover frequency determines the point at which the subwoofer starts playing the bass frequencies, and the phase control ensures proper alignment of the subwoofer with the other speakers in the system, reducing any phase cancellation issues.
Overall, the subwoofer pre-out simplifies the signal routing, dedicates power for low-frequency reproduction, and allows for fine-tuning of the bass response, resulting in a more balanced and immersive sound experience.
Connecting a Subwoofer to Subwoofer Pre-Out
Connecting a subwoofer to the subwoofer pre-out is a straightforward process that requires a few simple steps. Here’s a step-by-step guide:
- Identify the subwoofer pre-out on your audio receiver or amplifier. Look for a dedicated RCA (phono) output labeled “Subwoofer” or “Pre-Out.”
- Ensure that your subwoofer has a corresponding input for the subwoofer pre-out. Most subwoofers have a dedicated RCA input labeled “Sub In” or “LFE In.”
- Using an RCA cable, connect one end to the subwoofer pre-out on your audio receiver or amplifier.
- Connect the other end of the RCA cable to the corresponding input on your subwoofer.
- Double-check the connections to ensure that they are secure and tight to avoid any signal loss or interference.
- Power on your audio system and adjust the settings on your receiver or amplifier to activate the subwoofer pre-out. This may involve navigating through the audio settings menu and enabling the subwoofer output.
- Test the subwoofer by playing audio that has prominent low-frequency content. You should now hear the deep bass coming from your subwoofer, enhancing the overall listening experience.
Note: If you have multiple subwoofers or wish to integrate them using a subwoofer pre-out, you can follow the same steps for each subwoofer. Simply connect each subwoofer to its respective subwoofer pre-out on your audio receiver or amplifier.
Remember to consult the user manual of your specific audio receiver, amplifier, and subwoofer for any additional instructions or specifications regarding the connection process.
Once your subwoofer is connected to the subwoofer pre-out, you can further optimize the bass response by adjusting the subwoofer settings, such as volume, crossover frequency, and phase control. These settings allow you to customize the bass output according to your preferences and the characteristics of your listening room.
With the subwoofer successfully connected to the subwoofer pre-out, you can now enjoy deep, powerful bass that enhances your music, movies, and overall audio experience.
Adjusting Subwoofer Pre-Out Settings
Once you have connected your subwoofer to the subwoofer pre-out, it’s time to optimize its performance by adjusting the subwoofer pre-out settings. These settings will help you achieve the desired bass response and ensure a seamless integration with your existing audio system. Here are some key settings to consider:
- Volume: Adjusting the volume of the subwoofer allows you to balance its output with the rest of your speakers. Start with a moderate volume level and make gradual adjustments until you reach a balanced sound where the subwoofer blends seamlessly with the other speakers.
- Crossover Frequency: The crossover frequency determines at which point the subwoofer starts playing the bass frequencies, while the main speakers handle the midrange and high-frequency sounds. Experiment with different crossover frequencies to find the sweet spot that best integrates the subwoofer’s output with the rest of the speakers. Typically, a crossover frequency between 80Hz to 120Hz works well for most systems.
- Phase Control: The phase control setting adjusts the alignment of the subwoofer’s output with the other speakers in your system. This ensures that the sound waves from the subwoofer and the other speakers are in sync, minimizing any phase cancellation effects. Flip the phase switch or adjust the phase control knob to optimize the bass response and improve the overall audio coherence.
- Room Acoustics: Consider the acoustics of your listening room when adjusting the subwoofer pre-out settings. Factors such as room size, layout, and furniture placement can have a significant impact on the bass response. Experiment with different settings and placement of the subwoofer to find the optimal configuration that maximizes bass performance and minimizes acoustic anomalies like standing waves or excessive room resonance.
It’s important to note that every audio system and room configuration is unique, so the ideal settings may vary. Take your time to fine-tune the subwoofer pre-out settings and listen to a variety of music or movie scenes to ensure that the bass response is smooth, impactful, and well-integrated with the rest of the audio.
Additionally, if your audio receiver or amplifier offers advanced features like room correction or equalization, make use of these tools to further refine the bass response and tailor it to your preferences and room’s characteristics.
Remember, adjusting the subwoofer pre-out settings is a process of trial and error. Take your time, listen carefully, and make small adjustments to find the settings that deliver the best audio experience for your specific setup and personal preferences.
Troubleshooting Subwoofer Pre-Out Issues
While connecting and setting up a subwoofer using the subwoofer pre-out is generally straightforward, you may encounter some issues along the way. Here are some common problems and their potential solutions:
- No sound from the subwoofer: If you’re not hearing any sound from the subwoofer, check the connections first. Ensure that the RCA cable is securely plugged into the subwoofer pre-out and the subwoofer’s input. Also, verify that the subwoofer is powered on and its volume control is adjusted correctly. Finally, check your audio receiver or amplifier settings to ensure that the subwoofer output is enabled.
- Weak or no bass: If the bass from your subwoofer is weak or non-existent, start by checking the volume and crossover settings. Increase the subwoofer volume gradually and adjust the crossover frequency higher until you achieve a balanced and impactful bass response. Additionally, consider the placement of the subwoofer in the room. Experiment with different locations to find the spot that provides the best bass performance.
- Interference or hum: If you’re experiencing unwanted interference or hum coming from the subwoofer, it could be caused by improper grounding or signal interference. Ensure that all connections are secure and properly grounded. Adjusting the position of the subwoofer and keeping it away from other electronic devices or power sources can also help reduce interference.
- Mismatched phase: If the bass sounds distant or disconnected from the rest of the speakers, it could indicate a phase mismatch. Adjust the phase control on the subwoofer to improve the synchronization between the subwoofer and other speakers. Flipping the phase switch or experimenting with different phase settings can help achieve better integration.
- Distorted bass: If the bass coming from the subwoofer sounds distorted or muddy, it could be a sign of incorrect crossover settings or a defective subwoofer. Double-check that the crossover frequency is appropriately set and experiment with different frequencies to find the optimal balance. If the distortion persists, it may be necessary to have the subwoofer checked or replaced.
If you’ve tried all the troubleshooting steps and are still experiencing issues with your subwoofer pre-out, it may be beneficial to consult the user manual of your audio receiver, amplifier, and subwoofer for specific instructions and troubleshooting guidance.
Additionally, reaching out to technical support or seeking assistance from audio professionals can help diagnose and resolve any persistent issues you may encounter. Remember, a well-functioning subwoofer pre-out is crucial for achieving optimal bass performance and enjoying a satisfying audio experience.
Conclusion
In conclusion, the subwoofer pre-out is a valuable feature that enhances the performance and customization of your audio system. By using the subwoofer pre-out, you can enjoy improved bass response, greater control over your audio, reduced interference, flexibility in speaker setup, and optimized power distribution.
Understanding how the subwoofer pre-out works allows you to make the most of this feature and integrate your subwoofer seamlessly into your audio system. Connecting a subwoofer to the subwoofer pre-out is a straightforward process that involves using an RCA cable to establish the connection.
Once connected, adjusting the subwoofer pre-out settings is crucial for optimizing the bass response. Fine-tuning the volume, crossover frequency, and phase control allows you to achieve a well-balanced and immersive audio experience that complements your listening preferences and room acoustics.
If you encounter any issues with your subwoofer pre-out, troubleshooting common problems like no sound, weak bass, interference, mismatched phase, or distorted bass can help resolve the issue and restore optimal performance.
Remember, the subwoofer pre-out is a valuable tool that empowers you to take control of your audio system’s low-frequency performance. With its features and customization options, you can enjoy deep, powerful bass that adds a new dimension to your music, movies, and overall audio enjoyment.
So, go ahead and explore the possibilities of a subwoofer pre-out, and elevate your audio experience to new depths of richness and immersion!