Home>Devices & Equipment>Subwoofer>What Cable Do I Need To Connect Subwoofer To Receiver?
Subwoofer
What Cable Do I Need To Connect Subwoofer To Receiver?
Modified: January 22, 2024
Discover the right cable to connect your subwoofer to your receiver. Find out which cable is best suited for optimal audio quality and compatibility.
(Many of the links in this article redirect to a specific reviewed product. Your purchase of these products through affiliate links helps to generate commission for AudioLover.com, at no extra cost. Learn more)
Table of Contents
- Introduction
- Understanding the Basics of Subwoofer Connections
- Types of Subwoofer Connections
- Using a Wired Connection
- Using a Wireless Connection
- Choosing the Right Cable for a Wired Connection
- Understanding Different Cable Types
- Common Connection Methods
- Connecting a Subwoofer to a Receiver via RCA Cable
- Connecting a Subwoofer to a Receiver via Speaker Wire
- Connecting a Subwoofer to a Receiver via HDMI Cable
- Understanding Additional Connection Options
- Troubleshooting Subwoofer Connection Issues
- Conclusion
Introduction
Welcome to the world of subwoofers, where the deep and powerful bass takes your audio experience to a whole new level. Whether you’re a movie enthusiast, a music lover, or a gamer, a subwoofer can add that extra punch and rumble to your audio setup. But before you can enjoy the thunderous bass, you need to connect your subwoofer to your receiver.
Connecting a subwoofer to a receiver may seem like a daunting task, especially if you’re new to the world of audio equipment. With different types of connections and cables available, it’s important to understand the basics to make the right choices.
In this article, we will walk you through the different types of subwoofer connections, discuss the various cables and connection methods, and help you troubleshoot any connection issues that may arise. By the end of this guide, you’ll have a clear understanding of how to connect your subwoofer to your receiver.
So, let’s dive in and explore the world of subwoofer connections!
Understanding the Basics of Subwoofer Connections
Before we dive into the specifics of connecting a subwoofer to a receiver, it’s important to understand the basics of subwoofer connections. A subwoofer, as the name suggests, specializes in reproducing low-frequency sounds, commonly referred to as bass. Unlike regular speakers, subwoofers are dedicated solely to delivering deep and impactful bass.
A subwoofer typically receives its audio signal from a receiver or amplifier. The receiver serves as the central hub for your audio system, connecting all your audio sources, such as a TV, Blu-ray player, or gaming console, and distributing the sound to the speakers, including the subwoofer.
To connect a subwoofer to a receiver, there are two primary types of connections: wired and wireless. Let’s take a closer look at each of these connection types.
- Wired Connection: A wired connection involves physically connecting the subwoofer to the receiver using cables. This is the most common and reliable method of connecting a subwoofer.
- Wireless Connection: A wireless connection eliminates the need for physical cables but still requires a wireless transmitter and receiver to establish a wireless connection between the subwoofer and the receiver.
Both wired and wireless connections have their advantages and disadvantages. Wired connections generally offer better audio quality and stability, while wireless connections provide more flexibility in terms of subwoofer placement.
In the next sections, we will focus on wired connections as they are the most common and widely used method of connecting a subwoofer to a receiver. We’ll discuss the different types of cables you can use, the connection methods, and provide step-by-step instructions on how to make the connections.
Types of Subwoofer Connections
When it comes to connecting a subwoofer to a receiver, there are several types of connections that you can choose from. Each connection type has its own advantages and considerations, so it’s important to understand the different options available to you. Let’s explore the most common types of subwoofer connections:
- RCA Connection: The RCA (Radio Corporation of America) connection is the most widely used method for connecting a subwoofer to a receiver. It involves using RCA cables to transmit the audio signal from the receiver’s subwoofer output to the subwoofer’s input. This connection method provides a simple and effective way to establish a wired connection.
- Speaker Wire Connection: Another commonly used method is connecting the subwoofer to the receiver using speaker wire. This method involves connecting the subwoofer’s speaker level input terminals to the corresponding speaker outputs on the receiver. It allows the subwoofer to receive the audio signal through the speaker wire.
- HDMI Connection: If your receiver and subwoofer support HDMI (High-Definition Multimedia Interface), you can also connect them using an HDMI cable. This method allows for the transmission of both audio and video signals, making it suitable for home theater setups where audio and video synchronization is crucial.
These are the three main types of subwoofer connections that you will come across. Each connection type has its pros and cons, and the best choice for you will depend on your specific setup and preferences.
In the next sections, we will delve deeper into each connection type, discussing the cables required, the connection methods, and providing step-by-step instructions on how to make the connections. By the end of this article, you’ll have all the knowledge you need to confidently connect your subwoofer to your receiver and start enjoying that deep, immersive bass.
Using a Wired Connection
A wired connection is the most common and reliable method for connecting a subwoofer to a receiver. It involves physically connecting the subwoofer to the receiver using cables. This method ensures a stable and consistent audio signal transfer, resulting in optimal sound quality. Here’s what you need to know when using a wired connection:
1. Choose the Right Cable: The type of cable you need will depend on the specific connection method supported by your subwoofer and receiver. The most commonly used cables for subwoofer connections are RCA cables and speaker wires.
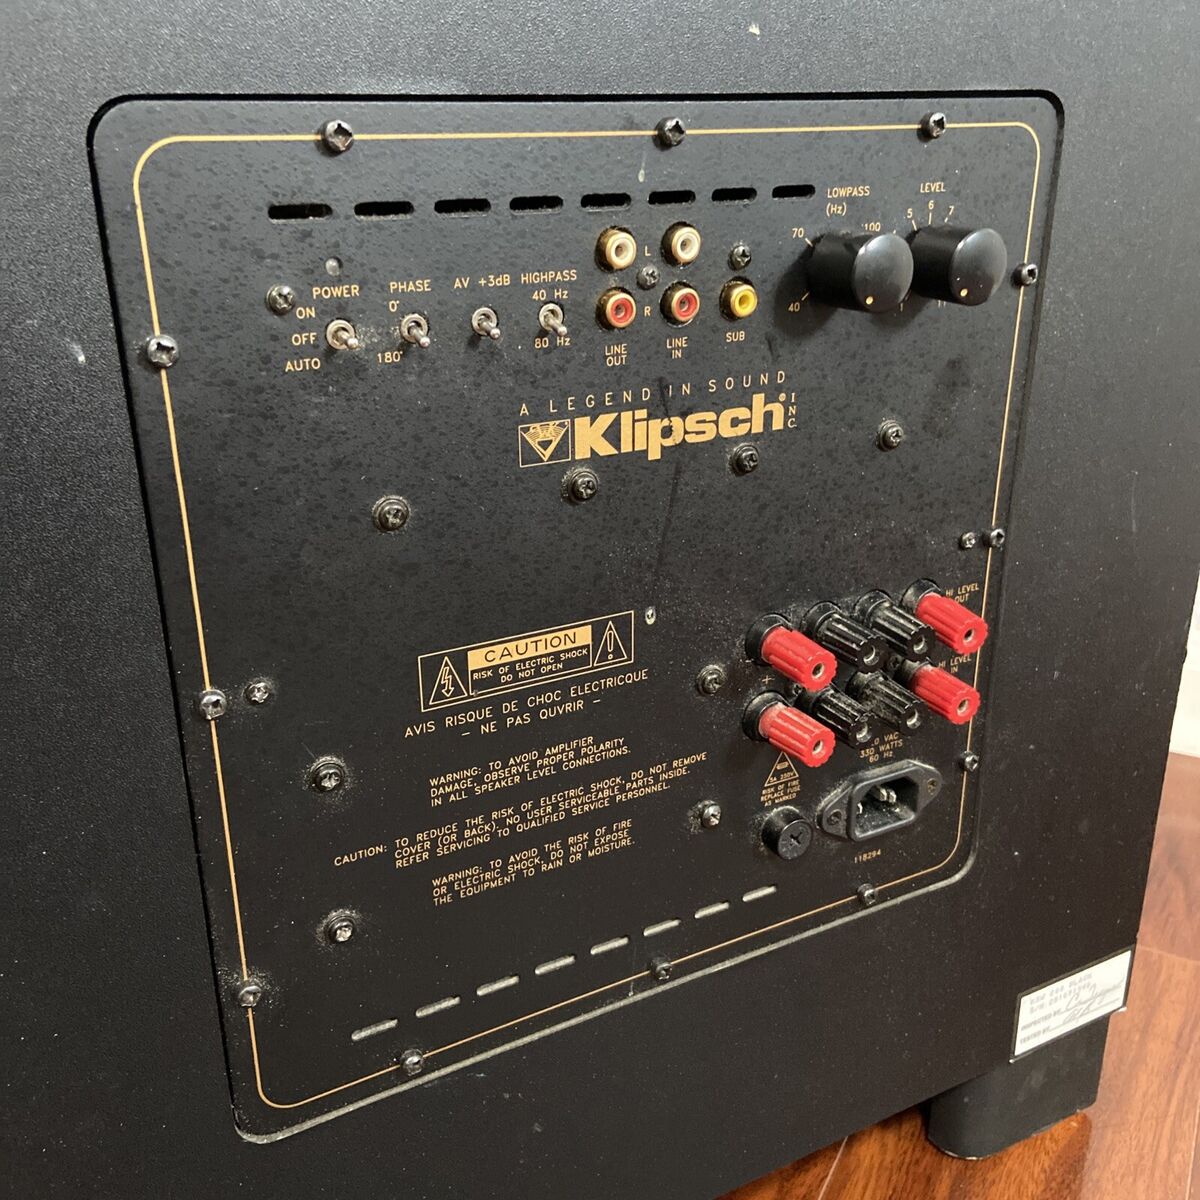
2. Locate the Subwoofer Output: On your receiver, locate the dedicated subwoofer output. It is usually labeled as “Sub Out” or “LFE Out” (Low-Frequency Effects).
3. Locate the Subwoofer Input: On your subwoofer, locate the subwoofer input. It is typically labeled as “Sub In” or “LFE In.”
4. Connecting via RCA Cable: If your subwoofer and receiver have RCA connections, use an RCA cable to make the connection. Insert one end of the cable into the subwoofer output on the receiver, and the other end into the subwoofer input on the subwoofer.
5. Connecting via Speaker Wire: If your subwoofer only has speaker-level input terminals, you’ll need to use speaker wire to connect it to the receiver. Strip the ends of the speaker wire and insert them into the corresponding speaker-level input terminals on the subwoofer. Then, connect the other end of the wire to the speaker output terminals on the receiver.
6. Adjust Subwoofer Settings: After making the physical connections, adjust the subwoofer settings on your receiver. This may include setting the subwoofer channel, adjusting the crossover frequency, and adjusting the volume level to achieve the desired balance with the other speakers in your setup.
By following these steps, you can successfully establish a wired connection between your subwoofer and your receiver. Remember to double-check the connections and ensure a snug fit to avoid any audio interruptions or quality issues.
In the next sections, we will discuss the different cable types in more detail, provide step-by-step instructions for each connection method, and address troubleshooting tips for common subwoofer connection issues.
Using a Wireless Connection
If you prefer a more flexible setup or have difficulty running cables between your subwoofer and receiver, a wireless connection may be an ideal option. A wireless connection allows you to eliminate the need for physical cables while still enjoying the benefits of a connected subwoofer. Here’s what you need to know when using a wireless connection:
1. Check Compatibility: Not all subwoofers and receivers support wireless connectivity. Make sure both your subwoofer and receiver have wireless capabilities before attempting a wireless connection. Some subwoofers come with built-in wireless receivers/transmitters, while others require an additional wireless kit.
2. Wireless Transmitter and Receiver: If your subwoofer and receiver don’t have built-in wireless capabilities, you’ll need a wireless transmitter and receiver kit. The transmitter connects to the subwoofer output on the receiver, while the receiver connects to the input on the subwoofer. Ensure that the transmitter and receiver are within a reasonable range for a stable wireless connection.
3. Pairing the Transmitter and Receiver: Consult the user manual for your wireless kit to find instructions on how to pair the transmitter and receiver. This process typically involves pressing a button or following a specific sequence of steps to establish a secure wireless connection.
4. Wireless Channel Selection: In some cases, you may encounter interference with other wireless devices in your vicinity. If this happens, try selecting a different channel on your wireless transmitter and receiver to mitigate any signal interference and ensure a reliable connection.
5. Adjusting Subwoofer Settings: After successfully establishing a wireless connection, adjust the subwoofer settings on your receiver. You may need to set the subwoofer channel, adjust the crossover frequency, and fine-tune the volume level to achieve optimal audio performance.
It’s important to note that while wireless connections offer convenience and flexibility, they may not always provide the same level of stability and audio quality as wired connections. Factors like distance, obstructions, and interference from other devices can affect the performance of a wireless connection. If you encounter any issues, refer to the user manual for troubleshooting tips or consider switching to a wired connection for a more reliable audio experience.
In the next sections, we will discuss different cable types for wired connections, such as RCA cables and speaker wires. We will provide detailed instructions on how to connect your subwoofer to your receiver using these cables and address common troubleshooting issues that you may encounter along the way.
Choosing the Right Cable for a Wired Connection
When it comes to establishing a wired connection between your subwoofer and receiver, choosing the right cable is essential. The cable you select will depend on the type of connection supported by your subwoofer and receiver. Here are the two most commonly used cable types for subwoofer connections:
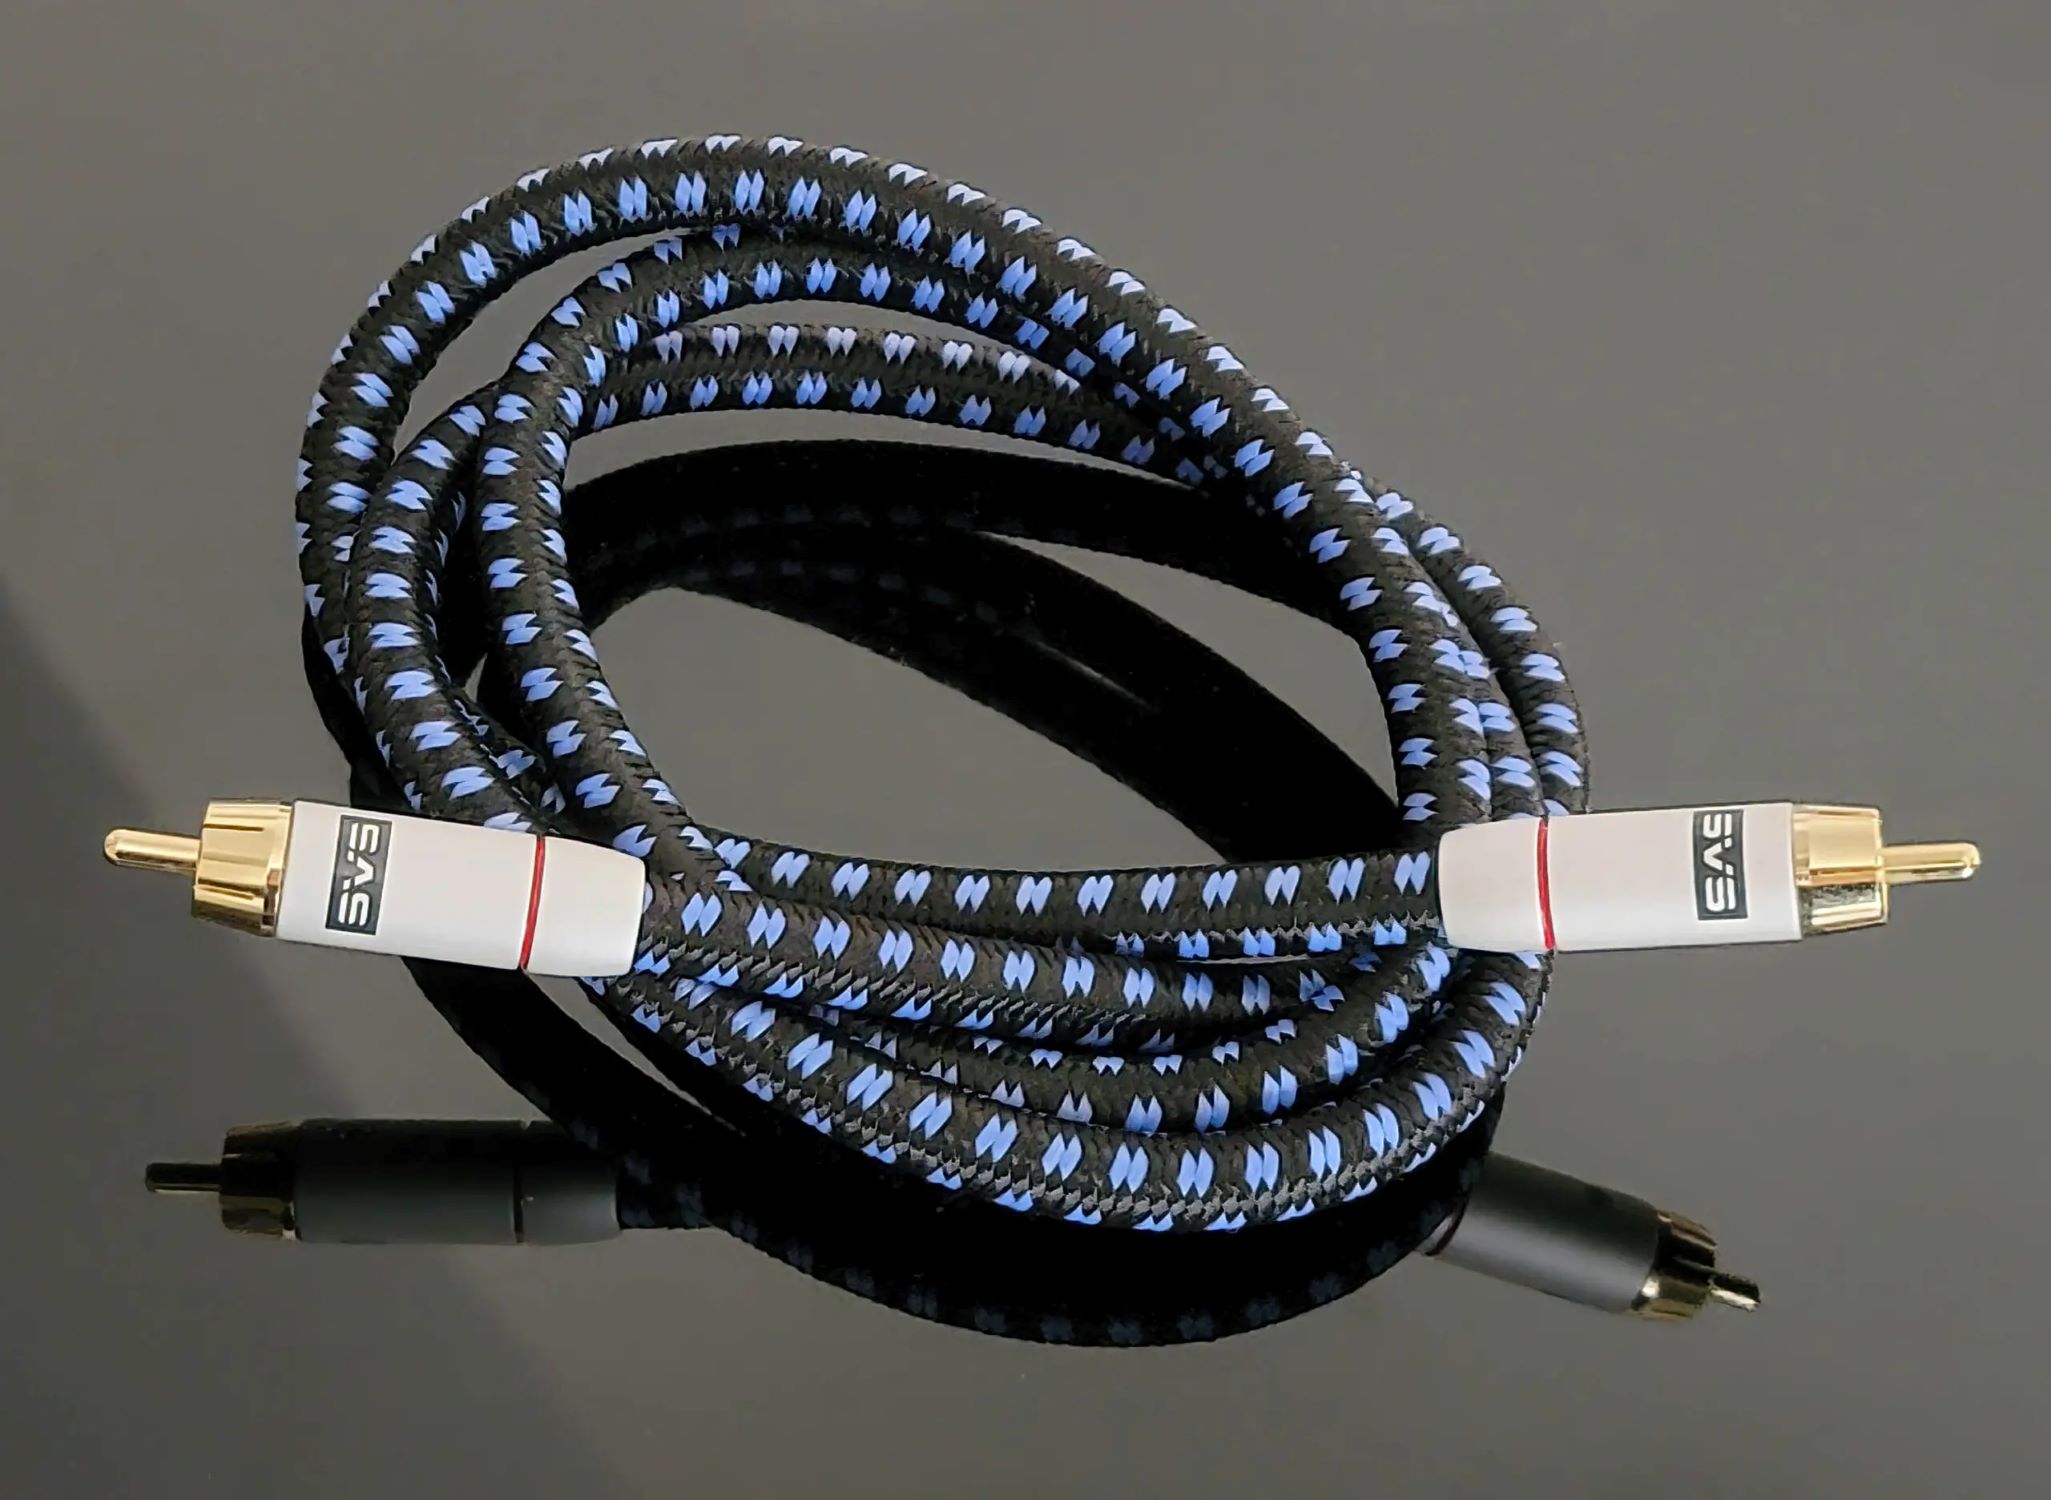
- RCA Cable: RCA (Radio Corporation of America) cables are widely used for subwoofer connections. These cables feature distinctive red and white connectors, with the red connector typically indicating the right audio channel and the white connector representing the left audio channel. RCA cables transmit analog audio signals and are compatible with most subwoofers and receivers that feature RCA connectivity options. When choosing an RCA cable, look for one that is shielded to reduce electromagnetic interference and ensure optimal signal transmission.
- Speaker Wire: Speaker wire is another common option for connecting a subwoofer to a receiver. It consists of two conductive wires, typically copper, that are encased in a plastic sheath. The wire gauge, expressed in AWG (American Wire Gauge), determines the thickness and conductivity of the wire. Thicker wires with lower gauge numbers offer better signal transmission. When selecting speaker wire, consider the distance between your subwoofer and receiver to ensure that the wire length is sufficient. Additionally, ensure that the wire is rated for the power output of your subwoofer and receiver to avoid overheating or damage.
When choosing between RCA cables and speaker wire, it’s important to consider factors such as compatibility, audio quality, and convenience. Both cable types can provide reliable connections, but they have different characteristics and considerations.
If your subwoofer and receiver have RCA connectors, using an RCA cable is a straightforward option. It offers ease of use and compatibility with most devices that feature RCA connectivity. On the other hand, if your subwoofer only supports speaker-level inputs, using speaker wire is necessary. This option provides a direct connection between the amplifier section of the receiver and the subwoofer, allowing for efficient power transfer.
Ultimately, the choice between an RCA cable and speaker wire will depend on your specific subwoofer and receiver setup. Consider factors such as the available connectivity options, the audio quality you desire, and the convenience of installation when selecting the cable type for your wired connection.
In the next sections, we will provide step-by-step instructions for connecting a subwoofer to a receiver using both RCA cables and speaker wire. We will guide you through the process, ensuring a successful and effective wired connection.
Understanding Different Cable Types
When it comes to connecting a subwoofer to a receiver, understanding the different cable types is important. The cable you choose plays a crucial role in ensuring optimal signal transmission and audio quality. Here, we’ll take a closer look at the various cable types commonly used for subwoofer connections:
- RCA Cable: RCA (Radio Corporation of America) cables are a widely used cable type for subwoofer connections. These cables have distinctive red and white connectors, with the red connector typically representing the right audio channel and the white connector representing the left audio channel. RCA cables transmit analog audio signals and are compatible with most subwoofers and receivers that feature RCA connectivity options. It’s important to choose high-quality RCA cables that are shielded to minimize interference and ensure optimal signal transmission.
- Speaker Wire: Speaker wire is another common cable type used for subwoofer connections. It consists of two conductive wires, typically copper, that are encased in a plastic sheath. Speaker wire allows for the transmission of electrical signals from the receiver to the subwoofer. When choosing speaker wire, consider the wire gauge, expressed in AWG (American Wire Gauge). Thicker wires with lower gauge numbers offer better conductivity and are suitable for longer cable runs. Ensure that the speaker wire you choose is rated to handle the power output of your subwoofer and receiver.
- HDMI Cable: HDMI (High-Definition Multimedia Interface) cables are primarily used for transmitting both audio and video signals. If your receiver and subwoofer support HDMI connectivity, you can use an HDMI cable for a convenient single-cable connection. HDMI cables are capable of carrying high-quality audio signals, including low-frequency effects (LFE) for the subwoofer. This makes them suitable for home theater setups where audio and video synchronization is crucial.
- Optical Cable: Optical cables, also known as Toslink cables, use fiber optic technology to transmit digital audio signals. While optical cables are commonly used for connecting devices like TVs, soundbars, and gaming consoles, they are not typically used for subwoofer connections. Subwoofers primarily rely on analog audio signals for reproducing bass frequencies, so optical cables are not the ideal choice in this case.
Understanding the different cable types allows you to make an informed decision based on your specific subwoofer and receiver requirements. Consider factors such as compatibility, audio quality, and convenience when selecting the cable type for your subwoofer connection.
In the next sections, we will delve deeper into the specific connection methods using RCA cables, speaker wire, and HDMI cables. We will provide detailed step-by-step instructions for each connection method to ensure a successful and efficient subwoofer connection.
Common Connection Methods
When it comes to connecting a subwoofer to a receiver, there are several common connection methods that you can choose from. Each method has its own benefits and considerations. Let’s explore the most commonly used connection methods:
- RCA Cable Connection: The RCA (Radio Corporation of America) cable connection is the most widespread method for connecting a subwoofer to a receiver. It involves using RCA cables to transmit the audio signal from the receiver’s subwoofer output to the subwoofer’s input. This method provides a simple and effective way to establish a wired connection. With RCA cables, you can achieve optimal sound quality and reliable signal transmission.
- Speaker Wire Connection: Speaker wire connections are another popular method for connecting a subwoofer to a receiver. This method involves using speaker wires to connect the subwoofer’s speaker-level input terminals to the corresponding speaker outputs on the receiver. Speaker wire connections allow for direct power transfer from the amplifier section of the receiver to the subwoofer, enhancing efficiency.
- HDMI Cable Connection: If your subwoofer and receiver support HDMI (High-Definition Multimedia Interface), you can use an HDMI cable for the connection. HDMI cables transmit both audio and video signals, making them ideal for home theater setups. This method simplifies connectivity by combining audio and video into a single cable. HDMI cables support high-quality audio, including the low-frequency effects (LFE) channel for the subwoofer, ensuring an immersive audio experience.
These connection methods offer different advantages and considerations. The RCA cable connection is widely compatible and straightforward to set up. Speaker wire connections provide direct power transfer and are suitable for longer cable runs. HDMI cable connections offer convenience by transmitting both audio and video signals in one cable.
It’s important to consider your specific setup, the available connectivity options on your subwoofer and receiver, and your desired audio quality when choosing the appropriate connection method. Ensuring compatibility between your devices and selecting the most suitable connection method will result in a seamless and enjoyable audio experience.
In the next sections, we will provide detailed step-by-step instructions for each connection method, including connecting a subwoofer to a receiver using RCA cables, speaker wires, and HDMI cables. We will guide you through the process to ensure a successful and optimized subwoofer connection.
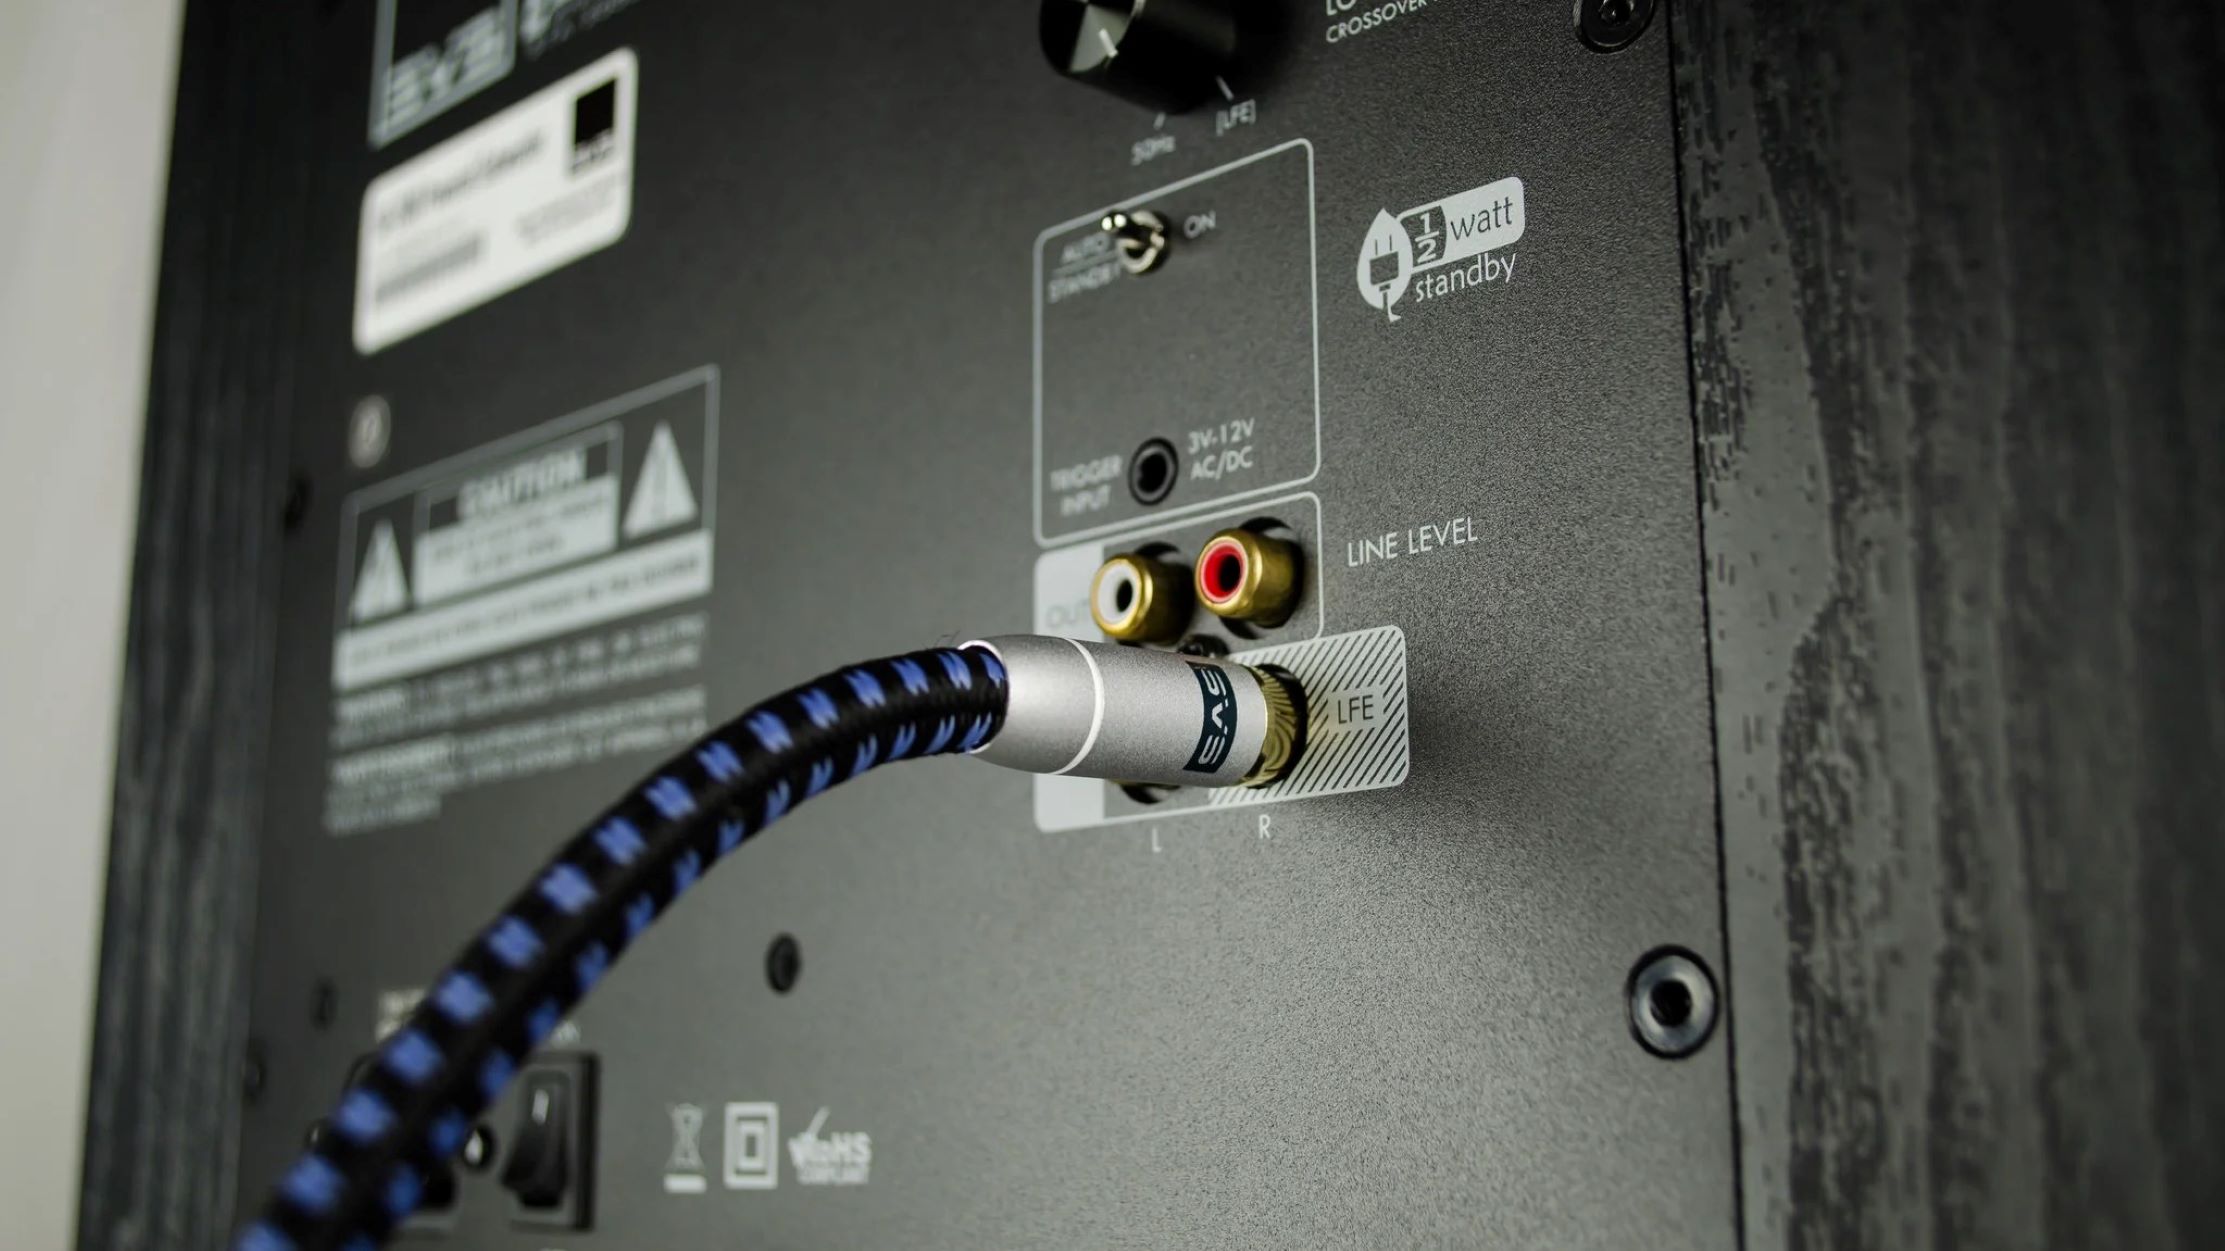
Connecting a Subwoofer to a Receiver via RCA Cable
Connecting a subwoofer to a receiver via RCA cable is one of the most common and straightforward methods. Follow these step-by-step instructions to establish a wired connection:
- Locate the Subwoofer Output: On your receiver, find the dedicated subwoofer output. It is usually labeled “Sub Out” or “LFE Out” (Low-Frequency Effects Out).
- Locate the Subwoofer Input: On your subwoofer, find the subwoofer input. It is typically labeled “Sub In” or “LFE In”.
- Choose the RCA Cable: Select an RCA cable with a length that suits your setup. Ensure that the cable is shielded to minimize interference and optimize signal transmission.
- Connect the RCA Cable: Take one end of the RCA cable and insert the red connector into the subwoofer output on the receiver. Insert the white connector into the left audio input on the subwoofer. If your subwoofer has a mono input, connect the white connector to the mono input instead.
- Configure Subwoofer Settings: After making the physical connection, adjust the subwoofer settings on your receiver. This may involve setting the subwoofer channel, adjusting the crossover frequency, and fine-tuning the volume level to achieve the desired bass level in your audio setup.
- Test the Connection: Play audio through your receiver to test the subwoofer connection. Ensure that the subwoofer is receiving the audio signal properly and that the bass response is as expected.
By following these steps, you can successfully connect a subwoofer to a receiver via an RCA cable. Double-check the connections and ensure a snug fit to avoid any audio interruptions or loss in signal quality.
Remember, the exact location and labeling of the subwoofer output and input may vary depending on your specific receiver and subwoofer models. Refer to the user manuals for your devices if you have trouble identifying the correct ports.
In the next sections, we will cover the process of connecting a subwoofer to a receiver using speaker wire and HDMI cables. Stay tuned for detailed instructions on these other connection methods.
Connecting a Subwoofer to a Receiver via Speaker Wire
Connecting a subwoofer to a receiver using speaker wire is a reliable method that allows for direct power transfer. Follow these step-by-step instructions to establish a wired connection:
- Locate the Subwoofer Speaker-Level Input Terminals: On your subwoofer, find the speaker-level input terminals. These are usually marked as “Speaker In” or “High-Level In”.
- Locate the Speaker Outputs on the Receiver: On your receiver, locate the speaker outputs for the front or main speakers. These terminals are typically labeled “Front” or identified by the respective channel, such as “Left” and “Right”.
- Choose the Speaker Wire: Select a suitable gauge speaker wire based on the distance between your subwoofer and receiver. Thicker wire (lower gauge number) is generally better for longer cable runs. Ensure that the wire is rated to handle the power output of your subwoofer and receiver.
- Cut the Speaker Wire: Cut two lengths of speaker wire, one for the left channel and one for the right channel, based on the required distance. Leave some extra length to make the connections easily.
- Strip the Ends of the Speaker Wire: Strip off a small part of the insulation from each end of the speaker wire to expose the bare wire for a secure connection.
- Connect the Speaker Wire to the Subwoofer: Insert the positive (+) and negative (-) ends of the left channel speaker wire into the corresponding speaker-level input terminals on the subwoofer. Repeat this step for the right channel speaker wire.
- Connect the Speaker Wire to the Receiver: Connect the other ends of the speaker wire to the corresponding speaker outputs on the receiver. Ensure that you connect the left channel to the left speaker output and the right channel to the right speaker output.
- Configure Speaker Settings: After making the physical connections, access the speaker settings on your receiver. Make sure to set the subwoofer channel to “On” or “Enabled” and adjust the crossover frequency and volume level if necessary.
- Test the Connection: Play audio through your receiver to test the subwoofer connection. Ensure that the subwoofer is receiving the audio signal properly and producing the desired bass response.
By following these steps, you can successfully connect a subwoofer to a receiver via speaker wire. Remember to double-check your connections and ensure a secure and proper fit to achieve optimal audio performance.
Keep in mind that the specific location of the speaker outputs and speaker-level input terminals may vary depending on your particular subwoofer and receiver models. Consult the user manuals for your devices if you encounter any difficulties in identifying the correct ports.
In the next section, we will cover the process of connecting a subwoofer to a receiver using HDMI cables, providing detailed instructions for this connection method.
Connecting a Subwoofer to a Receiver via HDMI Cable
If your subwoofer and receiver support HDMI (High-Definition Multimedia Interface), you can connect them using an HDMI cable. This method simplifies connectivity by combining audio and video signals into a single cable. Follow these step-by-step instructions to establish a connection:
- Check Compatibility: Ensure that both your subwoofer and receiver have HDMI ports and support HDMI connectivity. This connection method is commonly found in newer home theater setups.
- Select an HDMI Cable: Choose an HDMI cable that meets your desired length and supports the required HDMI version for your equipment. Select a high-quality cable to ensure optimal signal transmission.
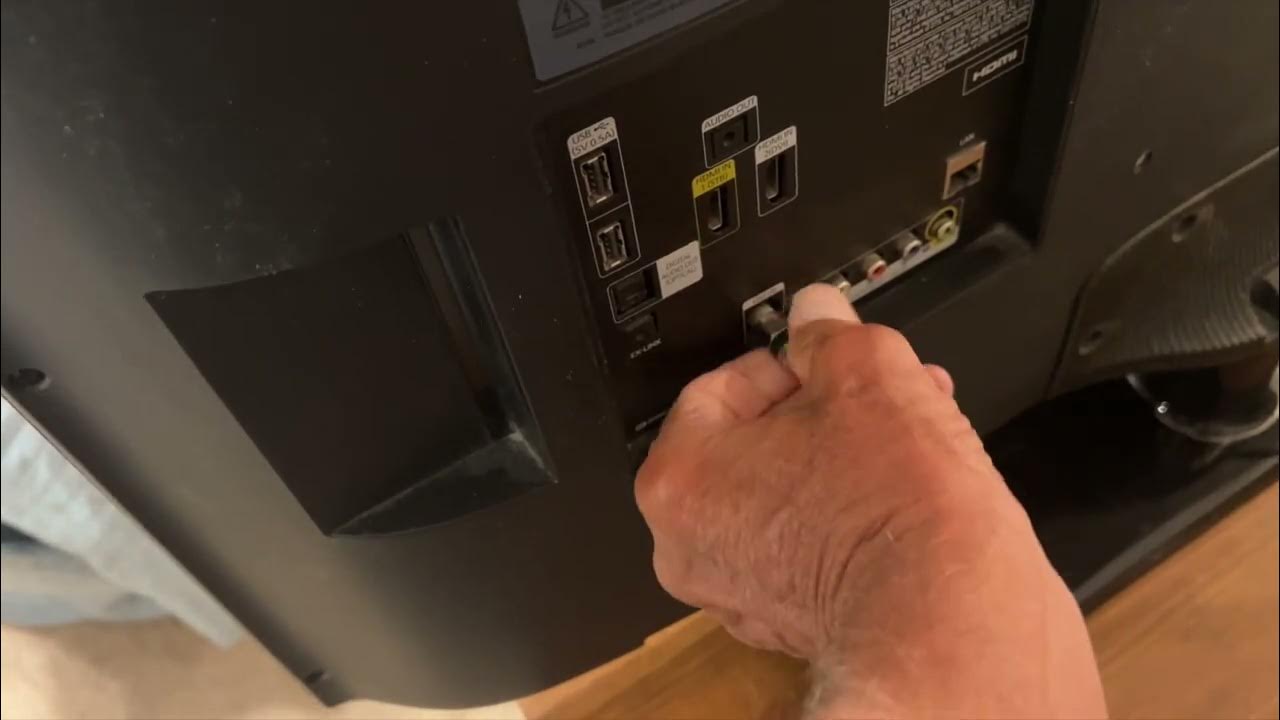
- Locate the HDMI Output on the Receiver: On your receiver, find the HDMI output port that is designated for audio output. It is usually labeled “Output” or “Audio Out”.
- Locate the HDMI Input on the Subwoofer: On your subwoofer, find the HDMI input port that is designated for audio input. It is typically labeled “Input” or “Audio In”.
- Connect the HDMI Cable: Insert one end of the HDMI cable into the HDMI output port on the receiver. Connect the other end into the HDMI input port on the subwoofer.
- Configure HDMI Settings: Access the audio settings on your receiver and verify that the HDMI output is set to transmit audio signals. Adjust the subwoofer settings, such as the crossover frequency and volume level, to achieve the desired bass response.
- Test the Connection: Play audio through your receiver to test the subwoofer connection. Ensure that the subwoofer is receiving the audio signal properly and that the bass output is as expected.
By following these steps, you can successfully connect a subwoofer to a receiver via an HDMI cable. Double-check the connections and ensure a secure fit to avoid any issues with signal transmission.
It’s worth noting that HDMI cables not only transmit audio but also carry video signals. This makes HDMI connections ideal for home theater setups where both audio and video synchronization are essential.
In the next sections, we will address additional connection options, troubleshoot common subwoofer connection issues, and offer final thoughts and tips on connecting and optimizing your subwoofer and receiver setup.
Understanding Additional Connection Options
In addition to the commonly used RCA, speaker wire, and HDMI cable connections, there are other options available for connecting a subwoofer to a receiver. These additional connection options include:
- Digital Coaxial Cable: Digital coaxial cables use a single RCA connector to transmit digital audio signals. While not as common as RCA, speaker wire, or HDMI connections for subwoofers, some receivers and subwoofers may have digital coaxial input and output ports. This connection type can provide a high-quality digital audio signal transfer.
- Subwoofer Pre-Out: Some home theater receivers feature a dedicated subwoofer pre-out port. This port allows you to connect your subwoofer directly to the receiver without using an additional cable or connection method. Simply connect an RCA cable from the subwoofer pre-out port on the receiver to the subwoofer’s input, and you’re good to go.
- Wireless Subwoofer Kits: If you prefer a wireless setup but your subwoofer and receiver do not have built-in wireless capabilities, you can opt for a wireless subwoofer kit. These kits typically include a wireless transmitter that connects to the subwoofer output on the receiver and a wireless receiver that connects to the subwoofer’s input. This wireless connection eliminates the need for physical cables, providing flexibility in subwoofer placement.
- Multi-room Audio Systems: If you have a multi-room audio system set up with separate zones, you may have the option to connect your subwoofer to a different zone or amplifier using dedicated speaker wire connections. This allows you to distribute audio signals to multiple zones within your home, including the subwoofer.
These additional connection options provide flexibility and alternative methods for connecting a subwoofer to a receiver. Consider your specific equipment and setup requirements when exploring these options.
It’s important to note that not all subwoofers and receivers may support these additional connection options. Always refer to the user manuals for your devices to determine the supported connection methods and the specific ports to use for each option.
In the next sections, we will address common subwoofer connection issues and offer troubleshooting tips to help you resolve any challenges you may encounter during the setup process.
Troubleshooting Subwoofer Connection Issues
While connecting a subwoofer to a receiver is generally a straightforward process, you may encounter some issues along the way. Here are a few common subwoofer connection issues and troubleshooting tips to help you resolve them:
- No Sound from the Subwoofer: If you’ve made the necessary connections, but there is no sound coming from the subwoofer, check the following:
- Ensure that the subwoofer is powered on and the volume is set appropriately.
- Check the receiver’s settings and ensure that the subwoofer channel is enabled.
- Verify that the crossover frequency is properly set, allowing the low frequencies to be directed to the subwoofer.
- Ensure that the RCA or speaker wire connections are secure and properly seated.
- Make sure the audio source you’re playing contains content with low-frequency information.
- Intermittent Signal or Crackling Noise: If you’re experiencing intermittent signal or crackling noise from the subwoofer, consider the following:
- Check the RCA or speaker wire connections and ensure they are securely connected.
- Inspect the cables for any signs of damage or wear. Replace them if necessary.
- Make sure there are no sources of interference nearby, such as wireless devices or electrical appliances.
- Try using a different RCA cable or speaker wire to rule out any issues with the cable itself.
- Ensure that any cable runs are away from power cables or other sources of electrical interference.
- No Output from the Receiver’s Subwoofer Output: If the receiver’s subwoofer output is not producing any output, troubleshoot as follows:
- Check the receiver’s settings and ensure that the subwoofer output is enabled.
- Make sure the subwoofer output level is not set to minimum or muted.
- Ensure that you are using the correct subwoofer output on the receiver if it has multiple options.
- Verify that the subwoofer is properly connected to the receiver using the appropriate cable type and connection method.
- Consider performing a factory reset on both the receiver and the subwoofer, following the instructions in the user manuals.
If you’ve tried these troubleshooting tips and are still experiencing issues, consult the user manuals for your specific subwoofer and receiver models. Additionally, reaching out to the manufacturer’s customer support can provide further assistance and guidance.
Remember to exercise caution when manipulating cables or adjusting settings. Power off your devices before making any changes, and always refer to the user manuals for detailed instructions specific to your equipment.
In the final section, we will conclude the article with a summary and provide some additional tips to enhance your subwoofer and receiver setup.
Conclusion
Connecting a subwoofer to a receiver is an essential step in creating a captivating audio experience. By understanding the basics of subwoofer connections and exploring the various connection methods, you can establish a reliable and optimized setup. Whether you choose a wired connection using RCA cables or speaker wire, or opt for the convenience of a wireless or HDMI connection, each method offers its own benefits and considerations.
Throughout this guide, we have provided step-by-step instructions for connecting a subwoofer to a receiver using different cable types and connection methods. We have discussed the importance of choosing the right cable for your setup, and outlined troubleshooting tips for resolving common connection issues.
Remember to consult the user manuals for your specific subwoofer and receiver models, as their ports and features may vary. Take time to properly configure the subwoofer settings on your receiver, including the crossover frequency and volume level, to achieve the desired bass response.
Whether you’re setting up your home theater system, improving your music setup, or enhancing your gaming experience, a properly connected subwoofer can make a significant difference. The deep and powerful bass will immerse you in sound, providing a richer and more immersive audio experience.
Now that you have the knowledge and understanding of subwoofer connections, it’s time to fine-tune your setup and enjoy the enhanced audio that a subwoofer brings. Get ready to feel the rumble and immerse yourself in the full range of sound that a subwoofer delivers!