Home>Devices & Equipment>Yamaha>How To Transpose Yamaha P45
Yamaha
How To Transpose Yamaha P45
Modified: February 11, 2024
Learn how to transpose Yamaha P45 easily with these step-by-step instructions. Enjoy playing your Yamaha keyboard in any key!
(Many of the links in this article redirect to a specific reviewed product. Your purchase of these products through affiliate links helps to generate commission for AudioLover.com, at no extra cost. Learn more)
Table of Contents
Introduction
Welcome to our guide on how to transpose on the Yamaha P45 digital piano. The ability to transpose the keyboard is a valuable feature that many musicians, both beginners and professionals, find extremely useful. Transposition allows you to change the key of the music you are playing without having to learn new fingerings or adjust your playing technique.
The Yamaha P45 is a popular and affordable option for those looking for a reliable and versatile digital piano. It offers a range of features, including transposition, that can enhance your musical experience. Whether you are playing in a band, accompanying a vocalist, or simply exploring different musical possibilities, the transposition feature on the Yamaha P45 can open up new avenues of creativity for you.
In this guide, we will take you through the step-by-step process of transposing on the Yamaha P45. We will cover everything from understanding the transposition feature to applying it to the keyboard. By the end of this guide, you will have a clear understanding of how to use the transposition feature effectively and confidently on your Yamaha P45.
So, if you’re ready to take your musical journey to the next level and explore the world of transposition, let’s get started!
Step 1: Understanding the Yamaha P45 Transposition Feature
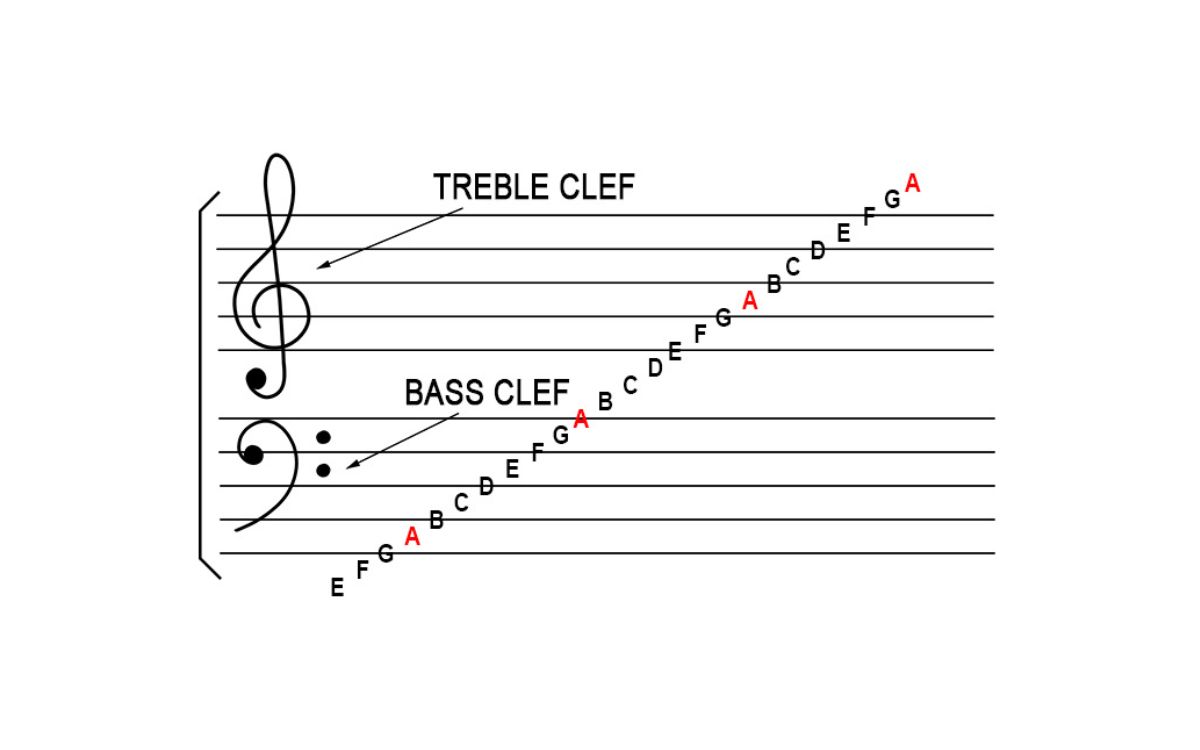
Before we dive into the process of transposing on the Yamaha P45, it’s important to have a clear understanding of what transposition is and how it works on this digital piano. Transposition refers to the act of changing the key of a piece of music, either higher or lower, without changing the actual notes being played. This can be incredibly useful in various musical scenarios, such as playing in a different key to accommodate a singer’s vocal range or adapting a piece to match the tonality of other instruments in an ensemble.
The Yamaha P45 offers a transposition feature that allows you to effectively change the key of the keyboard. The transposition interval determines how many steps or half steps the keys will be shifted. For example, if you want to transpose a piece up by one whole step, you would set the transposition interval to +2, and the keyboard will sound as if you are playing in a key two steps higher. Conversely, if you want to transpose a piece down by a half step, you would set the transposition interval to -1, and the keyboard will sound as if you are playing in a key half a step lower.
It’s important to note that transposing on the Yamaha P45 is a temporary adjustment and does not affect the actual notes you are playing. The transposed sound is only heard through the speakers or headphones connected to the piano. When you turn off the transposition feature or power off the instrument, the keyboard will revert back to its default settings.
The transposition feature on the Yamaha P45 is straightforward and user-friendly, making it accessible to beginners and experienced musicians alike. Now that you have a basic understanding of the concept of transposition and how it works on the Yamaha P45, let’s move on to the next step and learn how to access the transposition function on the keyboard.
Step 2: Accessing the Transposition Function
Now that you understand the basics of transposition on the Yamaha P45, the next step is to learn how to access the transposition function on the keyboard. Fortunately, accessing the transposition function on the Yamaha P45 is a straightforward process.
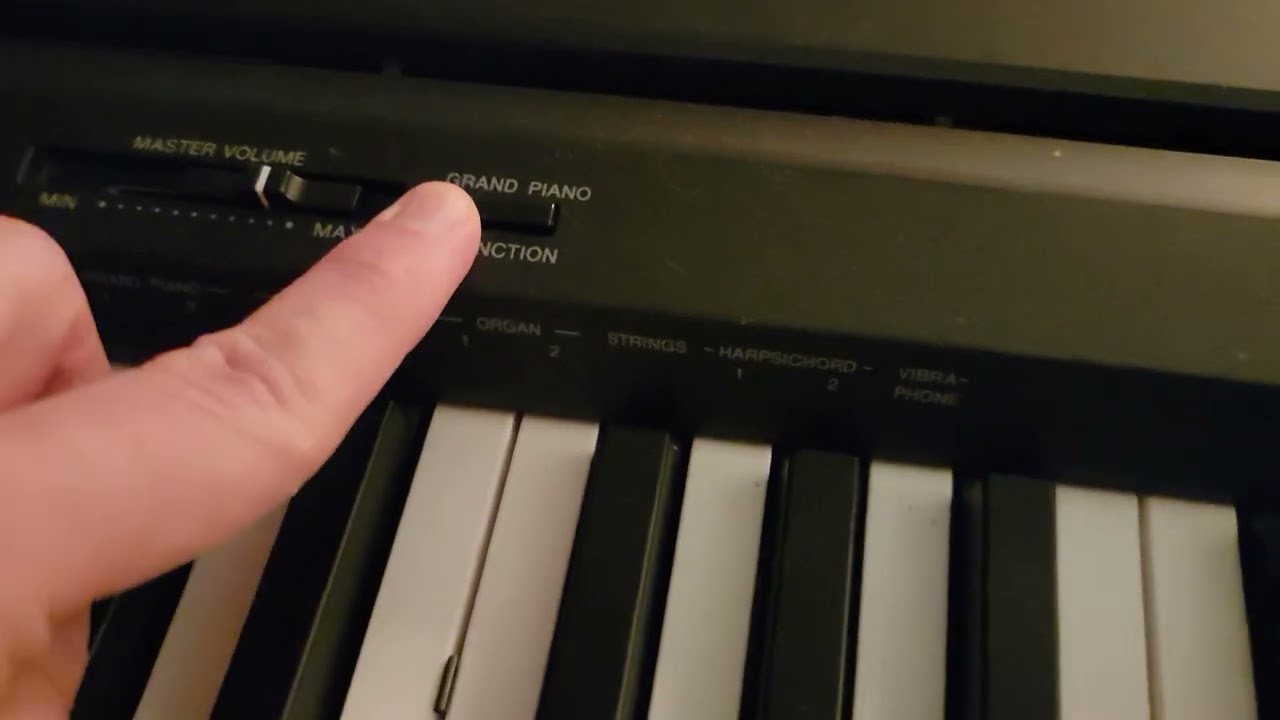
To access the transposition function, start by powering on the Yamaha P45. Once the piano is powered on, locate the “Function” button on the control panel. It is typically found towards the left or right side of the control panel, depending on your model. The “Function” button is usually labeled with the abbreviation “F” or “Fn”.
Press and hold the “Function” button. While holding down the button, locate the key on the keyboard labeled “Transpose” or “Transp”. The exact placement of this key may vary depending on your specific model, but it is often located towards the middle or lower section of the keyboard.
Once you have located the “Transpose” key, press it while still holding down the “Function” button. This combination of pressing the “Function” button and the “Transpose” key simultaneously will activate the transposition function on your Yamaha P45.
With the transposition function activated, you are now ready to move on to the next step: selecting the desired transposition interval.
Note: If you encounter any difficulties accessing the transposition function or locating the “Function” and “Transpose” keys, refer to the instruction manual that came with your Yamaha P45. The manual provides detailed diagrams and instructions specific to your model.
Step 3: Selecting the Desired Transposition Interval
Now that you have accessed the transposition function on the Yamaha P45, it’s time to select the desired transposition interval. The transposition interval determines how many steps or half steps the keys will be shifted, allowing you to change the key of the music you are playing.
To select the transposition interval, you will use the keys on the keyboard itself. Look for the keys labeled with a “+” (plus) sign and a “-” (minus) sign. These keys are typically located near the “Transpose” key used to activate the transposition function.
Press the “+” key to increase the transposition interval and raise the pitch of the keyboard. Each press of the “+” key will increase the interval by one step. For example, if you want to transpose the keyboard up by a whole step, press the “+” key once. Press it again to transpose up by two whole steps.
Conversely, if you want to transpose the keyboard down, press the “-” key. Each press of the “-” key will decrease the transposition interval by one step. For example, if you want to transpose the keyboard down by a half step, press the “-” key once. Press it again to transpose down by a whole step.
As you adjust the transposition interval, you will generally see a visual indicator on the display of the Yamaha P45, showing the current interval setting. This helps you keep track of the transposition level while playing.
Experiment with different transposition intervals to find the one that suits your musical needs. It may be helpful to refer to a musical instrument tuner or a keyboard with built-in pitch reference to ensure you accurately transpose to the desired key.
Once you have selected the desired transposition interval, you are ready to apply the transposition to the Yamaha P45. Proceed to the next step to learn how to do this.
Step 4: Applying the Transposition to the Yamaha P45
Now that you have selected the desired transposition interval on your Yamaha P45, it’s time to apply the transposition and hear the keyboard in its new key. Applying the transposition is a simple process that can be done with just a few steps.
Once you have selected the transposition interval, release the “Function” button and the “Transpose” key. At this point, the transposition function is still activated, but you can now start playing the keyboard and hear the transposed sound.
Play a few notes or chords on the keyboard to test the transposition. You will notice that the sound is now in the key determined by the transposition interval you selected. For example, if you set the interval to “+2,” the keyboard will sound as if you are playing in a key two steps higher than the actual notes being played.
While the transposition is applied, you can play any song or music piece, and it will sound as if you are playing in a different key. This is especially beneficial if you need to adapt the music to suit a vocalist, other instruments, or your personal preference.
If you find that the transposed sound on the Yamaha P45 doesn’t match your expectations or doesn’t align with the key you intended to play in, you can go back to the previous step and adjust the transposition interval accordingly. Experimenting with different intervals can help you find the perfect setting for your musical needs.
Remember that the transposition is a temporary adjustment and does not affect the actual notes being played. When you power off the Yamaha P45 or turn off the transposition function, the keyboard will revert back to its default settings.
Now that you have successfully applied the transposition to your Yamaha P45, it’s time to move on to the final step: testing the transposed keyboard to ensure it meets your musical requirements.
Step 5: Testing the Transposed Keyboard
After applying the transposition on your Yamaha P45, it’s important to test the transposed keyboard to ensure it meets your musical requirements. Testing the transposed sound allows you to evaluate the accuracy and compatibility of the transposition with the music you are playing.
Begin by playing various scales, chords, and melodies in the transposed key. Listen carefully to the sound and pay attention to the overall tonality and harmony. The transposed keyboard should sound natural and in tune. If you notice any discrepancies or inconsistencies in the transposed sound, it may indicate that the transposition interval needs to be adjusted.
As you test the transposed keyboard, it’s also important to assess how the new key interacts with other instruments or vocal ranges, if applicable. If you are playing in a band or accompanying a vocalist, check for any potential clashes or difficulties arising from the transposition. Ensure that the transposed sound seamlessly blends with the overall musical ensemble without compromising the integrity of the original composition.
Take note of any specific sections or musical passages within the piece that may require additional attention due to the transposition. Certain technical challenges or fingerings may arise when playing in a different key, and it’s important to address these nuances to maintain a fluid and expressive performance.
Additionally, consider the overall musical context and impact of the transposition. Does the new key enhance the emotive qualities of the piece? Does it provide a more comfortable or suitable range for the vocalist or other instruments? Evaluating the musicality and effectiveness of the transposition will ensure that it serves its intended purpose and enhances the overall musical experience.
If you encounter any issues or feel that the transposed sound is not meeting your expectations, don’t hesitate to fine-tune the transposition interval or seek guidance from a musical instructor or fellow musicians. Their expertise and feedback can help you make the necessary adjustments and achieve the desired musical outcome.
By thoroughly testing the transposed keyboard, you can confidently incorporate the transposition feature of the Yamaha P45 into your musical repertoire, knowing that it enhances your performance and brings your musical ideas to life.
Congratulations! You have successfully learned how to transpose on the Yamaha P45 and how to test and evaluate the transposed keyboard. With this newfound knowledge, you can now explore a wide range of musical possibilities and adapt your playing to various musical scenarios with ease.
Remember to practice and experiment with different transpositions to familiarize yourself with this valuable tool. Enjoy the creative freedom that transposition brings to your musical journey!
Conclusion
Transposing on the Yamaha P45 is a powerful feature that allows you to change the key of the keyboard effortlessly. By following the steps outlined in this guide, you can confidently transpose your music to accommodate different vocal ranges, play along with other instruments, or explore new tonalities.
Understanding the concept of transposition and how it works on the Yamaha P45 is crucial. By accessing the transposition function through the “Function” button and the “Transpose” key, you can easily select the desired transposition interval. Through experimentation and testing, you can find the perfect key to suit your musical needs and create a seamless and harmonious performance.
Remember that transposing on the Yamaha P45 is a temporary adjustment and does not affect the actual notes being played. It is a valuable tool that provides flexibility and versatility in your musical endeavors. Whether you are a beginner or an experienced musician, the transposition feature on the Yamaha P45 opens up a world of possibilities for you to explore.
As you continue to play and experiment with transposition, keep in mind the musical context and the impact it has on the overall composition. Pay attention to the tonality, compatibility with other instruments, and the emotional qualities the transposed key brings to the music.
By mastering the transposition feature on the Yamaha P45, you can confidently adapt to various musical situations, enhance your creativity, and bring a fresh perspective to your performances.
So, grab your Yamaha P45 and start transposing! Unlock new musical horizons and enjoy the transformative power of transposition. Let your imagination soar and create beautiful music in any key you desire.