Home>Devices & Equipment>Yamaha>How To Turn On Yamaha Piano
Yamaha
How To Turn On Yamaha Piano
Modified: February 22, 2024
Learn how to easily turn on your Yamaha piano with step-by-step instructions. Discover the key to unlocking your musical potential with Yamaha.
(Many of the links in this article redirect to a specific reviewed product. Your purchase of these products through affiliate links helps to generate commission for AudioLover.com, at no extra cost. Learn more)
Table of Contents
Introduction
Welcome to the world of Yamaha pianos! Yamaha is a renowned and trusted brand in the musical instrument industry, renowned for producing high-quality pianos that offer exceptional sound and playability. Whether you are a beginner or a seasoned pianist, learning how to turn on a Yamaha piano is an essential first step to enjoying its beautiful melodies.
In this article, we will guide you through the process of turning on your Yamaha piano, adjusting the volume, selecting different sounds, choosing playing modes, and even connecting external devices. So, let’s dive in and explore the wonderful features and functions of Yamaha pianos!
Before we begin, it’s important to note that the specific instructions may vary slightly depending on the model of your Yamaha piano. We recommend consulting the user manual that came with your piano for detailed instructions tailored to your specific model. With that said, let’s get started.
First and foremost, make sure your Yamaha piano is properly connected to a power source. Most Yamaha pianos come with an AC power adapter that needs to be plugged into a wall outlet. If your piano has a battery option, ensure that the batteries are inserted and properly charged.
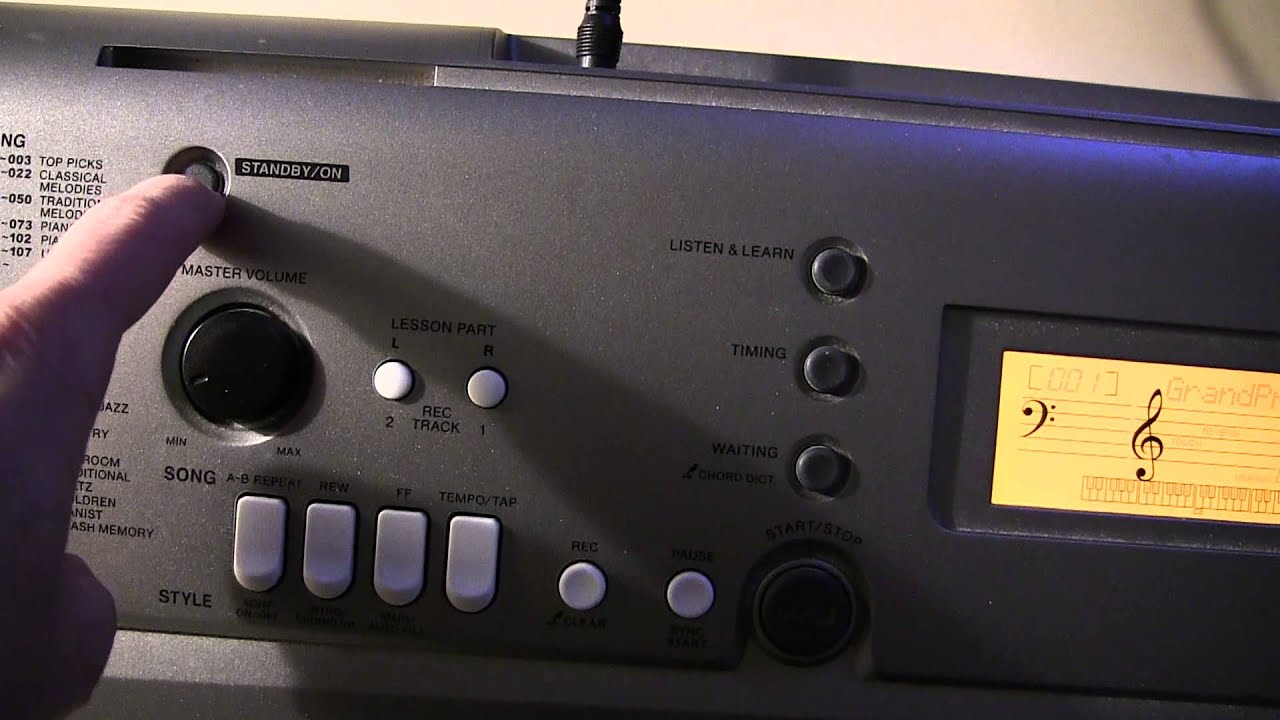
Once your Yamaha piano is connected to a power source, locate the power switch. The placement of the power switch may vary depending on the model, but it is usually located on the front panel, near the control buttons. Turn the power switch on by pressing it or flipping it, and you will notice that the piano’s display and lights come to life.
Now that your Yamaha piano is powered on, let’s move on to adjusting the volume. Yamaha pianos typically have a dedicated volume control button or knob. Locate the volume control and use it to increase or decrease the volume according to your preference.
Step 1: Power on the Yamaha Piano
Before you can start playing your Yamaha piano, the first step is to power it on. Follow these simple instructions to power on your Yamaha piano:
- Make sure your piano is connected to a power source. Most Yamaha pianos come with an AC power adapter that needs to be plugged into a wall outlet. If your piano has a battery option, ensure that the batteries are inserted and properly charged.
- Locate the power switch. The placement of the power switch may vary depending on the model, but it is usually located on the front panel, near the control buttons.
- Turn the power switch on. Press or flip the power switch to the “on” position.
- Once you turn on the power, you will notice that the piano’s display and lights come to life. It may take a few seconds for the piano to initialize.
- Check the piano’s display or indicators for any specific instructions or messages that may appear during the power-on process.
It’s worth noting that some Yamaha pianos have a standby mode to save power when not in use. In standby mode, the piano is not fully powered off and can quickly resume operation. To exit standby mode and fully power on the piano, simply press the power button again or follow the specific instructions provided in your user manual.
By following these steps, you have successfully powered on your Yamaha piano. Now it’s time to adjust the volume and get ready to create beautiful music. Let’s move on to the next step!
Step 2: Adjust the Volume
Once your Yamaha piano is powered on, it’s time to adjust the volume to your desired level. Follow these simple steps to adjust the volume:
- Locate the volume control. Yamaha pianos typically have a dedicated volume control button or knob. It is usually located on the front panel, near the control buttons.
- Use the volume control to increase or decrease the volume. Depending on the model of your Yamaha piano, you may need to press the up or down button to adjust the volume, or you may need to rotate a knob.
- Make incremental adjustments to find your preferred volume level. Start by setting the volume to a low level and gradually increase it to avoid sudden loud sounds.
- While adjusting the volume, it’s a good idea to play a few notes or chords on the piano to gauge the sound level and make adjustments accordingly.
- Listen carefully to the sound as you adjust the volume. Find the sweet spot where the sound is clear and balanced, neither too soft nor too loud.
Remember that the volume control on the Yamaha piano affects the overall sound output, including both the built-in speakers and any connected headphones or external audio devices. Adjust the volume according to your playing environment and personal preference.
It’s also worth noting that some Yamaha pianos offer additional volume control options, such as individual control for different keyboard sections or the ability to adjust the balance between the piano’s internal speakers and external audio devices. Consult your user manual for detailed instructions on these advanced volume control features.
Once you have adjusted the volume to your liking, you are ready to start playing your Yamaha piano with the perfect sound level. Move on to the next step to explore the different sounds and tones that your Yamaha piano has to offer!
Step 3: Select a Sound
Your Yamaha piano offers a wide variety of sounds and tones to enhance your playing experience. Whether you prefer the classic sound of a grand piano or want to experiment with different instrument sounds, selecting a sound is an exciting step in unleashing the full potential of your Yamaha piano. Here’s how you can select a sound:
- Locate the sound selection button or menu. Depending on the model of your Yamaha piano, this button may be labeled as “Voice,” “Sound,” or something similar.
- Press the sound selection button to access the available sound options. On some models, a screen or display will show you a list of sounds to choose from.
- Use the navigation buttons or knobs to browse through the available sounds. Yamaha pianos typically offer a wide range of choices, including different types of pianos (such as grand piano, upright piano, or electric piano), strings, organs, guitars, and more.
- Select a sound by pressing the corresponding button or using the navigation controls. The piano may emit a brief sound or visual indication to confirm your selection.
- Experiment with different sounds to find the one that suits your musical style and preferences. Don’t be afraid to explore and try out new sounds to add variety to your playing.
Yamaha pianos often come preloaded with a diverse selection of high-quality sounds, meticulously sampled from real instruments. This allows you to create a rich and immersive musical experience right from your piano.
Some advanced Yamaha models even offer the ability to customize and create your own unique sounds. These features may include adjusting parameters like attack, release, resonance, and more. Refer to your user manual or consult online resources specific to your model for guidance on advanced sound customization.
By following these steps, you can easily select a sound on your Yamaha piano and explore the endless musical possibilities it offers. Move on to the next step to learn about the various playing modes available to further enhance your playing experience.
Step 4: Choose a Playing Mode
Choosing a playing mode on your Yamaha piano allows you to explore different ways of expression and adapt your playing style to various musical genres. Depending on the model of your piano, you may have access to different playing modes that can enhance your musical experience. Here’s how you can choose a playing mode:
- Locate the playing mode button or menu. The button may be labeled as “Mode,” “Function,” or something similar.
- Press the playing mode button to access the available playing modes. The piano’s display or lights may indicate the current mode or display a list of available modes.
- Use the navigation buttons or knobs to browse through the available playing modes. Yamaha pianos often offer a range of options, such as standard mode, dual mode, split mode, and more.
- Select a playing mode that suits your musical needs or the style you wish to explore. Press the corresponding button or use the navigation controls to confirm your selection.
- Experiment with different playing modes to discover their unique features and capabilities. Each mode may offer distinct functionalities like layering two sounds, splitting the keyboard into different sections, adjusting transposition, and more.
Playing modes can greatly expand your creativity and enable you to perform more complex arrangements or emulate the sound of multiple instruments. For example, in the dual mode, you can combine two sounds, such as piano and strings, to create a richer and more dynamic performance. In split mode, you can assign different sounds to different sections of the keyboard.
Additionally, some Yamaha pianos offer advanced playing modes like ensemble mode, which allows you to play along with pre-recorded accompaniments in various musical styles. These modes can add depth and excitement to your playing, whether you are practicing or performing.
Exploring different playing modes on your Yamaha piano can open up a world of possibilities and enhance your musical journey. So go ahead and experiment with the various modes to find new ways to express yourself and enjoy a versatile playing experience!
Step 5: Connect External Devices (Optional)
If you want to expand the capabilities of your Yamaha piano or integrate it with other audio devices, you have the option to connect external devices. Connecting external devices can enhance your playing experience and allow you to explore new creative possibilities. Follow these steps to connect external devices to your Yamaha piano:
- Determine the type of external device you want to connect. Common examples include headphones, amplifiers, MIDI controllers, audio interfaces, and recording equipment.
- Identify the appropriate ports on your Yamaha piano for connecting the external device. These ports may include headphone jacks, USB ports, MIDI ports, audio output jacks, or even wireless connectivity options.
- Ensure that the external device you want to connect is compatible with your Yamaha piano and has the necessary cables or adapters.
- Connect the external device to the corresponding port on your Yamaha piano. For example, if you want to connect headphones, plug the headphone jack into the headphone output on your piano.
- Once the external device is connected, adjust the settings on your Yamaha piano, if necessary. Some pianos have specific settings or controls for configuring external devices, such as adjusting volume levels or selecting MIDI channels.
- Test the connection and functionality of the external device. Play a few notes or chords on your piano and listen through the connected headphones or external audio device to ensure proper sound output.
Note that the specific steps for connecting external devices may vary depending on the model of your Yamaha piano and the type of device you are connecting. Consult your user manual for detailed instructions and any specific recommendations or limitations from Yamaha.
Connecting external devices can open up a world of possibilities for recording, performing, or practicing with added convenience and flexibility. Whether you want to play silently with headphones, record your playing, or connect to music production software, utilizing external devices can enhance your overall piano experience.
Remember to follow proper cable management practices and handle the external devices with care to ensure reliable and long-lasting connections. Enjoy exploring new horizons by connecting external devices to your Yamaha piano!
Step 6: Adjust Additional Settings
In addition to powering on, adjusting the volume, selecting a sound, choosing a playing mode, and connecting external devices, there may be additional settings on your Yamaha piano that you can customize to further enhance your playing experience. These settings can vary depending on the model of your piano, but here are some common settings you may encounter:
- Touch Sensitivity: Yamaha pianos often allow you to adjust the touch sensitivity of the keys to suit your playing style. Options may include soft, medium, hard, or even customizable touch response.
- Pedal Functions: If your piano has pedals, you may be able to assign specific functions to each pedal. Common options include sustain, soft, and sostenuto pedal functions.
- Metronome: Yamaha pianos typically have a built-in metronome feature that can help you practice and maintain a steady tempo. Adjust the metronome settings to your desired tempo, time signature, and volume level.
- Transpose: Some Yamaha pianos allow you to transpose the entire keyboard up or down in semitone increments. This can be useful when playing with other instruments or accommodating a singer’s preferred key.
- Split Point: If your piano has split mode, you can adjust the split point which determines where the keyboard is divided into different sections for different sounds.
- Auto Power Off: Many Yamaha pianos have an auto power off function that conserves energy by automatically turning off the piano after a period of inactivity. You can adjust the time duration or disable this feature if desired.
To adjust these additional settings, refer to your user manual for detailed instructions specific to your Yamaha piano model. The user manual will provide step-by-step guidance on accessing the settings menu and making adjustments using the control panel, buttons, or digital display.
Customizing these settings can personalize your playing experience and ensure that your Yamaha piano is perfectly tailored to your needs. Take the time to explore and experiment with these additional settings to optimize your playing and unlock the full potential of your instrument.
Remember to save any changes you make to the settings so that they are retained the next time you power on the piano.
By adjusting these additional settings, you can further refine your Yamaha piano’s performance and make it truly your own. Enjoy the process of exploring and fine-tuning these settings to create the perfect playing environment for your musical journey!
Conclusion
Congratulations! You have now learned how to turn on a Yamaha piano and navigate its essential functions. By following the steps outlined in this article, you can power on your Yamaha piano, adjust the volume, select different sounds, choose playing modes, and even connect external devices.
Remember, each Yamaha piano model may have its own unique features and controls, so it’s important to consult the user manual specific to your instrument for detailed instructions and any additional functionalities it may offer. Familiarizing yourself with the manual will help you fully understand and utilize the capabilities of your Yamaha piano.
With your Yamaha piano powered on and set up to your preferences, you are ready to embark on a musical journey filled with beautiful melodies and limitless creativity. Whether you are a beginner learning to play your first notes or an experienced pianist seeking to explore new sounds and techniques, your Yamaha piano will provide you with a world-class musical experience.
Don’t forget to continuously engage with your Yamaha piano, experimenting with different sounds, playing modes, and settings to unlock its full potential. As you continue to grow as a musician, your Yamaha piano will be there to accompany and inspire you every step of the way.
So, start playing, composing, and expressing yourself through the enchanting sounds of a Yamaha piano. Let the music flow and enjoy the rich tones and precision that this esteemed brand has to offer. Open new horizons and set your creativity free with the timeless beauty of a Yamaha piano!