Home>Events & Info>Ballet>How To Do A Ballet Bun Without A Donut
Ballet
How To Do A Ballet Bun Without A Donut
Modified: January 22, 2024
Learn how to create a perfect ballet bun without the need for a donut, with our step-by-step guide. Achieve a professional and elegant look for your ballet performances.
(Many of the links in this article redirect to a specific reviewed product. Your purchase of these products through affiliate links helps to generate commission for AudioLover.com, at no extra cost. Learn more)
Table of Contents
Introduction
Welcome to the wonderful world of ballet! Whether you are a ballet dancer yourself or a parent helping your child prepare for a ballet class or performance, one of the essential skills to master is creating a ballet bun. A neat and secure ballet bun not only completes the traditional ballet aesthetic but also keeps the hair out of the dancer’s face, allowing for uninterrupted movement and focus.
In the past, the traditional method of creating a ballet bun involved using a donut-shaped foam padding to achieve a perfectly round shape. However, it is also possible to create a beautiful ballet bun without a donut, using only a few simple techniques and tools.
In this article, we will guide you through the step-by-step process of creating a ballet bun without a donut. From gathering and securing the hair to twisting and pinning it in place, we will show you the secrets to achieving a professional-looking ballet bun that will stay securely in place throughout even the most intense ballet routines.
So, whether you are getting ready for a ballet performance, a ballet class, or simply want to achieve that classic ballet look, let’s dive into the world of ballet buns and learn how to create one without a donut!
Materials Needed
Before we begin, it’s important to gather all the necessary materials to create a ballet bun without a donut. Here’s what you’ll need:
- A brush or comb to smooth the hair
- Elastic bands or hair ties
- Hairpins or bobby pins
- Hairspray or hair gel (optional)
- A hair net (optional)
These materials are readily available at most drugstores or beauty supply stores. If you don’t already have them on hand, take a trip to your local store or order them online to ensure you have everything you need to create your ballet bun without a donut.
It’s important to note that the color of the materials you choose should match your hair color as closely as possible to create a seamless and natural-looking bun.
Once you have gathered all the necessary materials, find a clean and well-lit space where you can comfortably work on your hair. Having a mirror in front of you will also be helpful to ensure you achieve the desired bun shape and appearance.
Now that you have all the materials ready, let’s move on to the step-by-step process of creating a ballet bun without a donut.
Step 1: Brush and Gather Hair
The first step in creating a ballet bun without a donut is to brush and gather your hair. Start by thoroughly brushing your hair to remove any tangles or knots. This will ensure that your bun looks neat and tidy.
Once your hair is detangled, gather your hair in a high ponytail. Use your hands or a brush to smooth out any bumps or unevenness. Make sure to position the ponytail at the desired height on your head. For a classic ballet look, aim for a ponytail that sits just above the crown of your head.
Once you have positioned the ponytail, secure it tightly with an elastic band or hair tie. Make sure to choose a hair tie that matches the color of your hair to create a seamless appearance.
If needed, you can use a mirror to check that the ponytail is centered and secure. Additionally, ensure that there are no loose strands or flyaways around the base of the ponytail.
With your hair gathered and secured, you are now ready to move on to the next step of creating your ballet bun without a donut.
Step 2: Secure the Hair with an Elastic Band
After gathering your hair into a high ponytail, the next step in creating a ballet bun without a donut is to secure the hair with an elastic band. This step is crucial in ensuring the stability and longevity of your ballet bun.
Take the end of the ponytail and carefully twist it around the base of the ponytail, coiling it tightly. As you twist the hair, make sure to keep it close to the head to maintain a clean and compact bun.
Once you have twisted the hair all the way to the ends, tuck the ends underneath the bun to hide them. Alternatively, you can use bobby pins to secure any loose ends in place.
Now, using an elastic band or hair tie, wrap it around the bun multiple times to hold it securely. Make sure to choose an elastic band in a color that matches your hair to maintain a seamless appearance.
When wrapping the elastic band, make sure to pull it tightly to ensure the bun stays in place throughout your ballet routine. However, be mindful not to pull too tightly to avoid discomfort or tension on your scalp.
With the hair securely fastened in a bun shape, you are now ready to move on to the next step and refine the appearance of your ballet bun.
Step 3: Twist and Coil the Hair
Now that the hair is secured in a ponytail and wrapped with an elastic band, it’s time to twist and coil the hair to create the ballet bun shape. This step will give your bun a polished and professional look.
Start by taking the ponytail and gently twist it around itself, working in a clockwise or counterclockwise direction. This twisting action will create a firm and tight coil. Keep the coiling motion close to the head to maintain a sleek and compact bun.
As you twist and coil the hair, ensure that the bun remains centered and aligned with the base. Take your time and make small adjustments as needed to create a symmetrical and balanced bun.
Continue twisting and coiling the hair until you reach the end of the ponytail. At this point, tuck any remaining loose ends underneath the bun to hide them. If necessary, use bobby pins to secure any stray hairs or loose ends in place.
Make sure to maintain a firm grip on the bun as you twist to prevent it from unraveling. If you have thicker or longer hair, you may need to use more bobby pins to ensure the bun stays in place.
Remember, practice makes perfect! Don’t be discouraged if your first attempts at twisting and coiling the hair are not as neat as you’d like. With time and practice, you’ll become more proficient in creating a beautifully shaped ballet bun.
With the hair twisted and coiled, it’s time to move on to the next step of securing the bun in place.
Step 4: Secure the Bun with Hairpins
Now that you have twisted and coiled the hair into a ballet bun shape, it’s time to secure it in place using hairpins. Hairpins are essential for keeping the bun secure and preventing it from unraveling during your ballet routine.
Start by placing a hairpin vertically into the bun, near the base. Slide the hairpin in, making sure it goes through the bun and catches some of the hair from the base in its prongs. This will anchor the bun to your head and provide a solid foundation.
Continue inserting hairpins around the bun, working in a clockwise or counterclockwise direction. As you insert each hairpin, make sure it goes through the bun and catches a section of hair from the base. This will hold the bun securely in place.
For thicker hair or if you want extra security, you can cross two hairpins in an “X” shape to further reinforce the bun. This technique helps distribute the weight of the hair evenly and provides added stability.
Remember to insert the hairpins discreetly, hiding them within the bun and ensuring they are not visible from the front or sides. You can use a mirror to check the placement and adjust the position of any visible hairpins.
It’s important to note that hairpins come in different sizes, so choose the ones that work best for your hair type and the thickness of your bun. Additionally, using hairpins that closely match your hair color will help them blend in seamlessly and maintain the polished appearance of your ballet bun.
Once you have securely pinned the bun in place, gently tug on the bun to ensure it feels secure and stable. If needed, adjust the position of any loose or wobbly hairpins to provide a firm hold.
With the bun securely fastened with hairpins, you’re almost done! Let’s move on to the final step to add the finishing touches to your ballet bun.
Step 5: Smooth and Finish the Bun
After securing the bun with hairpins, it’s time to smooth out any flyaways and add the final touches to achieve a polished and finished look for your ballet bun.
Start by using a brush or comb to gently smooth down any stray hairs or bumps around the bun. Make sure to be gentle to avoid disturbing the secured hairpins.
Next, you can use a small amount of hairspray or hair gel to tame any frizz and provide extra hold. Lightly mist the bun with hairspray or apply a small amount of hair gel to your fingertips and smooth it over the surface of the bun. This will help keep the bun in place and maintain its shape throughout your ballet routine.
If desired, you can also use a hairnet to enhance the sleek and polished appearance of the bun. Place the hairnet over the bun and gently stretch it to cover the entire bun, tucking any loose ends underneath. The hairnet will help keep the bun secure and provide a clean finish.
Finally, take a moment to examine your ballet bun from different angles using a mirror. Make any necessary adjustments, such as tightening any loose areas or repositioning hairpins to ensure a neat and symmetrical look.
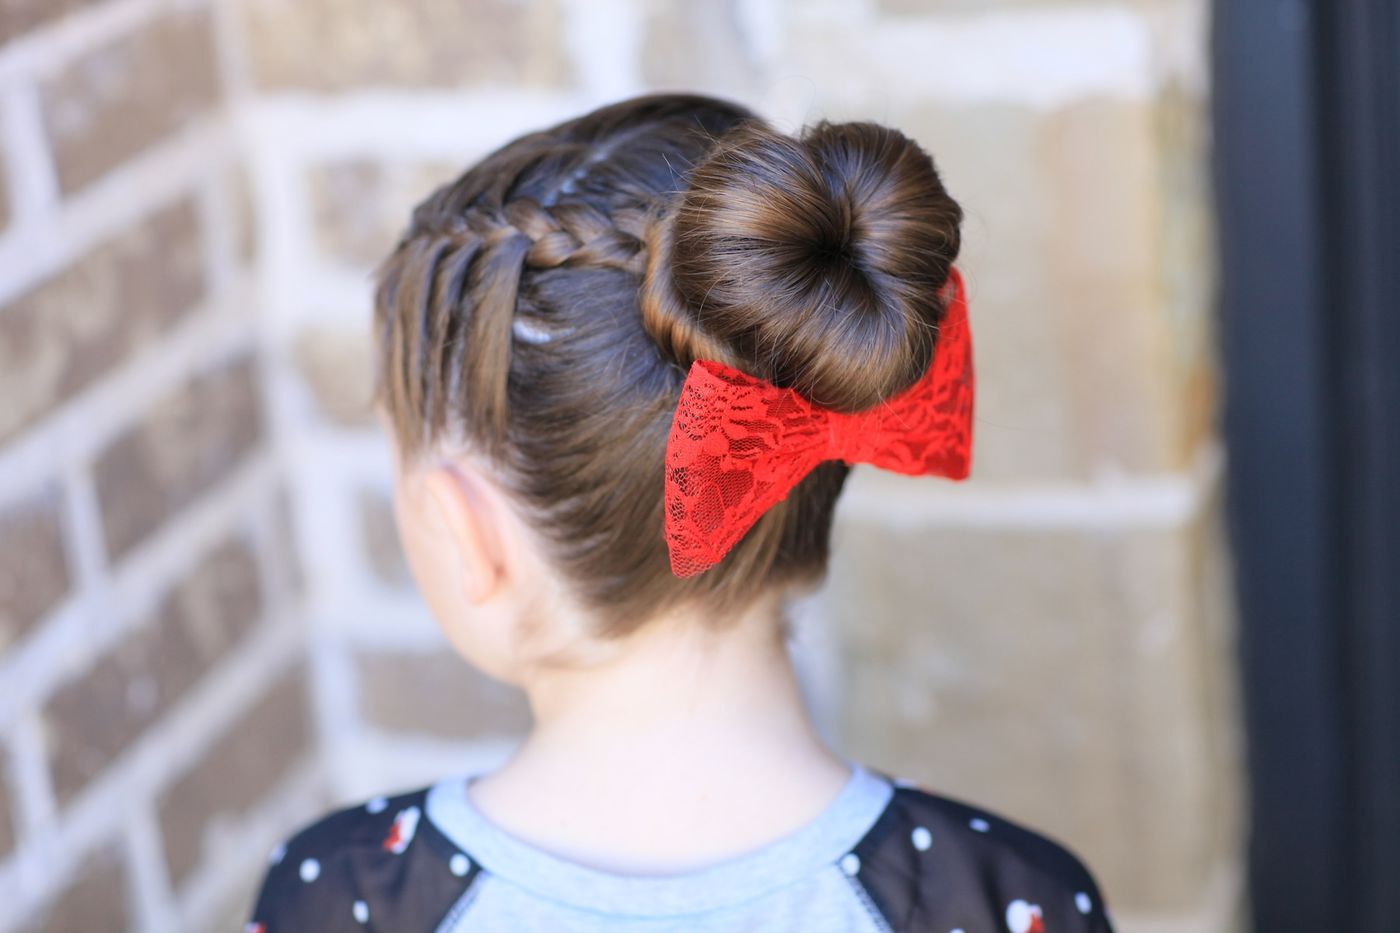
Congratulations! You have successfully created a beautiful ballet bun without a donut. Your hair is now elegantly styled and ready to accompany you during ballet class, rehearsal, or performance.
Remember, practice and patience are key when mastering the art of creating a ballet bun. With time, you will become more skilled at achieving the perfect shape and secure hold.
Now that you have mastered the technique of creating a ballet bun without a donut, you can confidently showcase your grace and talent as you dance your way through the enchanting world of ballet!
Conclusion
Creating a ballet bun without a donut is a skill every ballet dancer or ballet enthusiast should have. With a few simple steps and the right techniques, you can achieve a beautiful and secure bun that complements your ballet attire and keeps your hair neat and out of your face during performances or classes.
Throughout this article, we have walked you through the process of creating a ballet bun without a donut. From brushing and gathering your hair to securing it with an elastic band, twisting and coiling it into a bun shape, and finally, securing it with hairpins – each step is essential in achieving a professional-looking bun.
Remember to take your time and practice the technique. Creating the perfect ballet bun may require some trial and error, but with persistence, you will soon become an expert at creating a flawless bun that lasts throughout your ballet routine.
Additionally, don’t be afraid to experiment with different variations or add your personal touch to the bun. You can accessorize with beautiful hair accessories like ribbons or flowers to enhance the elegance of your ballet bun.
Now that you have the knowledge and skills to create a ballet bun without a donut, you can confidently showcase your talent and grace during ballet performances, classes, or even in everyday life. So, go ahead and embrace the classic ballet look with your perfectly styled ballet bun!