Home>Production & Technology>MIDI>How To MIDI Map In Serato DJ
MIDI
How To MIDI Map In Serato DJ
Published: February 22, 2024
Learn how to MIDI map in Serato DJ to customize your controller and optimize your DJ performance. Discover tips and tricks for efficient MIDI mapping.
(Many of the links in this article redirect to a specific reviewed product. Your purchase of these products through affiliate links helps to generate commission for AudioLover.com, at no extra cost. Learn more)
Table of Contents
Introduction
MIDI mapping is a powerful tool that allows DJs to customize and control their software in a way that suits their unique workflow. Whether you're a seasoned professional or just starting out, understanding MIDI mapping in Serato DJ can significantly enhance your performance and creativity.
By leveraging MIDI mapping, DJs can assign various functions within Serato DJ to external MIDI controllers, such as keyboards, drum pads, or specialized DJ controllers. This process enables you to tailor your setup to your specific preferences, providing a personalized and intuitive interface for manipulating your music.
In this comprehensive guide, we will delve into the intricacies of MIDI mapping in Serato DJ, offering step-by-step instructions and valuable insights to help you master this essential feature. From setting up MIDI devices to mapping controls and troubleshooting common issues, we'll cover everything you need to know to harness the full potential of MIDI mapping within Serato DJ.
Whether you're looking to fine-tune your performance by customizing your controller layout, or seeking to expand the functionality of your DJ setup, this guide will equip you with the knowledge and skills to make the most of MIDI mapping in Serato DJ. Let's embark on this journey to unlock the endless possibilities that MIDI mapping has to offer for DJs of all levels.
Understanding MIDI Mapping
MIDI mapping serves as the bridge between your hardware controllers and the software, allowing you to customize the behavior of your MIDI devices within Serato DJ. Essentially, it enables you to assign specific functions within the software to the physical controls on your MIDI device. This level of customization empowers you to tailor your DJ setup to your unique preferences and workflow, ultimately enhancing your performance and creativity.
At its core, MIDI mapping operates on the principle of assigning MIDI messages, such as note on/off, control change, or program change, to various parameters within Serato DJ. These parameters can encompass a wide range of functions, including but not limited to play, cue, loop, effects, and mixer controls. By establishing these associations, you effectively dictate how your MIDI controller interacts with the software, thereby shaping the user experience to align with your specific needs and creative vision.
One of the key advantages of MIDI mapping lies in its flexibility. It allows you to repurpose the physical controls on your MIDI device to perform functions beyond their default assignments. For example, you can designate a knob to adjust the filter frequency, assign a pad to trigger samples, or map a fader to control the crossfader curve. This level of customization empowers you to craft a personalized and intuitive interface that aligns seamlessly with your DJing style and preferences.
Furthermore, understanding MIDI mapping involves familiarizing yourself with the concept of MIDI channels. MIDI channels serve as communication pathways through which MIDI data is transmitted between devices. When mapping MIDI controls in Serato DJ, it's essential to ensure that the MIDI channel settings on your hardware controller correspond with the intended parameters within the software. This alignment ensures that the MIDI messages are accurately received and interpreted by Serato DJ, enabling seamless integration and precise control over your DJ setup.
In essence, comprehending MIDI mapping entails grasping the intricacies of assigning MIDI messages to software parameters and leveraging the flexibility of this process to tailor your DJ setup to your unique preferences. By mastering the art of MIDI mapping, you gain the ability to transform your MIDI controller into a versatile and personalized tool that amplifies your creative expression and elevates your DJ performance.
Setting Up MIDI Devices
Setting up MIDI devices is a fundamental step in preparing your DJ setup for MIDI mapping within Serato DJ. This process involves establishing a seamless connection between your external MIDI controller and the software, ensuring that the two components communicate effectively to facilitate the mapping of MIDI controls.
To begin, it's essential to connect your MIDI device to your computer using an appropriate interface, such as a USB cable or MIDI interface. Once the physical connection is established, you'll need to ensure that the MIDI device is recognized and properly configured within your computer's operating system. This typically involves installing any necessary drivers or software provided by the manufacturer to enable seamless communication between the MIDI device and your computer.
Next, within Serato DJ, navigate to the settings or preferences menu to access the MIDI tab. Here, you'll be able to view and manage the MIDI devices that are connected to your system. It's important to verify that your MIDI controller is detected and listed within the MIDI devices section. If your MIDI device is not automatically recognized, you may need to manually add it by selecting the "Add" or "Detect" option within the MIDI settings and following the on-screen instructions to establish the connection.
Once your MIDI device is successfully detected and integrated into Serato DJ, it's advisable to configure the MIDI channels and settings to align with your specific requirements. This may involve assigning MIDI channels to individual controls on your MIDI device, ensuring that they correspond with the intended parameters within Serato DJ. Additionally, you may have the option to customize the MIDI input and output settings to optimize the communication between your MIDI controller and the software, enhancing responsiveness and accuracy during MIDI mapping.
Furthermore, it's crucial to ensure that your MIDI device is powered on and functioning correctly before proceeding with MIDI mapping. This includes verifying that the physical controls, such as knobs, faders, and pads, are responsive and in good working condition. This step is essential to guarantee that the MIDI signals transmitted by your controller are accurately received by Serato DJ, enabling seamless mapping and reliable performance during your DJ sessions.
By meticulously setting up your MIDI devices in accordance with the aforementioned guidelines, you lay a solid foundation for the subsequent process of MIDI mapping within Serato DJ. This meticulous approach ensures that your external MIDI controller is seamlessly integrated and ready to be customized to suit your unique DJing style and preferences.
Mapping MIDI Controls
Mapping MIDI controls within Serato DJ empowers you to tailor the behavior of your external MIDI device to align with your specific DJing requirements and creative vision. This process involves assigning MIDI messages transmitted by your controller to various functions and parameters within the software, effectively customizing the behavior of your physical controls to suit your unique workflow.
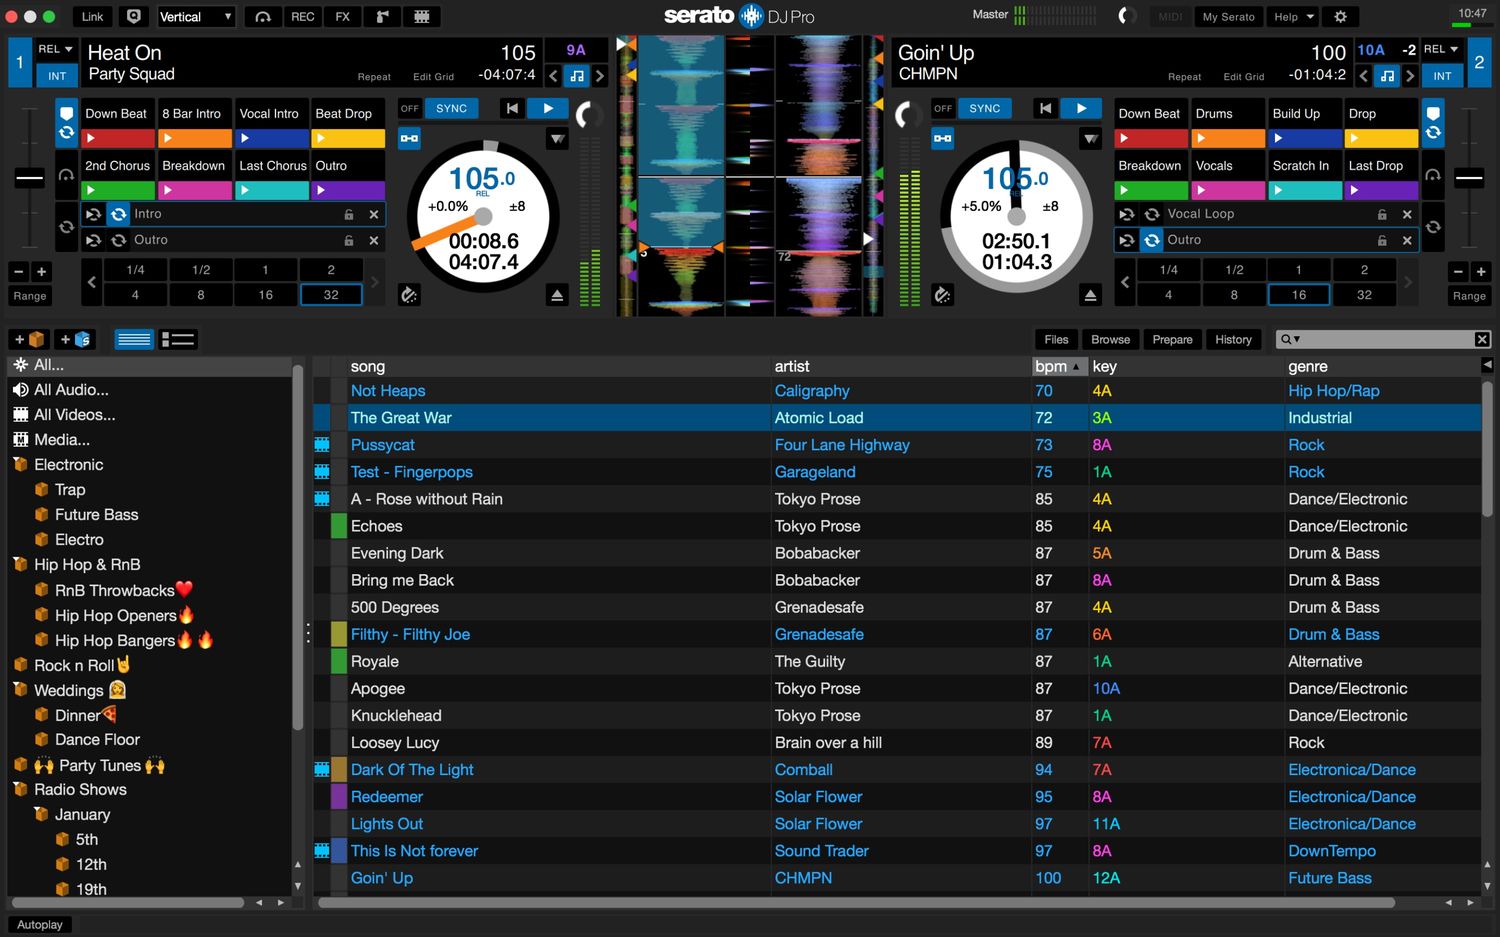
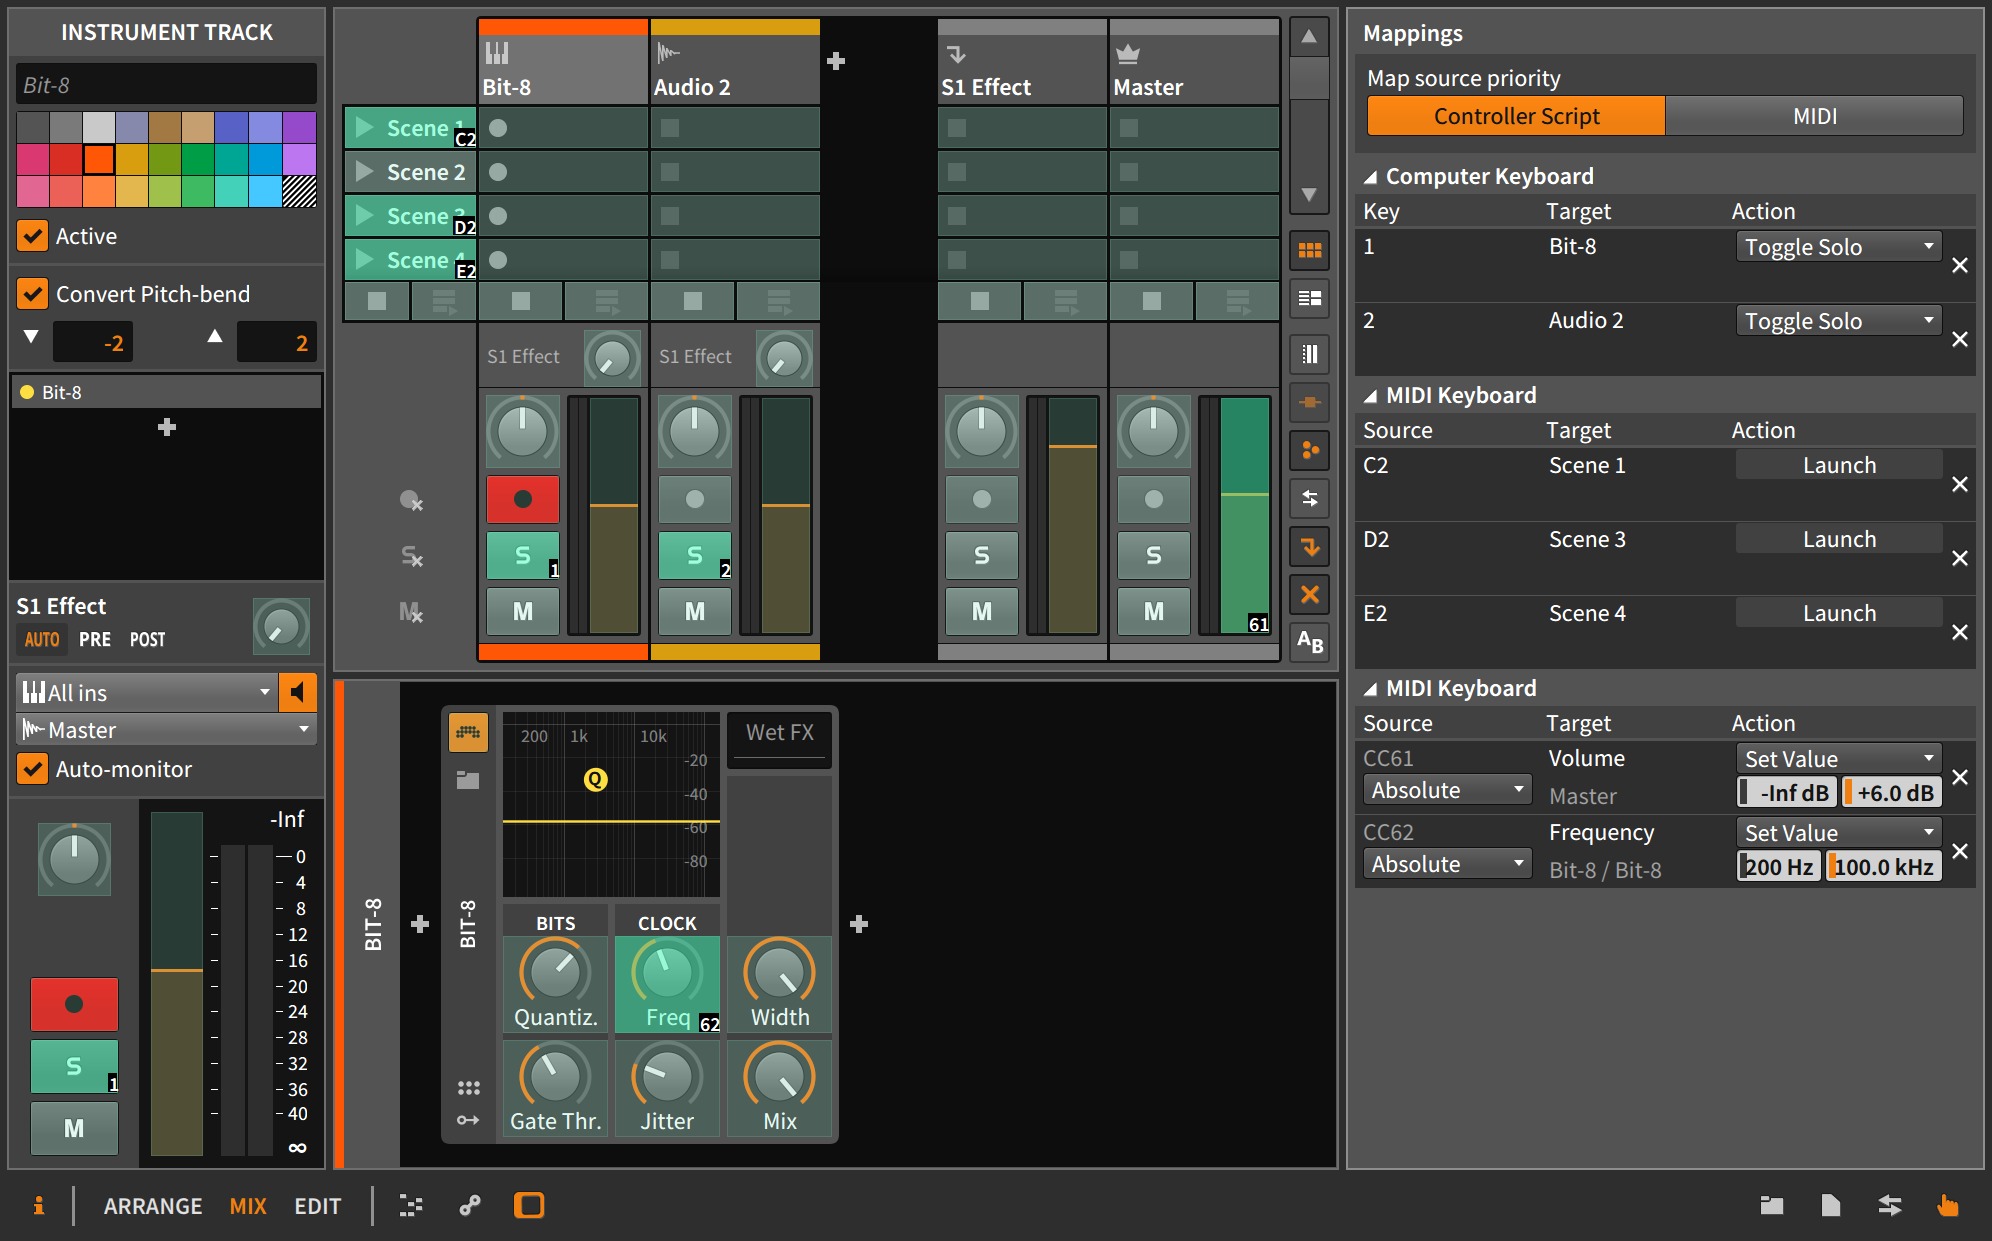
To initiate the MIDI mapping process, access the MIDI tab within the settings or preferences menu in Serato DJ. Here, you'll encounter a visual representation of the software interface, showcasing the available parameters that can be mapped to your MIDI controller. This intuitive interface allows you to seamlessly assign MIDI controls to specific functions within Serato DJ, providing a clear and user-friendly environment for customizing your DJ setup.
When mapping MIDI controls, it's essential to identify the specific functions or parameters within Serato DJ that you intend to assign to your MIDI device. This may encompass a wide range of capabilities, including cue points, loop controls, effects parameters, mixer settings, and playback functions. By strategically selecting the functions you wish to map, you can tailor your MIDI controller to streamline your DJ performance and enhance your creative capabilities.
Once you've identified the target parameters for MIDI mapping, the next step involves establishing the associations between the physical controls on your MIDI device and the corresponding functions within Serato DJ. This typically involves selecting a parameter in the software interface and then physically manipulating the desired control on your MIDI device to create the mapping. For instance, you can designate a specific knob to adjust the filter frequency, assign a pad to trigger samples, or map a fader to control the crossfader curve, thereby customizing your controller layout to match your preferred workflow.
During the MIDI mapping process, it's crucial to ensure that the assigned MIDI controls operate seamlessly and accurately within Serato DJ. This entails testing each mapped function to verify its responsiveness and reliability, confirming that the MIDI messages transmitted by your controller effectively trigger the intended actions within the software. By meticulously fine-tuning the MIDI mappings and conducting thorough testing, you can optimize the performance of your MIDI controller and create a tailored interface that amplifies your creative expression and efficiency as a DJ.
By mastering the art of mapping MIDI controls within Serato DJ, you gain the ability to sculpt a personalized and intuitive DJ setup that aligns seamlessly with your creative vision and enhances your performance capabilities. This level of customization empowers you to harness the full potential of your MIDI controller, transforming it into a versatile tool that amplifies your creativity and elevates your DJing experience.
Saving and Using MIDI Mapping
Once you have meticulously mapped the MIDI controls to your desired functions within Serato DJ, it's imperative to save your MIDI mapping configurations to ensure seamless integration and effortless recall during your DJ sessions. Saving your MIDI mapping not only preserves your customized settings but also allows you to reuse them across different performances, eliminating the need to recreate the mappings each time you launch the software.
In Serato DJ, the process of saving MIDI mapping configurations is straightforward and user-friendly. After finalizing your MIDI mappings, navigate to the MIDI tab within the settings or preferences menu. Here, you'll find the option to save your MIDI mapping settings, typically labeled as "Save" or "Export." By selecting this option, you can save your MIDI mapping configurations as a dedicated file on your computer, enabling you to archive and access them whenever needed.
By saving your MIDI mapping settings as a file, you create a convenient backup that safeguards your custom configurations against potential loss or system changes. This approach ensures that your meticulously crafted MIDI mappings remain intact and readily available, empowering you to seamlessly transition between different DJ setups or hardware configurations without compromising your preferred control layout.
Furthermore, the ability to use saved MIDI mapping configurations across various DJ performances enhances your flexibility and efficiency as a DJ. Whether you're switching between different MIDI controllers, performing at diverse venues, or collaborating with other DJs, having your MIDI mappings readily available streamlines the setup process and allows you to focus on delivering a captivating performance.
When it comes to using saved MIDI mapping configurations, Serato DJ offers a seamless import process that enables you to effortlessly load your custom mappings into the software. By accessing the MIDI tab within the settings or preferences menu, you can import your saved MIDI mapping file, instantly applying your personalized control layout to the current DJ setup.
This streamlined import process ensures that your custom MIDI mappings are readily accessible, empowering you to maintain a consistent and familiar control interface across different performances and setups. Whether you're performing at a club, festival, or private event, the ability to seamlessly apply your saved MIDI mappings enhances your confidence and allows you to focus on delivering an exceptional DJ experience.
By embracing the practice of saving and using MIDI mapping configurations within Serato DJ, you elevate your DJing capabilities and streamline your workflow, ensuring that your customized control layout remains accessible and consistent across various performances and hardware setups. This approach not only enhances your efficiency as a DJ but also reinforces the seamless integration of your MIDI controller with Serato DJ, empowering you to unleash your creativity and deliver unforgettable performances.
Troubleshooting MIDI Mapping Issues
Troubleshooting MIDI mapping issues is an essential aspect of optimizing the functionality and performance of your DJ setup within Serato DJ. While MIDI mapping empowers you to customize your control interface and enhance your creative capabilities, encountering technical challenges or unexpected behavior during the mapping process is not uncommon. By understanding common troubleshooting techniques and best practices, you can effectively address MIDI mapping issues and ensure a seamless and reliable DJing experience.
One prevalent issue that DJs may encounter when MIDI mapping is the misalignment of MIDI messages between the controller and the software. This discrepancy can manifest as controls on the MIDI device failing to trigger the intended functions within Serato DJ or producing unexpected results. To address this issue, it's crucial to verify the MIDI channel settings on both the controller and within the software. Ensuring that the MIDI channels are correctly aligned facilitates accurate communication and precise control over the mapped functions.
Another common challenge involves unresponsive or erratic behavior from mapped controls. When encountering this issue, it's advisable to inspect the MIDI input and output settings within Serato DJ to confirm that the software is accurately receiving and interpreting the MIDI messages from your controller. Additionally, checking the physical condition of the MIDI device, including the connectivity of cables and the functionality of controls, can help identify and resolve potential hardware-related issues that may impact MIDI mapping performance.
In some instances, MIDI mapping issues may arise due to conflicting MIDI assignments or overlapping control configurations. This can lead to unexpected behavior, such as controls triggering multiple functions simultaneously or conflicting with existing mappings. To mitigate this issue, conducting a thorough review of the MIDI mappings within Serato DJ, ensuring that there are no conflicting assignments or redundancies, can help streamline the control interface and eliminate unexpected behavior during DJ performances.
Furthermore, software updates and compatibility issues may impact MIDI mapping functionality. It's essential to stay informed about the latest updates for Serato DJ and your MIDI controller's firmware or software drivers. Keeping your software and hardware components up to date can mitigate potential compatibility issues and ensure that MIDI mapping operates seamlessly within the current environment.
By embracing a proactive approach to troubleshooting MIDI mapping issues, DJs can overcome technical challenges and optimize the performance of their MIDI controllers within Serato DJ. Through meticulous inspection of MIDI settings, hardware functionality, and software compatibility, you can elevate your MIDI mapping experience and cultivate a reliable and personalized DJ setup that empowers you to unleash your creativity and deliver captivating performances.