Home>Production & Technology>MIDI>How To Map MIDI Controls In Studio One
MIDI
How To Map MIDI Controls In Studio One
Modified: February 22, 2024
Learn how to map MIDI controls in Studio One and take full advantage of your MIDI devices. Get step-by-step instructions and tips for optimizing your MIDI setup.
(Many of the links in this article redirect to a specific reviewed product. Your purchase of these products through affiliate links helps to generate commission for AudioLover.com, at no extra cost. Learn more)
Table of Contents
Introduction
MIDI, short for Musical Instrument Digital Interface, has revolutionized the way musicians, producers, and sound engineers interact with digital audio workstations (DAWs) like Studio One. This powerful protocol enables seamless communication between hardware controllers and software, allowing for intuitive manipulation of virtual instruments, effects, and various parameters within the DAW environment.
In the realm of music production, MIDI mapping plays a pivotal role in bridging the gap between physical control surfaces and the digital domain. By assigning MIDI controls to specific functions within Studio One, users can unleash a new level of creativity and efficiency in their workflow. Whether tweaking synth parameters, adjusting mixer settings, or triggering complex automation, the possibilities are as vast as the sonic landscapes one can create.
Understanding how to effectively map MIDI controls in Studio One is a fundamental skill that empowers users to tailor their music production environment to their unique preferences. From novices seeking to streamline their creative process to seasoned professionals aiming to achieve unparalleled precision and expressiveness, MIDI mapping is a cornerstone of modern music production.
In this comprehensive guide, we will delve into the intricacies of setting up MIDI devices, mapping MIDI controls to parameters, and creating custom MIDI mapping templates in Studio One. Additionally, we will explore valuable tips and tricks to optimize the MIDI mapping experience, ultimately enhancing the synergy between hardware controllers and the software environment.
Whether you're a keyboardist looking to integrate your favorite MIDI controller seamlessly into Studio One, a DJ aiming to craft dynamic live performances, or a producer seeking to harness the full potential of MIDI-enabled hardware, this guide will equip you with the knowledge and techniques to elevate your music production endeavors. So, let's embark on this journey to unlock the boundless potential of MIDI mapping in Studio One.
Setting Up MIDI Devices in Studio One
Setting up MIDI devices in Studio One is the foundational step towards harnessing the power of MIDI mapping for seamless control and manipulation of various parameters within the DAW environment. Whether you're connecting a MIDI keyboard, pad controller, or other hardware interface, Studio One offers a user-friendly interface for integrating these devices effortlessly.
-
Connecting MIDI Hardware: To begin, ensure that your MIDI hardware is connected to your computer via USB or MIDI cables. Once the physical connection is established, launch Studio One and navigate to the 'Studio One' menu on the top toolbar.
-
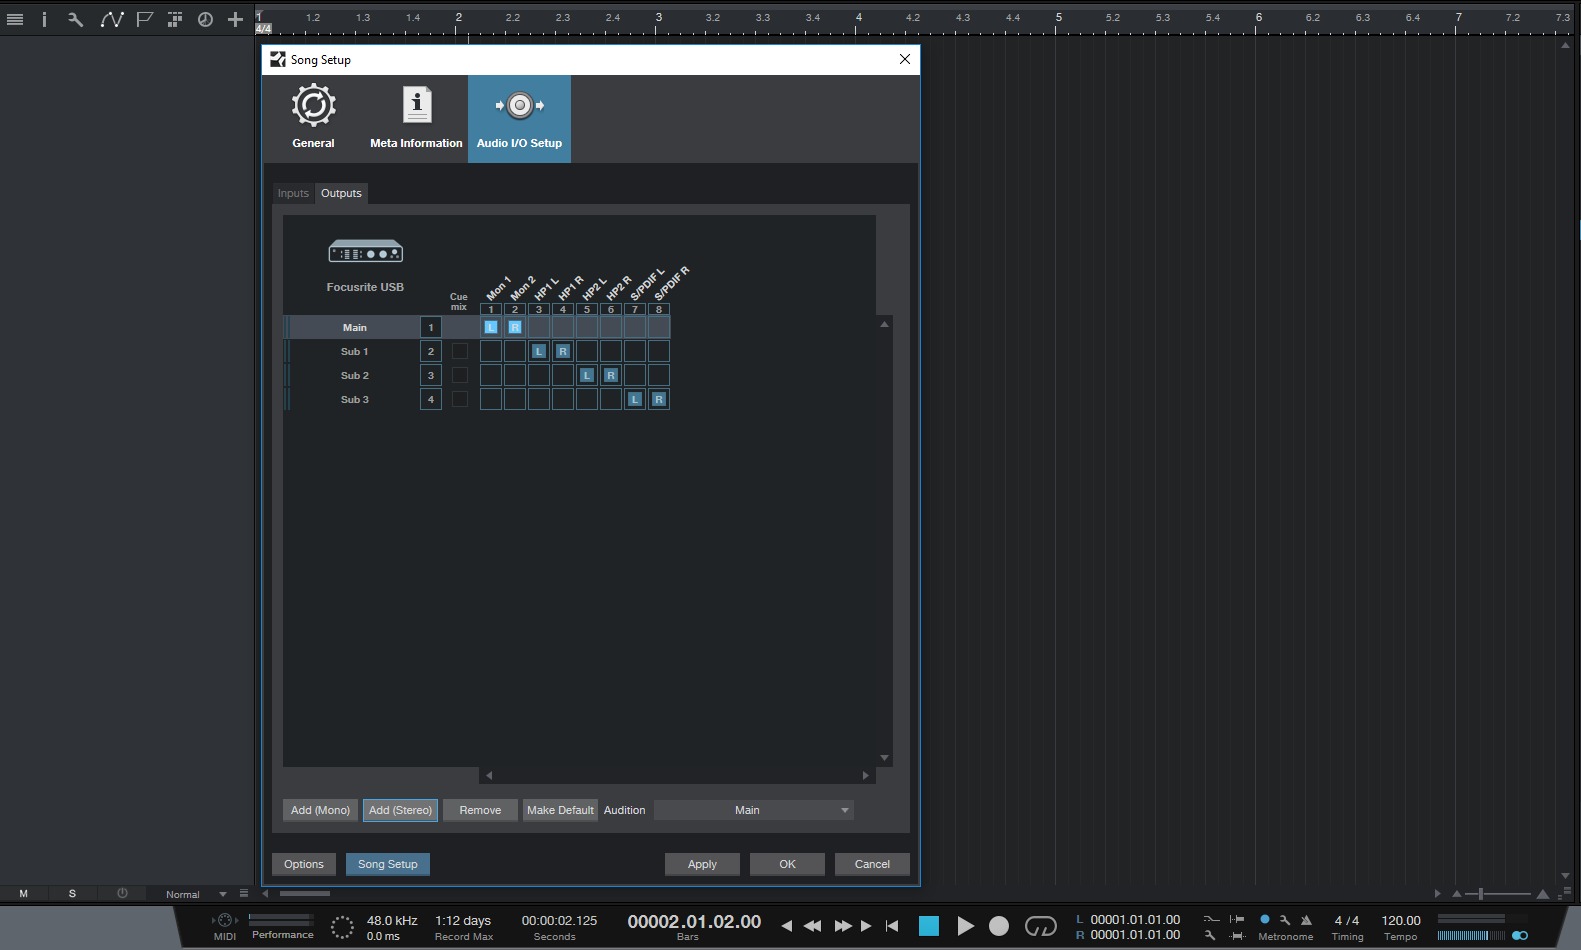
Accessing External Devices: Within the 'Studio One' menu, select 'Options' and then 'External Devices.' This will open the 'External Devices' window, where you can manage MIDI controllers, keyboards, and other external devices.
-
Adding a New Device: Click on the 'Add' button within the 'External Devices' window to initiate the process of adding a new MIDI device. Studio One provides a comprehensive list of pre-configured devices, making it convenient to select your specific MIDI controller from the available options. If your device is not listed, you can create a custom device profile by selecting 'New Keyboard' or 'New Instrument' and configuring the MIDI input and output settings.
-
Assigning MIDI Channels and Ports: Once the MIDI device is added, you can specify the MIDI input and output ports, as well as the MIDI channels used for communication between the hardware controller and Studio One. This step ensures that Studio One recognizes and communicates with your MIDI device effectively.
-
Testing MIDI Connectivity: To verify that the MIDI device is successfully integrated, play some notes on your MIDI keyboard or trigger pads on your MIDI controller. Studio One should respond to the MIDI input, indicating that the setup process is complete and the MIDI hardware is ready for use.
By following these steps, you can seamlessly set up MIDI devices in Studio One, laying the groundwork for engaging in MIDI mapping to control various aspects of your music production workflow. With your MIDI hardware integrated into Studio One, you are now poised to delve into the exciting realm of MIDI mapping, enabling intuitive and expressive manipulation of virtual instruments, effects, and essential parameters within the DAW.
In the subsequent sections, we will explore the intricacies of mapping MIDI controls to parameters, creating custom MIDI mapping templates, and uncovering valuable tips and tricks to enhance the efficiency and flexibility of MIDI mapping in Studio One. Let's embark on this journey to unlock the full potential of MIDI integration and control within the Studio One environment.
Mapping MIDI Controls to Parameters
Mapping MIDI controls to parameters in Studio One empowers users to establish a direct and tactile connection between hardware controllers and the myriad of functions within the DAW. Whether it's adjusting plugin parameters, manipulating mixer settings, or triggering automation, MIDI mapping offers a dynamic and intuitive approach to shaping and sculpting sounds with precision and expressiveness.
Mapping Process
-
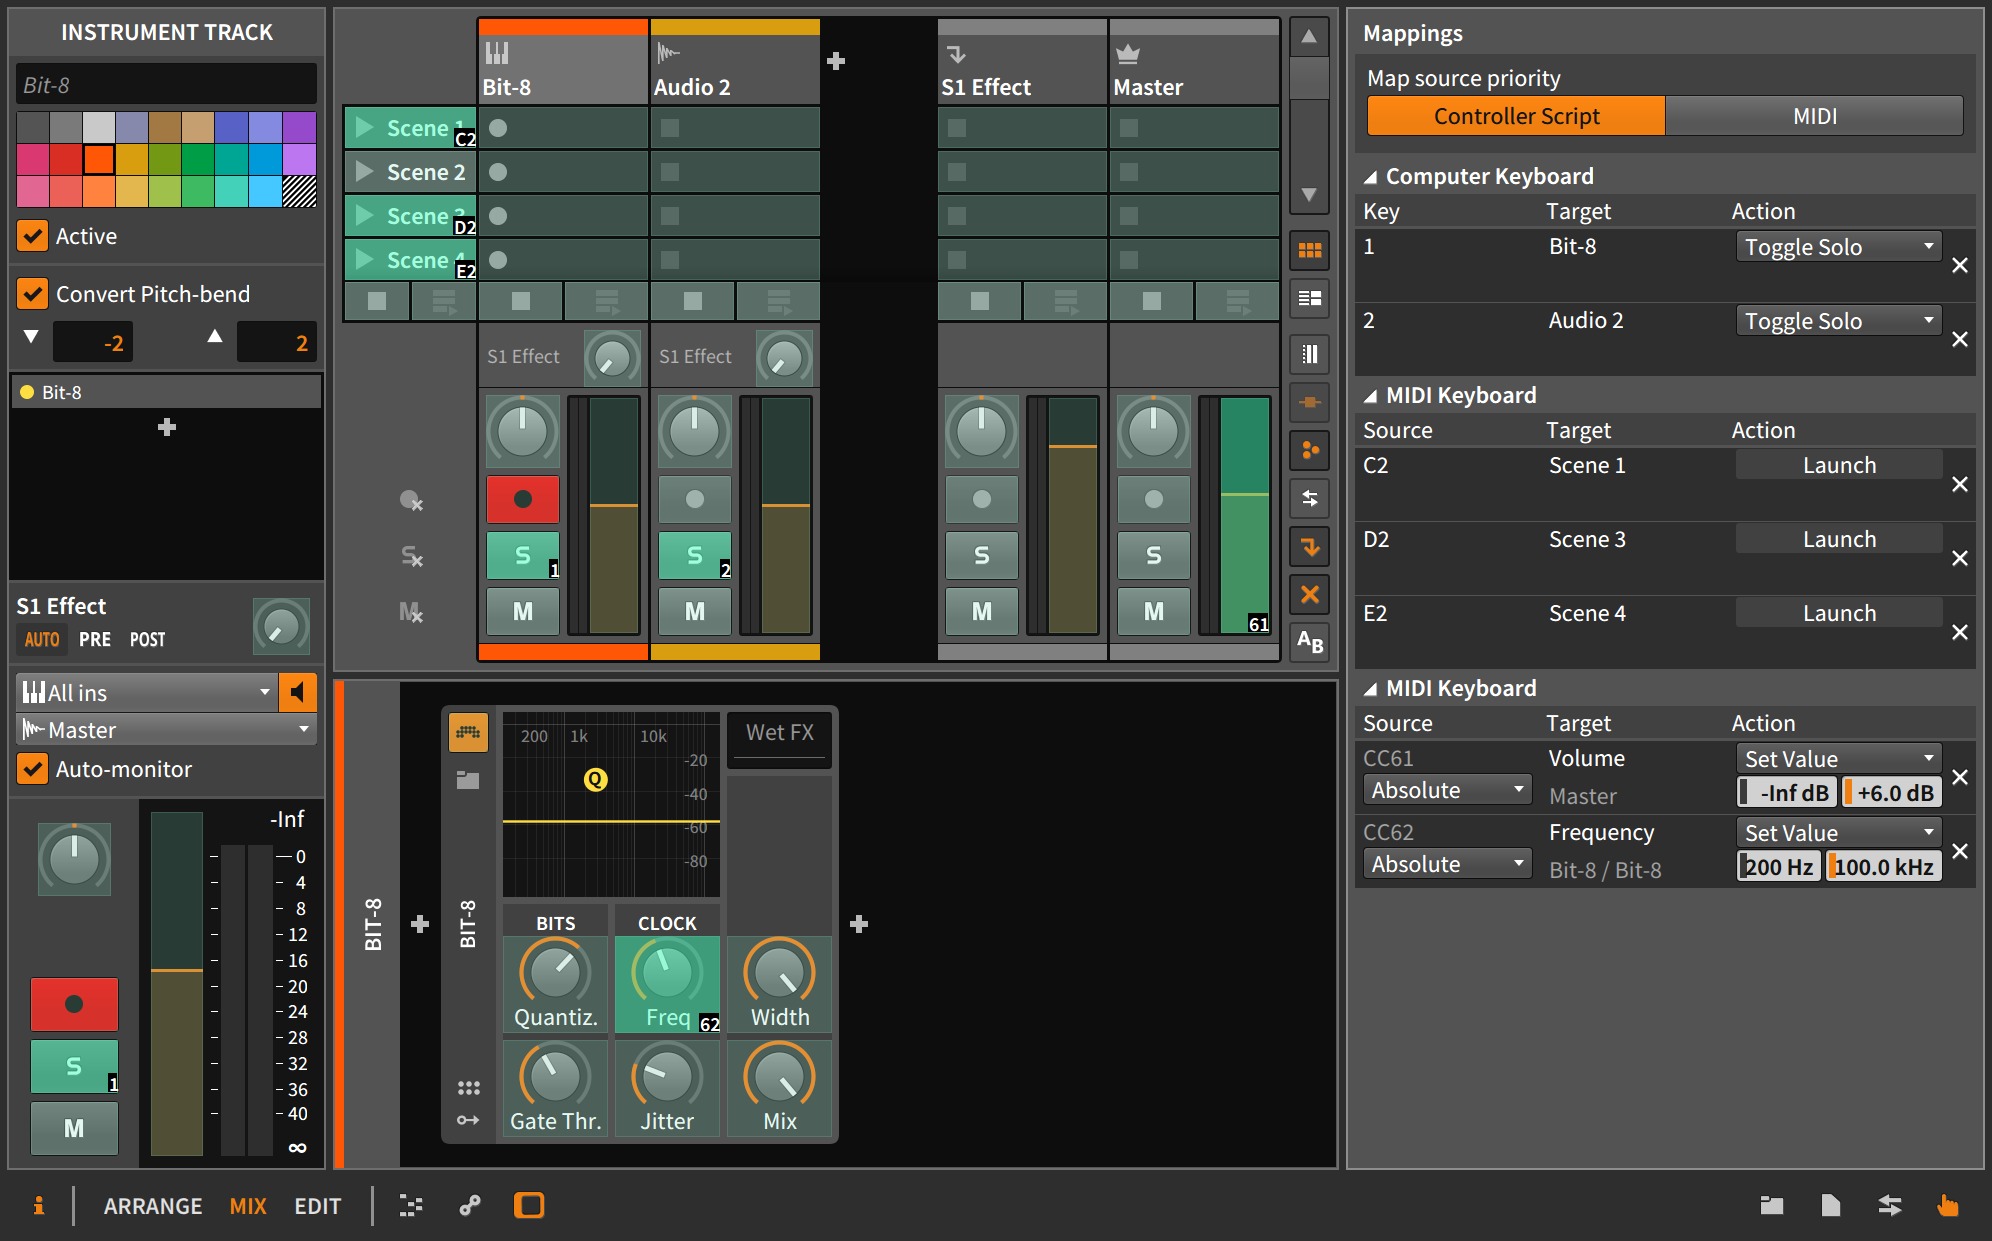
Selecting a Parameter: To initiate the MIDI mapping process, users can simply right-click on the desired parameter within Studio One, such as a plugin knob, fader, or any assignable control. This action opens a contextual menu where the "Link to Controller" option can be accessed.
-
Engaging MIDI Learn Mode: Upon selecting "Link to Controller," Studio One enters MIDI Learn mode, awaiting input from the MIDI controller. Upon activation, the parameter becomes receptive to MIDI input, ready to be associated with a physical control on the MIDI device.
-
Physical Control Assignment: With MIDI Learn mode active, users can manipulate the desired parameter by touching a knob, slider, or button on their MIDI controller. Studio One promptly recognizes the MIDI input and assigns the physical control to the parameter, establishing a direct link between the hardware and software.
-
Verification and Fine-Tuning: After assigning the MIDI control, users can verify the mapping by interacting with the physical control and observing the corresponding parameter adjustment within Studio One. Fine-tuning the mapping may be necessary to ensure the desired range and behavior of the parameter are accurately reflected by the MIDI control.
Advanced Mapping Options
Studio One offers advanced MIDI mapping capabilities, enabling users to delve deeper into customizing the behavior of MIDI controls. This includes the ability to invert control ranges, apply scaling and smoothing to control input, and even map a single MIDI control to multiple parameters for intricate and synchronized adjustments.
Flexibility and Creativity
The flexibility of MIDI mapping in Studio One extends to non-traditional applications, allowing users to map MIDI controls to unconventional parameters, such as track visibility, macro controls, or even custom script functions. This versatility empowers users to tailor their MIDI controllers to suit their unique workflow and creative preferences, fostering a personalized and efficient music production environment.
By mastering the art of mapping MIDI controls to parameters in Studio One, users can unleash the full potential of their hardware controllers, elevating their creative process and enabling seamless interaction with the rich array of features and functions within the DAW.
In the subsequent section, we will delve into the creation of custom MIDI mapping templates, providing users with a streamlined approach to configuring and reusing MIDI mappings across projects, further enhancing the efficiency and consistency of their music production workflow.
Creating Custom MIDI Mapping Templates
Creating custom MIDI mapping templates in Studio One empowers users to streamline their workflow and maintain consistency in MIDI control assignments across different projects. By establishing predefined mapping configurations tailored to specific hardware controllers or production scenarios, users can expedite the setup process and ensure a cohesive MIDI control experience from project to project.
Template Creation Process
-
Initial Mapping Configuration: To create a custom MIDI mapping template, users can first configure their MIDI controls to suit their preferred parameters within Studio One. This involves mapping various controls to specific functions, such as mixer faders, plugin parameters, or transport controls, according to their individual preferences and production requirements.
-
Saving Custom Templates: Once the desired MIDI control assignments are in place, users can save the mapping configurations as custom templates within Studio One. This involves accessing the MIDI mapping configuration window and selecting the option to save the current mappings as a template. Users can provide a descriptive name for the template, reflecting the associated hardware controller or intended usage scenario for easy identification.
-
Template Accessibility: After saving the custom MIDI mapping template, it becomes readily accessible within Studio One's template library, allowing users to apply the predefined mappings to new projects or existing ones. This streamlined approach eliminates the need to recreate MIDI control assignments for each project, saving time and ensuring consistency across productions.
Benefits of Custom Templates
-
Efficiency and Consistency: Custom MIDI mapping templates expedite the setup process for MIDI controllers, enabling users to swiftly apply established mappings to new projects. This enhances workflow efficiency and ensures consistent control assignments, especially when working with multiple projects or utilizing the same hardware controller across different sessions.
-
Tailored to Hardware Controllers: Custom templates can be tailored to specific hardware controllers, accommodating the unique layout and capabilities of each device. This personalized approach optimizes the integration of MIDI controllers with Studio One, aligning the mappings with the physical controls and user preferences.
-
Adaptability and Reusability: The reusability of custom MIDI mapping templates allows users to adapt their predefined configurations to various production scenarios, from live performance setups to studio recording sessions. This adaptability fosters a seamless transition between projects and facilitates a cohesive MIDI control experience.
By leveraging custom MIDI mapping templates, users can establish a standardized and efficient approach to integrating their hardware controllers with Studio One, promoting a cohesive and streamlined MIDI control experience across their music production endeavors.
Tips and Tricks for Efficient MIDI Mapping
Efficient MIDI mapping is not only about the technical process of assigning controls to parameters; it also encompasses strategic approaches and best practices that enhance the overall MIDI control experience within Studio One. By incorporating the following tips and tricks, users can optimize their MIDI mapping workflow, elevate their creative capabilities, and navigate the intricacies of MIDI control with finesse.
1. Organize and Label MIDI Controls
Maintaining a well-organized approach to MIDI control assignments can significantly streamline the mapping process. By labeling controls on the hardware device and within Studio One, users can quickly identify and assign specific functions, ensuring clarity and coherence in their MIDI mappings.
2. Utilize MIDI Layers and Banks
For MIDI controllers with extensive control surfaces, leveraging MIDI layers and banks can expand the mapping possibilities. This approach allows users to assign multiple functions to a single control by toggling between different layers or banks, maximizing the utility of their hardware controllers without overwhelming the primary mapping interface.
3. Embrace MIDI Control Groups
Grouping related parameters under a single MIDI control can enhance efficiency and coherence in MIDI mappings. For instance, assigning multiple EQ parameters to a rotary knob or fader enables simultaneous manipulation of frequency bands, providing a tactile and integrated approach to shaping the sound.
4. Explore MIDI Mapping Presets
Studio One offers a range of predefined MIDI mapping presets for popular hardware controllers. Users can explore and utilize these presets as a starting point for their own mappings, leveraging the optimized configurations provided by the software to expedite the setup process and ensure compatibility with their MIDI devices.
5. Dynamic Mapping with Macros and Scripts
Harnessing the power of macros and custom scripts in Studio One enables users to create dynamic and intricate MIDI mappings. By defining custom functions and workflows through scripting, users can expand the scope of MIDI control, unlocking advanced capabilities and tailored solutions for their specific production requirements.
6. Fine-Tune Control Response and Scaling
Adjusting the response curves and scaling of MIDI controls within Studio One allows users to tailor the sensitivity and range of their hardware devices to suit their playing style and preferences. Fine-tuning control response ensures a natural and intuitive interaction with parameters, enhancing the expressiveness and precision of MIDI control.
7. Document Custom Mappings
Maintaining documentation of custom MIDI mappings, including control assignments, scaling settings, and unique functionalities, facilitates seamless integration across projects and serves as a valuable reference for future mapping endeavors. This practice promotes consistency and clarity in MIDI control configurations.
By incorporating these tips and tricks into their MIDI mapping endeavors, users can navigate the intricacies of MIDI control with confidence and creativity, fostering an efficient and personalized approach to integrating hardware controllers with Studio One. This strategic and nuanced approach to MIDI mapping transcends technical proficiency, empowering users to sculpt their sonic landscapes with precision and expressiveness.
Conclusion
In conclusion, mastering the art of MIDI mapping in Studio One opens a gateway to a world of boundless creativity and efficiency for music producers, sound engineers, and performers. The seamless integration of MIDI hardware controllers with Studio One empowers users to sculpt and shape their sonic visions with tactile precision, leveraging the expressive capabilities of physical controls to breathe life into digital audio environments.
By setting up MIDI devices in Studio One, users establish a direct line of communication between their hardware controllers and the DAW, laying the foundation for immersive and dynamic MIDI control. The process of mapping MIDI controls to parameters within Studio One provides a canvas for personalized interaction, where every twist of a knob or slide of a fader translates into nuanced sonic transformations.
Creating custom MIDI mapping templates further enhances the efficiency and consistency of MIDI control, allowing users to tailor their mappings to specific hardware controllers or production scenarios. This streamlined approach expedites the setup process and ensures a cohesive MIDI control experience across different projects, fostering a seamless transition between creative endeavors.
Moreover, the tips and tricks for efficient MIDI mapping serve as guiding principles for users to navigate the complexities of MIDI control with finesse. From organizing and labeling MIDI controls to exploring advanced mapping possibilities through macros and scripts, these strategic approaches elevate the MIDI mapping experience, empowering users to unlock the full potential of their hardware controllers within Studio One.
As technology continues to evolve and reshape the landscape of music production, MIDI mapping remains a cornerstone of bridging the gap between the physical and digital realms. The fusion of tactile interaction and digital manipulation through MIDI mapping embodies the convergence of artistry and technology, enabling users to unleash their creativity with unparalleled control and expression.
In essence, the journey of MIDI mapping in Studio One transcends mere technical proficiency; it embodies a harmonious synergy between human creativity and technological innovation. It is a journey that empowers users to shape soundscapes, breathe life into compositions, and elevate their musical endeavors with the seamless integration of hardware controllers and the limitless possibilities of MIDI control within Studio One.