Home>Events & Info>Acapella>How To Sync Acapella To Beat In Garageband
Acapella
How To Sync Acapella To Beat In Garageband
Published: January 2, 2024
Learn how to sync acapella vocals to the beat in Garageband with easy step-by-step instructions. Enhance your music production skills and create professional-sounding tracks.
(Many of the links in this article redirect to a specific reviewed product. Your purchase of these products through affiliate links helps to generate commission for AudioLover.com, at no extra cost. Learn more)
Table of Contents
Introduction
When it comes to creating music, the art of mixing vocals and beats is essential. One popular technique used by musicians and producers is syncing acapella vocals to a beat. Acapella refers to the isolated vocal track of a song, allowing you to focus solely on the vocals without any accompanying instruments or background music. Garageband, a popular digital audio workstation, provides a platform for musicians and producers to seamlessly sync acapella vocals to a beat, creating a polished and professional sound.
In this article, we will guide you through the process of syncing acapella to a beat in Garageband. Whether you are an aspiring musician or an experienced producer, mastering this technique will enhance your ability to create captivating tracks with perfectly synchronized vocals.
Before we dive into the steps, it’s important to note that having a good understanding of music production and basic knowledge of Garageband will be beneficial. Additionally, having the acapella vocal track and the desired beat ready will save you time during the process.
Now, let’s get started and explore the step-by-step process to sync acapella vocals to a beat in Garageband!
Step 1: Importing the Acapella and Beat Tracks
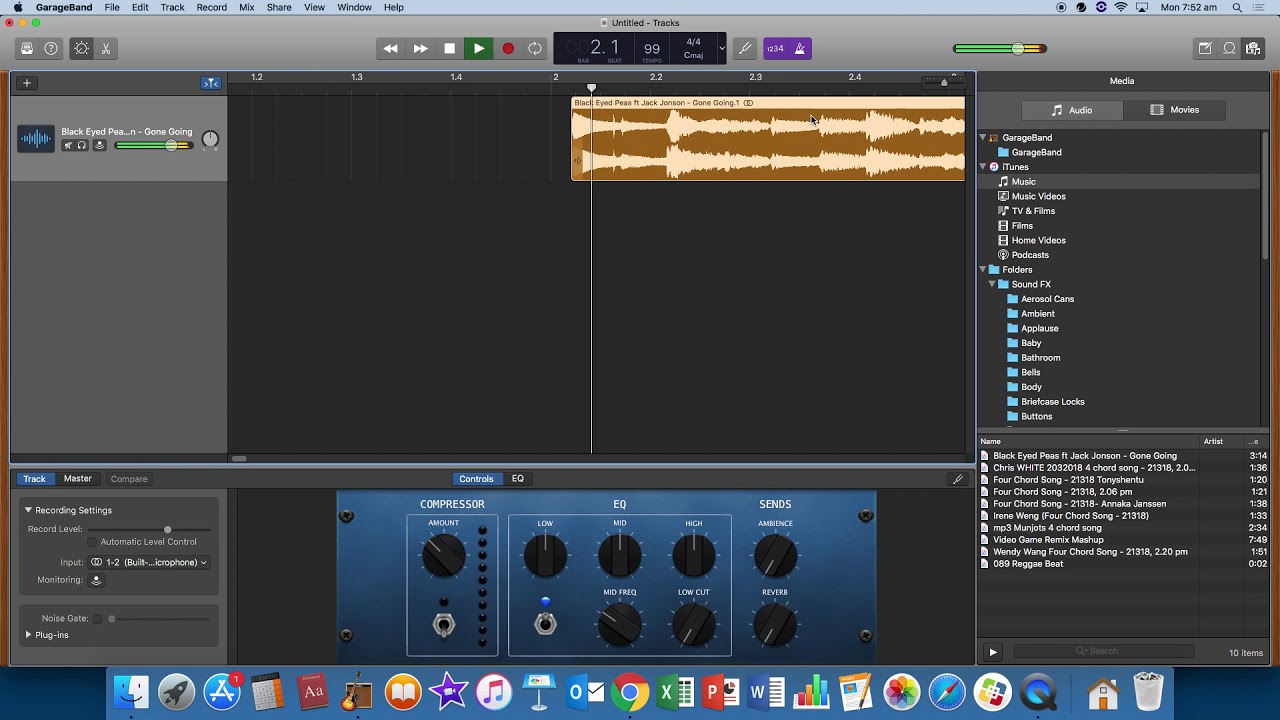
The first step in syncing acapella vocals to a beat in Garageband is to import the acapella and beat tracks into your project. Garageband allows you to easily import audio files in various formats, such as MP3 or WAV.
To import the acapella and beat tracks, follow these steps:
- Launch Garageband and create a new project or open an existing one.
- Click on the “Media Browser” button located in the control bar at the top of the screen.
- In the Media Browser, navigate to the location where your acapella and beat tracks are saved.
- Select the acapella track by clicking on it, and then click on the “Import” button to import it into your project.
- Repeat the process for the beat track, importing it into your project.
Once imported, the acapella and beat tracks will be displayed as separate regions in the Garageband timeline. You can easily see the waveform of each track, which will help you in aligning and syncing them.
It’s important to ensure that both tracks have similar audio quality and levels, as this will contribute to a more seamless integration later in the process.
In the next step, we will adjust the tempo of the beat to match the acapella vocals.
Step 2: Adjusting the Tempo of the Beat
Once you have imported the acapella and beat tracks into your Garageband project, the next step is to adjust the tempo of the beat. This is crucial for ensuring that the acapella and beat are perfectly synced.
To adjust the tempo of the beat, follow these steps:
- Select the beat track in the Garageband timeline by clicking on it.
- In the inspector area on the right side of the screen, locate the “Tempo” section.
- By default, the tempo will be set to the original tempo of the beat track. To change it, click on the tempo value and enter the desired tempo that matches the acapella vocals.
- Gardeband will automatically adjust the tempo of the beat track to match the specified value. You can preview the adjusted tempo by playing back the beat track.
It’s important to carefully listen to the acapella vocal track and choose a tempo that complements its rhythm and flow. Depending on the nature of the acapella, you may need to increase or decrease the tempo to achieve optimal synchronization with the vocals.
Once you are satisfied with the adjusted tempo, you can move on to the next step, aligning the acapella vocals with the beat.
Step 3: Aligning the Acapella with the Beat
After adjusting the tempo of the beat to match the acapella vocals, the next step is to align the acapella with the beat in Garageband. This ensures that the vocals and the instrumental elements of the track are perfectly synchronized.
Follow these steps to align the acapella vocals with the beat:
- Click and drag the acapella track in the Garageband timeline to align it with the beat track. You can use the zoom tool to zoom in for a more precise alignment, allowing you to match the beats and phrases of the acapella vocals with the beats of the instrumental elements.
- Listen carefully to the acapella and beat tracks together to check the alignment. Pay attention to the rhythmic patterns and ensure that the vocals are in sync with the beat.
- If necessary, make small adjustments by dragging the acapella track forward or backward in the timeline until you achieve the desired alignment.
During this step, it’s important to have a sharp ear and a good understanding of the timing and rhythm of both the vocals and the beat. Take your time and make precise adjustments to ensure a seamless synchronization.
Once you have successfully aligned the acapella with the beat, proceed to the next step for fine-tuning the sync and making any additional adjustments.
Step 4: Fine-tuning the Sync
After aligning the acapella vocals with the beat, the next step is to fine-tune the synchronization in Garageband. This step involves making any necessary adjustments to ensure that the vocals and the beat seamlessly blend together.
Follow these steps to fine-tune the sync:
- Zoom in on the timeline to get a closer look at the waveforms of the acapella and beat tracks.
- Listen to the track carefully and identify any areas where the sync may be slightly off.
- Use the trim tool to make small adjustments to the start and end points of the acapella vocals. This can help you align the vocals more precisely with the beats of the instrumental elements.
- Pay attention to any vocal nuances or timing variations in the acapella track and adjust the alignment accordingly, ensuring that they sync up perfectly with the beat.
- Continuously listen to the track and make minor adjustments as needed, focusing on maintaining a seamless blend between the vocals and the beat.
During this step, it’s crucial to have a keen ear and a good understanding of the musicality of the track. Making precise adjustments will help you achieve a polished and professional sound.
Once you are satisfied with the synchronization between the acapella and the beat, you can move on to the final step of adding effects and mixing the track.
Step 5: Adding Effects and Mixing
After successfully syncing the acapella vocals with the beat in Garageband, the final step is to add effects and mix the track. This step involves enhancing the overall sound quality, balancing the levels of various elements, and applying creative effects to achieve the desired aesthetic.
Follow these steps to add effects and mix your synced acapella and beat track:
- Select the acapella and beat tracks in the Garageband timeline.
- Explore the various effects and plugins available in Garageband’s library. Experiment with equalizers, compressors, reverb, delay, and other effects to enhance the vocals and the beat.
- Adjust the levels of the acapella and beat tracks, ensuring that they blend together harmoniously. Use Garageband’s mixer to control the volume, panning, and other parameters of each track.
- Apply automation to add movement and dynamics to the mix. This can involve fading in and out certain sections, adjusting the volume levels at specific points, or adding other creative variations.
- Continuously listen to the track and make adjustments to the effects, levels, and overall mix, ensuring that every element is balanced and contributes to a cohesive sound.
Throughout this step, it’s essential to trust your ears and make creative decisions that align with your artistic vision. Don’t be afraid to experiment and try different combinations of effects and mixing techniques to achieve the desired result.
Once you are satisfied with the effects and mix, don’t forget to save your project and export it in the desired format for sharing or further post-production.
With these steps, you have successfully synced your acapella vocals to a beat in Garageband and polished the track by adding effects and mixing. Now, you can proudly showcase your synced and professional-sounding music to the world.
Conclusion
Syncing acapella vocals to a beat in Garageband is a crucial skill for musicians and producers looking to create professional-sounding tracks. By following the step-by-step process outlined in this article, you can achieve seamless synchronization between the vocals and the instrumental elements, resulting in a captivating and polished final product.
Starting with importing the acapella and beat tracks, adjusting the tempo, aligning the vocals with the beat, fine-tuning the sync, and adding effects and mixing, each step plays a vital role in ensuring a cohesive and compelling sound.
Throughout the process, it’s important to trust your ears, pay attention to detail, and make precise adjustments to achieve a seamless blend between the vocals and the beat. Additionally, being familiar with Garageband’s features and having a good understanding of music production principles will greatly contribute to your success.
Remember to have fun and experiment with creative effects and mixing techniques to add your unique touch to the track. Making use of Garageband’s library of plugins and effects opens up a world of possibilities to enhance the vocals and the beat.
With practice and dedication, you will refine your skills in syncing acapella vocals to a beat in Garageband. This technique will allow you to create professional-quality tracks that stand out and captivate your audience.
So, start syncing, mixing, and creating your own musical masterpieces with Garageband and take your music production to new heights!