Home>Events & Info>Acapella>How To Make Acapella Garageband
Acapella
How To Make Acapella Garageband
Published: January 2, 2024
Learn how to create acapella tracks using Garageband with our easy step-by-step guide. Discover the best techniques to isolate vocals and achieve professional acapella results.
(Many of the links in this article redirect to a specific reviewed product. Your purchase of these products through affiliate links helps to generate commission for AudioLover.com, at no extra cost. Learn more)
Table of Contents
Introduction
Welcome to our comprehensive guide on how to make acapella using Garageband. Acapella, derived from the Italian phrase “a capella” meaning “in the manner of the chapel,” refers to the art of singing without instrumental accompaniment. It emphasizes the power of the human voice and allows for the intricate harmonies and vocal techniques to take center stage.
Giving your favorite songs an acapella remix can be a fun and creative way to showcase your vocal skills or simply enjoy a stripped-down version of the track. Garageband, a popular digital audio workstation, provides a user-friendly platform to create high-quality acapella tracks from existing songs.
In this article, we will take you through a step-by-step process of making an acapella using Garageband. Whether you are a seasoned musician or a beginner exploring your vocal abilities, this guide will help you produce professional-grade acapellas that stand out.
Before we dive into the process, let’s take a moment to understand the importance of acapella music. Acapella allows listeners to appreciate the raw talent and sheer beauty of the human voice. It showcases the intricate vocal harmonies, control, and emotive qualities that can sometimes get overshadowed by instrumentation in regular music tracks.
Furthermore, acapella music has gained popularity in various genres, including pop, R&B, hip hop, and even electronic music. It has become a platform for artists and vocal groups to showcase their creativity and musicianship, often resulting in jaw-dropping performances that captivate audiences.
Now that we understand the significance of acapella music, let’s move on to the step-by-step process of creating your own acapella using Garageband.
Step 1: Importing Your Song into Garageband
The first step in creating an acapella in Garageband is to import your desired song into the software. Here’s how you can do it:
- Launch Garageband: Open the Garageband application on your computer. If you don’t have Garageband installed, you can download it from the App Store or Apple’s website.
- Create a new project: Click on “New Project” to create a new project in Garageband. Select the “Empty Project” option and click “Choose” to proceed.
- Choose the audio track: On the main Garageband screen, click on the “Tracks” icon at the top to view the available track options. Select the “Audio” option to create a new audio track.
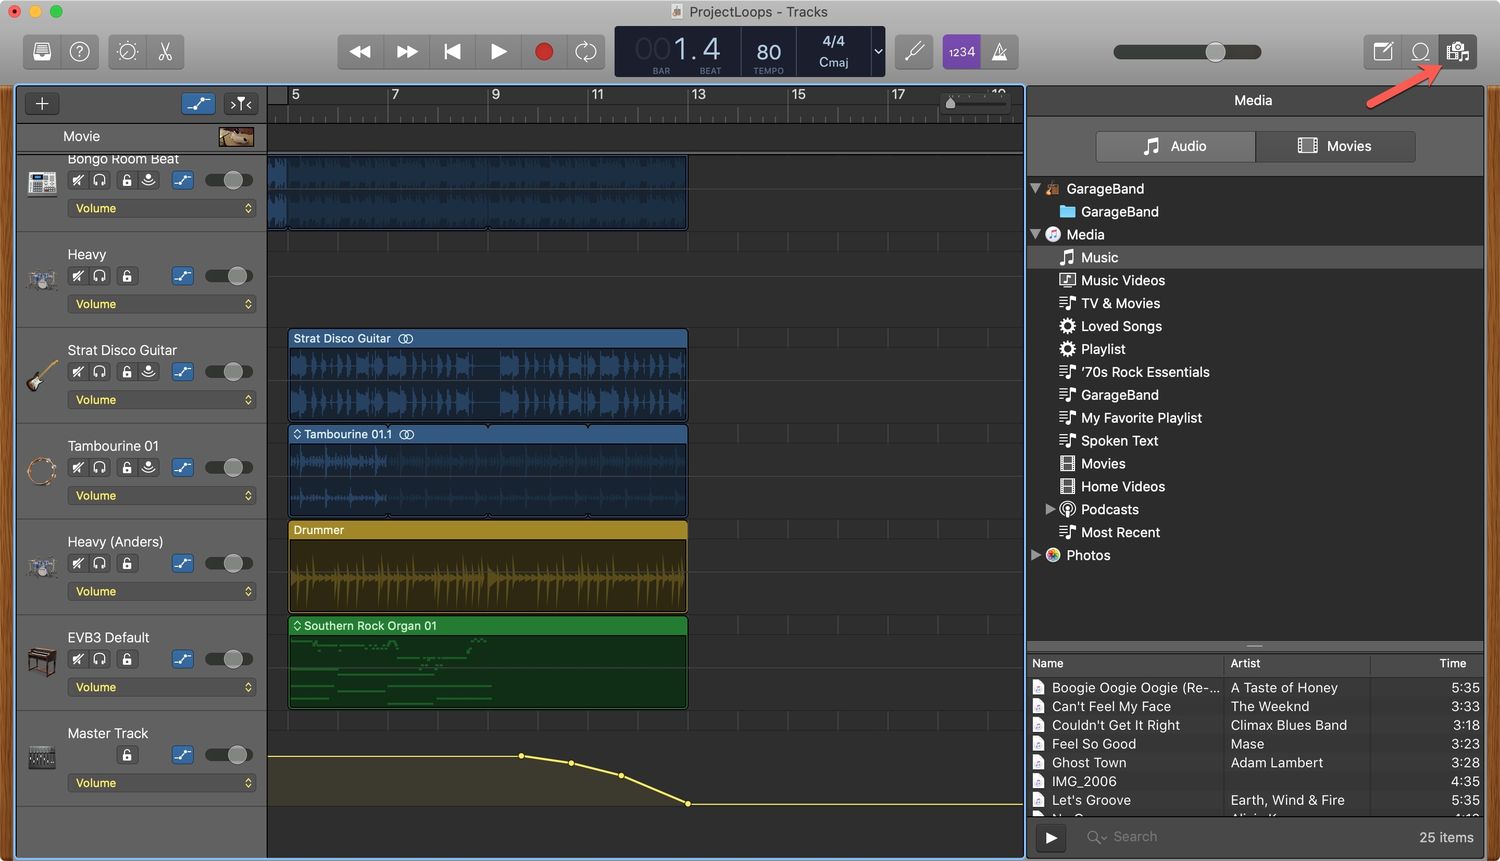
- Import the song: To import your song into Garageband, click on the “Media Browser” icon, located in the top-right corner of the Garageband window. This will open the Media Browser panel.
- Browse and select your song: In the Media Browser panel, navigate to the folder where your song is stored. Browse through your files and select the desired song you want to make an acapella of. Click “Import” to bring the song into Garageband.
- Adjust the track length: After importing the song, Garageband will display the waveform of the audio track. If necessary, you can adjust the length of the song by dragging the edges of the waveform to trim it.
Once you have successfully imported your song into Garageband, you are ready to move on to the next step of isolating the vocals.
Step 2: Isolating the Vocals
Now that you have imported your song into Garageband, the next step is to isolate the vocals from the rest of the audio. Here’s how you can do it:
- Double-click on the audio track: In the Garageband window, locate the audio track containing your imported song. Double-click on the track to open the Track Editor for that specific track.
- Enable Flex Time: At the top of the Track Editor window, click on the “Flex” button. This enables Flex Time, which allows for more precise editing of the audio.
- Zoom in on the waveform: Zoom in on the waveform of the song to get a closer look at the audio. This will make it easier to isolate the vocals. You can do this by using the zoom slider at the bottom of the Garageband window or by using the pinch-to-zoom gesture on a trackpad.
- Select the vocal sections: Click and drag your mouse cursor over the vocal sections of the waveform to select them. Be careful to only select the parts where the vocals are present and not the instrumental elements.
- Create a new track: Right-click on the selected vocal sections and choose “Cut”. Then, create a new audio track by clicking on the “Tracks” icon and selecting “Audio” from the dropdown menu. Right-click on the new track and choose “Paste” to paste the cut vocal sections onto the new track.
- Delete the original track: Once you have successfully isolated the vocals onto the new track, you can delete the original audio track that contains the entire song. Right-click on the track and select “Delete Track” to remove it.
By following these steps, you will have effectively isolated the vocals from the rest of the audio in your song. The next step is to remove the instrumental elements present in the vocals to create a true acapella version.
Step 3: Removing Instrumentation
Now that you have isolated the vocals on a separate track in Garageband, the next step is to remove the instrumentation from the vocals to create a true acapella. Follow these steps to remove the instrumental elements:
- Select the vocal track: Click on the vocal track to highlight it. This will ensure that any edits or effects applied will only affect the vocals and not the rest of the tracks.
- Create a new track: Right-click on the vocal track and select “Duplicate Track” from the context menu. This will create a duplicate track of the vocals.
- Apply the High-Pass Filter: Select the duplicated vocal track and navigate to the “Smart Controls” pane on the right side of the Garageband window. Click on the “EQ” tab. Enable the “High-Pass” filter and adjust the frequency cutoff. This will remove the low-frequency instrumental elements, such as bass and drums, from the vocals.
- Adjust the filter settings: Experiment with the filter settings to find the perfect balance. Be careful not to overdo it, as it can affect the overall quality of the vocals. You want to remove the instrumentation while maintaining the clarity and integrity of the vocals.
- Listen and make adjustments: Play the acapella track and listen to the result. If you notice any artifacts or unintended changes in the vocals, go back and fine-tune the filter settings until you achieve the desired outcome.
- Trim and align the tracks: If necessary, trim and align the acapella track with the original instrumental track for better synchronization. This will ensure that the acapella stays in time with the music.
By following these steps, you will successfully remove the instrumental elements from the vocals, leaving you with a clean and pure acapella track. The next step is to adjust the vocal levels to enhance the acapella even further.
Step 4: Adjusting Vocal Levels
Once you have removed the instrumental elements and created a clean acapella track in GarageBand, the next step is to adjust the vocal levels to ensure clarity and balance. Follow these steps to adjust the vocal levels:
- Listen to the acapella track: Play the acapella track and carefully listen to the vocals. Pay attention to any parts that are too loud or too soft.
- Access the Track Mixer: Click on the “Mix” button at the top of the GarageBand window to open the Track Mixer. This will allow you to adjust the individual track levels.
- Adjust the vocal track volume: Locate the acapella track in the Track Mixer. Use the volume slider or knobs to adjust the level of the vocal track. Increase or decrease the volume as needed to achieve a well-balanced sound.
- Consider compression: If you want to further enhance the vocal levels and control dynamics, you can apply compression to the acapella track. Compression helps to even out the volume levels and make the vocals more consistent.
- Tweak the EQ settings: Depending on the characteristics of the vocals, you may need to make some adjustments to the EQ settings in the Track Mixer. Boost or cut certain frequencies to enhance the vocals and achieve a desired tonal balance.
- Use effects sparingly: You can experiment with adding effects to the acapella track, such as reverb or delay, to add depth and ambiance. However, be mindful not to overdo it, as it may overshadow the natural beauty of the vocals.
By following these steps, you can fine-tune the vocal levels in your acapella and ensure that the vocals are clear, balanced, and sonically appealing. The next step is to enhance the acapella further by applying some additional techniques and effects.
Step 5: Enhancing the Acapella
After adjusting the vocal levels, it’s time to enhance the acapella and make it sound even more polished and professional. Here are some techniques you can use to enhance your acapella in GarageBand:
- Add harmonies: If you want to create a richer and more textured acapella, consider adding harmonies to the vocals. Experiment with different vocal arrangements and layer additional vocal tracks to create harmonies that complement the main vocal line.
- Pitch correction: To ensure that the vocals are pitch-perfect, you can use GarageBand’s built-in pitch correction tools. Apply subtle pitch correction to correct any slight pitch inaccuracies and make the vocals sound more precise and in tune.
- Apply subtle reverb: Adding a touch of reverb to the acapella can give it a sense of space and depth. Use GarageBand’s reverb effects to create a natural-sounding ambience that enhances the overall acapella experience.
- Consider vocal effects: Depending on your creative vision for the acapella, you can experiment with additional vocal effects such as chorus, delay, or echo. These effects can add a unique sonic character to the vocals and make them stand out.
- Use automation: GarageBand allows you to automate various parameters, such as volume or effects settings, over time. Utilize automation to make subtle changes in volume or effects intensity during different sections of the acapella, adding variety and dynamics to the vocal performance.
- Apply EQ and compression: Fine-tune the EQ settings to shape the frequency response of the vocals. Use gentle EQ adjustments to emphasize certain frequencies or enhance the clarity of the vocals. Additionally, consider using compression to control the dynamic range and ensure a more consistent vocal performance.
By applying these techniques, you can take your acapella to the next level and achieve a professional sound that will captivate listeners. Remember to experiment and trust your musical instincts to create an acapella that reflects your artistic vision.
Once you are satisfied with the enhancements, it’s time to move on to the final step: exporting the acapella.
Step 6: Exporting the Acapella
Now that you have perfected your acapella in GarageBand, it’s time to export it and save it as a standalone audio file that you can share or use in your projects. Follow these steps to export your acapella:
- Select the acapella track: Make sure the acapella track is the only track enabled for exporting. You can mute or disable any other tracks that are not part of the acapella to ensure that only the vocals are included in the export.
- Go to the Export menu: In the GarageBand menu bar, click “Share” and then select “Export Song to Disk” from the dropdown menu. This will open the export options dialog.
- Choose the audio format: In the export options dialog, choose the audio format for your acapella. Common formats include MP3, WAV, and AIFF. Consider the intended use of the acapella and the platform or software you will be using it in when selecting the format.
- Specify the output location: Choose the location on your computer where you want to save the exported acapella file. Select a location that is easily accessible and organized for future use.
- Set the export settings: Configure any additional export settings according to your preferences. You may have options to adjust the bit rate, sample rate, and other parameters depending on the chosen audio format.
- Export the acapella: Once you have reviewed and confirmed the export settings, click “Export” to export your acapella. GarageBand will start the export process and generate the acapella audio file based on your specified settings.
After the export process is completed, you will have a standalone acapella file that you can use in your projects, share with others, or upload to streaming platforms. Make sure to listen to the exported acapella and verify that it sounds as desired before finalizing it.
Congratulations! You have successfully created an acapella using GarageBand and learned how to enhance and export it. Now you can explore new creative possibilities by applying these techniques to your favorite songs and enjoy the beauty of acapella music.
Remember, as you continue to experiment with acapella production, feel free to explore new effects, vocal arrangements, and creative ideas to further refine your skills and create stunning acapella tracks.
Conclusion
Creating acapella tracks using GarageBand can be a rewarding and creative endeavor. With the right techniques and tools, you can transform any song into a captivating and stripped-down vocal masterpiece. In this comprehensive guide, we walked you through the step-by-step process of making an acapella in GarageBand, from importing your song to exporting the final acapella.
We started by emphasizing the significance of acapella music, which allows for the pure expression of the human voice. We then delved into the practical steps of isolating the vocals, removing instrumentation, adjusting vocal levels, and enhancing the acapella with harmonies, effects, and automation.
Throughout the process, we highlighted the importance of maintaining a balanced sound and preserving the natural beauty of the vocals. Additionally, we provided tips on how to use GarageBand’s features, such as the Track Mixer and EQ, to achieve the desired acapella sound.
Finally, in the last step, we guided you through exporting your acapella as a standalone audio file so that you can easily share or use it in other projects.
With these skills and knowledge, you now have the power to create impressive acapella tracks using GarageBand. Whether you’re an experienced musician or a budding vocalist, the possibilities are endless. You can showcase your talent, experiment with different vocal arrangements, or simply enjoy the beauty of stripped-down vocals.
Remember, the key to acapella production is creativity and experimentation. Don’t be afraid to try new techniques, explore different effects, and push the boundaries of your vocal abilities. The more you practice and refine your skills, the better you’ll become at producing professional-grade acapella tracks.
So, get ready to unleash your vocal prowess and embark on a journey of acapella creation with GarageBand. Let your voice take center stage and captivate listeners with the enchanting art of acapella music.