Home>Instruments>Guitar>How To Relic A Guitar Neck


Guitar
How To Relic A Guitar Neck
Published: February 14, 2024
Learn how to relic a guitar neck and give your instrument a vintage look with our step-by-step guide. Discover the best techniques for aging your guitar.
(Many of the links in this article redirect to a specific reviewed product. Your purchase of these products through affiliate links helps to generate commission for AudioLover.com, at no extra cost. Learn more)
Table of Contents
Introduction
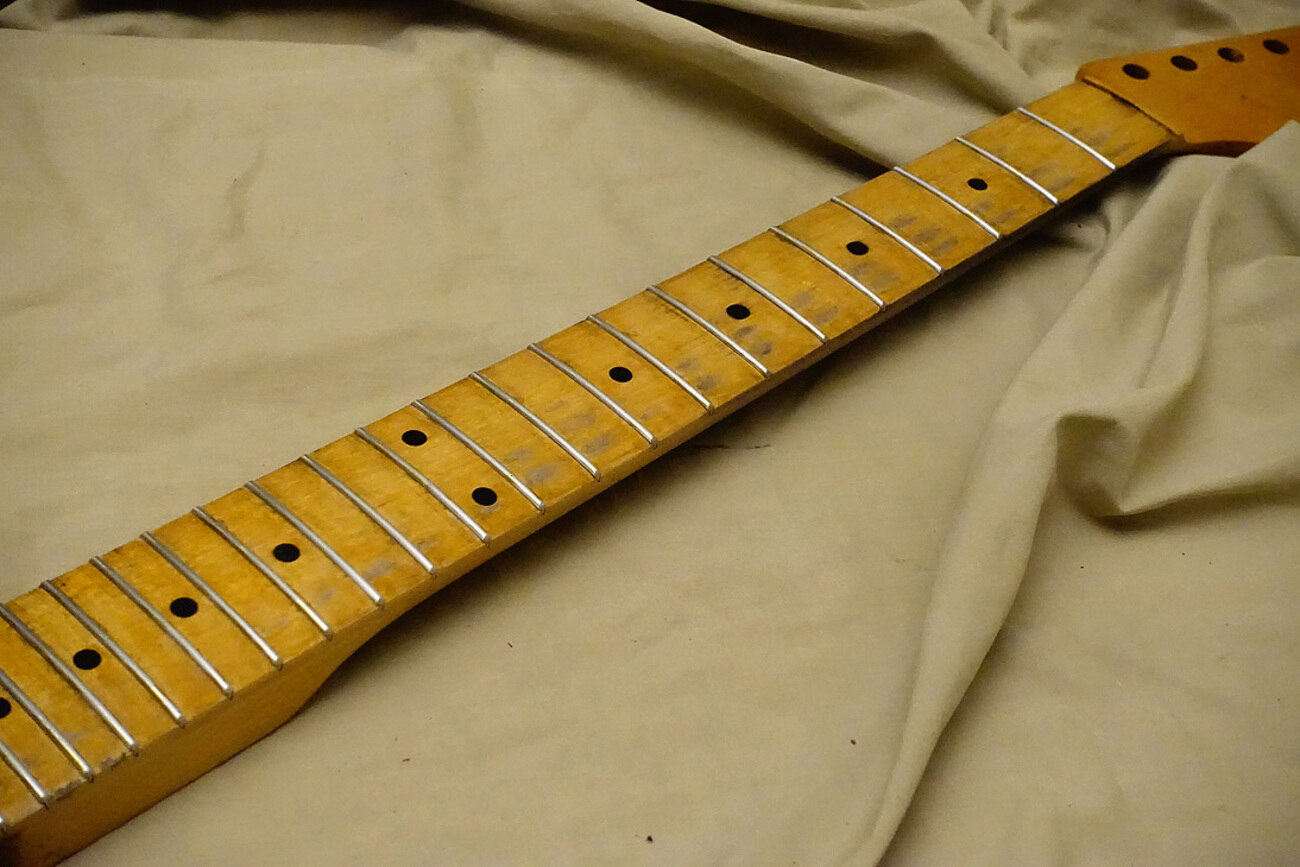
Creating a relic guitar neck is a fascinating process that involves aging a new or existing guitar neck to achieve the appearance and feel of a well-worn, vintage instrument. This technique has gained popularity among guitar enthusiasts and luthiers who seek to replicate the unique character and vibe of aged instruments. Relicing a guitar neck involves carefully simulating the natural wear and tear that occurs over years of playing, resulting in a visually striking and comfortable neck that complements the overall aesthetic of the guitar.
The relicing process allows guitarists to customize the look and feel of their instruments, imparting a sense of history and personality to an otherwise new or mass-produced guitar. By distressing the neck, players can achieve a vintage, played-in feel that enhances their connection to the instrument and influences their playing experience. Whether aiming to replicate the wear patterns of a specific era or simply seeking a distinctive, well-loved appearance, relicing a guitar neck offers a creative outlet for guitar enthusiasts to express their individuality and appreciation for vintage instruments.
In this comprehensive guide, we will explore the step-by-step process of relicing a guitar neck, from gathering the necessary materials to executing various aging techniques. Whether you're a seasoned luthier or an adventurous guitarist looking to personalize your instrument, this guide will provide valuable insights into the art of relicing guitar necks. Through a combination of technique, creativity, and attention to detail, you can transform a new or underwhelming guitar neck into a visually captivating and tactilely satisfying component that adds character and charm to your instrument.
Materials Needed
Before embarking on the journey of relicing a guitar neck, it’s essential to gather the appropriate materials to ensure a successful and authentic aging process. The following items are commonly used in the relicing process:
- New or Existing Guitar Neck: Whether you’re working with a new, unfinished neck or an existing one, the relicing process can be applied to achieve the desired vintage appearance.
- Sandpaper and Steel Wool: Various grits of sandpaper, ranging from coarse to fine, are essential for distressing the neck’s finish and simulating natural wear. Steel wool can also be used to create a smooth, worn texture.
- Stain or Tinted Lacquer: Stain or tinted lacquer is utilized to add color and depth to the wood, replicating the aged patina found on vintage guitar necks.
- Clear Lacquer or Nitrocellulose Finish: A clear lacquer or nitrocellulose finish is applied to protect the neck and provide a glossy, authentic sheen.
- Masking Tape: Masking tape is used to create defined edges and protect areas of the neck from unintended distressing or staining.
- Soft Cloth and Tack Cloth: These are employed for applying stains and finishes, as well as for removing excess material and achieving a smooth, even surface.
- Detailing Brushes and Foam Brushes: Detailing brushes are useful for intricate work, while foam brushes are ideal for applying stains and finishes evenly.
- Workbench or Stable Surface: A sturdy workbench or stable surface provides a secure area for performing the relicing process without risking damage to the guitar neck.
- Protective Gear: Safety goggles, gloves, and a respirator are essential for personal protection when sanding, staining, and applying finishes.
These materials form the foundation for relicing a guitar neck and serve as the essential tools for achieving an authentic vintage appearance. With these items in hand, you’ll be well-prepared to embark on the journey of transforming a new or existing guitar neck into a visually compelling and tactilely satisfying relic.
Preparation
Before diving into the process of relicing a guitar neck, it’s crucial to prepare the workspace and the neck itself to ensure a smooth and successful aging process. The following steps outline the essential preparations for this transformative endeavor:
- Clean the Neck: Begin by thoroughly cleaning the guitar neck to remove any dirt, oils, or residues that may interfere with the relicing process. A gentle, non-abrasive cleaner can be used to ensure a pristine surface for the subsequent steps.
- Remove Hardware: If working with an existing guitar neck, carefully remove any hardware, such as tuning machines and frets, to facilitate unrestricted access to the entire neck surface. This step is essential for achieving consistent aging and distressing.
- Masking: Protect any areas of the neck that should remain unaffected by the relicing process, such as the fretboard and binding, by carefully applying masking tape to create defined edges and boundaries. This precaution ensures that only the intended areas undergo distressing and staining.
- Sand the Finish: If the neck features a glossy or polyurethane finish, lightly sand the surface to remove the existing finish and create a suitable base for the subsequent aging techniques. Gradually progress from coarse to fine grit sandpaper to achieve the desired level of distressing.
- Smooth the Surface: Following the sanding process, utilize steel wool to further smooth the neck’s surface and simulate the natural wear that occurs over time. This step contributes to the tactile authenticity of the relicing process.
- Prepare the Workspace: Set up a well-ventilated workspace with adequate lighting to facilitate the application of stains and finishes. Ensure that the work area is free from dust and debris to prevent imperfections in the final relic finish.
- Personal Protection: Prior to commencing the relicing process, don appropriate personal protective gear, including safety goggles, gloves, and a respirator, to safeguard against potential irritants and fumes associated with sanding, staining, and finishing.
By meticulously preparing the guitar neck and the workspace, you establish a solid foundation for executing the relicing process with precision and care. These preparatory measures set the stage for transforming a new or existing neck into a visually captivating and authentically aged relic that embodies the allure of vintage instruments.
Creating Wear
Once the guitar neck and workspace are meticulously prepared, it’s time to initiate the process of creating wear on the neck’s surface. This step involves distressing the wood and replicating the natural signs of aging and use that are characteristic of vintage instruments. The following techniques are commonly employed to achieve authentic wear patterns:
- Fretboard Wear: Using fine-grit sandpaper or steel wool, carefully simulate fretboard wear in areas where the player’s fingers naturally make contact. Focus on the lower frets, particularly beneath the E and A strings, where the most pronounced wear typically occurs. This technique imparts a realistic, played-in appearance to the fretboard.
- Back of the Neck: Employ sandpaper to distress the finish on the back of the neck, concentrating on the areas where the player’s hand exerts the most pressure. Emulate the wear and smoothness that develops over years of playing, paying attention to the contours of the neck for an authentic feel.
- Headstock Distressing: Simulate wear on the headstock by strategically distressing the finish around the edges and tuning machine holes. This technique replicates the natural chipping and wear that occurs from regular tuning and handling, contributing to the vintage aesthetic.
- Aging Hardware: If applicable, consider aging the hardware, such as tuners and nuts, to align with the reliced appearance of the neck. Lightly distress the hardware using steel wool or a patina solution to complement the overall vintage vibe.
By methodically applying these wear-inducing techniques, you can imbue the guitar neck with the visual and tactile characteristics of a well-played vintage instrument. Each distressing method contributes to the overall narrative of the neck’s history, culminating in a compelling relic finish that evokes the charm and charisma of aged guitars.
Aging the Wood
After creating wear on the guitar neck, the next crucial step in the relicing process involves aging the wood to enhance its visual appeal and replicate the patina found on vintage instruments. This phase focuses on imparting depth and character to the wood, elevating the relicing process to an artful endeavor. The following techniques are commonly utilized to age the wood and achieve an authentic vintage appearance:
- Staining the Wood: Apply a suitable wood stain or tinted lacquer to the neck, carefully blending the color to achieve a natural, aged patina. Select a stain that complements the desired vintage aesthetic, considering the hues prevalent in instruments from the targeted era.
- Aging the Finish: Utilize staining techniques to create an aged, weathered appearance on the neck’s finish. This process involves strategically applying and removing layers of stain to mimic the nuanced discoloration and wear found on vintage guitar necks.
- Highlighting Grain and Figure: Enhance the natural grain and figure of the wood by selectively darkening and accentuating these features with the chosen stain or tinted lacquer. This technique adds visual interest and depth to the neck, amplifying its vintage allure.
- Blending Techniques: Employ blending and shading techniques to ensure a harmonious and authentic aging effect across the entire neck. Carefully transition between different areas of the neck, ensuring a seamless integration of the aging effects for a cohesive and realistic appearance.
- Layering Finishes: Apply clear lacquer or nitrocellulose finish to protect the aged wood and enhance its visual appeal. Layer the finishes to achieve the desired level of gloss and authenticity, while safeguarding the reliced appearance for long-lasting enjoyment.
By skillfully executing these aging techniques, you can transform the guitar neck into a visually compelling and historically resonant relic that captures the essence of vintage instruments. The artistry and attention to detail involved in aging the wood contribute to the creation of a captivating and tactilely satisfying relic that pays homage to the timeless appeal of well-worn guitars.
Final Touches
As the relicing process nears completion, attention to final touches is paramount to perfecting the vintage aesthetic and ensuring a cohesive, authentic appearance. These crucial final steps elevate the reliced guitar neck to a visually captivating and tactilely satisfying work of art. The following considerations and techniques are integral to adding the finishing touches:
- Smoothing and Polishing: After aging the wood and applying finishes, carefully inspect the neck for any rough or uneven areas. Address any imperfections by lightly sanding and polishing the surface to achieve a smooth, tactilely pleasing finish that replicates the feel of a well-played instrument.
- Refining Wear Patterns: Fine-tune the wear patterns and distressing to ensure a balanced and natural appearance. Pay attention to the nuances of wear on the fretboard, back of the neck, and headstock, refining the details to evoke the character and history of a vintage instrument.
- Applying Patina: Consider applying a patina solution to further enhance the aged appearance of the wood and hardware. This technique adds depth and authenticity to the reliced neck, imbuing it with the allure of a cherished vintage instrument.
- Inspecting and Detailing: Thoroughly inspect the neck for any areas that may require additional detailing or blending. Attend to any inconsistencies or blemishes, ensuring that the reliced finish exudes a cohesive and convincing vintage charm.
- Reinstalling Hardware: If hardware was removed, carefully reinstall and age it to seamlessly integrate with the reliced neck. Pay attention to the subtle details, such as aging screws and tuners, to maintain the overall vintage aesthetic.
- Final Protective Measures: Once satisfied with the reliced appearance, apply a final layer of clear lacquer or nitrocellulose finish to protect the aged wood and finishes. This protective measure ensures the longevity of the reliced neck while preserving its vintage allure.
By meticulously attending to these final touches, you can elevate the reliced guitar neck to a visually captivating and historically resonant work of art. The culmination of these refinements and details results in a reliced neck that embodies the allure and character of vintage instruments, providing a visually striking and tactilely satisfying addition to any guitar.
Conclusion
The art of relicing a guitar neck is a captivating journey that transcends the mere aging of an instrument; it is an homage to the timeless allure and character of vintage guitars. Through meticulous preparation, skillful distressing, and artful aging techniques, a new or existing guitar neck can be transformed into a visually compelling and tactilely satisfying relic that exudes the charm of a well-played instrument.
Relicing a guitar neck offers enthusiasts and luthiers a creative outlet to personalize and infuse character into their instruments, fostering a deeper connection between player and guitar. The process of creating wear, aging the wood, and refining the reliced appearance is a testament to the artistry and attention to detail involved in replicating the history and charm of vintage instruments.
By embracing the techniques and considerations outlined in this guide, individuals can embark on a rewarding journey of relicing their guitar necks, each imbued with a unique narrative and aesthetic. Whether seeking to evoke the spirit of a specific era or simply desiring a distinctive, well-loved appearance, relicing a guitar neck celebrates the individuality and creativity of guitar enthusiasts while paying homage to the enduring appeal of vintage instruments.
Ultimately, the reliced guitar neck stands as a testament to the craftsmanship, artistry, and passion that define the world of guitar luthiery and customization. It serves as a tangible embodiment of history, character, and personalized artistry, enriching the playing experience and visually enhancing the instrument. The allure of a reliced guitar neck lies not only in its vintage aesthetic, but also in the stories it tells and the connection it fosters between musician and instrument.
As you embark on your own relicing journey, may this guide serve as a source of inspiration and knowledge, empowering you to create reliced guitar necks that resonate with the timeless charm and allure of vintage instruments.


