Home>Production & Technology>Acoustic>How To Change The Battery In An Acoustic-Electric Guitar
Acoustic
How To Change The Battery In An Acoustic-Electric Guitar
Published: March 12, 2024
Learn how to change the battery in your acoustic-electric guitar with our step-by-step guide. Keep your guitar sounding great and ready to play.
(Many of the links in this article redirect to a specific reviewed product. Your purchase of these products through affiliate links helps to generate commission for AudioLover.com, at no extra cost. Learn more)
Table of Contents
Introduction
Changing the battery in an acoustic-electric guitar is an essential maintenance task that ensures your instrument continues to deliver optimal sound quality during performances and practice sessions. Acoustic-electric guitars are equipped with built-in electronics, such as pickups and preamps, which rely on a power source to function effectively. The battery powers these components, allowing the guitar to produce the amplified sound that is characteristic of acoustic-electric instruments.
Over time, the battery in an acoustic-electric guitar will require replacement as it loses its ability to hold a charge. This can result in diminished sound output, distortion, or even complete loss of signal, impacting the overall performance of the instrument. Therefore, knowing how to change the battery is a valuable skill for any acoustic-electric guitar player.
In this comprehensive guide, we will walk through the step-by-step process of changing the battery in an acoustic-electric guitar. By following these instructions, you will be able to maintain the functionality and performance of your instrument, ensuring that it continues to produce the rich, amplified tones that are synonymous with acoustic-electric guitars.
Whether you are a seasoned musician or a beginner, understanding the inner workings of your acoustic-electric guitar and knowing how to perform basic maintenance tasks, such as changing the battery, empowers you to take control of your instrument's upkeep. With the right tools and a clear understanding of the process, you can easily replace the battery and keep your acoustic-electric guitar in prime playing condition.
Now, let's delve into the step-by-step process of changing the battery in an acoustic-electric guitar, ensuring that you can continue to enjoy the full potential of your instrument's amplified sound.
Step 1: Gather the necessary tools
Before embarking on the task of changing the battery in your acoustic-electric guitar, it is essential to gather the necessary tools to ensure a smooth and efficient process. Having the right tools at your disposal will not only simplify the task but also help prevent any potential damage to the guitar's components. Here's a comprehensive list of the tools you will need:
-
New Battery: The first and most crucial item you will need is a replacement battery that is compatible with your acoustic-electric guitar's electronics. It's important to ensure that the new battery matches the specifications recommended by the guitar's manufacturer to guarantee optimal performance.
-
Small Screwdriver: Acoustic-electric guitars typically feature a battery compartment that is secured with screws. A small screwdriver, such as a Phillips or flat-head screwdriver, will be necessary to remove the screws and access the battery compartment.
-
Lint-Free Cloth: It's advisable to have a lint-free cloth on hand to gently clean the battery compartment and surrounding areas. This will help remove any dust or debris that may have accumulated, ensuring a clean environment for the new battery.
-
Battery Compartment Cover (if applicable): Some acoustic-electric guitars have a removable battery compartment cover. If your guitar is equipped with this feature, ensure that you have the cover readily available to secure the new battery in place after installation.
-
Optional: Guitar Stand or Soft Surface: While not a tool in the traditional sense, having a guitar stand or a soft surface to lay the guitar on can be beneficial. Placing the guitar on a stable surface during the battery replacement process helps prevent accidental damage and provides a secure area to work on the instrument.
By gathering these essential tools, you will be well-prepared to proceed with the battery replacement process, ensuring that you have everything you need to complete the task efficiently and effectively. With the tools in hand, you are ready to move on to the next step in the process: locating the battery compartment.
Step 2: Locate the battery compartment
Locating the battery compartment is a crucial initial step in the process of changing the battery in an acoustic-electric guitar. The placement of the battery compartment can vary depending on the specific make and model of the guitar, but there are several common locations where it is typically found.
-
Check the Control Panel: Many acoustic-electric guitars feature an onboard control panel, often located along the upper bout of the instrument. The battery compartment is frequently integrated into this area, making it easily accessible for battery replacement. Look for a small panel with screws or a latch that provides access to the compartment.
-
Inspect the Endpin Jack: In some acoustic-electric guitars, particularly those with undersaddle pickups, the battery compartment may be housed within the endpin jack. The endpin jack is the socket where the guitar's cable is connected, and it may contain a compartment for the battery. To access it, gently unscrew or unlatch the endpin jack to reveal the battery compartment.
-
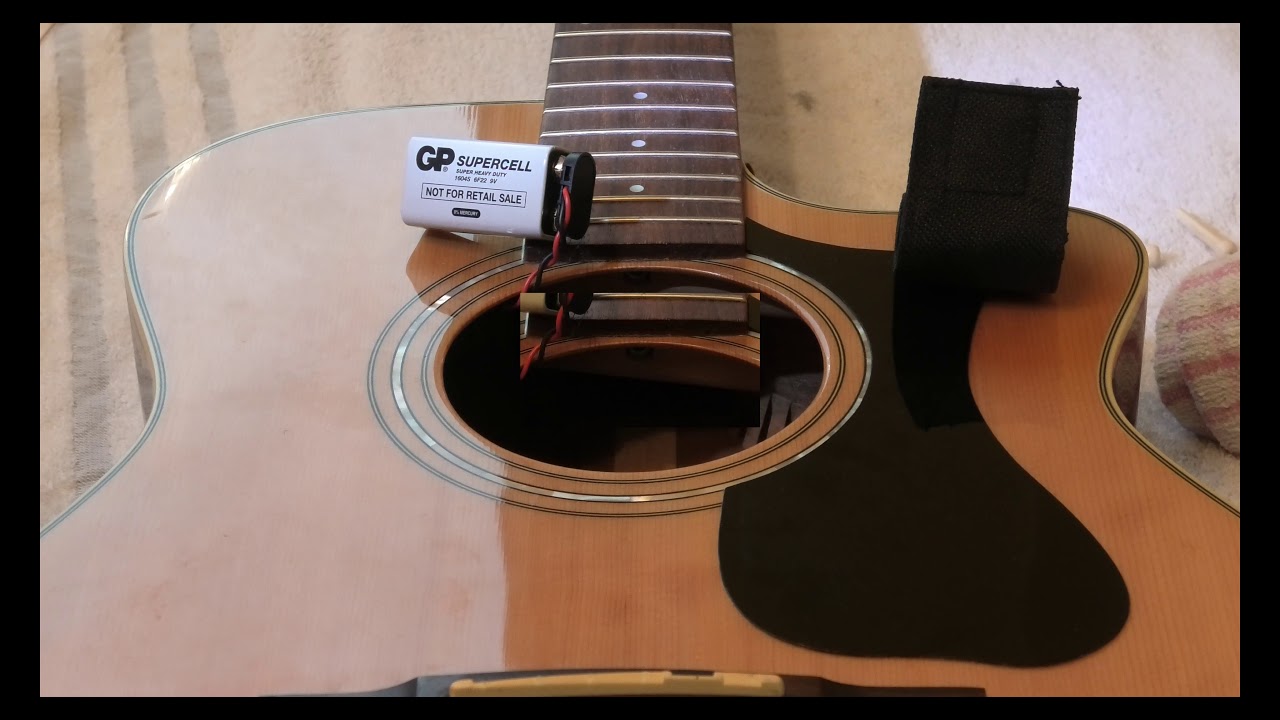
Explore the Soundhole: Certain acoustic-electric guitars have the battery compartment located inside the soundhole, typically near the neck joint. This design allows for convenient access to the battery without requiring the removal of external panels. Look for a discrete compartment within the soundhole that can be opened to reveal the battery housing.
-
Refer to the Owner's Manual: If you are unsure about the specific location of the battery compartment in your acoustic-electric guitar, consulting the owner's manual can provide valuable guidance. The manual often includes detailed diagrams and instructions for accessing and replacing the battery, ensuring that you can confidently locate the compartment.
Once you have identified the location of the battery compartment, take a moment to familiarize yourself with its features and any securing mechanisms, such as screws, latches, or covers. Understanding how the compartment is accessed will prepare you for the next step of removing the old battery and proceeding with the replacement process.
By carefully locating the battery compartment, you are setting the stage for a successful battery replacement, ensuring that you can proceed with confidence and precision. With the battery compartment identified, you are ready to move on to the next step: removing the old battery.
Step 3: Remove the old battery
With the battery compartment located, the next step is to carefully remove the old battery from the acoustic-electric guitar. This process requires attention to detail and a gentle touch to avoid damaging the internal components of the instrument. Here's a detailed guide on how to remove the old battery:
-
Turn Off the Guitar: Before proceeding, it's important to ensure that the guitar's electronics are turned off to prevent any potential electrical issues during the battery removal process. If your guitar features an onboard preamp with a built-in tuner, make sure to switch it off before continuing.
-
Access the Battery Compartment: Depending on the design of the battery compartment, use the appropriate tool, such as a small screwdriver, to open the compartment. Carefully unscrew any screws or release any latches securing the compartment cover. If the battery compartment is located within the endpin jack, gently unscrew or unlatch the jack to reveal the battery housing.
-
Remove the Old Battery: Once the compartment is open, identify the old battery inside. Take note of its orientation and how it is positioned within the compartment. Using caution, carefully remove the old battery, ensuring that you do not inadvertently dislodge any other components or wiring in the process.
-
Dispose of the Old Battery: Properly dispose of the old battery in accordance with local regulations and guidelines for battery recycling. Many communities offer designated recycling centers or drop-off locations for used batteries, ensuring that they are disposed of in an environmentally responsible manner.
-
Clean the Battery Compartment: With the old battery removed, take a moment to inspect the battery compartment for any dust, debris, or corrosion. Use a lint-free cloth to gently clean the interior of the compartment, ensuring that it is free from any contaminants that could affect the performance of the new battery.
By following these detailed steps, you can safely and effectively remove the old battery from your acoustic-electric guitar, preparing the way for the next crucial stage: inserting the new battery. With the old battery removed and the compartment clean, you are now ready to proceed with the installation of the replacement battery, ensuring that your guitar continues to deliver exceptional amplified sound.
Step 4: Insert the new battery
With the old battery removed and the battery compartment clean, it's time to proceed with the installation of the new battery in your acoustic-electric guitar. This step is crucial in ensuring that your instrument continues to deliver optimal amplified sound and performance. Follow these detailed instructions to effectively insert the new battery:
-
Select the Correct Battery: Before inserting the new battery, ensure that you have the correct replacement that aligns with the specifications recommended by the guitar's manufacturer. It's essential to match the type, size, and voltage of the new battery to the original one to maintain the proper functioning of the guitar's electronics.
-
Position the New Battery: Carefully position the new battery in the compartment, taking note of its orientation and polarity. Most batteries have markings indicating the positive (+) and negative (-) terminals. Align the new battery accordingly, ensuring that it fits securely in place without any unnecessary movement.
-
Secure the Battery: If the battery compartment features a securing mechanism, such as a cover or latch, ensure that it is properly closed and secured to hold the new battery in place. This helps prevent the battery from shifting or dislodging during regular use, maintaining a stable connection for the guitar's electronics.
-
Test the Connection: After inserting the new battery and securing the compartment, it's advisable to test the connection by briefly turning on the guitar's electronics. If your acoustic-electric guitar features an onboard preamp with a built-in tuner, activate the electronics to verify that the new battery is providing power and that the instrument is functioning as expected.
-
Close the Compartment: Once the new battery is in place and its connection has been verified, carefully close the battery compartment, ensuring that any screws or latches are securely fastened. This step helps protect the battery and internal components while maintaining the overall integrity of the guitar's design.
By following these detailed instructions, you can confidently insert the new battery in your acoustic-electric guitar, ensuring that it is positioned correctly and securely within the compartment. With the new battery in place, you are now ready to proceed with the final step: testing the guitar to confirm that the new battery is functioning effectively and that the instrument is ready for use.
Step 5: Test the guitar
After successfully inserting the new battery and securing the compartment, it's essential to proceed with testing the guitar to ensure that the new battery is functioning as intended. Testing the guitar allows you to verify that the electronics are receiving power from the new battery and that the instrument is ready for use. Here's a detailed guide on how to effectively test the guitar after replacing the battery:
-
Activate the Electronics: Turn on the guitar's electronics, including any onboard preamp or pickup systems. If your acoustic-electric guitar features a built-in tuner, activate it to confirm that the electronics are receiving power from the new battery. Listen for any indicators of power, such as LED lights or audible signals from the preamp.
-
Check for Signal: With the electronics activated, strum the guitar strings and listen for the amplified sound produced by the pickups. If your acoustic-electric guitar is connected to an amplifier or sound system, ensure that the signal is being transmitted effectively. Test the volume and tone controls to verify that the electronics are responsive and that the new battery is facilitating proper signal transmission.
-
Monitor Battery Life: Keep an eye on the battery life indicator, if available, to gauge the performance of the new battery. Some acoustic-electric guitars feature a low battery warning system that alerts the player when the battery requires replacement. By monitoring the battery life, you can ensure that the new battery is functioning optimally and plan for future replacements as needed.
-
Play and Listen: Play the guitar through various playing styles and techniques to assess the overall sound quality and amplified tone. Listen for any irregularities or distortions that may indicate issues with the battery or electronics. Testing the guitar across different musical passages allows you to evaluate its performance under varying conditions.
-
Perform a Built-in Tuner Check: If your acoustic-electric guitar is equipped with a built-in tuner, use it to check the instrument's tuning accuracy. The tuner's responsiveness and accuracy can provide valuable insights into the functionality of the electronics and the stability of the new battery's power supply.
By following these testing procedures, you can effectively evaluate the performance of your acoustic-electric guitar after replacing the battery. Testing the guitar allows you to confirm that the new battery is providing power to the electronics, ensuring that the instrument is ready for use in performances, rehearsals, or practice sessions. With the guitar successfully tested, you can proceed with confidence, knowing that your instrument is equipped with a reliable power source for its amplified sound.
Conclusion
In conclusion, mastering the process of changing the battery in an acoustic-electric guitar is a valuable skill that empowers musicians to maintain the optimal performance of their instruments. By following the step-by-step guide outlined in this article, guitar players can confidently navigate the battery replacement process, ensuring that their acoustic-electric guitars continue to deliver exceptional amplified sound.
The journey begins with gathering the necessary tools, including a new battery, small screwdriver, lint-free cloth, and optional guitar stand or soft surface. These tools provide the foundation for a seamless battery replacement experience, allowing players to approach the task with preparedness and precision.
Locating the battery compartment is the next crucial step, as it sets the stage for accessing the old battery and preparing for the insertion of the new one. Whether the compartment is integrated into the control panel, housed within the endpin jack, or located inside the soundhole, identifying its position is essential for a successful battery replacement.
Removing the old battery requires a delicate touch and attention to detail, ensuring that the guitar's internal components remain unharmed during the process. Proper disposal of the old battery and cleaning of the compartment create a clean and safe environment for the new battery to be installed.
Inserting the new battery marks a pivotal moment in the process, as it rejuvenates the power source for the guitar's electronics. Selecting the correct battery, positioning it securely, and testing the connection are essential steps in ensuring that the new battery seamlessly integrates into the instrument's functionality.
Finally, testing the guitar after battery replacement allows players to confirm that the new battery is facilitating optimal performance. Activating the electronics, checking for signal, monitoring battery life, and performing a built-in tuner check are integral to evaluating the instrument's readiness for use.
By mastering the art of changing the battery in an acoustic-electric guitar, musicians can uphold the integrity of their instruments and continue to explore the rich, amplified tones that define the acoustic-electric experience. This essential maintenance task empowers players to take control of their instrument's upkeep, ensuring that it remains a reliable and versatile tool for musical expression.
In essence, the ability to change the battery in an acoustic-electric guitar is a testament to a musician's dedication to their craft and their commitment to preserving the instrument's functionality. With the knowledge and skills gained from this guide, players can embark on their musical journeys with confidence, knowing that their acoustic-electric guitars are equipped with a reliable power source for amplified sound.