Home>Instruments>Guitar>How To Change The Strings On An Acoustic Guitar
Guitar
How To Change The Strings On An Acoustic Guitar
Modified: February 15, 2024
Learn how to change the strings on your acoustic guitar with our step-by-step guide. Keep your guitar sounding great and playing smoothly.
(Many of the links in this article redirect to a specific reviewed product. Your purchase of these products through affiliate links helps to generate commission for AudioLover.com, at no extra cost. Learn more)
Table of Contents
Introduction
Changing the strings on your acoustic guitar is a crucial aspect of guitar maintenance and can significantly impact the instrument's sound and playability. Whether you're a seasoned guitarist or a beginner, knowing how to change the strings on an acoustic guitar is an essential skill that can enhance your playing experience and keep your instrument in top condition.
When it comes to guitar strings, wear and tear are inevitable. Over time, strings accumulate dirt, sweat, and oils from your fingertips, leading to a loss of tone and intonation. By changing your strings regularly, you can ensure that your guitar produces a vibrant, clear, and consistent sound. Additionally, fresh strings can improve the playability of your instrument, making it easier to fret notes and chords.
In this comprehensive guide, we will walk you through the step-by-step process of changing the strings on your acoustic guitar. From gathering the necessary tools and materials to tuning the newly installed strings, we'll cover each stage in detail. By following these instructions, you'll be able to maintain your guitar's optimal performance and enjoy a satisfying playing experience.
Whether you're preparing for a performance, recording session, or casual practice, having a well-maintained set of strings can make a world of difference. So, let's dive into the process of changing the strings on your acoustic guitar and unleash the full potential of your beloved instrument.
Tools and Materials Needed
Before embarking on the journey of changing the strings on your acoustic guitar, it’s essential to gather the necessary tools and materials. Having the right equipment at hand will streamline the string-changing process and ensure that you can complete the task with ease. Here’s a list of items you’ll need:
- Guitar Strings: Select a set of high-quality acoustic guitar strings that are suitable for your playing style and musical preferences. Acoustic guitar strings come in various materials, such as bronze, phosphor bronze, and silk, each offering distinct tonal characteristics.
- String Winder: A string winder is a handy tool that significantly speeds up the process of removing and installing guitar strings. It features a crank that allows you to swiftly unwind the old strings and tighten the new ones, saving you time and effort.
- Wire Cutters: You’ll need wire cutters to trim the excess length of the strings once they’re installed. This ensures that the strings are neatly secured and prevents any sharp ends from causing discomfort while playing.
- Tuner: A reliable tuner is essential for accurately tuning your guitar once the new strings are in place. Whether you prefer a digital tuner or a clip-on tuner, having this tool on hand will help you achieve precise tuning and maintain the desired pitch for each string.
- Clean Cloth: Before installing the new strings, it’s beneficial to have a clean cloth or microfiber towel to wipe down the guitar’s body, neck, and fretboard. This removes any accumulated dust, oils, or residues, providing a fresh surface for the new strings.
By ensuring that you have these tools and materials ready, you can proceed with confidence and efficiency when changing the strings on your acoustic guitar. With everything in place, you’re well-equipped to embark on this essential maintenance task and revitalize the sonic and tactile qualities of your instrument.
Removing the Old Strings
Before installing new strings on your acoustic guitar, it’s crucial to remove the old ones carefully. This process involves several steps to ensure that the strings are taken off without causing damage to the instrument. Here’s a systematic guide to removing the old strings:
- Loosen the Strings: Using a string winder, gradually unwind each string in a counterclockwise direction to reduce tension. Be cautious as you do this, as the sudden release of tension can cause the string to snap. Loosen the strings until they are slack and can be easily removed from the tuning pegs.
- Remove the Strings from the Bridge: Once the strings are slack, carefully unwind them from the bridge of the guitar. Acoustic guitars typically have bridge pins securing the strings. Gently push the bridge pins out from the body of the guitar using a bridge pin puller or a small, flat object. This will release the strings from the bridge, allowing you to pull them out smoothly.
- Remove the Strings from the Tuning Pegs: After freeing the strings from the bridge, unwind them from the tuning pegs located on the headstock. Pull the strings out of the pegs and set them aside for proper disposal. Take care not to scratch the guitar’s headstock or the body during this process.
- Clean the Guitar: With the old strings removed, take this opportunity to clean the guitar’s body, neck, and fretboard. Use a clean cloth to wipe away any accumulated dust, oils, or residues. This will prepare the guitar for the installation of the new strings and contribute to its overall maintenance.
By following these steps, you can safely and effectively remove the old strings from your acoustic guitar. This paves the way for the next stages of the string-changing process, allowing you to proceed with confidence and care as you prepare to install the fresh set of strings.
Cleaning the Guitar
After removing the old strings from your acoustic guitar, it’s an opportune time to give your instrument a thorough cleaning. Cleaning the guitar not only enhances its visual appeal but also contributes to its longevity and performance. Here’s a step-by-step guide to cleaning your acoustic guitar:
- Body Cleaning: Using a clean cloth, gently wipe the body of the guitar to remove any dust, fingerprints, or smudges. Pay special attention to areas around the soundhole, bridge, and pickguard. If there are stubborn marks, lightly dampen the cloth with water or a specialized guitar polish, ensuring that the body is not excessively wet.
- Neck and Fretboard Cleaning: Carefully clean the neck of the guitar, including the back of the neck and the fretboard. You can use a separate clean cloth or a microfiber towel to wipe away any grime or residue. If the fretboard appears dry, you may consider applying a small amount of fretboard conditioner to hydrate the wood and maintain its luster.
- Hardware and Tuning Pegs: Inspect the hardware, including the tuning pegs and bridge, for any accumulated dirt or debris. Use a soft brush or cloth to gently clean these components, ensuring that they operate smoothly and remain free from obstructions.
- Polishing: If desired, you can apply a small amount of guitar polish to the body of the guitar, following the manufacturer’s instructions. This can help restore the shine and protect the finish of the instrument. Be cautious not to apply polish to the fretboard or any unfinished areas of the guitar.
By meticulously cleaning your acoustic guitar, you not only maintain its aesthetic appeal but also contribute to its overall well-being. A clean and well-maintained guitar is a joy to play and can inspire confidence and creativity during your practice sessions and performances. With the instrument now refreshed and pristine, you’re ready to proceed with the next steps of the string-changing process.
Preparing the New Strings
As you embark on the process of changing the strings on your acoustic guitar, it’s essential to prepare the new set of strings before installation. Proper preparation ensures that the strings are ready for mounting and can deliver optimal tone and performance. Here’s a guide to preparing the new strings:
- Inspect the New Strings: Before unwrapping the new strings from their packaging, take a moment to inspect them for any visible defects or irregularities. Check for kinks, bends, or corrosion, as these can affect the strings’ integrity and sound quality.
- Unwind the Strings: Carefully unwrap each string from its packaging, taking care not to introduce any twists or tangles. Handle the strings gently to avoid causing any damage or compromising their structural integrity.
- Identify the String Gauges: Acoustic guitar string sets consist of different gauges for each string, typically denoted by numbers such as .010, .013, .017, and so on. Ensure that you have the correct string gauges for your preferred tuning and playing style.
- Stretch the Strings: To minimize the amount of initial stretching required after installation, gently pull and stretch each string along its length. This helps to pre-condition the strings and reduce the likelihood of significant tuning instability during the initial playing sessions.
- Organize the Strings: Arrange the strings in the order of installation, starting from the thinnest (high E) to the thickest (low E). This ensures a systematic approach when installing the strings and minimizes confusion during the process.
By carefully preparing the new strings, you set the stage for a smooth and effective installation process. Attention to detail at this stage contributes to the overall stability, tone, and playability of the strings once they are mounted on the guitar. With the strings now primed and ready, you’re well-equipped to proceed with the next phase of the string-changing process.
Installing the New Strings
With the old strings removed and the guitar cleaned, it’s time to install the new set of strings on your acoustic guitar. Proper installation is crucial for achieving optimal tone, stability, and playability. Here’s a step-by-step guide to installing the new strings:
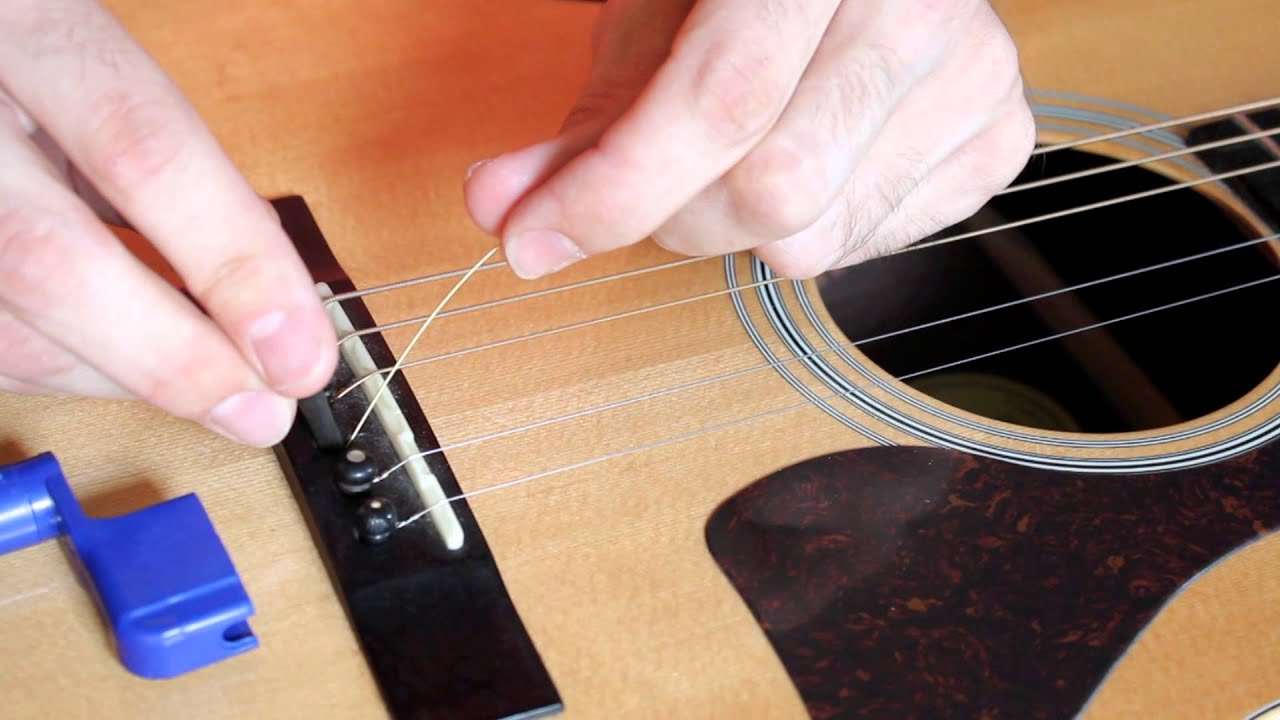
- Insert the Strings into the Bridge: Beginning with the thinnest string (high E), insert the end of the string into the corresponding bridge pin hole. Ensure that the ball end of the string is secured beneath the bridge plate, allowing for a stable anchor point.
- Secure the Bridge Pins: Gently push the bridge pin back into place, securing the string in position. Repeat this process for each string, ensuring that the bridge pins are snugly seated and the strings are held securely in the bridge.
- Thread the Strings through the Tuning Pegs: Guide each string up the neck of the guitar and insert it through the corresponding tuning peg. Leave a sufficient length of the string protruding beyond the peg to allow for several winds during the tuning process.
- Wind the Strings: Using a string winder, begin winding each string onto its respective tuning peg in a clockwise direction. Maintain tension on the string as you wind it, ensuring that the coils are neat and evenly spaced along the peg. This process secures the strings and facilitates tuning stability.
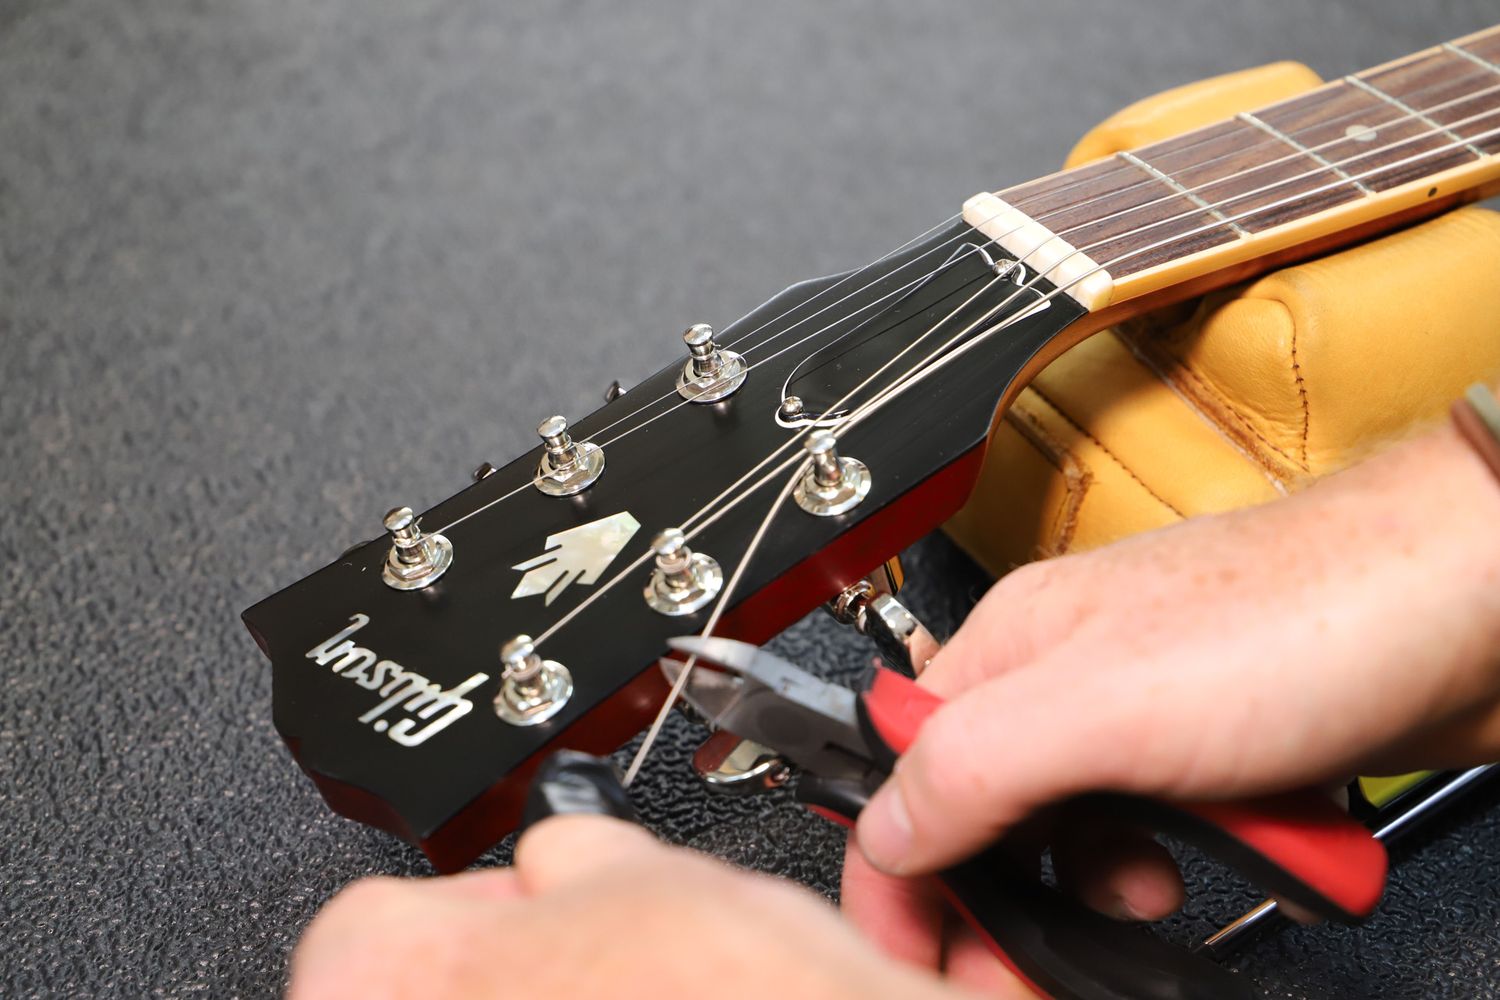
- Trim Excess String: Once the strings are securely wound and tuned to pitch, use wire cutters to trim the excess length protruding from the tuning pegs. Leave a small amount of slack to prevent the strings from unraveling, but ensure that there are no sharp ends that could cause injury or discomfort.
By following these steps, you can effectively install the new strings on your acoustic guitar, setting the stage for enhanced tonal richness and improved playability. With the strings now securely in place, you’re ready to proceed to the final stage of the string-changing process: tuning the guitar to perfection.
Tuning the Guitar
After installing the new strings on your acoustic guitar, the next crucial step is to tune the instrument to the desired pitch. Proper tuning ensures that the strings produce accurate and harmonious tones, setting the stage for an enjoyable playing experience. Here’s a guide to tuning your guitar after installing new strings:
- Initial Tuning: Begin by tuning the thickest string (low E) to the correct pitch using a tuner. Once the low E string is in tune, proceed to tune the remaining strings in the following order: A, D, G, B, and high E. Utilize a tuner to ensure precise tuning for each string.
- Stretching the Strings: After the initial tuning, gently stretch and manipulate each string to help seat the winding and minimize the amount of subsequent stretching required. This process contributes to tuning stability and reduces the likelihood of significant pitch shifts during playing.
- Retuning and Fine-Tuning: Following the initial stretching, revisit the tuning of each string and make any necessary adjustments. As the new strings settle, they may experience minor pitch fluctuations. Continuously check and fine-tune the tuning of the strings until they stabilize and hold their pitch reliably.
- Double-Check the Tuning: Once the strings have settled and the initial stretching is complete, double-check the tuning of the guitar to ensure that each string is precisely tuned to the correct pitch. Pay attention to the overall harmony and balance of the instrument’s sound.
By meticulously tuning your acoustic guitar after installing new strings, you ensure that the instrument produces resonant and accurate tones, setting the stage for an enjoyable and rewarding playing experience. With the guitar now in tune and the strings settled, you’re ready to explore the full potential of your revitalized instrument.
Final Tips and Considerations
As you complete the process of changing the strings on your acoustic guitar, it’s important to consider a few final tips and best practices that can contribute to the longevity and performance of your instrument. Here are some valuable insights to keep in mind:
- Regular Maintenance: Make changing the strings a regular part of your guitar maintenance routine. Depending on your playing frequency and style, consider changing the strings every 1-3 months to maintain optimal tone and playability.
- Proper Disposal: Dispose of old strings responsibly. Many music stores and recycling centers accept old guitar strings for recycling. Alternatively, you can repurpose them for craft projects or securely dispose of them in the trash.
- String Stretching: After installing new strings, gently stretch and retune them multiple times to minimize the amount of subsequent stretching required during playing. This helps stabilize the strings and reduce tuning instability.
- Environmental Considerations: Store your guitar in a stable environment with moderate temperature and humidity levels. Extreme conditions can affect the performance and lifespan of the strings and the instrument as a whole.
- Experiment with String Types: Explore different types of acoustic guitar strings to discover the tonal characteristics that best complement your playing style and musical preferences. Various materials and gauges can significantly influence the sound of your instrument.
- Professional Setup: Consider consulting a professional guitar technician for a comprehensive setup after changing the strings. This can optimize the guitar’s playability, intonation, and overall performance.
By incorporating these final tips and considerations into your string-changing process and overall guitar care routine, you can enhance the longevity, tone, and playability of your acoustic guitar. With a well-maintained and optimally strung instrument at your disposal, you’re poised to embark on a musical journey filled with inspiration and creativity.