Home>Production & Technology>Metronome>How To Make Metronome Louder In Cubase
Metronome
How To Make Metronome Louder In Cubase
Published: January 14, 2024
Learn how to make the metronome louder in Cubase and improve your rhythm. Increase the volume of your metronome with these simple steps.
(Many of the links in this article redirect to a specific reviewed product. Your purchase of these products through affiliate links helps to generate commission for AudioLover.com, at no extra cost. Learn more)
Table of Contents
Introduction
When it comes to music production, having a reliable metronome is essential. A metronome helps musicians maintain accurate time and rhythm while practicing or recording. However, many musicians find that the default metronome volume in their software may not be loud enough for their needs. If you’re using Cubase as your digital audio workstation (DAW) and you’re looking to make your metronome louder, you’ve come to the right place.
Cubase is a powerful DAW that offers a range of customizable features, including the ability to adjust the volume of your metronome. By following a few simple steps, you can increase the metronome volume to ensure it can cut through your mix and be clearly heard.
In this article, we’ll guide you through the process of making your metronome louder in Cubase, providing you with the necessary steps and settings to achieve the desired result. Whether you’re a beginner or an experienced musician, this tutorial will enable you to optimize your metronome volume in Cubase.
Before we dive into the specific steps, it’s important to note that Cubase offers various versions, including Cubase Pro, Cubase Artist, and Cubase Elements. While the interface and specific features may vary slightly between these versions, the overall metronome settings and volume adjustment methods remain consistent across all versions. So, no matter which version of Cubase you’re using, you’ll be able to follow along and make your metronome louder.
Now, let’s get started with the first step: opening Cubase.
Step 1: Opening Cubase
The first step in making your metronome louder in Cubase is to open the software on your computer. Launch Cubase by double-clicking on the desktop icon or selecting it from the applications menu.
Once Cubase is open, you’ll be greeted with the main project window. This is where you can create and edit your music projects. Take a moment to familiarize yourself with the interface if you’re new to Cubase.
If you already have a specific project that you want to work on, you can open it by selecting “File” from the main menu and choosing “Open Project.” Alternatively, you can create a new project by selecting “File” and then “New Project.”
Once you have your project open or a new project created, you’re ready to proceed to the next step, which involves adjusting the metronome settings.
Before we move on, it’s worth mentioning that Cubase offers a range of customizable features and settings, allowing you to tailor the software to your specific preferences. The metronome settings are part of these customizable options, and by accessing them, you can adjust not only the volume but also the tempo, time signature, and other related parameters of the metronome. For the purpose of this tutorial, we will focus on increasing the metronome volume.
Now that you have Cubase open and your project ready, let’s move on to step two and explore the metronome settings.
Step 2: Adjusting Metronome Settings
Now that you have Cubase open and your project ready, it’s time to adjust the metronome settings. Cubase offers comprehensive options for customizing the metronome to suit your needs.
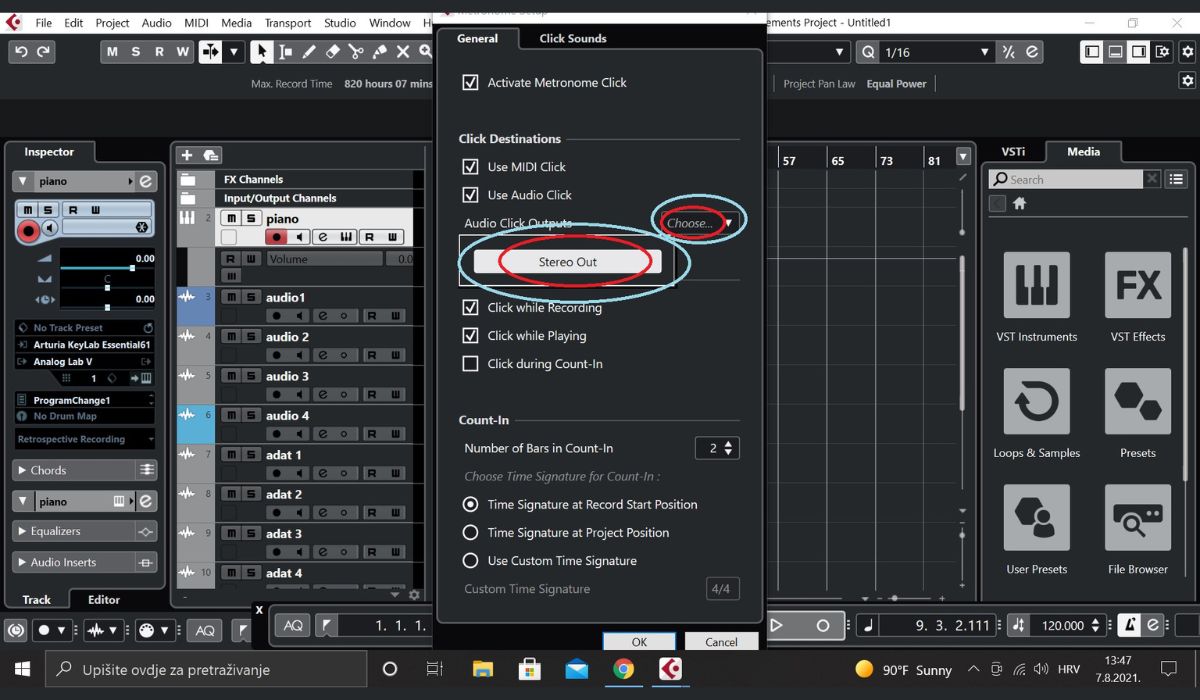
To access the metronome settings, locate the toolbar at the top of the Cubase interface. From the toolbar, navigate to “Transport” and click on it to expand the dropdown menu. Within this menu, you’ll find an option called “Metronome Setup.” Click on “Metronome Setup” to open the metronome settings window.
In the metronome settings window, you’ll find various parameters that you can adjust. These parameters include the sound source, volume, click pattern, and more. To make your metronome louder, our focus will be on the volume control.
Look for the “Volume” slider in the metronome settings window. By default, the volume may be set to a lower level to avoid overpowering other tracks in your mix. However, to make the metronome louder, simply move the volume slider to the right. Increase the volume level to a point where it is audible and easily distinguishable while you’re playing or recording.
While adjusting the metronome volume, it is advisable to strike a balance between hearing the metronome clearly and ensuring it doesn’t become intrusive or overpowering. Finding the right volume level will depend on your personal preferences and the specific requirements of your project.
Once you have adjusted the metronome volume to your desired level, you can explore other metronome settings as well. Cubase allows you to customize various aspects, such as the click pattern, accent beats, and pre-roll settings, depending on your specific needs. Take some time to experiment with these settings to find what works best for you and your music.
Now that you have adjusted the metronome settings, let’s move on to the next step, where we’ll focus on increasing the metronome volume further.
Step 3: Increasing Metronome Volume
After adjusting the metronome settings, if you still feel that the volume is not loud enough, don’t worry! There are additional steps you can take in Cubase to increase the metronome volume even further.
To amplify the metronome volume beyond the default settings, you can utilize Cubase’s Control Room feature. The Control Room provides a dedicated area where you can manage your monitoring and cue mixes, including the metronome volume.
To access the Control Room, go to the main Cubase menu and select “Studio.” From the dropdown menu, choose “Control Room” to open the Control Room panel.
Within the Control Room panel, you’ll find various controls and options related to monitoring and cue mixes. Look for the “Cue” section, which allows you to adjust the volume of the metronome specifically for your headphones or cue mix.
In the “Cue” section, locate the volume slider labeled “Metronome.” By moving this slider to the right, you can further increase the volume of the metronome in your headphones or cue mix. Adjust the volume slider until the metronome is loud enough for your needs.
Remember to keep the balance between the metronome volume and the other elements in your mix. It’s important to ensure that the metronome is audible and distinct without overpowering other important elements of your music.
Once you’ve achieved your desired metronome volume, you can now move on to the final step: testing the louder metronome to ensure it meets your expectations.
With the metronome volume increased, you’ll be able to stay in perfect time and rhythm during your music production process. Now, let’s move on to step four and put the louder metronome to the test.
Step 4: Testing the Louder Metronome
Now that you’ve adjusted the metronome settings and increased the volume both within the metronome setup and the Control Room, it’s time to test the louder metronome to ensure it meets your expectations.
To test the metronome, play or record a section of your music project while the metronome is active. Pay close attention to the metronome sound and its overall volume in relation to the other elements in your mix.
As you play or record, assess whether the metronome is now easily audible and distinct. Ensure that it helps you stay in time without overpowering other critical elements of your music.
If you find that the metronome volume is still not satisfactory, you can revisit the metronome settings and the Control Room panel to make further adjustments. Fine-tuning the volume should help you achieve the desired balance and clarity in your mix.
It’s essential to spend some time experimenting with the metronome volume during the testing phase. Every musician’s preferences and project requirements can differ, so take the opportunity to discover the ideal metronome volume that suits your unique needs.
During the testing phase, you may also want to try recording different instruments or experimenting with various musical genres. This will allow you to assess the metronome’s performance in different musical contexts and ensure it remains clear and audible across different tracks and arrangements.
Once you are satisfied with the metronome volume and its performance in your music project, you can proceed with confidence, knowing that your metronome is now louder and more effective.
Now, wrap up the process and conclude the article.
Conclusion
Having a loud and clear metronome is crucial for musicians during practice and recording sessions. In this article, we have explored how to make the metronome louder in Cubase, a powerful digital audio workstation.
By following the step-by-step guide, you can easily adjust the metronome settings and increase its volume to ensure it cuts through the mix and remains audible. Starting with opening Cubase and navigating to the metronome settings, you can adjust the volume to your liking. If you need further amplification, you can utilize the Control Room feature to boost the metronome volume in your headphones or cue mix.
After making these adjustments, it’s important to test the louder metronome to ensure it meets your expectations. Play or record a section of your music project and evaluate the metronome volume, making any necessary refinements to maintain the right balance with other elements in your mix.
Remember, finding the optimal metronome volume is a personal preference and may vary depending on the specific requirements of your project. Take the time to experiment and fine-tune the volume until it suits your needs perfectly.
With a louder metronome in Cubase, you can now stay in perfect time and rhythm with confidence. Whether you’re practicing your instrument or recording a new song, the improved metronome volume will greatly enhance your musical experience.
Continue exploring Cubase’s range of features and customization options to further optimize your music production process. And don’t forget to regularly check and adjust your metronome volume as your music projects evolve.
So, go ahead, open Cubase, and make your metronome louder to elevate your music production to new heights!