Home>Production & Technology>MIDI>Why Can’t I Hear Anything When I’m Trying To Record MIDI Instruments In Ableton Live Lite 9
MIDI
Why Can’t I Hear Anything When I’m Trying To Record MIDI Instruments In Ableton Live Lite 9
Modified: February 22, 2024
Experiencing issues with recording MIDI instruments in Ableton Live Lite 9? Discover why you can't hear anything and how to troubleshoot it. Learn how to optimize your MIDI recording experience.
(Many of the links in this article redirect to a specific reviewed product. Your purchase of these products through affiliate links helps to generate commission for AudioLover.com, at no extra cost. Learn more)
Table of Contents
Introduction
When you're all set to unleash your musical creativity by recording MIDI instruments in Ableton Live Lite 9, the last thing you want is to encounter an unexpected silence. It can be frustrating and perplexing to find yourself in a situation where you're unable to hear the anticipated sounds despite your best efforts. This issue can stem from various factors, including input and output settings, MIDI mapping, and potential connection hiccups. In this guide, we'll delve into the intricacies of troubleshooting this perplexing problem, equipping you with the knowledge and strategies to restore the harmonious flow of music creation in Ableton Live Lite 9.
Let's embark on this journey to uncover the root causes of the silence that has befallen your MIDI recording endeavors. Together, we'll explore the crucial settings, configurations, and potential pitfalls that could be impeding the auditory gratification you seek. By the end of this comprehensive exploration, you'll possess a deeper understanding of the intricacies of recording MIDI instruments in Ableton Live Lite 9, enabling you to overcome obstacles and harness the full potential of your musical aspirations. So, without further ado, let's embark on this sonic adventure and unravel the mystery behind the elusive sounds that have eluded your eager ears.
Checking the Input Settings
Ensuring that the input settings are correctly configured is paramount when troubleshooting the issue of not hearing anything during MIDI recording in Ableton Live Lite 9. The input settings determine how the MIDI signals are received and processed by the software, directly impacting the auditory output. Let's delve into the essential steps to meticulously examine and adjust the input settings to restore the much-awaited musical sounds.
-
Selecting the Correct MIDI Input Device: Begin by verifying that the appropriate MIDI input device is selected within Ableton Live Lite 9. Navigate to the "MIDI" or "Preferences" section, depending on the version, and locate the input device settings. Ensure that the correct MIDI controller or interface is chosen as the designated input device. This step is crucial as an incorrect selection can lead to the software not receiving the MIDI signals, resulting in a lack of audio output.
-
Input Monitoring: Check the input monitoring settings to ascertain that the MIDI signals from your connected instrument are being received by Ableton Live Lite 9. This can be done by examining the track's input monitoring options and ensuring that it is set to "Auto" or "In." By doing so, you enable the software to monitor and process the incoming MIDI data, paving the way for audible feedback during recording.
-
Adjusting MIDI Channel Configuration: Verify that the MIDI channel configuration aligns with the settings of your MIDI instrument. If the MIDI channels are mismatched, the software may not interpret the incoming signals correctly, resulting in a lack of audio output. Confirm that the MIDI channels of your instrument and Ableton Live Lite 9 are harmoniously synchronized to facilitate seamless communication and audio playback.
-
Input Gain and Volume Levels: Pay attention to the input gain and volume levels of your MIDI instrument. Inadequate input gain or excessively low volume levels can impede the transmission of MIDI signals to the software, leading to a lack of audible feedback. Adjust the input gain and volume levels to ensure that the MIDI signals are robust and perceptible within Ableton Live Lite 9, fostering an environment conducive to successful audio playback.
By meticulously scrutinizing and fine-tuning the input settings encompassing the MIDI input device selection, input monitoring, MIDI channel configuration, and input gain and volume levels, you can pave the way for a harmonious and gratifying MIDI recording experience in Ableton Live Lite 9. These foundational steps lay the groundwork for resolving the perplexing issue of not hearing anything during MIDI recording, empowering you to unleash your musical creativity with confidence and clarity.
Checking the Output Settings
In the realm of MIDI recording, the output settings wield significant influence over the auditory manifestation of your musical endeavors. By meticulously examining and fine-tuning the output settings within Ableton Live Lite 9, you can unravel the mystery behind the absence of audible feedback and restore the melodic resonance that accompanies MIDI recording. Let's embark on a comprehensive exploration of the pivotal steps involved in scrutinizing and optimizing the output settings to reignite the symphony of sound within your creative pursuits.
-
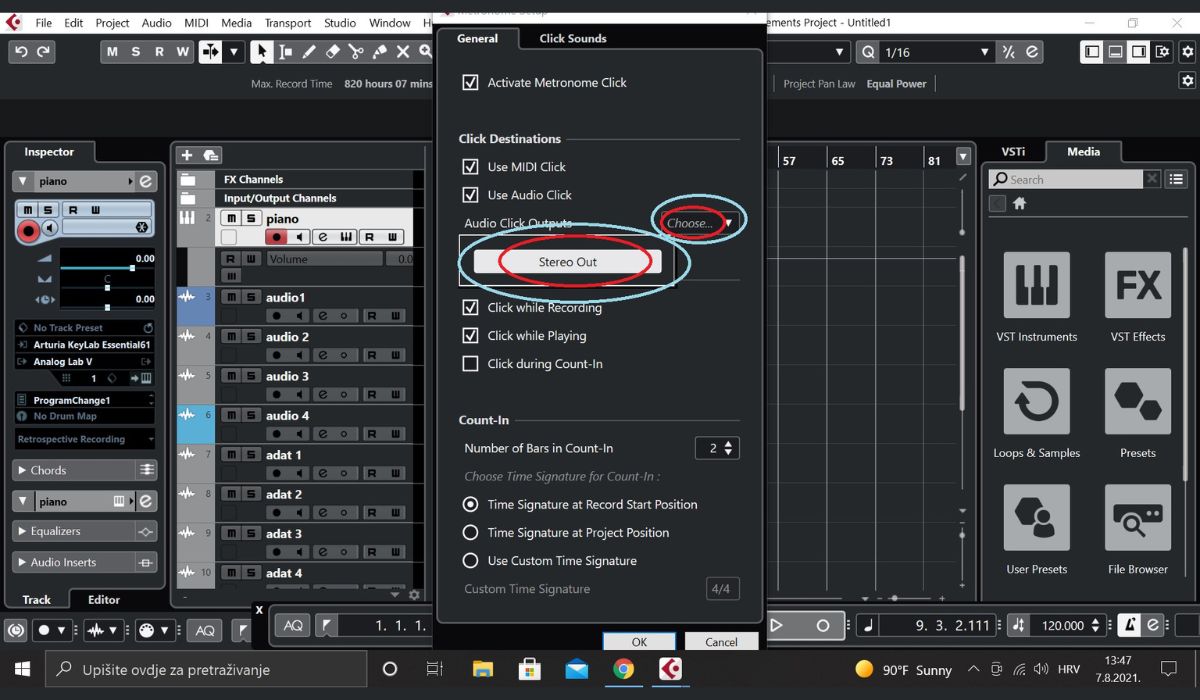
Audio Output Device Selection: Commence the journey of rectifying the silent void by verifying the selection of the appropriate audio output device within Ableton Live Lite 9. Navigate to the software's audio preferences and confirm that the correct output device, such as your audio interface or sound card, is designated for audio playback. A mismatch in the audio output device can lead to the absence of sound, warranting meticulous attention to this foundational setting.
-
Output Routing and Configuration: Delve into the output routing and configuration settings to ensure that the audio signals are channeled to the intended output destination. Verify that the output routing aligns with your desired playback device, such as speakers or headphones, to facilitate the transmission of audio signals from Ableton Live Lite 9 to the auditory realm. This meticulous alignment is pivotal in restoring the harmonious flow of sound within the MIDI recording environment.
-
Output Volume and Monitoring: Pay heed to the output volume levels and monitoring settings to ascertain that the audio signals generated by Ableton Live Lite 9 are perceptible and resonant. Adjust the output volume levels to an optimal range, ensuring that the auditory feedback is neither subdued nor overwhelming. Additionally, monitor the output signals to confirm that they are being transmitted to the designated playback device, providing a tangible manifestation of your MIDI recording efforts.
-
Audio Driver Configuration: Delve into the intricacies of audio driver configuration to ensure seamless compatibility and functionality. Verify that the audio drivers are up to date and compatible with Ableton Live Lite 9, as outdated or incompatible drivers can impede the audio output, leading to a disconcerting lack of sound. By meticulously attending to the audio driver configuration, you pave the way for a robust and reliable audio output environment.
By meticulously scrutinizing and optimizing the output settings encompassing audio output device selection, output routing and configuration, output volume and monitoring, and audio driver configuration, you can rekindle the symphonic resonance within your MIDI recording pursuits. These foundational steps lay the groundwork for resolving the perplexing issue of not hearing anything during MIDI recording, empowering you to infuse your musical creations with auditory vibrancy and clarity.
Checking the MIDI Mapping
In the intricate realm of MIDI recording, the meticulous mapping of MIDI controls and parameters plays a pivotal role in shaping the auditory landscape of your musical compositions within Ableton Live Lite 9. The process of checking the MIDI mapping entails a comprehensive examination of how the MIDI signals are interpreted and translated within the software, directly influencing the generation of sound and the responsiveness of your MIDI instruments. Let's embark on a detailed exploration of the crucial steps involved in scrutinizing and optimizing the MIDI mapping to rekindle the symphonic resonance within your creative endeavors.
Verifying MIDI Control Assignments
Commence the journey of unraveling the intricacies of MIDI mapping by verifying the assignments of MIDI controls and parameters within Ableton Live Lite 9. Navigate to the MIDI mapping section of the software and meticulously examine the assignments allocated to various MIDI controllers and instruments. Ensure that the MIDI controls are accurately mapped to the intended parameters, such as volume, pitch, modulation, and other essential elements that contribute to the auditory tapestry of your compositions. This meticulous verification lays the foundation for a harmonious and responsive MIDI mapping environment, fostering a seamless translation of your musical intentions into tangible sound.
Fine-Tuning MIDI Assignments
Delve into the realm of fine-tuning MIDI assignments to ensure that the mapping aligns with your creative vision and expressive nuances. Adjust the MIDI assignments to reflect your desired interaction with the software, empowering you to articulate your musical ideas with precision and fluidity. By fine-tuning the MIDI assignments, you imbue your compositions with a personalized touch, allowing for intuitive and expressive control over the auditory elements encapsulated within Ableton Live Lite 9. This meticulous fine-tuning process amplifies the symbiotic relationship between the MIDI instruments and the software, culminating in a rich and dynamic musical experience.
Validating MIDI Signal Transmission
Pay heed to the validation of MIDI signal transmission to confirm that the mapped controls effectively communicate with Ableton Live Lite 9. Test the MIDI instruments and controllers to ensure that the signals are seamlessly transmitted to the software, eliciting the intended responses and manipulations of the mapped parameters. This validation process serves as a crucial litmus test, affirming the robustness and reliability of the MIDI mapping, and paving the way for an immersive and responsive interaction between the MIDI instruments and the software. By validating the MIDI signal transmission, you fortify the foundation of your MIDI mapping environment, fostering a seamless conduit for the manifestation of your musical expressions.
Optimizing MIDI Mapping Workflow
Embark on the optimization of the MIDI mapping workflow to streamline and enhance the interaction between your MIDI instruments and Ableton Live Lite 9. Explore the software's mapping configuration options and customize the workflow to align with your creative preferences and production methodologies. By optimizing the MIDI mapping workflow, you cultivate an environment that empowers you to navigate and manipulate the musical elements with efficiency and fluidity, amplifying the creative potential encapsulated within the software. This optimization process elevates the MIDI mapping experience, fostering a symbiotic synergy between your artistic intentions and the responsive capabilities of Ableton Live Lite 9.
By meticulously scrutinizing and optimizing the MIDI mapping encompassing control assignments, fine-tuning, signal validation, and workflow optimization, you can reignite the symphonic resonance within your MIDI recording pursuits. These foundational steps lay the groundwork for resolving the perplexing issue of not hearing anything during MIDI recording, empowering you to infuse your musical creations with auditory vibrancy and clarity.
Troubleshooting MIDI Connection Issues
In the realm of MIDI recording, the seamless interaction between MIDI instruments and software hinges upon the robustness and reliability of the MIDI connections. When faced with the disconcerting silence that accompanies MIDI recording issues in Ableton Live Lite 9, delving into the realm of troubleshooting MIDI connection issues becomes paramount. This comprehensive exploration encompasses a meticulous examination of the hardware, cables, drivers, and software configurations, unraveling potential obstacles and restoring the harmonious flow of musical expression.
Verifying Hardware Connections
Commence the troubleshooting journey by meticulously verifying the physical connections of your MIDI instruments and controllers. Inspect the MIDI cables, ensuring that they are securely connected to the designated input ports of your MIDI interface or audio interface. Pay heed to the power status of the MIDI instruments, confirming that they are operational and poised to transmit MIDI signals to the software. By meticulously attending to the integrity of the hardware connections, you lay the groundwork for a robust and reliable MIDI communication environment within Ableton Live Lite 9.
Examining MIDI Interface and Drivers
Delve into the realm of MIDI interfaces and drivers to ascertain their seamless compatibility and functionality within the MIDI recording ecosystem. Verify that the MIDI interface is recognized by your computer's operating system and that the requisite drivers are installed and up to date. Outdated or incompatible drivers can impede the transmission of MIDI signals, leading to a disconcerting lack of audio output. By meticulously examining the MIDI interface and drivers, you fortify the foundation of your MIDI communication infrastructure, fostering a seamless conduit for the manifestation of your musical expressions.
Software Configuration and MIDI Settings
Navigate to the MIDI settings within Ableton Live Lite 9 and meticulously examine the software configuration pertaining to MIDI input and output. Confirm that the MIDI input and output settings align with the designated MIDI devices and channels, ensuring a harmonious synchronization between the software and your MIDI instruments. Additionally, verify that the MIDI routing within the software is configured to channel the incoming MIDI signals to the intended tracks, enabling the seamless recording and playback of MIDI data. By meticulously scrutinizing the software configuration and MIDI settings, you pave the way for a robust and responsive MIDI recording environment, amplifying the creative potential encapsulated within Ableton Live Lite 9.
Testing MIDI Signal Transmission
Embark on the pivotal phase of testing the MIDI signal transmission to validate the seamless communication between your MIDI instruments and Ableton Live Lite 9. Play the MIDI instruments and controllers, monitoring the transmission and reception of MIDI signals within the software. Verify that the MIDI signals are being accurately interpreted and processed, eliciting the intended responses and manipulations of the musical parameters. This meticulous testing process serves as a crucial litmus test, affirming the robustness and reliability of the MIDI connections, and paving the way for an immersive and responsive interaction between the MIDI instruments and the software.
Resolving Latency and Timing Issues
In the realm of MIDI recording, latency and timing issues can disrupt the seamless synchronization between the MIDI instruments and the software, leading to a disjointed and dissonant playback experience. Delve into the software's latency settings and meticulously optimize the buffer size to minimize latency and enhance the real-time responsiveness of MIDI instruments. Additionally, fine-tune the MIDI clock settings to ensure precise synchronization between multiple MIDI devices, fostering a cohesive and harmonious musical ensemble. By resolving latency and timing issues, you elevate the auditory experience within Ableton Live Lite 9, infusing your musical creations with precision and fluidity.
By meticulously troubleshooting MIDI connection issues encompassing hardware connections, MIDI interfaces and drivers, software configuration, MIDI signal transmission testing, and latency and timing optimization, you can rekindle the symphonic resonance within your MIDI recording pursuits. These foundational steps lay the groundwork for resolving the perplexing issue of not hearing anything during MIDI recording, empowering you to infuse your musical creations with auditory vibrancy and clarity.
Conclusion
In the intricate realm of MIDI recording within Ableton Live Lite 9, the journey of troubleshooting the perplexing issue of not hearing anything during MIDI recording unfolds as a comprehensive exploration of the foundational elements that underpin the auditory manifestation of musical creativity. By meticulously scrutinizing and optimizing the input settings, output settings, MIDI mapping, and troubleshooting MIDI connection issues, you embark on a transformative odyssey that empowers you to restore the symphonic resonance within your creative endeavors.
The meticulous examination of input settings encompasses the selection of the correct MIDI input device, input monitoring, MIDI channel configuration, and input gain and volume levels. By meticulously attending to these foundational settings, you pave the way for the seamless reception and processing of MIDI signals within Ableton Live Lite 9, fostering an environment conducive to successful audio playback and creative expression.
Delving into the realm of output settings unveils the pivotal role played by audio output device selection, output routing and configuration, output volume and monitoring, and audio driver configuration. By meticulously scrutinizing and optimizing these settings, you rekindle the auditory resonance within your MIDI recording pursuits, empowering you to infuse your musical creations with vibrancy and clarity.
The comprehensive exploration of MIDI mapping encompasses the verification of MIDI control assignments, fine-tuning of MIDI assignments, validation of MIDI signal transmission, and optimization of the MIDI mapping workflow. By meticulously attending to these foundational elements, you fortify the symbiotic relationship between your MIDI instruments and Ableton Live Lite 9, culminating in a rich and dynamic musical experience characterized by precision and fluidity.
The journey of troubleshooting MIDI connection issues unfolds as a transformative odyssey encompassing the verification of hardware connections, examination of MIDI interface and drivers, meticulous scrutiny of software configuration and MIDI settings, testing of MIDI signal transmission, and resolution of latency and timing issues. By meticulously attending to these pivotal elements, you restore the harmonious flow of musical expression within Ableton Live Lite 9, empowering you to navigate and manipulate the auditory elements with efficiency and fluidity.
In conclusion, the journey of troubleshooting the issue of not hearing anything during MIDI recording in Ableton Live Lite 9 transcends the mere resolution of technical obstacles; it encapsulates a transformative odyssey that amplifies the creative potential and expressive nuances encapsulated within your musical aspirations. By delving into the intricacies of input and output settings, MIDI mapping, and troubleshooting MIDI connection issues, you emerge equipped with a deeper understanding of the foundational elements that underpin the auditory manifestation of your musical endeavors. This newfound knowledge empowers you to navigate the intricacies of MIDI recording with confidence and clarity, infusing your compositions with auditory vibrancy and resonant clarity.