Home>Production & Technology>MIDI>Why Is Arturia Minilab MIDI Not Working
MIDI
Why Is Arturia Minilab MIDI Not Working
Modified: February 22, 2024
Discover solutions to troubleshoot MIDI connectivity issues with your Arturia Minilab and get your MIDI controller working again. Explore tips and fixes for MIDI problems.
(Many of the links in this article redirect to a specific reviewed product. Your purchase of these products through affiliate links helps to generate commission for AudioLover.com, at no extra cost. Learn more)
Table of Contents
Introduction
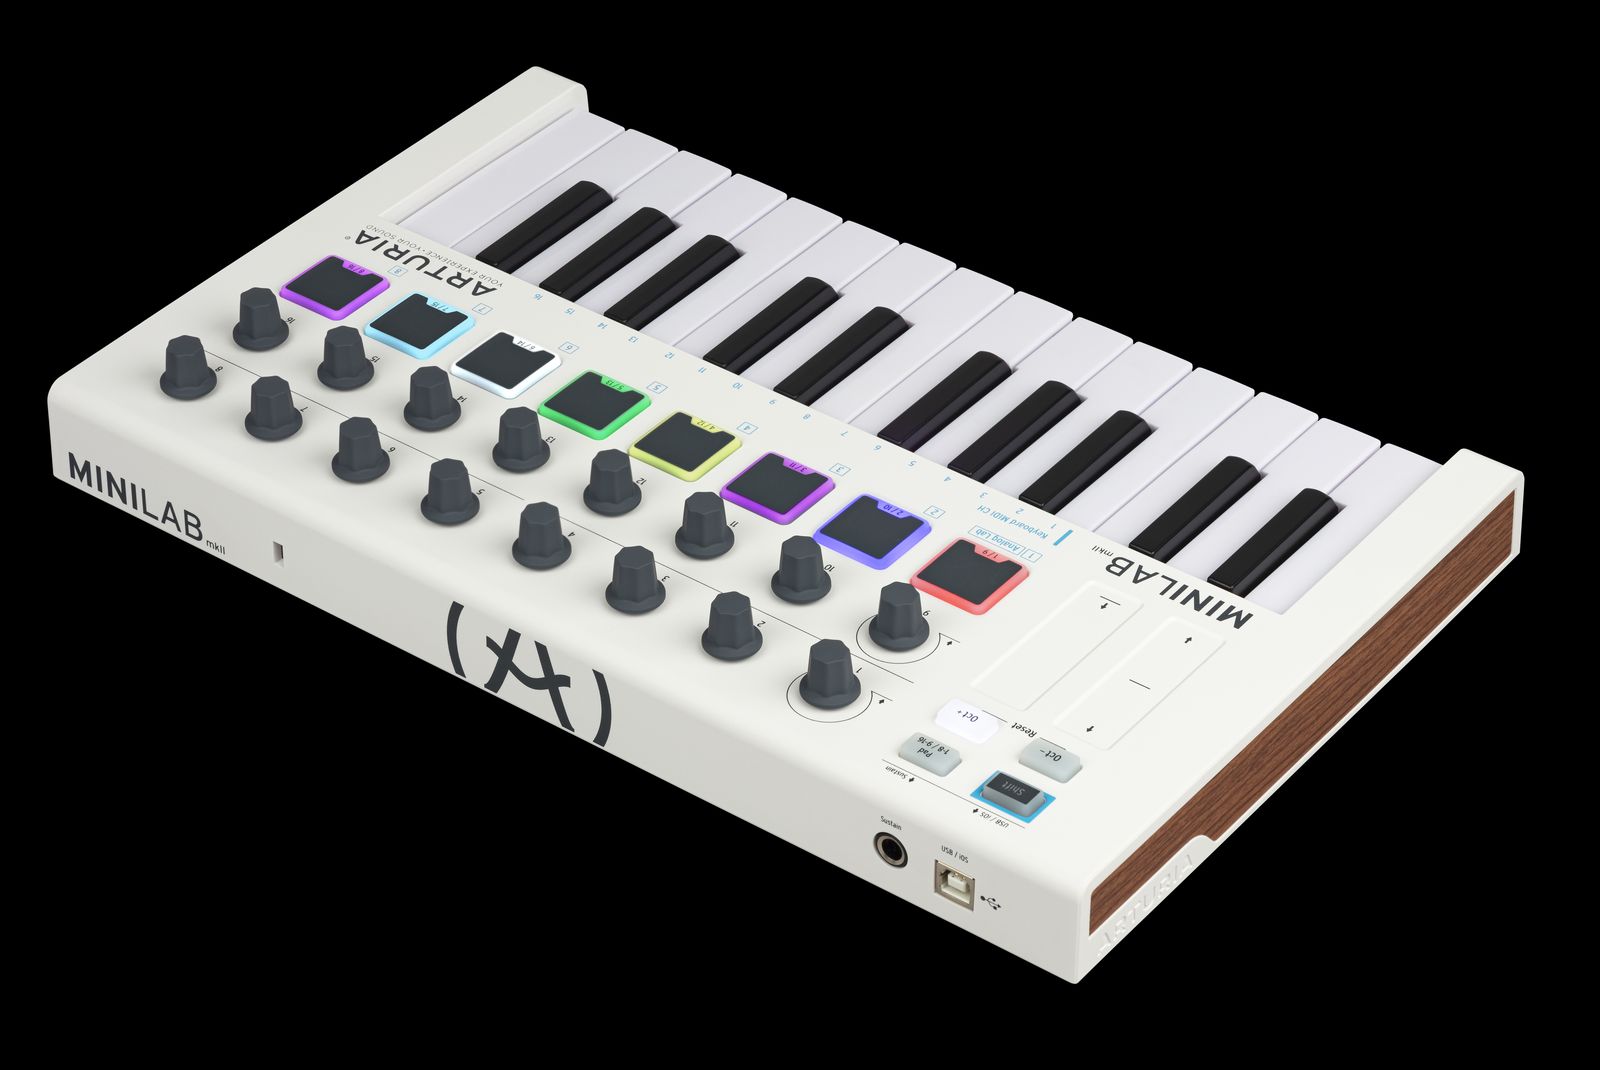
The Arturia Minilab is a versatile MIDI controller that has gained popularity among musicians and producers for its compact size and intuitive design. However, encountering issues with MIDI functionality can be frustrating, especially when it disrupts the creative workflow. If you find yourself in a situation where your Arturia Minilab MIDI is not working as expected, fear not – there are several troubleshooting steps you can take to address the issue and get back to making music seamlessly.
In this article, we will explore various potential solutions to diagnose and resolve the MIDI connectivity issues with your Arturia Minilab. By following these steps, you can troubleshoot the problem and potentially save time and effort in seeking assistance. Whether you're a seasoned music producer or a budding enthusiast, understanding how to troubleshoot MIDI connectivity problems can be invaluable in maintaining a smooth and uninterrupted creative process.
Let's delve into the troubleshooting steps to identify and address the root cause of the MIDI connectivity issues with your Arturia Minilab. Whether it's a hardware or software-related issue, the following steps will guide you through the process of diagnosing and resolving the problem, ultimately allowing you to harness the full potential of your MIDI controller and unleash your creativity without hindrance.
Check the USB Connection
One of the primary steps in troubleshooting issues with the Arturia Minilab MIDI functionality is to inspect the USB connection. A loose or faulty connection can often be the culprit behind MIDI connectivity problems. Here's a detailed guide on checking the USB connection to ensure a stable and reliable connection between your Arturia Minilab and your computer.
-
Inspect the USB Cable: Begin by examining the USB cable connected to your Arturia Minilab. Ensure that the cable is securely plugged into the MIDI controller and the USB port on your computer. Sometimes, a loose connection can lead to intermittent MIDI signal transmission, causing disruptions in functionality.
-
Try a Different USB Port: If you've confirmed that the USB cable is securely connected, consider trying a different USB port on your computer. Occasionally, USB ports can develop faults or experience connectivity issues. By switching to a different USB port, you can rule out potential problems associated with a specific port.
-
Use a High-Quality USB Cable: The quality of the USB cable can also impact the stability of the MIDI connection. If possible, try using a high-quality USB cable known for its reliable data transmission capabilities. A premium USB cable can minimize the risk of connectivity issues caused by cable malfunctions.
-
Check for Physical Damage: Inspect the USB cable for any signs of physical damage, such as frayed wires or bent connectors. Physical damage to the USB cable can impede the flow of MIDI data, leading to erratic behavior in the Arturia Minilab's connectivity.
-
Restart the Computer and MIDI Controller: Sometimes, a simple restart can resolve USB connection-related issues. Reboot your computer and power cycle the Arturia Minilab to refresh the USB connection and potentially eliminate any temporary glitches affecting the MIDI functionality.
By thoroughly examining and addressing the USB connection, you can potentially identify and resolve issues impacting the MIDI connectivity of your Arturia Minilab. A stable and reliable USB connection is fundamental to ensuring seamless communication between the MIDI controller and your computer, allowing you to fully harness the creative potential of your music production setup.
Update the Firmware
Updating the firmware of your Arturia Minilab can be a pivotal step in troubleshooting MIDI connectivity issues. Firmware serves as the underlying software that governs the functionality of the MIDI controller, and outdated or corrupted firmware can potentially lead to erratic behavior, including MIDI connectivity problems. By ensuring that the firmware is up to date, you can mitigate the risk of compatibility issues and enhance the overall performance of your Arturia Minilab.
Here's a comprehensive guide on updating the firmware of your Arturia Minilab to address potential MIDI connectivity issues:
-
Access the Arturia Website: Navigate to the official Arturia website and locate the support section or downloads area. Look for firmware updates specifically tailored for the Arturia Minilab MIDI controller. Arturia typically provides firmware updates to address known issues and improve the overall functionality of their products.
-
Download the Latest Firmware: Once you've identified the firmware update for the Arturia Minilab, download the latest version to your computer. It's crucial to ensure that you're obtaining the correct firmware update corresponding to your specific model of the MIDI controller. Pay close attention to compatibility requirements and any specific instructions provided by Arturia.
-
Follow the Firmware Update Instructions: After downloading the firmware update, carefully review any accompanying instructions or documentation provided by Arturia. These instructions often outline the precise steps for updating the firmware of the Arturia Minilab. It's essential to adhere to the manufacturer's guidelines to avoid potential errors during the update process.
-
Connect the Arturia Minilab: Before initiating the firmware update, ensure that your Arturia Minilab is connected to your computer via the USB cable. A stable connection is necessary to facilitate the firmware update process. Additionally, make sure that the MIDI controller is powered on and in a ready state for the update.
-
Execute the Firmware Update: Launch the firmware update utility or application provided by Arturia. Follow the on-screen prompts to initiate the firmware update process. This typically involves selecting the Arturia Minilab as the target device and specifying the location of the downloaded firmware update file. Once the update process begins, avoid interrupting the connection or powering off the MIDI controller until the update is complete.
-
Verify the Firmware Update: After the firmware update is successfully executed, verify that the Arturia Minilab MIDI controller reflects the updated firmware version. This can often be confirmed through the MIDI controller's settings or by accessing the firmware information within the update utility. Ensuring that the firmware update was applied successfully is crucial in addressing potential issues related to outdated firmware.
By diligently updating the firmware of your Arturia Minilab, you can proactively address potential MIDI connectivity issues stemming from firmware-related anomalies. Keeping the firmware up to date not only enhances the stability and performance of the MIDI controller but also minimizes the likelihood of encountering compatibility issues with your music production setup. Additionally, staying abreast of firmware updates allows you to leverage the latest features and optimizations offered by Arturia, ultimately enhancing your creative workflow and musical endeavors.
Verify MIDI Settings in DAW
Verifying the MIDI settings in your Digital Audio Workstation (DAW) is a crucial step in troubleshooting MIDI connectivity issues with your Arturia Minilab. The DAW serves as the central hub for music production, facilitating the integration of MIDI controllers, virtual instruments, and audio recording and editing capabilities. Ensuring that the MIDI settings within your DAW are configured correctly can significantly impact the seamless functionality of your Arturia Minilab and its interaction with the digital environment.
Here's a comprehensive guide on verifying the MIDI settings in your DAW to address potential MIDI connectivity issues:
-
Access the MIDI Settings: Open your DAW and navigate to the MIDI settings or preferences section. This is where you can configure the MIDI input and output settings, including the recognition of MIDI controllers such as the Arturia Minilab. Pay close attention to the specific settings related to MIDI input devices and ensure that the Arturia Minilab is recognized and selected as an active MIDI input device within the DAW.
-
Check MIDI Input Routing: Verify the MIDI input routing within your DAW to confirm that the MIDI signals from the Arturia Minilab are being received and routed to the intended virtual instruments or MIDI tracks. Incorrect MIDI input routing can lead to a lack of responsiveness or connectivity issues, hindering the seamless integration of the MIDI controller with your music production projects.
-
Test MIDI Signal Reception: Initiate a test of MIDI signal reception within the DAW by triggering notes or MIDI commands from the Arturia Minilab. Monitor the MIDI activity indicators within your DAW to ensure that the MIDI signals are being received and registered by the software. This real-time feedback can help identify any discrepancies in MIDI signal reception and provide insights into potential connectivity issues.
-
Review MIDI Channel Assignments: If your DAW supports MIDI channel assignments, verify that the MIDI channels used by the Arturia Minilab align with the settings within your music projects. Inconsistencies in MIDI channel assignments can lead to communication errors and result in the MIDI controller's signals not being properly interpreted by the DAW.
-
Check for MIDI Thru and Filter Settings: Some DAWs offer MIDI Thru and MIDI filter settings that control the passage and filtering of MIDI data. Ensure that these settings are configured appropriately to allow the smooth transmission of MIDI data from the Arturia Minilab to the designated destinations within your music projects.
By meticulously verifying the MIDI settings in your DAW, you can pinpoint and rectify potential configuration issues that may be impeding the seamless connectivity and functionality of your Arturia Minilab MIDI controller. A thorough understanding of the MIDI settings within your DAW empowers you to optimize the integration of MIDI controllers and elevate your music production endeavors with enhanced control and creativity.
Test with Different USB Ports
Testing your Arturia Minilab with different USB ports can be a crucial step in troubleshooting MIDI connectivity issues. USB ports can occasionally develop faults or encounter connectivity issues, leading to disruptions in the communication between your MIDI controller and the computer. By testing the Arturia Minilab with different USB ports, you can effectively assess whether the issue is specific to a particular port and potentially identify a stable connection for seamless MIDI functionality.
Here's a detailed guide on testing your Arturia Minilab with different USB ports to address potential MIDI connectivity issues:
-
Identify Available USB Ports: Begin by identifying the available USB ports on your computer. Modern computers often feature multiple USB ports, including both USB-A and USB-C variants. Take note of the locations and types of USB ports available for connecting the Arturia Minilab.
-
Switch to a Different USB Port: Disconnect the Arturia Minilab from its current USB port and connect it to a different USB port on your computer. Ensure that the connection is secure and that the MIDI controller is recognized by the computer upon plugging it into the new port.
-
Monitor MIDI Connectivity: Once the Arturia Minilab is connected to the new USB port, monitor the MIDI connectivity and functionality. Test the responsiveness of the MIDI controller within your music production software to ascertain whether the new USB port provides a stable and reliable connection for MIDI communication.
-
Assess Stability and Consistency: Evaluate the stability and consistency of the MIDI connectivity while using the Arturia Minilab with the different USB port. Pay attention to any improvements or discrepancies in MIDI signal transmission, such as reduced latency or enhanced responsiveness.
-
Repeat the Process: If necessary, repeat the process of testing the Arturia Minilab with additional USB ports on your computer. By systematically testing the MIDI controller with different USB ports, you can gather valuable insights into the stability and compatibility of each port with the Arturia Minilab.
-
Note Observations: Take note of any observations or patterns regarding the MIDI connectivity when using different USB ports. Documenting your findings can aid in identifying a USB port that consistently provides optimal MIDI functionality with the Arturia Minilab.
By systematically testing the Arturia Minilab with different USB ports, you can effectively troubleshoot potential connectivity issues and identify a stable USB port that facilitates seamless MIDI communication. This process allows you to optimize the connectivity of your MIDI controller and maintain a reliable interface between the Arturia Minilab and your music production environment.
Contact Arturia Support
If you've diligently followed the preceding troubleshooting steps and are still encountering persistent MIDI connectivity issues with your Arturia Minilab, reaching out to Arturia's dedicated support team can provide invaluable assistance in resolving the underlying problem. Arturia's support representatives possess comprehensive knowledge of their products and are equipped to offer tailored guidance and solutions to address technical issues experienced by users.
When initiating contact with Arturia Support, it's essential to provide detailed information regarding the specific MIDI connectivity issues you're encountering. Be prepared to articulate the steps you've already taken to troubleshoot the problem, including any relevant observations or patterns observed during the troubleshooting process. Clear and concise communication regarding the symptoms and behavior of the MIDI connectivity problem can aid the support team in formulating an effective resolution.
Arturia typically offers multiple channels for contacting their support team, including online ticket submission, email correspondence, and in some cases, live chat or phone support. Prioritize the channel that best aligns with your preferences and urgency, ensuring that you can effectively convey the details of the MIDI connectivity issues to the support team.
When submitting a support ticket or email, consider including the following information to facilitate a streamlined and targeted response from Arturia Support:
- A comprehensive description of the MIDI connectivity issues, including specific error messages, if any, and the behavior of the Arturia Minilab during operation.
- Details of your computer's operating system, the version of your music production software (DAW), and any relevant system configurations that may impact MIDI functionality.
- Documentation of the troubleshooting steps you've undertaken, along with the outcomes and any notable observations made during the process.
- If applicable, provide information regarding any recent system updates, software installations, or changes to your music production setup that coincided with the onset of the MIDI connectivity issues.
By furnishing Arturia Support with a detailed overview of the MIDI connectivity issues and your proactive troubleshooting efforts, you enable the support team to expedite the diagnostic process and offer targeted solutions tailored to your specific situation. Arturia's commitment to customer satisfaction and technical expertise positions their support team as a valuable resource in resolving intricate technical issues, ultimately ensuring that you can fully leverage the capabilities of your Arturia Minilab MIDI controller without impediments.
In the event that the MIDI connectivity issues are indicative of a potential hardware fault or require advanced technical intervention, Arturia's support team can guide you through the appropriate steps for warranty-related inquiries or facilitate the process of obtaining specialized technical assistance. Rest assured that Arturia's support infrastructure is designed to empower users with the necessary resources and expertise to address technical challenges comprehensively, allowing you to resume your music production endeavors with confidence and efficiency.