Home>Production & Technology>Noise Cancellation>How To Turn Off Noise Cancellation Facetime
Noise Cancellation
How To Turn Off Noise Cancellation Facetime
Published: November 22, 2023
Learn how to easily turn off noise cancellation on Facetime and enjoy crystal clear audio during your video calls. Stop the background noise now!
(Many of the links in this article redirect to a specific reviewed product. Your purchase of these products through affiliate links helps to generate commission for AudioLover.com, at no extra cost. Learn more)
Table of Contents
Introduction
Welcome to our comprehensive guide on how to turn off noise cancellation on Facetime. With the rise of remote work and virtual communication, Facetime has become a popular platform for connecting with colleagues, friends, and family. While noise cancellation on Facetime can help remove background noise and improve call quality, there are situations where disabling this feature is necessary.
In this article, we will dive into the world of noise cancellation on Facetime, explore the reasons why you might want to turn it off, and provide you with a step-by-step guide to disable noise cancellation. Whether you’re experiencing audio issues during your calls or prefer to allow ambient sounds to be heard, we’ve got you covered.
Many Facetime users are unaware that noise cancellation is a built-in feature that automatically reduces background noise during calls. This technology detects and suppresses sounds, such as the hum of a fan or the clatter of a keyboard, ensuring a clear and focused conversation. While it can be a helpful tool, some scenarios call for a different approach.
There are various reasons why you might want to disable noise cancellation on Facetime. For starters, it can be frustrating when the feature mistakenly identifies important sounds as background noise and muffles them. For example, if you’re in a noisy environment but need to hear your baby crying or an important notification, noise cancellation might inadvertently silence these crucial sounds.
Additionally, in certain situations, you might want callers on the other end to hear your surroundings. This could be useful during a conference call when you want to enhance the feeling of being present in a specific location or when providing a virtual tour of a place with notable sounds.
Now that we have a better understanding of noise cancellation on Facetime and the reasons to disable it, it’s time to explore how to turn it off. In the following sections, we will guide you through the steps to disable noise cancellation on Facetime, troubleshoot any issues that may arise, and help you make the most out of your Facetime calls.
Understanding Noise Cancellation on Facetime
Before we delve into the process of disabling noise cancellation on Facetime, let’s take a closer look at how this feature works. Noise cancellation is a technology designed to reduce unwanted background noise during audio calls. When activated, it analyzes the sound captured by your device’s microphone and filters out any sounds that it classifies as noise.
Facetime uses advanced algorithms to identify and remove various types of background noise, such as the hum of an air conditioner, the chatter of a busy café, or the clanging of dishes in a restaurant. By eliminating these distracting sounds, noise cancellation aims to provide callers with a clearer and more focused audio experience.
One of the remarkable aspects of noise cancellation on Facetime is its ability to distinguish between human voices and other noises. By prioritizing voice frequencies, it ensures that the caller’s intended speech is transmitted clearly, even in environments with a high level of ambient noise.
Facetime’s noise cancellation feature has been optimized to work seamlessly across various devices, including iPhones, iPads, and Macs. Whether you’re using the latest iPhone model or an older Macbook, you can take advantage of this built-in technology to enhance your audio quality during Facetime calls.
It’s important to note that noise cancellation on Facetime is an automatic feature and is enabled by default. This means that unless you manually disable it, the noise cancellation feature will be active during your calls. However, by following the steps we will discuss later in this guide, you can easily turn off noise cancellation and regain control over your audio settings.
Now that we have a solid understanding of how noise cancellation works on Facetime, let’s explore the reasons why you may want to disable this feature in certain situations.
Reasons to Disable Noise Cancellation
While noise cancellation on Facetime can be beneficial in many scenarios, there are instances where disabling this feature can be advantageous. Here are some reasons why you might want to consider turning off noise cancellation:
- Preserving important sounds: In some situations, you may need to hear specific sounds in your surroundings, such as a baby crying, an emergency alarm, or an important notification. By disabling noise cancellation, you can ensure that these crucial sounds are not unintentionally muted during your Facetime calls.
- Enhancing the ambiance: There may be instances when you want the person on the other end of the call to experience the atmosphere of your location. If you’re giving a virtual tour of a place or sharing a unique setting, turning off noise cancellation allows the ambient sounds to be heard, providing a more immersive experience for the caller.
- Improving audio quality: While noise cancellation is designed to improve the audio quality by reducing background noise, there can be situations where this feature mistakenly identifies important sounds as noise and attenuates them. Disabling noise cancellation can help prevent such instances and ensure that the audio quality remains clear and unaffected.
- Collaboration and conference calls: During group calls or collaborative meetings, there may be times when background noise is part of the discussion. For example, if you’re having a virtual team-building activity or a brainstorming session in a lively environment, disabling noise cancellation allows all participants to fully engage and feel connected.
- Privacy concerns: While noise cancellation primarily focuses on reducing unwanted sounds, it may inadvertently pick up conversations or sensitive information in the background. By disabling this feature, you can minimize the risk of unintended audio capture and protect your privacy during Facetime calls.
By considering these reasons, you can determine whether disabling noise cancellation on Facetime is the right choice for your particular situation. Now, let’s proceed to the next section, where we will provide you with a step-by-step guide to turning off noise cancellation on Facetime.
Step-by-Step Guide to Turn Off Noise Cancellation on Facetime
If you’re looking to disable noise cancellation on Facetime, you’ll be glad to know that the process is straightforward and can be done within a few simple steps. Follow the guide below to turn off noise cancellation:
- Launch the Facetime app on your device. Ensure that you are signed in with your Apple ID.
- Tap on the “Settings” option, which is usually represented by a gear or cog icon.
- Scroll down until you find the “Facetime” option and tap on it.
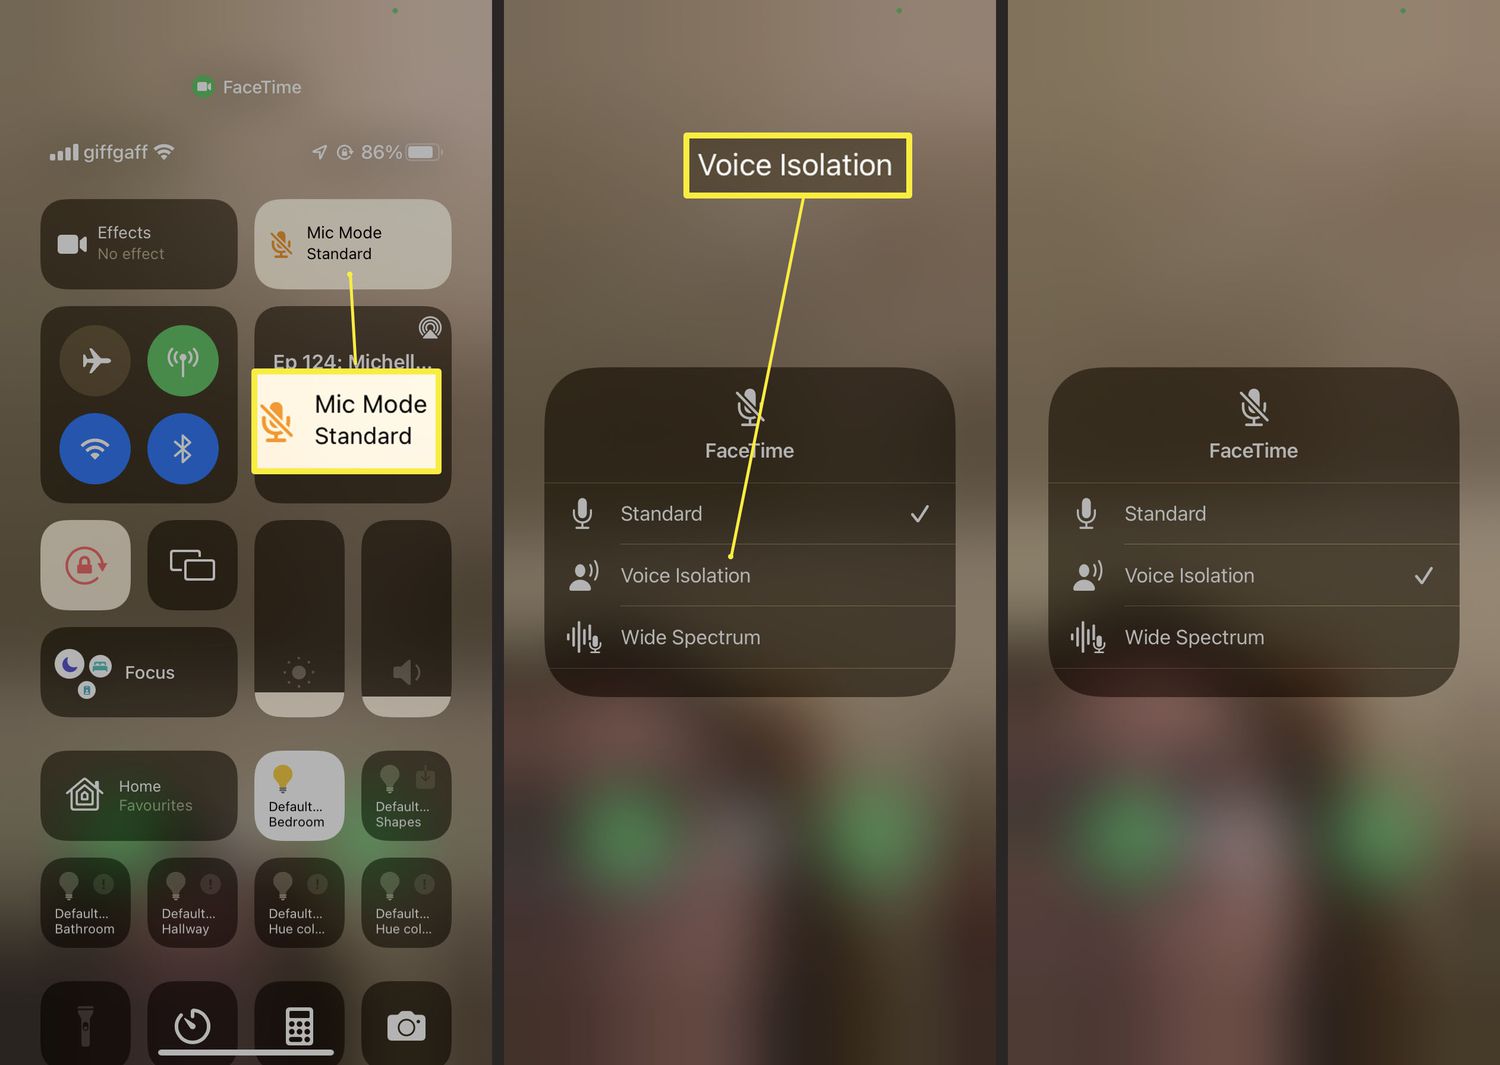
- In the Facetime settings, look for the “Audio” section and locate the “Noise Cancellation” toggle switch. By default, it should be enabled or turned on.
- Tap on the toggle switch to disable noise cancellation. You should see the switch move to the off position, indicating that the noise cancellation feature is now disabled.
- Exit the settings menu and return to your Facetime call. The noise cancellation feature will remain disabled until you manually enable it again.
That’s it! By following these steps, you can easily turn off noise cancellation on Facetime and customize your audio settings to suit your preferences and requirements during calls.
It’s worth noting that the steps mentioned above may slightly vary depending on the version of Facetime and the operating system you’re using. If you are unable to find the noise cancellation toggle switch in the Facetime settings, consult the documentation or support resources provided by Apple for your specific device and software version.
Now that you know how to disable noise cancellation, let’s move on to the next section, where we will discuss how to test the disabled noise cancellation feature and ensure it’s working as intended.
Testing the Disabled Noise Cancellation Feature
After disabling noise cancellation on Facetime, it’s important to confirm that the feature is indeed turned off and that your audio settings have been adjusted accordingly. Here are a few simple steps to test the disabled noise cancellation feature:
- Make a Facetime call to a trusted contact or use the “Test Call” option if available.
- Engage in a conversation, ensuring that there is some background noise or ambient sound present.
- Ask the person on the other end to provide feedback on the audio quality and whether any background noise is audible.
- Listen carefully during the call and see if you can hear the ambient sounds clearly. If you disabled noise cancellation successfully, the background noise should be noticeable and not suppressed.
- If necessary, repeat the test with different ambient sounds or in a different environment to ensure consistent results.
By conducting this test, you can verify if noise cancellation is truly turned off on your Facetime calls. It’s important to remember that if you want to re-enable noise cancellation at any point, you can simply follow the steps mentioned earlier and toggle the switch back to the on position.
If, during the test, you find that the background noise is still being suppressed or filtered, double-check your Facetime settings to ensure that noise cancellation is indeed disabled. If the issue persists, you may need to troubleshoot further or seek assistance from Apple support.
Now that you’ve successfully tested the disabled noise cancellation feature, let’s move on to the next section where we will provide you with some troubleshooting tips in case you encounter any issues or challenges along the way.
Troubleshooting Tips
While disabling noise cancellation on Facetime is generally a straightforward process, it’s possible to encounter some issues or challenges along the way. Here are some troubleshooting tips to help you address common problems:
- Double-check your settings: If noise cancellation doesn’t seem to be disabled even after following the steps, revisit the Facetime settings and ensure that you have indeed turned off the noise cancellation toggle switch.
- Restart your device: Sometimes, a simple restart can resolve technical glitches. Try restarting your device and then check if noise cancellation is disabled on Facetime.
- Update your Facetime app: Make sure you have the latest version of Facetime installed on your device. Updating the app can often fix bugs or issues related to audio settings.
- Check for software updates: In addition to updating the Facetime app, ensure that your device’s operating system is up to date. Software updates often include bug fixes and improvements that can resolve audio-related problems.
- Contact Apple support: If you’ve tried the aforementioned troubleshooting tips and are still experiencing difficulties with disabling noise cancellation, reach out to Apple support for further assistance. They can provide tailored guidance based on your specific device and software version.
By following these troubleshooting tips, you should be able to address common issues and successfully disable noise cancellation on Facetime. Remember, every device and software version may have slight variations, so it’s essential to adapt the troubleshooting steps to your specific situation.
Now that we’ve covered troubleshooting tips, let’s move on to the concluding section of our guide.
Conclusion
Congratulations! You have now learned how to turn off noise cancellation on Facetime. Whether you need to preserve important sounds, enhance the ambiance, or improve audio quality, disabling noise cancellation gives you greater control over your Facetime experience.
In this article, we explored the concept of noise cancellation on Facetime, understanding how it works to reduce background noise during calls. We discussed the reasons why you might want to disable this feature, such as the need to hear specific sounds or create a more immersive environment for your callers.
We provided you with a step-by-step guide to easily turn off noise cancellation on Facetime, allowing you to customize your audio settings. Additionally, we shared tips on testing the disabled noise cancellation feature and troubleshooting common issues that may arise along the way.
Remember, while noise cancellation can be a useful feature in many situations, it’s important to understand when and why to disable it. Consider the circumstances and requirements of your Facetime calls to determine whether noise cancellation should be enabled or disabled.
Enjoy the freedom and flexibility of controlling noise cancellation on Facetime, ensuring that your audio quality and overall call experience meet your specific needs. Should you encounter any challenges, don’t hesitate to refer back to this guide or seek assistance from Apple support.
Thank you for reading our comprehensive guide on turning off noise cancellation on Facetime. We hope this article has been informative and helpful in enhancing your Facetime communication. Happy calling!