Home>Production & Technology>Noise Cancellation>How To Turn Off Noise Cancellation On Zoom
Noise Cancellation
How To Turn Off Noise Cancellation On Zoom
Published: November 3, 2023
Want to turn off noise cancellation on Zoom? Follow our step-by-step guide to disable noise cancellation and improve your audio quality. Say goodbye to background noise and interruptions!
(Many of the links in this article redirect to a specific reviewed product. Your purchase of these products through affiliate links helps to generate commission for AudioLover.com, at no extra cost. Learn more)
Table of Contents
Introduction
Noise cancellation is a feature that has become increasingly popular in video conferencing platforms like Zoom. It helps to enhance the audio quality of your calls by reducing background noise and improving clarity. However, there may be instances when you need to temporarily disable noise cancellation on Zoom to allow certain sounds or to troubleshoot audio issues. In this article, we will guide you through the steps to turn off noise cancellation on Zoom.
Zoom has made it incredibly easy for users to control various audio settings, including noise cancellation. Whether you’re working from a busy coffee shop or participating in a virtual event with multiple speakers, knowing how to disable noise cancellation can be useful in ensuring all sounds are captured during your Zoom meetings. By following the simple steps outlined in this article, you can quickly adjust the noise cancellation settings as per your requirements.
It’s important to note that while noise cancellation can be a valuable tool, there may be instances when you want to turn it off temporarily. This could be when you want to ensure all sounds, even background noise, are heard by others in the meeting. Additionally, disabling noise cancellation can be helpful if you’re experiencing audio issues or have certain audio requirements that are not compatible with the feature.
In the following sections, we will guide you step by step on how to turn off noise cancellation on Zoom, allowing you to have more control over your audio settings and optimize your Zoom experience.
Why Turn off Noise Cancellation?
Noise cancellation is undoubtedly a valuable feature in video conferencing platforms like Zoom, as it helps to minimize distracting background noise and improve the overall audio quality. However, there are certain situations where you may need to turn off noise cancellation temporarily. Let’s explore some reasons why you might want to disable noise cancellation on Zoom:
1. Allowing Important Sounds: Noise cancellation can sometimes filter out certain sounds that you want others to hear. For instance, if you’re conducting a presentation and want to include the ambient sounds of an event or location, disabling noise cancellation ensures these sounds are not eliminated from the audio feed.
2. Collaborative Discussions: In group or team meetings, it’s important to hear everyone’s input clearly. Turning off noise cancellation can help to ensure everyone’s voice is captured, especially when multiple people are speaking simultaneously.
3. Troubleshooting Audio Issues: If you encounter audio problems during a Zoom call, disabling noise cancellation can be a useful troubleshooting step. Sometimes, noise cancellation may unintentionally block certain sounds, resulting in distorted or muffled audio. By turning off noise cancellation, you can determine if the feature is causing the audio issues.
4. Compatibility with External Devices: Noise cancellation may not always be compatible with certain audio devices or peripherals. This can result in compatibility issues and affect the overall audio experience. Disabling noise cancellation allows you to work with external devices without any potential conflicts.
5. Personal Preference: Lastly, it all comes down to personal preference. While noise cancellation can be beneficial in many situations, some individuals may simply prefer to have all sounds captured, including background noise. Disabling noise cancellation allows for a more natural and immersive audio experience, based on individual preferences.
It’s worth noting that noise cancellation is a feature that can be adjusted to suit individual needs. If you find that the default settings are too aggressive or not effective enough, you can modify the noise cancellation level rather than disabling it completely. This way, you can achieve the desired balance between capturing important sounds and minimizing background noise.
Now that we understand the reasons why you might want to turn off noise cancellation, let’s proceed to the step-by-step guide on how to disable this feature in Zoom.
Step 1: Launch Zoom
The first step in turning off noise cancellation on Zoom is to launch the Zoom application on your device. Ensure that you have the latest version of Zoom installed for the best experience.
If you haven’t downloaded Zoom yet, you can visit the Zoom website (https://zoom.us/) and click on the “Download” button to get the Zoom application for your specific device. Follow the on-screen instructions to complete the installation process.
Once you have Zoom installed, locate the Zoom icon on your desktop or in your applications folder and double-click on it to launch the application.
Alternatively, if you have Zoom pinned to your taskbar or dock, you can simply click on the icon to launch it.
After launching Zoom, you will be prompted to sign in with your Zoom account. If you don’t have an account yet, you can create one by clicking on the “Sign Up Free” button and following the registration process.
Once you are signed in to your Zoom account, you are ready to proceed to the next step.
Step 2: Go to Settings
After launching Zoom and signing in to your account, the next step is to access the settings menu where you can adjust the noise cancellation feature.
To go to the settings menu, follow these steps:
- Look for the gear icon in the top right corner of the Zoom window. This gear icon represents the settings and is the gateway to various configuration options.
- Click on the gear icon to open the settings menu. A drop-down menu will appear with different options.
- Select the “Settings” option from the drop-down menu. This will open the Zoom settings window.
- The settings window provides access to a wide range of options for customizing your Zoom experience. In this window, you can adjust audio, video, meeting, and other settings according to your preferences.
By accessing the settings menu, you gain control over various features and functionalities of Zoom, including noise cancellation.
Once you have successfully accessed the settings menu, you are ready to proceed to the next step of disabling noise cancellation on Zoom.
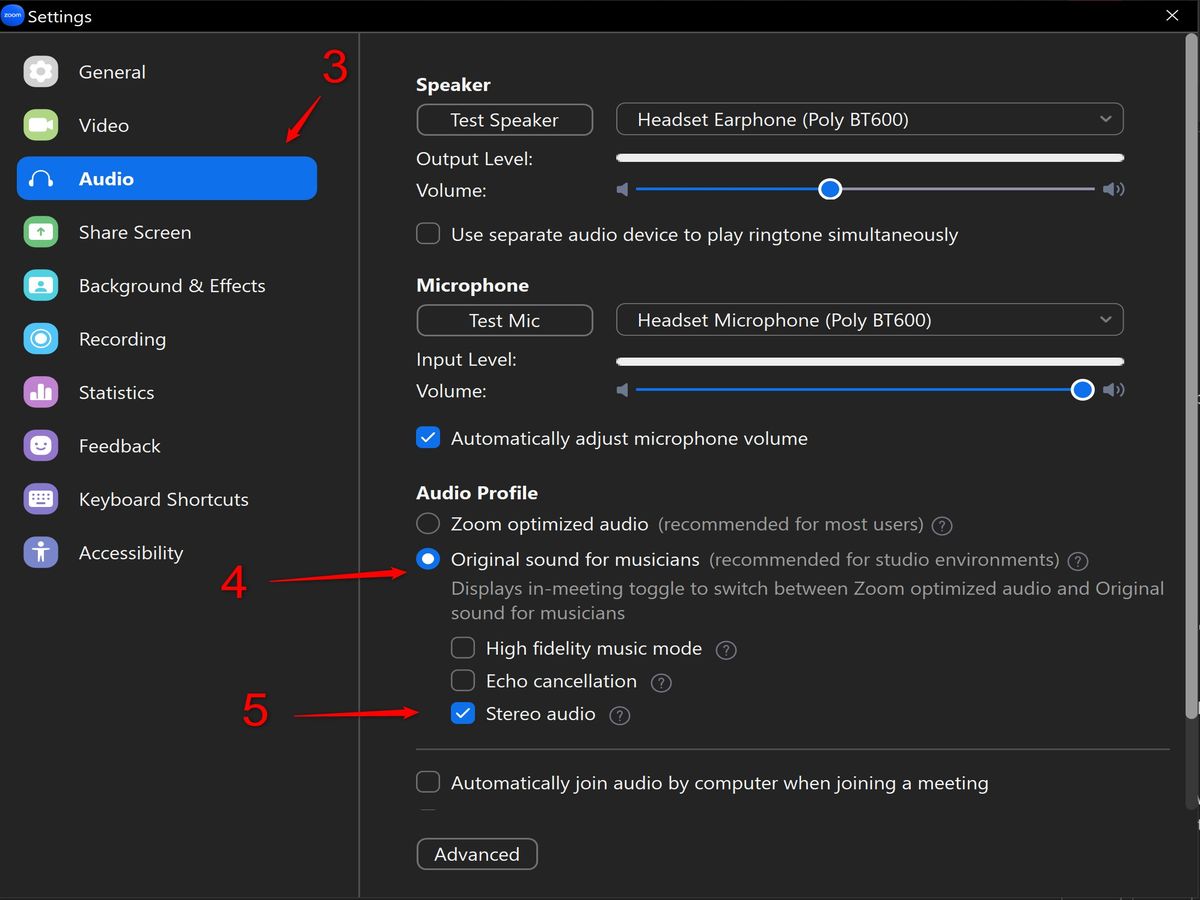
Step 3: Navigate to the Audio tab
After accessing the Zoom settings window, the next step is to navigate to the Audio tab. This is where you can find the specific settings related to audio configuration, including noise cancellation.
To navigate to the Audio tab, follow these steps:
- Once you are in the Zoom settings window, you will see a sidebar on the left-hand side. Look for the “Audio” option and click on it.
- By clicking on the “Audio” option, the settings related to audio configuration will be displayed in the main section of the settings window.
- In the Audio settings, you will find various options such as microphone settings, speaker settings, and audio advanced settings.
- Scroll down the Audio settings until you find the “Advanced” section.
- Within the Advanced section, you will see the “Suppress Persistent Background Noise” option.
This option is responsible for noise cancellation in Zoom. By default, it is usually enabled, meaning that background noise will be suppressed. To disable noise cancellation, you will need to adjust the settings in this section.
Once you have successfully navigated to the Audio tab and located the “Suppress Persistent Background Noise” option, you are ready to proceed to the next step of adjusting the noise cancellation settings on Zoom.
Step 4: Adjust the Noise Cancellation settings
Now that you have reached the “Suppress Persistent Background Noise” option in the Zoom Audio settings, it’s time to adjust the noise cancellation settings to turn off this feature.
To adjust the noise cancellation settings, follow these steps:
- Click on the checkbox next to the “Suppress Persistent Background Noise” option to uncheck it. This action will disable noise cancellation in Zoom.
- Once you uncheck the box, any background noise that was previously being suppressed will now be picked up by your microphone and transmitted to others in the meeting.
- If you want to fine-tune the noise cancellation level, you can click on the “Audio Settings” button located below the “Suppress Persistent Background Noise” option.
- Clicking on the “Audio Settings” button will open a new window where you can adjust various audio settings, including the noise cancellation level.
- Here, you can experiment with different settings and find the right balance between suppressing background noise and capturing important sounds.
- Once you have adjusted the noise cancellation settings to your desired level, click on the “Apply” or “OK” button to save the changes.
By following these steps, you can effectively adjust and disable noise cancellation in Zoom, ensuring that all sounds are captured during your meetings.
Now that you have adjusted the noise cancellation settings, let’s move on to the final step of testing the changes to ensure that noise cancellation is indeed turned off.
Step 5: Test the changes
After adjusting the noise cancellation settings in Zoom, it is essential to test the changes to ensure that noise cancellation is indeed turned off and that all sounds are being captured during your meetings.
Follow these steps to test the changes:
- Join or start a Zoom meeting to test the audio settings.
- During the meeting, make sure there is some background noise present, such as a fan running or people talking in the background.
- Speak or make sounds while the background noise is present and check if your microphone is picking up the sounds properly.
- Listen to the audio playback or ask someone in the meeting to confirm that they can hear the background noise.
- If the background noise is being captured and transmitted to others, it means that noise cancellation is successfully turned off.
- If the background noise is not being captured or is significantly reduced, you may need to revisit the noise cancellation settings and adjust them accordingly.
- Repeat the test in different scenarios to ensure that the noise cancellation feature is disabled and that all sounds are being captured as intended.
By testing the changes, you can ensure that noise cancellation is appropriately disabled on Zoom, allowing for a more natural and immersive audio experience during your meetings.
Congratulations! You have successfully learned how to turn off noise cancellation on Zoom. Now you can enjoy a more flexible audio experience while using the platform.
Conclusion
Noise cancellation is a valuable feature in Zoom that helps improve audio quality by reducing background noise. However, there are situations where you may need to turn off noise cancellation temporarily. Whether you want to capture all sounds, troubleshoot audio issues, or have specific audio requirements, disabling noise cancellation can be a useful option.
In this article, we have provided a step-by-step guide on how to turn off noise cancellation on Zoom. By launching Zoom, accessing the settings, navigating to the Audio tab, and adjusting the noise cancellation settings, you can easily disable this feature and have more control over your audio experience.
Remember, while noise cancellation can be disabled, it can also be adjusted to suit your needs. If the default settings are too aggressive or not effective enough, you can fine-tune the noise cancellation level in the Audio settings.
After making the necessary adjustments, it is crucial to test the changes by joining or starting a Zoom meeting and ensuring that all sounds, including background noise, are being captured. Testing helps confirm that noise cancellation is indeed turned off, allowing for a more natural and immersive audio experience during your meetings.
By following the steps outlined in this article and understanding the reasons to turn off noise cancellation, you now have the knowledge to optimize your audio settings on Zoom and have more control over your virtual meetings.
So go ahead, disable noise cancellation when needed, and enjoy crystal-clear audio with the flexibility to capture all sounds as you desire in your Zoom meetings.