Home>Production & Technology>Remix>How To Make A Remix In Sony Vegas

Remix
How To Make A Remix In Sony Vegas
Modified: January 22, 2024
Learn how to create a fantastic remix in Sony Vegas with our step-by-step guide. Master the art of remixing and create dynamic and captivating music.
(Many of the links in this article redirect to a specific reviewed product. Your purchase of these products through affiliate links helps to generate commission for AudioLover.com, at no extra cost. Learn more)
Table of Contents
Introduction
Remixing has become a popular art form that allows individuals to put their own creative spin on existing music or videos. With the right tools and techniques, anyone can make a remix that is unique and captivating. One such tool that is widely used by professionals and amateurs alike is Sony Vegas.
Sony Vegas is a powerful video editing software that offers a range of features to help you create stunning remixes. Whether you’re a beginner looking to experiment with remixing or an experienced editor wanting to take your skills to the next level, Sony Vegas has got you covered.
In this article, we will walk you through the step-by-step process of creating a remix in Sony Vegas. From importing audio and video files to adding effects and exporting the final product, we will cover everything you need to know to produce a professional-grade remix.
But before we dive into the details, let’s take a moment to understand the significance of remixing. Remixing is not just about combining different elements from existing tracks; it’s about adding your own creative touch and transforming the original material into something fresh and exciting. It’s a way to showcase your artistic voice and engage with the audience in a unique way.
Whether you want to remix a popular song, a memorable movie scene, or even a compilation of viral videos, Sony Vegas provides the tools and flexibility to make your remix stand out. So, if you’re ready to unleash your creativity and master the art of remixing with Sony Vegas, let’s get started!
Step 1: Importing the audio and video files
The first step in creating a remix in Sony Vegas is importing the audio and video files that you want to work with. Sony Vegas supports a wide range of audio and video formats, so you can easily import your desired files without any issues.
To import the files, follow these steps:
- Open Sony Vegas and create a new project or open an existing project.
- Click on the “Import Media” option in the File menu or use the shortcut Ctrl+I.
- Navigate to the location where your audio and video files are stored and select them.
- Click the “Open” button to import the selected files into your project.
Once the files are imported, they will appear in the “Project Media” tab on the left side of the screen. From here, you can view and manage all the imported files for your remix.
Sony Vegas allows you to work with multiple audio and video tracks, giving you the flexibility to mix and match different elements for your remix. You can easily drag and drop the imported files onto the timeline to start arranging them.
It’s important to note that when importing video files, Sony Vegas will separate the audio and video tracks by default. This allows you to work with them independently and make precise edits. If you want to keep them linked together, you can right-click on the video track and select “Link Group” to maintain the synchronization between the audio and video.
Now that you have your audio and video files imported and arranged on the timeline, you’re ready to move on to the next step of creating your remix in Sony Vegas.
Step 2: Arranging the tracks
Once you have imported your audio and video files into Sony Vegas, the next step is to arrange the tracks on the timeline. This step is crucial in determining the structure and flow of your remix.
To arrange the tracks, follow these steps:
- Click and drag the audio and video clips on the timeline to position them in the desired order. You can easily move them around and adjust their placement.
- To trim or cut a track, select the clip on the timeline and use the “Split” tool or press the S key. This allows you to remove unwanted portions or create seamless transitions between different parts of the tracks.
- If you want to add additional audio or video tracks, simply right-click on the timeline and select “Insert Track.” This gives you more flexibility to incorporate different elements into your remix.
- You can also adjust the length of the tracks by dragging the edges of the clips on the timeline. This helps you sync the audio and video tracks and create a cohesive remix.
As you arrange the tracks, keep in mind the overall vision and theme of your remix. Consider how different elements complement each other and create a sense of harmony. Experiment with different arrangements and transitions to find the combination that best represents your creative vision.
By arranging the tracks effectively, you can create a remix that flows smoothly and captivates your audience. Take the time to fine-tune the placement and order of the tracks until you are satisfied with the overall composition.
Now that you have successfully arranged the tracks, it’s time to move on to the next step and start adding effects and editing the audio track in Sony Vegas.
Step 3: Applying effects and editing the audio track
Once you have arranged the tracks in Sony Vegas, it’s time to add effects and edit the audio track to enhance the overall sound and quality of your remix. This step allows you to unleash your creativity and bring your remix to life.
To apply effects and edit the audio track, follow these steps:
- Select the audio track you want to edit on the timeline by clicking on it.
- Go to the “Audio FX” tab located in the top menu of Sony Vegas. Here, you will find a range of audio effects and enhancements that you can apply to your track.
- Browse through the available effects and choose the ones that best suit your remix. You can add effects such as reverb, echo, equalization, or even apply filters to modify the sound.
- Once you have selected an effect, click and drag it onto the audio track on the timeline. This applies the effect to the selected section of the track.
- To adjust the parameters of the effect, double-click on the effect icon on the audio track. A dedicated window will open where you can modify the settings to achieve the desired sound.
- You can also edit the audio track by adjusting the volume levels and applying fades. Sony Vegas provides options to increase or decrease the volume of specific sections, as well as create smooth fade-ins and fade-outs for seamless transitions.
- Experiment with different effects and editing techniques to create a unique and captivating audio experience for your remix.
Remember to listen to your remix as you apply effects and make audio edits to ensure everything sounds cohesive and balanced. Don’t be afraid to try out different combinations and settings until you achieve the desired result.
By applying effects and editing the audio track, you can elevate the quality of your remix and make it stand out from the crowd. The enhanced sound will captivate your audience and create a more immersive listening experience.
Now that you have applied effects and edited the audio track, it’s time to move on to the next step and sync the audio and video tracks in Sony Vegas.
Step 4: Syncing the audio and video tracks
Once you have added effects and edited the audio track in Sony Vegas, it’s essential to sync the audio and video tracks to ensure seamless playback of your remix. Syncing is crucial for maintaining the right timing and visual impact of your video.
To sync the audio and video tracks, follow these steps:
- Identify a specific point in the video where a clear visual or auditory cue can be used to align the tracks. For example, a beat drop or a prominent visual action.
- Play the video and carefully listen to the audio to determine if there are any noticeable time discrepancies.
- If the audio track is ahead or behind the video, you can manually adjust its position by dragging the audio clip on the timeline. Use the visual cues in the video to guide you.
- Another option is to use the “Track Synchronization” feature in Sony Vegas. Right-click on the audio track and select “Properties.” In the “Track Synchronization” tab, you can input the desired time adjustment to sync the audio with the video accurately.
- Preview the playback to ensure that the audio and video are synchronized properly. Make fine adjustments as necessary.
- If you have multiple audio tracks, repeat the syncing process for each track to ensure they are all properly aligned with the video.
Syncing the audio and video tracks is crucial for maintaining a seamless viewing experience and delivering the intended impact of your remix. Take the time to carefully adjust the tracks until they align perfectly.
Remember to continually play back the video and audio to check for any discrepancies. A well-synced remix will enhance the overall impact and create a professional-quality product.
Now that you have successfully synced the audio and video tracks, let’s move on to the next step and add transitions to your remix in Sony Vegas.
Step 5: Adding transitions
Transitions play a vital role in creating a smooth and visually appealing remix. They help to seamlessly connect different clips and enhance the overall flow of your video. In Sony Vegas, you have a variety of transitions to choose from, allowing you to add a professional touch to your remix.
To add transitions to your remix, follow these steps:
- Select the point in the timeline where you want to add a transition between two clips.
- Go to the “Transitions” tab in Sony Vegas. Here, you will find a wide range of transition effects to choose from.
- Browse through the available options and choose the one that best suits your creative vision and the overall theme of your remix.
- Click and drag the selected transition onto the timeline, specifically between the two clips where you want the effect to occur.
- Adjust the duration of the transition by dragging its edges on the timeline. This allows you to control the speed and smoothness of the transition effect.
- Preview the playback to ensure that the transition works seamlessly between the clips. Make adjustments as necessary to achieve the desired visual flow.
When adding transitions, it’s important to consider the tone and mood of your remix. Some transition effects may work well for energetic and fast-paced remixes, while others may be more suitable for slower and introspective remixes.
Remember not to overuse transitions and keep them in moderation. The goal is to enhance the visual impact and flow of your remix without distracting the viewer from the content.
By adding transitions effectively, you can elevate the visual experience of your remix, making it more engaging and polished.
Now that you have added transitions, let’s move on to the next step: adding text and graphics to your remix with Sony Vegas.
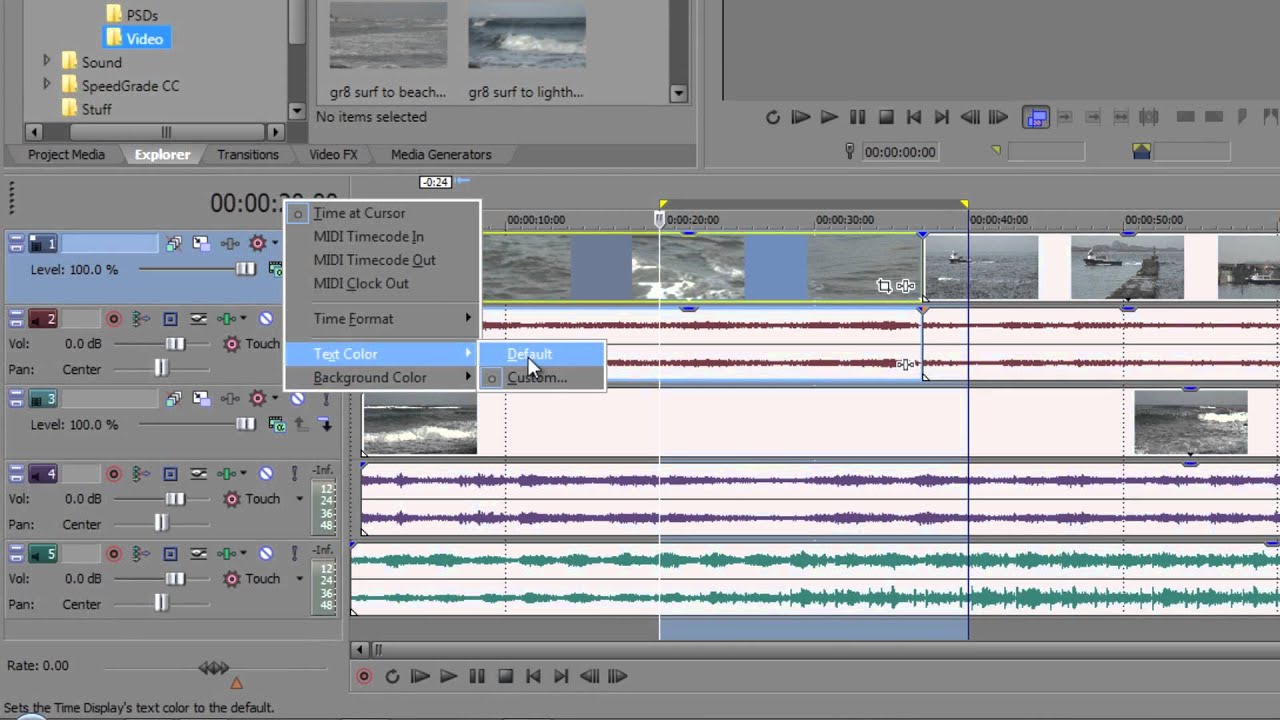
Step 6: Adding text and graphics
Adding text and graphics to your remix in Sony Vegas can significantly enhance its visual appeal and convey important information to your audience. Whether it’s displaying song lyrics, captions, or creative graphics, this step allows you to add a personal touch and make your remix more engaging.
To add text and graphics to your remix, follow these steps:
- Go to the “Media Generators” tab in Sony Vegas. Here, you will find a variety of options for adding text and graphics.
- Click on the desired text or graphic generator to select it.
- Drag the selected generator onto the timeline at the point where you want the text or graphic to appear.
- Customize the appearance of the text or graphic by adjusting the settings in the “Properties” panel. You can modify the font, size, color, opacity, and other visual elements.
- Enter the desired text in the text box or import the graphic file that you want to include.
- Position the text or graphic on the screen by clicking and dragging it on the timeline.
- If you want the text or graphic to appear and disappear at specific times, keyframe the visibility by setting the opacity to 0% at the desired points on the timeline.
- Preview the playback to ensure that the text or graphic is displayed as intended and make any necessary adjustments.
When adding text and graphics, consider the design principles, such as readability, color contrast, and alignment. Make sure the text or graphic does not obstruct important elements of your remix and complements the overall aesthetics.
Additionally, you can experiment with different animations and effects to make the text or graphic transitions more dynamic. Sony Vegas provides a range of options to animate and customize text and graphic elements to suit your creative vision.
By adding text and graphics thoughtfully, you can enhance the storytelling and visual impact of your remix, capturing the attention of your audience and adding an extra layer of creativity.
With text and graphics now incorporated, let’s move on to the final step: exporting your remix in Sony Vegas.
Step 7: Exporting the remix
After putting in all the hard work and creativity, it’s time to export your remix from Sony Vegas and share it with the world. Exporting ensures that your remix can be played on various devices and platforms, allowing others to enjoy your creation.
To export your remix from Sony Vegas, follow these steps:
- Make sure your remix is saved and ready for export in Sony Vegas.
- Go to the “File” menu and select the “Render As” option.
- In the “Save As” dialog box, choose the location on your computer where you want to save the exported file.
- Select the desired output format for your remix. Sony Vegas supports a wide range of video formats, such as MP4, AVI, and WMV.
- Customize the export settings based on your preferences or the requirements of the platform where you plan to share your remix.
- Specify the quality, resolution, and other parameters for the exported file.
- Click on the “Render” or “OK” button to start the exporting process.
- Wait for Sony Vegas to complete the export process, which can vary depending on the length and complexity of your remix.
- Once the export is finished, locate the exported file in the chosen destination folder.
Now that you have successfully exported your remix, you can share it on various platforms, such as social media, video-sharing websites, or simply enjoy it on your personal device.
Before sharing your remix, it’s recommended to watch the exported file to ensure that it plays as intended and meets your quality expectations. If any issues or inconsistencies are noticed, you can go back to Sony Vegas and make necessary adjustments before exporting it again.
Congratulations! You have completed the process of creating a remix in Sony Vegas, from importing the audio and video files to adding effects, syncing tracks, applying transitions, adding text and graphics, and finally exporting the remix.
Now, feel free to explore further possibilities, experiment with different techniques, and continue refining your remixing skills in Sony Vegas.
With your newfound knowledge and creativity, you can continue to create unique and captivating remixes that leave a lasting impact on your audience.
Conclusion
Creating a remix in Sony Vegas is an exciting and creative journey that allows you to showcase your artistic vision and transform existing audio and video content into something fresh and unique. With the step-by-step process outlined in this article, you now have the knowledge and tools to embark on your remixing adventure.
By importing audio and video files, arranging tracks, applying effects, editing the audio track, syncing tracks, adding transitions, and incorporating text and graphics, you can create a remix that captures the essence of your artistic vision. Sony Vegas provides a range of features and options to help you bring your remix to life and share it with the world.
Throughout the process, remember to infuse your creativity and personal touch. Experiment with different arrangements, effects, and design elements to make your remix truly unique. Consider the flow and overall theme of your remix, and strive to create a cohesive and engaging experience for your audience.
Once you have completed your remix, make sure to export it in a suitable format and share it on various platforms to showcase your creative talent. Take pride in your work and allow others to be inspired by your remix.
Remember, a remix is not just about combining different elements; it’s an opportunity to express your individuality and create something that resonates with others. So, let your imagination run wild and explore the endless possibilities that await you in the world of remixing with Sony Vegas.
Now, armed with the knowledge and skills you’ve gained, go forth and create remixes that captivate, inspire, and leave a lasting impression. Happy remixing!