Home>Instruments>Bass>How To Boost Bass In Sony Vegas
Bass
How To Boost Bass In Sony Vegas
Modified: January 22, 2024
Boost the bass in your Sony Vegas videos with our step-by-step guide. Enhance your audio quality and create a more immersive viewing experience.
(Many of the links in this article redirect to a specific reviewed product. Your purchase of these products through affiliate links helps to generate commission for AudioLover.com, at no extra cost. Learn more)
Table of Contents
Introduction
Welcome to this guide on how to boost bass in Sony Vegas! If you’re a music enthusiast, video editor, or content creator, you know that having a solid bass sound is crucial for creating impactful and immersive audio experiences. Whether you’re working on a movie, a YouTube video, or a music production, enhancing the bass can significantly enhance the overall quality and depth of your audio.
Sony Vegas is a powerful video editing software that offers various audio editing tools and effects. By applying the right techniques, you can take your audio to the next level and make it stand out. In this article, we will walk you through step-by-step instructions on how to boost bass in Sony Vegas, allowing you to create rich and vibrant audio tracks with ease.
Before we dive into the process, it’s essential to understand the importance of bass in audio production. The bass is responsible for the low-frequency range, adding depth, warmth, and power to the overall sound. Boosting the bass can make a significant difference in the audio experience, especially if you’re working with genres such as hip-hop, electronic, or any other bass-driven music.
Now, let’s get started with the step-by-step process of boosting bass in Sony Vegas. Whether you’re a beginner or an experienced user, you’ll find the instructions easy to follow, enabling you to enhance the bass in your audio tracks effortlessly. So, without further ado, let’s explore the techniques and tips to bring out the best bass in your audio!
Step 1: Importing Audio Clip
The first step in boosting bass in Sony Vegas is to import your audio clip into the software. To do this, follow the simple instructions below:
- Launch Sony Vegas and open your project.
- Click on the File menu and select Import.
- Navigate to the location where your audio file is saved and select it.
- Click on the Open button to import the audio clip into your project.
Once you have successfully imported the audio clip, it will appear in your project’s timeline, ready for editing.
It’s important to note that the quality of your audio file can have a significant impact on the final result. Make sure to use high-quality audio files or recordings to ensure optimal bass enhancement. Low-quality or poorly recorded audio may limit your ability to achieve the desired bass boost.
By importing the audio clip into Sony Vegas, you’re now ready to proceed to the next step, where we will explore techniques for adjusting the track volume to optimize the bass levels in your audio.
Step 2: Adjusting Track Volume
Once you’ve imported your audio clip into Sony Vegas, the next step is to adjust the track volume to optimize the bass levels. This step is essential for achieving a balanced audio mix.
Follow the instructions below to adjust the track volume:
- Select the audio clip in the timeline by clicking on it.
- Locate the volume control for the selected audio clip in the track header.
- Click and drag the volume control up or down to increase or decrease the overall volume of the audio clip.
- Preview the audio by playing it back to ensure you have achieved the desired volume level.
When adjusting the track volume, it’s important to keep an eye on the level indicators to prevent audio clipping. Clipping occurs when the volume level exceeds the maximum limit, resulting in distortion and poor audio quality. To avoid clipping, aim to keep the volume levels within a safe range, taking into consideration the overall dynamics of the audio.
By adjusting the track volume, you can control the overall loudness of the audio without compromising the quality. This step sets the foundation for further bass enhancement, as it allows you to optimize the levels before applying any additional effects or plugins.
Once you’re satisfied with the track volume adjustment, you’re ready to move on to the next step, where we will explore how to apply an equalizer effect to further enhance the bass frequencies in your audio clip.
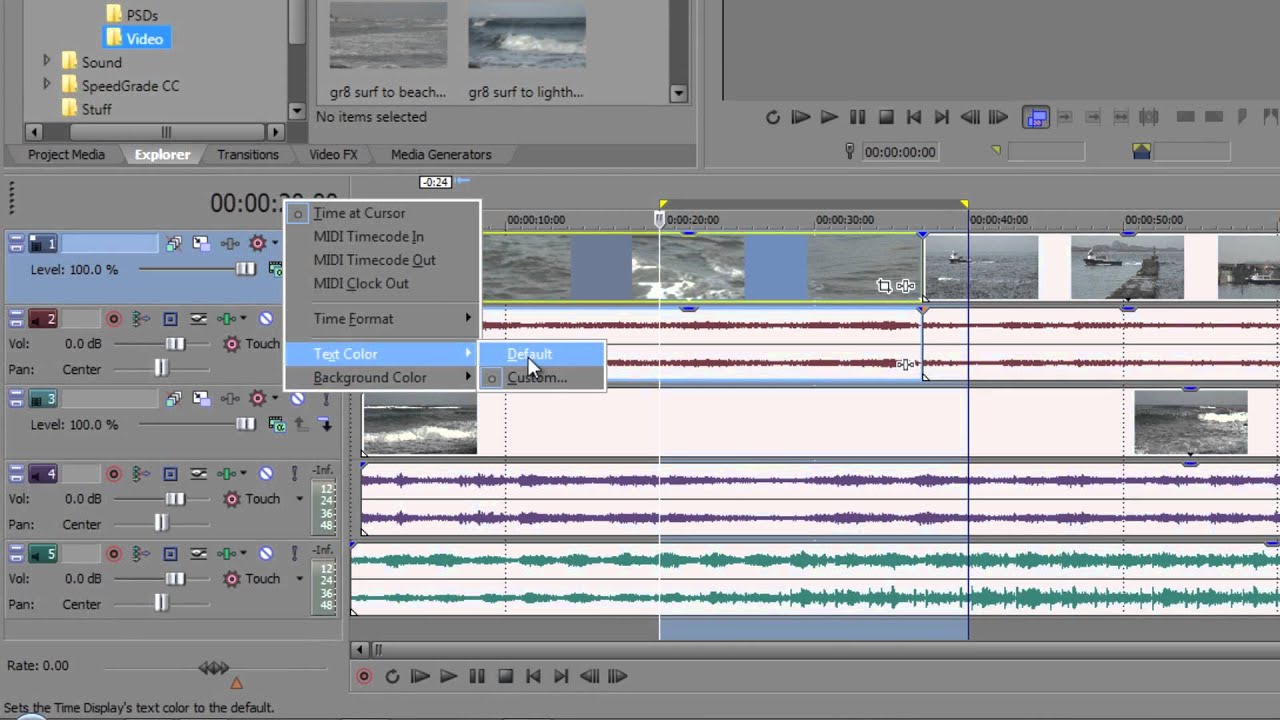
Step 3: Applying Equalizer Effect
Now that you have adjusted the track volume in Sony Vegas, it’s time to apply an equalizer effect to further enhance the bass frequencies in your audio clip. The equalizer is a powerful tool that allows you to boost or attenuate specific frequency ranges, giving you precise control over the audio’s tonal balance.
Follow the steps below to apply the equalizer effect:
- Select the audio clip in the timeline.
- Click on the “FX” button in the track header to open the Effects window.
- In the Effects window, click on the “Audio FX” tab and scroll down to find the “Equalizer” effect.
- Drag and drop the Equalizer effect onto the audio clip in the timeline.
- With the Equalizer effect selected, click on the “Edit” button to open the Equalizer settings.
Now that you have accessed the Equalizer settings, it’s time to fine-tune the bass frequencies to achieve the desired effect. Keep in mind that every audio clip is unique, so the ideal settings may vary depending on the specific characteristics of your audio.
Experiment with the equalizer controls to boost the lower frequencies, where the bass resides. Commonly, you can adjust the sliders in the lower frequency range, such as 60Hz, 80Hz, or 100Hz, to give the bass a noticeable boost. However, be careful not to overdo it, as excessive bass can result in a muddy or boomy sound.
Remember, the goal is to achieve a balanced and natural-sounding bass. Take the time to listen to your audio clip while making gradual adjustments to the equalizer settings. Trust your ears and find the sweet spot that enhances the bass without overpowering the other elements of the audio.
Once you’re satisfied with the equalizer settings, click on the “OK” button to apply the effect. Preview the audio clip to ensure that the equalizer has enhanced the bass frequencies in a way that complements the overall sound.
Now that you’ve applied the equalizer effect and boosted the bass frequencies, it’s time to move on to the next step, where we will explore techniques for enhancing the low frequencies even further.
Step 4: Enhancing Low Frequencies
After applying the equalizer effect in Sony Vegas to boost the bass frequencies, it’s time to take it a step further and enhance the low frequencies for a more impactful bass sound. By specifically targeting the low-end of the spectrum, you can add depth and richness to your audio clip.
Follow these steps to enhance the low frequencies:
- Select the audio clip in the timeline.
- Open the “Audio FX” window by clicking on the “FX” button in the track header.
- Scroll down to find the “Low Pass” or “Bass Boost” effect.
- Drag and drop the effect onto the audio clip in the timeline.
- Adjust the settings of the effect to emphasize the desired low frequencies.
The “Low Pass” effect allows you to control the cutoff frequency of the audio, filtering out higher frequencies and emphasizing the lower frequencies. Adjust the cutoff frequency to find a balance that enhances the bass without making the audio sound muddy or overpowering.
Another option is the “Bass Boost” effect, which directly boosts the low frequencies without affecting the rest of the spectrum. Use this effect sparingly, as too much bass boost can result in an unnatural or distorted sound.
As you make adjustments, keep in mind the overall mix and ensure that the low frequency enhancements blend well with the rest of the audio elements. Take the time to listen critically and make subtle changes to achieve the desired impact.
Once you’re satisfied with the low-frequency enhancements, click on the “OK” button to apply the effect. Preview the audio clip to ensure that the low frequencies have been enhanced effectively and that the bass sounds clear and powerful.
With the low frequencies appropriately enhanced, you’re now ready to move on to the final step, where we will explore additional adjustments and fine-tuning of the EQ settings.
Step 5: Adjusting EQ Settings
Now that you have boosted the bass frequencies and enhanced the low-end of your audio clip, it’s time to fine-tune the EQ settings in Sony Vegas to achieve the perfect balance and tonal clarity. The EQ controls allow you to shape the overall frequency response of your audio, ensuring that all elements are well-balanced and cohesive.
Follow these steps to adjust the EQ settings:
- Select the audio clip in the timeline.
- Open the “Audio FX” window by clicking on the “FX” button in the track header.
- Scroll down to find the “Parametric Equalizer” or “Graphic Equalizer” effect.
- Drag and drop the effect onto the audio clip in the timeline.
- Adjust the frequency bands and gain controls to fine-tune the EQ settings.
With the Parametric Equalizer, you have precise control over the frequency bands, allowing you to boost or attenuate specific ranges. The Graphic Equalizer provides a graphical representation of the frequency spectrum, making it easier to visually identify and adjust the desired frequencies.
When adjusting the EQ settings, it’s important to listen closely and make subtle changes. Pay attention to the overall balance and ensure that the bass frequencies are powerful and well-defined without overpowering other elements of the audio.
You can experiment with different frequency ranges and band adjustments to achieve the desired tonal balance. For example, you may want to fine-tune the mid-range frequencies to give clarity and presence to vocals or instruments while maintaining the richness of the bass.
Take your time to iterate through different EQ settings and listen critically to the results. Remember, the key is to achieve a well-balanced and natural-sounding mix that emphasizes the bass while maintaining clarity and fidelity across the spectrum.
Once you’re satisfied with the EQ adjustments, click on the “OK” button to apply the effect. Preview the audio clip to ensure that the EQ settings have optimized the tonal balance, resulting in a powerful bass and overall audio clarity.
Congratulations! You’ve successfully adjusted the EQ settings in Sony Vegas to enhance the bass frequencies and create a captivating audio experience. Take some time to listen to your final audio mix and make any additional tweaks necessary to achieve the desired result.
With these steps, you now have the knowledge and techniques to boost bass in Sony Vegas and elevate the quality of your audio projects. Whether you’re working on videos, music productions, or any other creative endeavors, remember to experiment, trust your ears, and have fun in the process!
Thank you for reading this guide, and we hope it was helpful in enhancing your bass sound. Happy editing!
Conclusion
Boosting the bass in Sony Vegas can add tremendous depth and impact to your audio projects. By following the step-by-step instructions outlined in this guide, you have learned how to import audio clips, adjust track volume, apply an equalizer effect, enhance low frequencies, and fine-tune EQ settings.
Throughout the process, it’s crucial to maintain a balanced approach, ensuring that the bass enhancements complement the overall audio mix without overpowering other elements. Remember to trust your ears and use subtle adjustments to achieve the desired impact.
While Sony Vegas provides powerful tools and effects, it’s essential to start with high-quality audio recordings or files to maximize the potential for bass enhancement. Poorly recorded or low-quality audio may limit your ability to achieve optimal results.
Ultimately, the goal of boosting the bass is to create a captivating and immersive audio experience for your audience. Whether you’re working on videos, music productions, or any other creative projects, enhancing the bass can take your audio to the next level and make it stand out.
Take the time to experiment, listen critically, and have fun in the process. Every audio clip and project is unique, so don’t be afraid to explore different adjustments and techniques to find the best results.
Thank you for reading this guide on how to boost bass in Sony Vegas. We hope that the information provided has equipped you with the necessary knowledge to enhance your audio and create impactful soundscapes. Happy editing!