Home>Production & Technology>Surround Sound>How To Do A 7.1 Surround Sound Test
Surround Sound
How To Do A 7.1 Surround Sound Test
Modified: February 18, 2024
Discover how to perform a 7.1 surround sound test and maximize your audio experience. Immerse yourself in the world of surround sound with our easy-to-follow guide.
(Many of the links in this article redirect to a specific reviewed product. Your purchase of these products through affiliate links helps to generate commission for AudioLover.com, at no extra cost. Learn more)
Table of Contents
- Introduction
- Understanding 7.1 Surround Sound
- Importance of a Surround Sound Test
- Preparing for the 7.1 Surround Sound Test
- Step 1: Positioning the Speakers
- Step 2: Adjusting Speaker Levels
- Step 3: Choosing the Right Test Materials
- Step 4: Playing the Test Signals
- Step 5: Analyzing the Sound Output
- Troubleshooting Surround Sound Issues
- Conclusion
Introduction
Welcome to the world of immersive audio experiences with 7.1 surround sound! Whether you’re a movie enthusiast, a passionate gamer, or an audiophile seeking the ultimate audio setup, a 7.1 surround sound system can take your entertainment to a whole new level.
Surround sound technology provides a realistic and captivating audio experience by reproducing sound from multiple directions. The “7.1” in 7.1 surround sound refers to the distribution of speakers in the setup: seven full-range speakers and one low-frequency subwoofer. This configuration allows for precise sound localization, creating a sense of depth and dimension that adds depth to your favorite movies, games, and music.
The purpose of this article is to guide you on how to perform a 7.1 surround sound test. Whether you’re setting up your surround sound system for the first time or calibrating an existing setup, conducting a thorough sound test is essential to ensure optimal audio performance and accurate speaker placement.
By following the steps outlined in this guide, you’ll be able to position your speakers correctly, adjust their levels, select appropriate test materials, play test signals, and analyze the sound output to identify any potential issues. With the knowledge gained from this 7.1 surround sound test, you’ll be able to fine-tune your system and enjoy a truly immersive audio experience.
Before we dive into the specifics of the surround sound test, it’s important to understand the various factors that make 7.1 surround sound such a sought-after audio technology. Let’s explore the different components and the importance of conducting a comprehensive sound test.
Understanding 7.1 Surround Sound
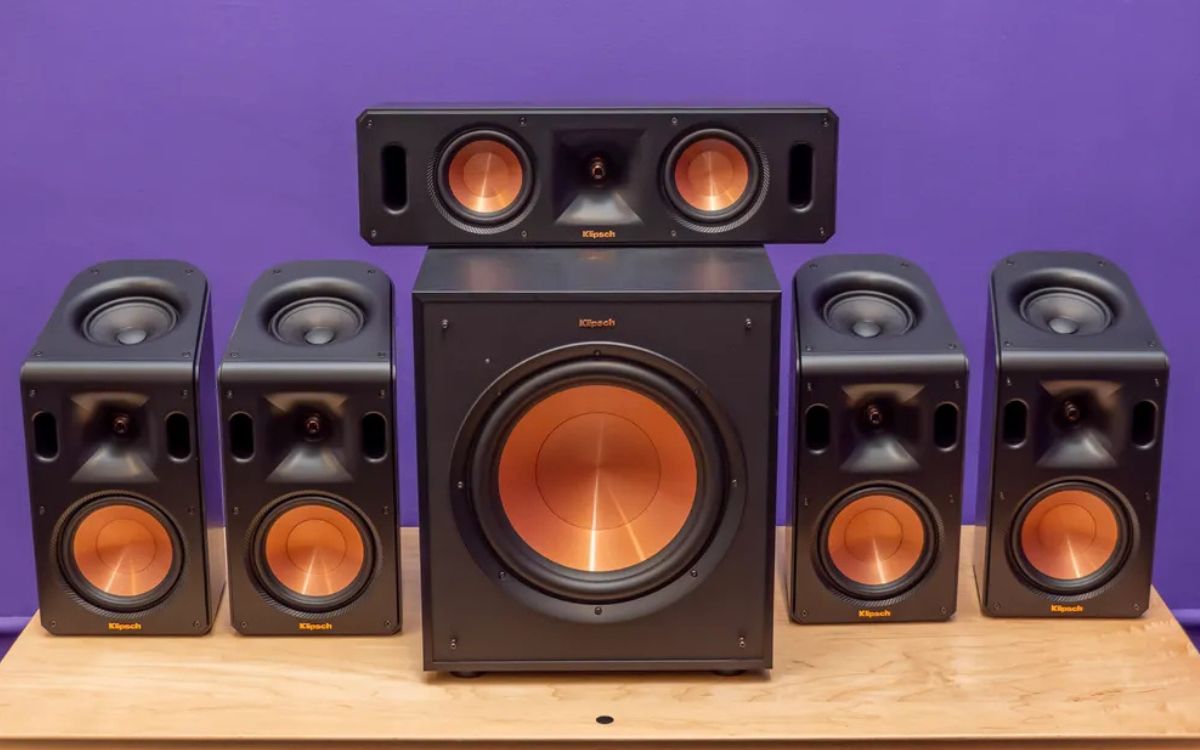
7.1 surround sound is a multi-channel audio format that aims to recreate a lifelike and immersive audio experience. It incorporates a total of eight speakers, which are strategically placed around the listener to produce directional audio cues and enhance the sense of realism.
The “7” in 7.1 surround sound refers to the seven traditional speakers used in the setup – three in the front (left, center, and right), two at the side (left surround and right surround), two at the back (left rear surround and right rear surround) – while the “.1” signifies the presence of a low-frequency subwoofer.
Each speaker in a 7.1 surround sound system has a specific role to play. The front speakers handle dialogue and sound effects from the front of the soundstage, while the side speakers complement the frontal audio by delivering ambient sounds and background noise. The rear speakers add a sense of depth by providing sound from behind the listener.
The subwoofer is responsible for reproducing low-frequency sounds and enhancing the impact of explosions, musical basslines, and other elements that require powerful and deep audio reproduction.
This configuration allows for precise sound localization, making it easier for listeners to pinpoint the source of the audio and enhancing immersion. Whether you’re watching a movie, playing a video game, or listening to music, the multi-channel setup of 7.1 surround sound can transport you into the heart of the action.
It’s worth noting that not all audio content is specifically mixed for 7.1 surround sound. Many movies, games, and music tracks are mastered in a format that supports up to 5.1 surround sound. In such cases, the 7.1 system can still provide an enhanced audio experience by utilizing the additional speakers to create a more expansive soundstage.
Now that we have a basic understanding of 7.1 surround sound, let’s explore why performing a 7.1 surround sound test is crucial to ensuring optimal audio performance and how it helps in setting up your system effectively.
Importance of a Surround Sound Test
Performing a thorough surround sound test is critical for several reasons. Firstly, it ensures that your speakers are correctly positioned, allowing for accurate sound localization. Proper speaker placement is essential for immersing yourself in the audio experience and creating a realistic soundstage.
Additionally, a surround sound test helps you balance the audio levels of each speaker in your setup. Achieving a harmonious blend between all the speakers is crucial for seamless transitions and an immersive audio experience. The test enables you to fine-tune the speaker levels and ensure that no single speaker overpowers or gets drowned out by the others.
Moreover, the surround sound test allows you to identify any potential issues with your audio setup. It helps you to determine if there are any faulty speakers, connectivity problems, or calibration errors that could affect the overall sound quality. By conducting a test, you can diagnose and address these issues before they impact your viewing or listening experience.
A surround sound test is also beneficial in selecting the right test materials. It allows you to evaluate the performance of your speakers across different frequencies, sound effects, and audio formats. This helps you determine whether your system can accurately reproduce the full range of sounds and effects found in movies, games, and music.
Another crucial aspect of a surround sound test is analyzing the sound output. By listening to specific test signals, you can evaluate the clarity, dynamic range, and overall tonal balance of your system. This allows you to make informed adjustments and optimizations, ensuring that you’re getting the most out of your surround sound setup.
Finally, a surround sound test provides an opportunity for troubleshooting any issues that may arise. If you’re experiencing distorted sound, unbalanced levels, or audio artifacts, the test can help you identify the source of the problem and take remedial measures. Whether it’s a faulty connection, incorrect settings, or room acoustics, the test facilitates problem-solving and enhances your surround sound experience.
In summary, a surround sound test is crucial for correct speaker positioning, balanced audio levels, identifying issues, selecting appropriate test materials, analyzing sound output, and troubleshooting. By investing time in conducting a comprehensive surround sound test, you can fine-tune your system for optimal performance and enjoy a truly immersive audio experience.
Preparing for the 7.1 Surround Sound Test
Before you dive into conducting a 7.1 surround sound test, it’s important to make a few preparations to ensure accurate results and a smooth testing process.
Firstly, ensure that your surround sound system is properly set up and all the speakers are connected and functioning correctly. Check the cables, connections, and power supply to each speaker. Make sure they are securely plugged in and there are no loose connections or damaged cables.
Next, ensure that your audio receiver or amplifier is compatible with 7.1 surround sound and is set up correctly. Refer to the user manual or manufacturer’s instructions for guidance on setting up the receiver to support 7.1 audio output. Make sure all the speaker channels are configured properly, and any necessary audio processing options are enabled.
Consider the acoustics of your room. A well-designed listening environment can greatly enhance the audio experience. Take note of any reflective surfaces, such as large windows or hard walls, which may cause sound distortions. Consider using sound-absorbing materials or strategically placing furniture to improve the sound quality and reduce echoes or unwanted reflections.
Ensure that you have a suitable source device to play the test materials. This could be a Blu-ray player, a gaming console, a media streaming device, or a computer with appropriate audio output capabilities. Make sure the device is connected to your audio receiver or amplifier using an appropriate cable, such as HDMI or optical, to transmit the audio signals.
Lastly, familiarize yourself with the different settings and controls on your audio receiver or amplifier. Understand how to access the speaker calibration menu, adjust volume levels, and control other audio parameters. This knowledge will be essential during the sound test.
By adequately preparing for the 7.1 surround sound test, you can ensure that your system is ready for evaluation and any necessary adjustments. Taking the time to address these preparations will lead to a more accurate and effective testing process.
Step 1: Positioning the Speakers
Proper placement of the speakers in a 7.1 surround sound system is crucial to achieving accurate sound localization and an immersive audio experience. Each speaker has a specific role to play in delivering the audio to the listener, and their positioning impacts the overall soundstage.
Here’s a guide to help you position the speakers in your setup:
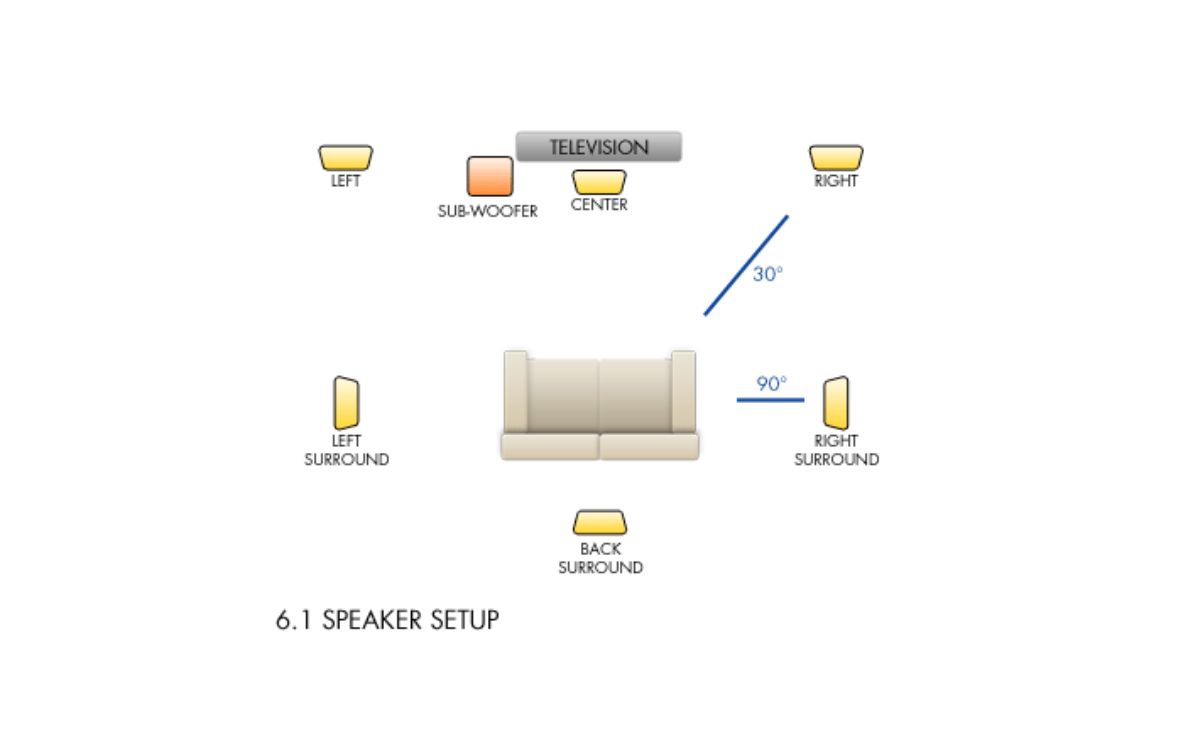
- Front Left, Center, and Right Speakers: These three speakers should be placed in front of the listener. The center speaker should be positioned directly above or below the display screen, while the left and right speakers should be equidistant from the center speaker and slightly angled towards the listener.
- Side Surround Speakers: The two side surround speakers should be placed at or slightly behind the listening area, aimed towards the listener. These speakers provide ambient sounds and background noise to enhance the overall audio immersion.
- Rear Surround Speakers: The two rear surround speakers should be positioned directly behind the listening area, facing forward. They add depth and dimension to the audio experience by providing sound from behind the listener.
- Subwoofer: The low-frequency subwoofer is typically omnidirectional and can be placed anywhere in the room. Experiment with different placements to find the spot that delivers the best bass response and integration with the other speakers.
When positioning the speakers, consider the distance from the listening area. Start by placing the speakers at an equal distance from the listener, forming an equilateral triangle with the center speaker. Adjustments may be necessary based on the specifics of your room and personal preferences.
It’s also important to avoid obstructing the speakers or placing them too close to walls or corners, as this can cause sound reflections and distortions. Experiment with speaker placement and listen for any changes in sound quality or imaging as you fine-tune the position of each speaker.
Remember, achieving optimal speaker positioning may require some trial and error. Take the time to experiment with different placements and listen carefully to the audio output. By positioning the speakers correctly, you can optimize the surround sound experience and ensure accurate sound localization.
Step 2: Adjusting Speaker Levels
Once you have positioned the speakers in your 7.1 surround sound system, the next step is to adjust their levels. Balancing the audio levels ensures that all the speakers contribute equally to the audio experience, creating a seamless and immersive soundstage.
Here’s a guide to help you adjust the speaker levels effectively:
- Access the Speaker Calibration Menu: Use your audio receiver or amplifier’s menu system to access the speaker calibration settings. Look for options like “Speaker Levels” or “Channel Levels.”
- Test Signal: Most receivers come with built-in test signals specifically designed for speaker calibration. These signals typically consist of pink noise or tone sweeps that are played through each speaker individually.
- Starting Point: Begin with the front center speaker. Adjust its level so that it sounds balanced and prominent without overpowering the other speakers. This will serve as the reference point for the rest of the speakers.
- Front Left and Right Speakers: Adjust the levels of the front left and right speakers to match the center speaker. They should contribute equally to the overall audio output, maintaining a cohesive soundstage.
- Side Surround Speakers: Follow the same process for the side surround speakers. Adjust their levels so that they blend well with the front speakers and contribute to the immersive surround sound experience.
- Rear Surround Speakers: Adjust the levels of the rear surround speakers to achieve a balanced sound with the rest of the speakers. These speakers should provide ambient sound and depth without overpowering the front and side speakers.
- Subwoofer: Adjust the level of the subwoofer to achieve a balanced and seamless integration with the other speakers. The bass should enhance the overall audio experience without overwhelming the rest of the sound spectrum.
During the process of adjusting speaker levels, take note of any significant differences in sound output. Listen for any discrepancies in volume or tonality. Make fine adjustments to ensure a consistent and cohesive sound throughout the system.
In some cases, your audio receiver or amplifier may offer automated calibration systems that use a microphone to measure and adjust the speaker levels for you. Follow the instructions provided with your equipment to utilize this feature if available.
Remember that everyone’s preferences may vary, so trust your ears and make adjustments that suit your personal taste. The goal is to create a well-balanced soundstage that immerses you in the audio experience.
With the speakers properly positioned and their levels adjusted, you’re now ready to move on to the next step of the 7.1 surround sound test: choosing the right test materials.
Step 3: Choosing the Right Test Materials
Choosing the right test materials is crucial for conducting a comprehensive 7.1 surround sound test. The test materials should cover a wide range of frequencies, audio effects, and spatial cues to evaluate the performance of your speakers accurately.
Here are some factors to consider when selecting test materials for your surround sound test:
- Frequency Range: Look for test materials that cover the full frequency range of your system, from the low frequencies handled by the subwoofer to the high frequencies reproduced by the main speakers. This will allow you to assess the speaker’s ability to reproduce sounds at different frequency ranges.
- Surround Sound Effects: Opt for test materials that showcase the capabilities of a surround sound system. Look for audio tracks that feature directional effects, panning sounds, and realistic spatial cues. These effects will test the accuracy of sound localization and the immersive qualities of your surround sound setup.
- Dynamic Range: Choose test materials that have a wide dynamic range, ranging from soft whispers to booming explosions. This will help you evaluate how well your speakers handle subtle nuances and deliver impactful, dynamic sound reproduction.
- Audio Formats: Test your surround sound system with various audio formats, such as Dolby Digital, DTS, and even high-resolution audio formats like Dolby TrueHD or DTS-HD Master Audio. This will allow you to assess the compatibility and performance of your system with different audio formats.
- Source Material: Use test materials from different sources, including movies, video games, and music tracks, to evaluate the performance of your surround sound system across various types of content. This will give you a comprehensive assessment of how well your system reproduces different audio sources.
There are several resources available online that provide dedicated surround sound test materials, including audio calibration discs, demo Blu-ray discs, and software applications. These resources often include test tones, sound effects, and audio clips specifically designed for evaluating surround sound systems.
When conducting the test, listen carefully to the test materials and pay attention to any abnormalities, distortions, or imbalances in the sound. Take note of the spatial cues, directionality, and overall audio fidelity. This will help you identify any issues with your speakers or audio setup that need further adjustment or calibration.
Remember that the purpose of the 7.1 surround sound test is to assess the performance of your system and ensure that it is delivering the intended audio experience. By selecting appropriate and diverse test materials, you can gain valuable insights into the capabilities of your surround sound setup.
Now that you have chosen the right test materials, it’s time to move on to the next step: playing the test signals.
Step 4: Playing the Test Signals
Playing the test signals is a crucial step in conducting a thorough 7.1 surround sound test. These audio signals are specifically designed to evaluate the performance of your speakers and assess the accuracy of sound reproduction across different channels.
Here’s how you can play the test signals and analyze the sound output:
- Access Test Signal Options: Refer to your audio receiver or amplifier’s menu system to find the test signal options. Look for settings such as “Test Tones,” “Channel Check,” or “Speaker Test.”
- Select Individual Channel Test: Choose the option that allows you to play test signals for each channel independently. This will enable you to assess the performance of each speaker individually.
- Follow the Sequence: Play the test signal for the front left speaker and listen carefully. Verify if the sound is clear and balanced without any distortion or abnormal tonal qualities. Repeat this process for each channel, including the center, front right, side surround, rear surround, and subwoofer.
- Pay Attention to Sound Localization: During the test, listen for accurate sound localization. The audio should appear to come from the intended direction and create a realistic and immersive soundstage. If you notice any localization issues or imbalances, make note of them for further adjustment.
- Check for Consistency: Ensure that the sound output is consistent across all speakers. There should be a seamless transition from one channel to another, maintaining a cohesive audio experience. If there are any noticeable differences in volume or tonality between channels, adjust the speaker levels accordingly.
- Listen for Surround Effects: Pay attention to the surround sound effects and directional cues in the test signals. The side and rear surround speakers should accurately reproduce sounds that are intended to come from their respective directions, enhancing the immersive qualities of your surround sound system.
As you play the test signals, take note of any irregularities, imbalances, or distortions. Listen for any gaps or inconsistencies in sound quality and imaging. If you identify any issues, revisit the previous steps to ensure proper speaker positioning and level adjustments.
It’s essential to create an environment conducive to critical listening during this step. Minimize distractions, set the volume at a reasonable level, and focus on analyzing the sound output. Consider taking notes to document your observations and any adjustments that you make during the test.
By playing the test signals and carefully analyzing the sound output, you can gain valuable insights into the performance of your surround sound system and identify any areas that need further calibration or adjustment.
Now that you have evaluated the sound output during the test, it’s time to move on to the final step: troubleshooting any surround sound issues.
Step 5: Analyzing the Sound Output
After playing the test signals in your 7.1 surround sound system, it’s time to analyze the sound output and evaluate the overall performance of your setup. This step allows you to identify any issues, make necessary adjustments, and ensure an optimal audio experience.
Here’s how you can effectively analyze the sound output during the surround sound test:
- Listen for Clarity: Pay attention to the clarity of the sound coming from each speaker. Ensure that the dialogue, music, and sound effects are easily distinguishable and free from distortion or muddiness.
- Assess Impact and Dynamics: Evaluate the impact and dynamics of the audio. Explosions, deep basslines, and other dynamic sound effects should be powerful and impactful without overwhelming the rest of the audio spectrum.
- Check Imaging and Soundstage: Pay close attention to the imaging and soundstage. Sounds should appear to come from their intended directions, creating a sense of space and immersion. Verify that the surround speakers are effectively filling the room to enhance the surround sound experience.
- Identify Localization Issues: Listen for any localization issues where the sound appears to be coming from the wrong direction or lacks precision. Note any discrepancies and adjust speaker positioning if necessary.
- Take Note of Imbalances: If you notice any imbalances in volume or tonality between the speakers, make adjustments to the speaker levels accordingly. Aim for a balanced and consistent sound output across all channels.
- Consider Room Acoustics: Keep in mind that room acoustics can have a significant impact on the sound output. If you notice excessive echoes, reverberations, or other room-related issues, consider utilizing sound-absorbing materials or adjusting speaker placement to mitigate these effects.
While analyzing the sound output, don’t hesitate to make further adjustments to optimize the performance of your surround sound system. Fine-tune the speaker levels, experiment with speaker placement, or explore any audio processing options offered by your receiver or amplifier to address any issues you observe.
Throughout the analysis process, trust your ears and rely on your personal judgment. Remember that the ultimate goal is to achieve an immersive and enjoyable audio experience, tailored to your preferences and the capabilities of your surround sound system.
By carefully analyzing the sound output and making necessary adjustments, you can ensure that your 7.1 surround sound system is delivering the best audio quality possible.
After completing the analysis, you should have a clear understanding of your system’s performance. If any persistent issues arise, you may need to further troubleshoot and address any underlying problems within your setup.
Now that you’ve completed the surround sound test and analyzed the sound output, you can confidently enjoy a truly immersive audio experience with your 7.1 surround sound system.
Troubleshooting Surround Sound Issues
Even with the best setup and careful testing, issues may still arise in a 7.1 surround sound system. Fortunately, troubleshooting common issues can help you identify and resolve problems to optimize your audio experience. Here are some common surround sound issues and their potential solutions:
- Imbalanced Sound: If you notice imbalances between speakers, particularly the left and right channels, check the speaker levels and make adjustments accordingly. Ensure that the balance control on your receiver or amplifier is centered to avoid any skewed audio.
- Localization Problems: If sound localization is inaccurate, review the positioning of your speakers. Ensure that they are correctly placed and angled towards the listening area. Make fine adjustments to achieve a more precise sense of directional sound.
- Inconsistent Bass: If the bass response seems inconsistent or lacking, experiment with the subwoofer placement. Moving it to different locations within the room can help optimize the bass performance. You can also adjust the crossover frequency setting on your receiver to ensure a smooth transition between the subwoofer and the main speakers.
- Distorted Sound: Distorted sound can be caused by various factors, such as faulty speaker connections, damaged cables, or incorrect amplifier settings. Double-check all connections and cables, ensuring they are properly connected and in good condition. Verify that the amplifier settings are appropriate for your setup, and make any necessary adjustments.
- Echoes and Reverberations: Excessive echoes and reverberations can negatively impact the sound quality. Consider using sound-absorbing materials, such as acoustic panels or curtains, to reduce reflections in the room. Rearrange furniture or add carpets to help minimize sound reflections from hard surfaces.
- No Sound from Surround Speakers: If you’re experiencing issues with your surround speakers, ensure they are correctly connected to the amplifier or receiver. Check the speaker wires for any signs of damage. Additionally, ensure that the surround sound mode is appropriately selected on your audio device to activate the surround speakers.
If you encounter persistent issues that cannot be resolved through troubleshooting, consider seeking professional assistance. A knowledgeable audio technician or installer can help diagnose and resolve complex issues, ensuring your surround sound system operates optimally.
Remember that patience and persistence are key when troubleshooting surround sound issues. With determination, you can overcome any obstacles and achieve the immersive audio experience that a 7.1 surround sound system promises.
Now that you’re armed with troubleshooting knowledge, you can confidently address any issues that may arise and enjoy a seamless and immersive audio experience with your 7.1 surround sound system.
Conclusion
Congratulations! You have successfully completed the 7.1 surround sound test and now have a better understanding of how to optimize your audio experience. By taking the time to position your speakers correctly, adjust their levels, choose suitable test materials, play the test signals, analyze the sound output, and troubleshoot any issues, you have taken crucial steps towards achieving a truly immersive audio setup.
Surround sound technology has the power to transport you into a world of captivating audio experiences. Whether you’re watching your favorite movies, playing immersive video games, or listening to music, a properly calibrated surround sound system can enhance your enjoyment and provide a new level of immersion.
Remember that the 7.1 surround sound test is an ongoing process. As you acquire new audio content or make changes to your setup, it’s important to revisit the test and make any necessary adjustments to ensure optimal performance.
By following the steps outlined in this guide and trusting your ears, you can fine-tune your surround sound system and achieve the best possible audio quality. Whether you’re an avid movie enthusiast, a passionate gamer, or a music lover, the thrill and realism of a properly calibrated 7.1 surround sound system can elevate every audio experience.
Enjoy the immersive audio journey that awaits you with your 7.1 surround sound system, and may you be captivated by every moment of sound. Happy listening!