Home>Production & Technology>Surround Sound>How To Enable 7.1 Surround Sound
Surround Sound
How To Enable 7.1 Surround Sound
Published: December 23, 2023
Learn how to enable 7.1 surround sound for an immersive audio experience. Enhance your gaming or movie-watching with this surround sound setup.
(Many of the links in this article redirect to a specific reviewed product. Your purchase of these products through affiliate links helps to generate commission for AudioLover.com, at no extra cost. Learn more)
Table of Contents
Introduction
Welcome to the world of immersive sound. Whether you are a gaming enthusiast, a movie buff, or an audiophile, having a surround sound system can drastically enhance your audio experience. And when it comes to surround sound, 7.1 is considered the gold standard.
In this article, we will take a deep dive into 7.1 surround sound and guide you on how to enable it for your audio system. From understanding the basics of 7.1 surround sound to configuring your settings, we will walk you through the entire process. So, buckle up and get ready to immerse yourself in an audio landscape that will bring your entertainment to life.
Before we dive into the technicalities, let’s quickly brush up on the fundamentals of surround sound. Surround sound is a technology that utilizes multiple audio channels to create a more realistic and immersive audio experience. By placing speakers strategically around a listening area, surround sound systems can recreate directional sounds, giving you the feeling of being right in the middle of the action.
When we talk about 7.1 surround sound, we are referring to a system that consists of seven full-range speakers and one subwoofer. These speakers are placed at specific locations, creating an audio environment that captures every nuance and detail of the sound mix. With 7.1 surround sound, you can experience sound coming from all directions – front, back, left, right, and even above you – making it one of the most immersive audio setups available.
Enabling 7.1 surround sound may sound daunting, but fear not! We will guide you through the process step by step. From checking your audio system’s compatibility to configuring the audio settings, we will ensure that you have all the information you need to enjoy the ultimate audio experience.
Understanding 7.1 Surround Sound
Before we delve into the technical process of enabling 7.1 surround sound, it’s important to have a solid understanding of how this audio setup works. By comprehending the basics, you’ll be better equipped to optimize your system for the best possible sound experience.
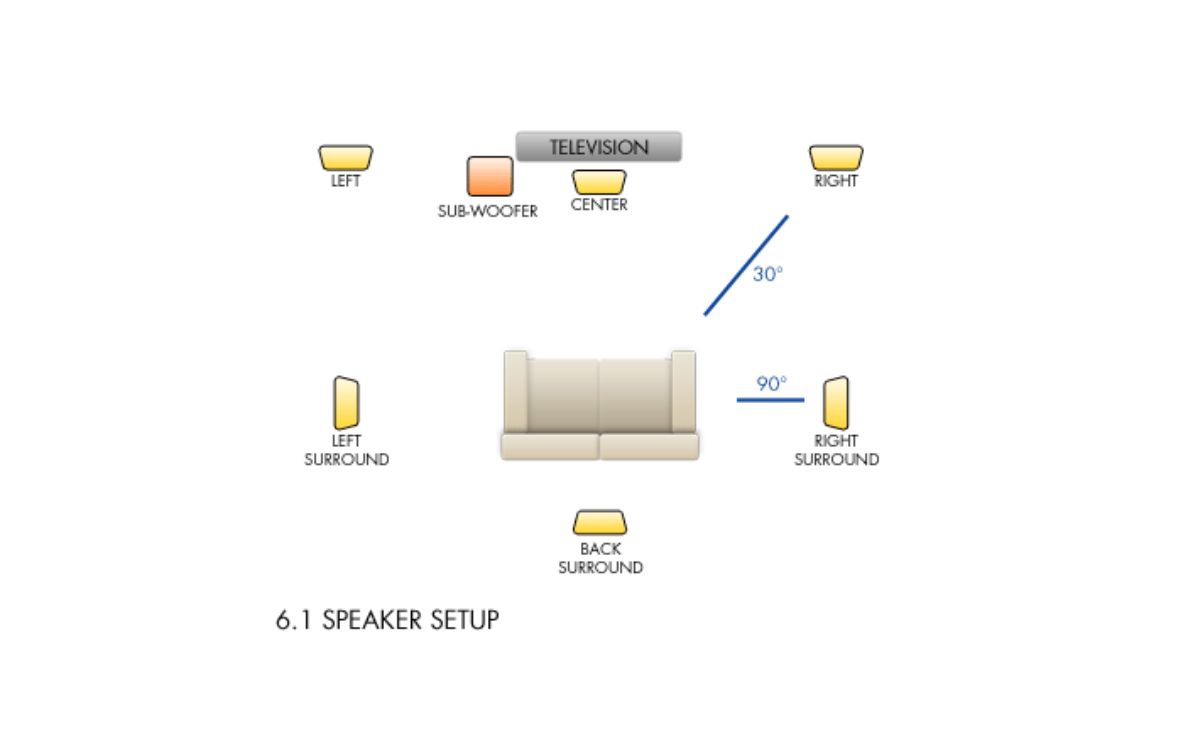
As mentioned earlier, 7.1 surround sound consists of seven full-range speakers and one subwoofer. The seven speakers are divided into three fronts, two sides, two rears, and one subwoofer. The three front speakers, typically located in the front center and left and right positions, are responsible for delivering dialogue and other focused sounds.
The two side speakers are positioned to the sides of the listening area, creating a broader stereo soundstage and encompassing you in the audio environment. The two rear speakers add depth and immersion by reproducing sounds from behind you, providing a more realistic and enveloping experience.
The final component of a 7.1 surround sound system is the subwoofer. This specialized speaker is dedicated to reproducing low-frequency sounds, such as deep bass and rumbling explosions, to add impact and depth to the audio experience.
The 7.1 setup creates a more accurate representation of sound compared to lower channel configurations. The additional rear speakers enhance the sense of spatial awareness, allowing you to pinpoint sounds coming from different directions. This added immersion makes it a popular choice for home theaters, gaming setups, and dedicated audio enthusiasts.
It’s important to note that in order to fully experience 7.1 surround sound, you’ll require audio content that is encoded in a compatible format. Movies, games, and music that are specifically mixed for 7.1 surround sound will provide the most immersive experience.
Now that you have a better understanding of the components and benefits of 7.1 surround sound, let’s move on to the next step: checking the compatibility of your audio system.
Requirements for Enabling 7.1 Surround Sound
Before you can enjoy the immersive audio experience of 7.1 surround sound, it’s important to ensure that your audio system meets the necessary requirements. Here are the key elements you’ll need:
- Audio Source: You’ll need audio content, such as movies or games, that are encoded in 7.1 surround sound. It’s important to check if your preferred platforms or devices support this audio format.
- AV Receiver: An AV (audio/video) receiver is the heart of your surround sound system. Make sure your AV receiver supports 7.1 channel output. It should have adequate HDMI inputs and be able to decode the audio format you’re using.
- Surround Sound Speakers: You’ll need a total of seven full-range speakers and one subwoofer to create a 7.1 setup. Ensure that your speakers are positioned correctly for optimal sound distribution.
- Speaker Cables: High-quality speaker cables are essential for transmitting audio signals from your AV receiver to the speakers. Make sure you have the appropriate lengths and gauge of cables for your setup.
- HDMI Cables: HDMI cables are used to connect your audio source devices, such as Blu-ray players or gaming consoles, to your AV receiver. Ensure you have HDMI cables that support the required bandwidth and are of good quality.
In addition to these hardware requirements, it’s also important to consider the layout and acoustics of your listening space. Ideally, your listening area should be optimized for sound, with minimal echo and proper placement of speakers for an immersive experience.
Lastly, it’s worth mentioning that not all audio systems or devices support 7.1 surround sound. It’s essential to verify the capabilities of your specific equipment and ensure compatibility before attempting to enable 7.1 surround sound.
Once you have gathered the necessary components and confirmed compatibility, you’re ready to move on to configuring your audio settings to enable 7.1 surround sound. In the next section, we’ll guide you through this process step by step.
Checking Audio System Compatibility
Before you can enable 7.1 surround sound, it’s crucial to check the compatibility of your audio system. This will ensure that all your equipment can support the desired audio configuration. Here are the steps to follow:
- Check AV Receiver Specifications: Begin by reviewing the specifications of your AV receiver. Look for information on the number of channels it supports, specifically checking if it can handle 7.1 surround sound. If your AV receiver doesn’t have enough channels, you may need to upgrade to a compatible one.
- Verify Speaker Setup: Ensure that your speaker setup aligns with a 7.1 configuration. If you already have a surround sound system, count the number of speakers you have. Verify if it includes the necessary seven full-range speakers and one subwoofer. If you’re setting up a new system, ensure that you purchase the appropriate speakers for a 7.1 setup.
- Review Audio Source Compatibility: Confirm that the sources you plan to use—such as Blu-ray players, gaming consoles, or streaming devices—are capable of outputting 7.1 surround sound. Check the specifications of these devices or refer to their user manuals to ensure compatibility.
- Assess HDMI Support: Check if both your AV receiver and audio source devices support HDMI connections. HDMI is the preferred method for transmitting high-quality audio signals from your source to the receiver. Verify that your devices have HDMI inputs and outputs capable of handling the bandwidth required for 7.1 surround sound.
- Investigate Audio Settings: Dive into the audio settings of your AV receiver and source devices. Look for options related to speaker configuration and audio output. Ensure that you can select a 7.1 setup and that the audio format you desire is available. If necessary, consult the user manuals of your devices for guidance on accessing and adjusting these settings.
By thoroughly checking the compatibility of your audio system, you can avoid any potential roadblocks and ensure that your equipment is capable of delivering immersive 7.1 surround sound. If you discover any limitations or incompatibilities, you may need to make adjustments or upgrades to fully enable 7.1 surround sound.
Once you have confirmed compatibility, it’s time to move on to configuring the audio settings to enable 7.1 surround sound. In the next section, we will guide you through the necessary steps to optimize your system for the best audio experience.
Configuring Audio Settings for 7.1 Surround Sound
Now that you have ensured the compatibility of your audio system, it’s time to configure the necessary audio settings to enable 7.1 surround sound. Here is a step-by-step guide to help you with the configuration process:
- Connect Your Devices: Start by connecting your audio source devices, such as Blu-ray players or gaming consoles, to your AV receiver using HDMI cables. Ensure that the cables are securely plugged into the corresponding HDMI inputs and outputs.
- Access AV Receiver Settings: Use your AV receiver’s remote control or front panel display to access the settings menu. Look for options related to speaker configuration, audio output, or surround sound settings. Different receiver models may have varying menu layouts, so consult your device’s user manual if you encounter difficulties.
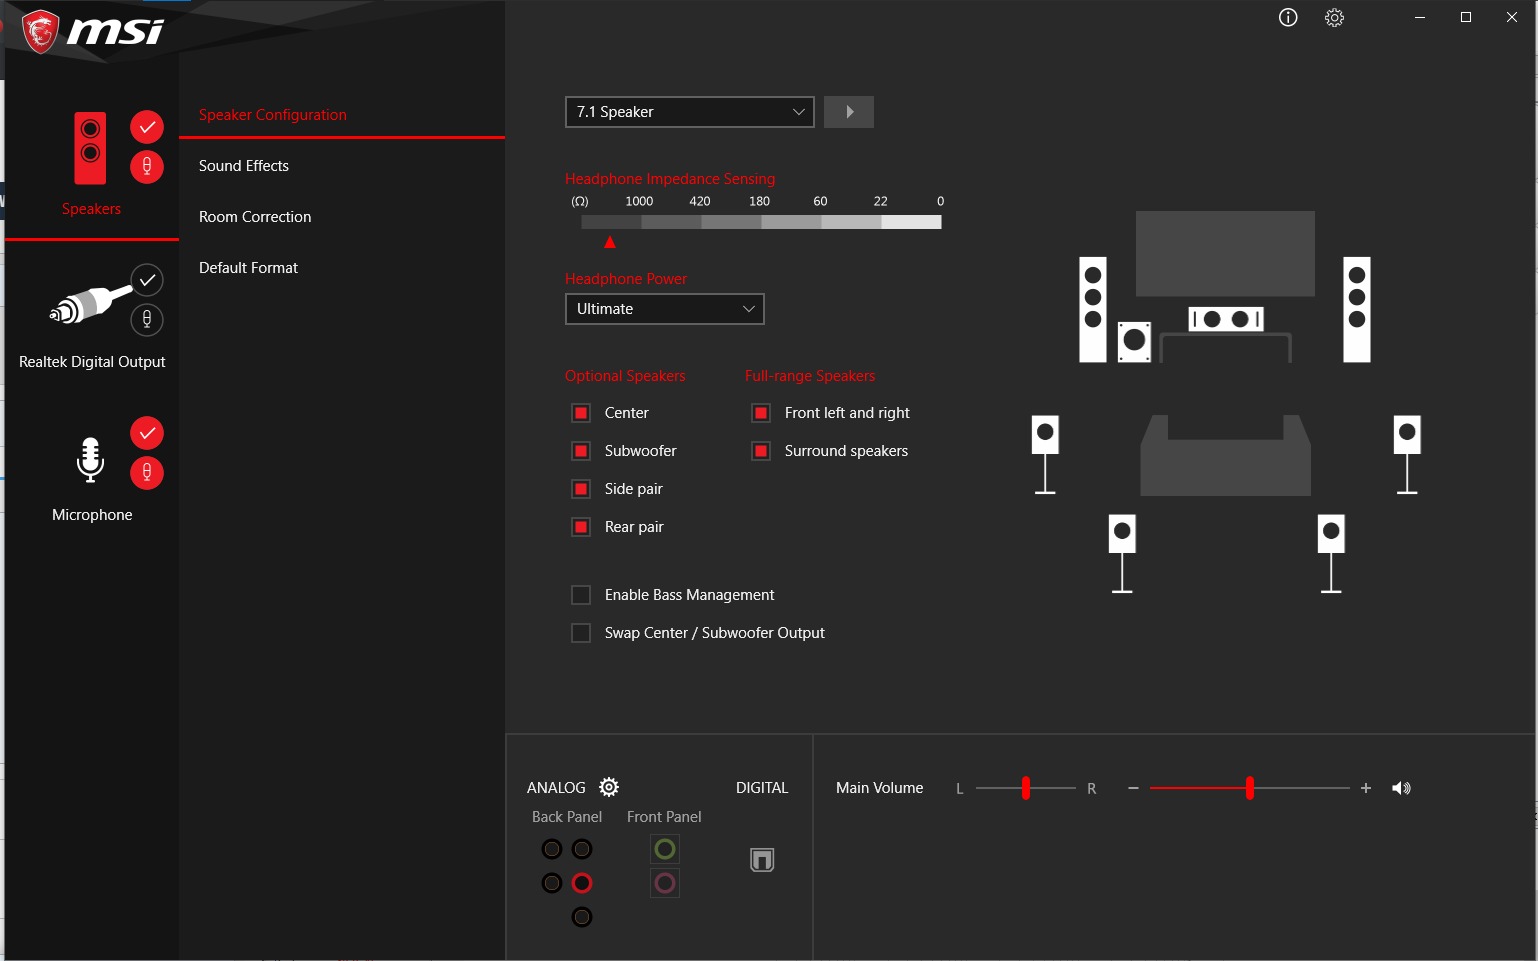
- Select Speaker Configuration: Within the AV receiver settings, navigate to the speaker configuration section. Select the option for a 7.1 speaker setup. This will inform the receiver of the specific speaker placement and configuration.
- Adjust Speaker Levels: After selecting the 7.1 speaker configuration, proceed to adjust the relative levels of each speaker. This ensures that the sound output is balanced and optimized for your listening area. Most AV receivers provide a built-in test tone generator to assist you in this process. Follow the instructions displayed on your receiver’s screen to adjust each speaker’s level accordingly.
- Choose Audio Format: In the audio output settings, select the desired audio format. This may include options like Dolby TrueHD, DTS-HD Master Audio, or other lossless surround sound formats. Choose the format that corresponds to the content you will be playing and that is supported by your audio source device.
- Configure Speaker Distance: Some AV receivers allow you to input the distances between each speaker and your primary listening position. This information helps the receiver optimize the audio output for the specific acoustics of your room. Follow the on-screen instructions to enter the appropriate distances.
- Test and Fine-Tune: Once you have configured the audio settings, it’s time to test your setup. Play a movie or audio clip that features 7.1 surround sound and assess the sound output from each speaker. Adjust individual speaker levels or make small tweaks to the settings to achieve the desired listening experience. Remember, personal preference plays a significant role here, so feel free to experiment until you are satisfied.
By following these steps, you will be able to configure your audio settings to enable 7.1 surround sound. Remember to consult your AV receiver’s user manual and explore the specific features and options available on your device to make the most out of your surround sound system.
Now that you have successfully set up and configured your audio system for 7.1 surround sound, it’s important to be aware of common issues that may arise. In the next section, we will discuss some troubleshooting tips to help you overcome any potential challenges.
Troubleshooting Common Issues
While setting up and configuring 7.1 surround sound, you may encounter some common issues. Don’t worry—these can often be resolved with simple troubleshooting steps. Here are a few tips to help you overcome common challenges:
- No Sound from Rear Speakers: If you aren’t hearing any sound from your rear speakers, ensure that they are properly connected to the AV receiver. Check the speaker wires and connections to ensure they are secure. Additionally, verify that you have selected the correct speaker configuration in your receiver’s settings.
- Inconsistent Sound Levels: If you notice inconsistencies in sound levels among your speakers, use your AV receiver’s built-in test tone generator to adjust the speaker levels. The test tone will help you balance the audio output from each speaker. Additionally, check for any volume level adjustments specific to individual speakers in your receiver’s settings.
- No Audio or Low Volume: If you’re experiencing no audio or low volume, confirm that all devices in your audio setup—such as your audio source, AV receiver, and speakers—are powered on and connected properly. Check the audio output settings on your source device and receiver to ensure they are properly configured for 7.1 surround sound. Additionally, check your receiver’s volume settings and adjust them accordingly.
- Audio Dropout: If you encounter brief interruptions or audio dropouts, check for any loose connections in your audio setup. Ensure that all cables, including HDMI and speaker wires, are securely plugged in. If the issue persists, try using different cables or testing the affected components individually to identify the source of the problem.
- Unsupported Audio Format: If you’re unable to select or play certain audio formats, such as Dolby TrueHD or DTS-HD Master Audio, ensure that the audio source device is capable of decoding and outputting those formats. Verify that the format is supported by both your source device and AV receiver. It’s also worth checking for any firmware updates for your devices that may add support for additional audio formats.
Remember, troubleshooting steps may vary depending on your specific equipment and audio setup. Refer to the user manuals of your devices for more detailed troubleshooting instructions or consult the customer support of your device manufacturers for further assistance.
By addressing these common issues, you can optimize your 7.1 surround sound experience and enjoy immersive audio without any disruptions. Now, let’s wrap things up in the concluding section.
Conclusion
Congratulations! You have successfully learned about and enabled 7.1 surround sound for your audio system. By understanding the fundamentals, checking compatibility, configuring settings, and troubleshooting common issues, you have taken important steps towards achieving an immersive audio experience.
7.1 surround sound creates a captivating audio environment that brings movies, games, and music to life. With seven full-range speakers and a subwoofer strategically placed around your listening area, you can enjoy spatially accurate and immersive sound from all directions.
Remember to ensure the compatibility of your audio system, including your AV receiver, speakers, and audio source devices. Verify that they can support 7.1 surround sound and have the necessary connections and settings to enable it.
Proper configuration of your audio settings, including speaker setup, audio format selection, and calibration of speaker levels, is crucial for optimal sound performance. Don’t forget to indulge in some audio testing and fine-tuning to achieve the desired listening experience.
In case you encounter any issues along the way, such as no sound from rear speakers or inconsistent sound levels, utilize troubleshooting steps like verifying connections, adjusting settings, and checking for firmware updates to resolve them.
Now, sit back, relax, and immerse yourself in the breathtaking audio experience that 7.1 surround sound offers. Whether you’re watching a thrilling movie, engaging in intense gaming sessions, or enjoying your favorite music, the enveloping sound will transport you to another dimension.
Thank you for joining us on this journey to enable 7.1 surround sound. We hope this guide has been informative and helpful. Remember, tweaking and personalizing your audio setup is part of the fun, so don’t be afraid to experiment and make adjustments to suit your preferences. Enjoy the incredible soundscapes that await you!