Home>Production & Technology>Surround Sound>How To Test My 5.1 Surround Sound
Surround Sound
How To Test My 5.1 Surround Sound
Modified: February 18, 2024
Learn how to test your 5.1 surround sound system and ensure optimal audio quality. Understand the importance of surround sound calibration for an immersive home theater experience.
(Many of the links in this article redirect to a specific reviewed product. Your purchase of these products through affiliate links helps to generate commission for AudioLover.com, at no extra cost. Learn more)
Table of Contents
Introduction
Welcome to the world of immersive audio experience – the 5.1 Surround Sound. Whether you’re a movie enthusiast, a gaming aficionado, or simply a music lover, having a 5.1 Surround Sound system can elevate your audio enjoyment to a whole new level. But how do you know if your surround sound system is working optimally? How do you test and ensure that the speakers are correctly set up and delivering the desired audio experience?
In this article, we will guide you through the process of testing your 5.1 Surround Sound system. From understanding the basics of surround sound technology to checking speaker connections, adjusting audio settings, and conducting speaker tests, we will cover all the essential steps to help you achieve the best possible sound quality from your system.
So, if you’re ready to dive into the world of immersive audio, let’s get started and learn how to test your 5.1 Surround Sound system.
Understanding 5.1 Surround Sound
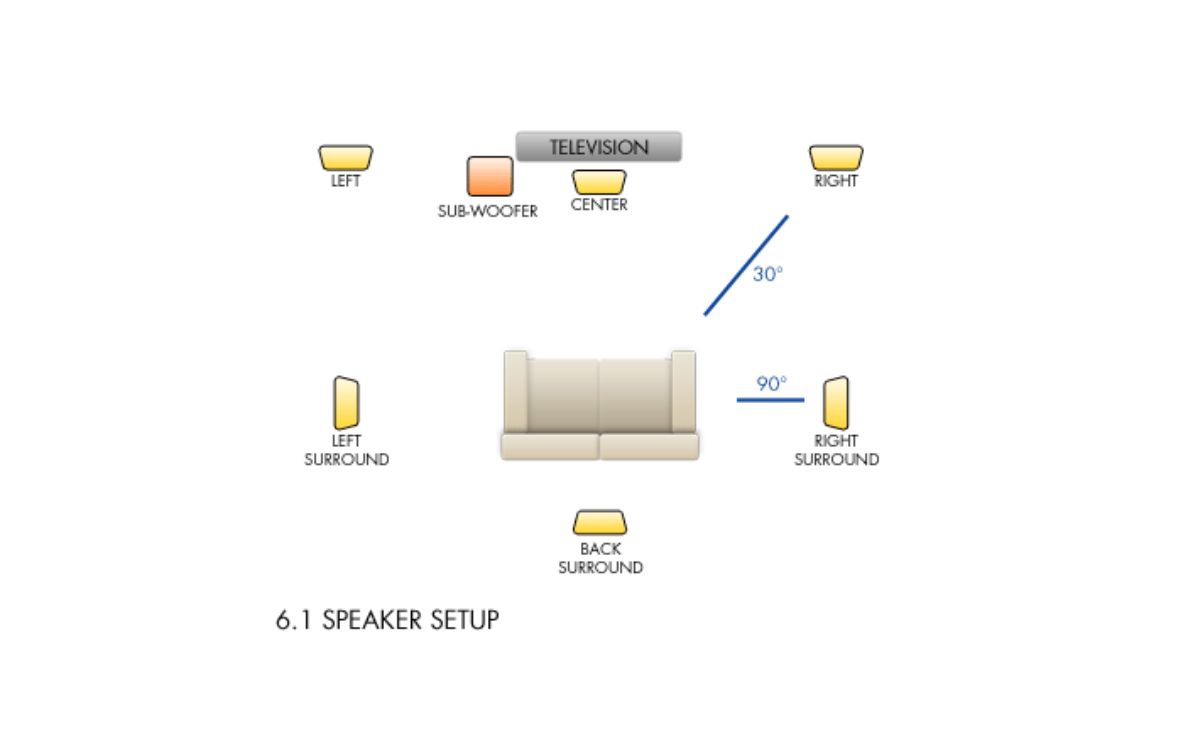
To fully appreciate the testing process, it’s important to have a basic understanding of what exactly 5.1 Surround Sound entails. The “5.1” in the term refers to the number of audio channels that make up the system. It consists of five primary speakers: front left, front right, center, rear left, and rear right, along with a dedicated subwoofer.
Each speaker serves a specific purpose in creating a surround sound experience. The front left and front right speakers provide the main audio output, delivering the majority of the sound. The center speaker is responsible for dialogues and vocals, ensuring clear and crisp dialogue reproduction. The rear left and rear right speakers create a sense of immersion and depth by producing background sounds, ambient noise, and special effects.
The subwoofer, on the other hand, focuses on low-frequency sounds, delivering deep and powerful bass. It adds richness and impact to explosions, rumbling engines, and other low-end audio effects, enhancing the overall audio experience.
Together, these speakers work harmoniously to create a surround sound environment where sounds can be placed accurately all around the listener, providing a more realistic and immersive audio experience.
Now that you have a solid understanding of what 5.1 Surround Sound entails, let’s move on to the practical aspect of setting up and testing your system.
Setting up Your 5.1 Surround Sound System
Before you can start testing your 5.1 Surround Sound system, you need to ensure that it is properly set up. Here are the steps to follow:
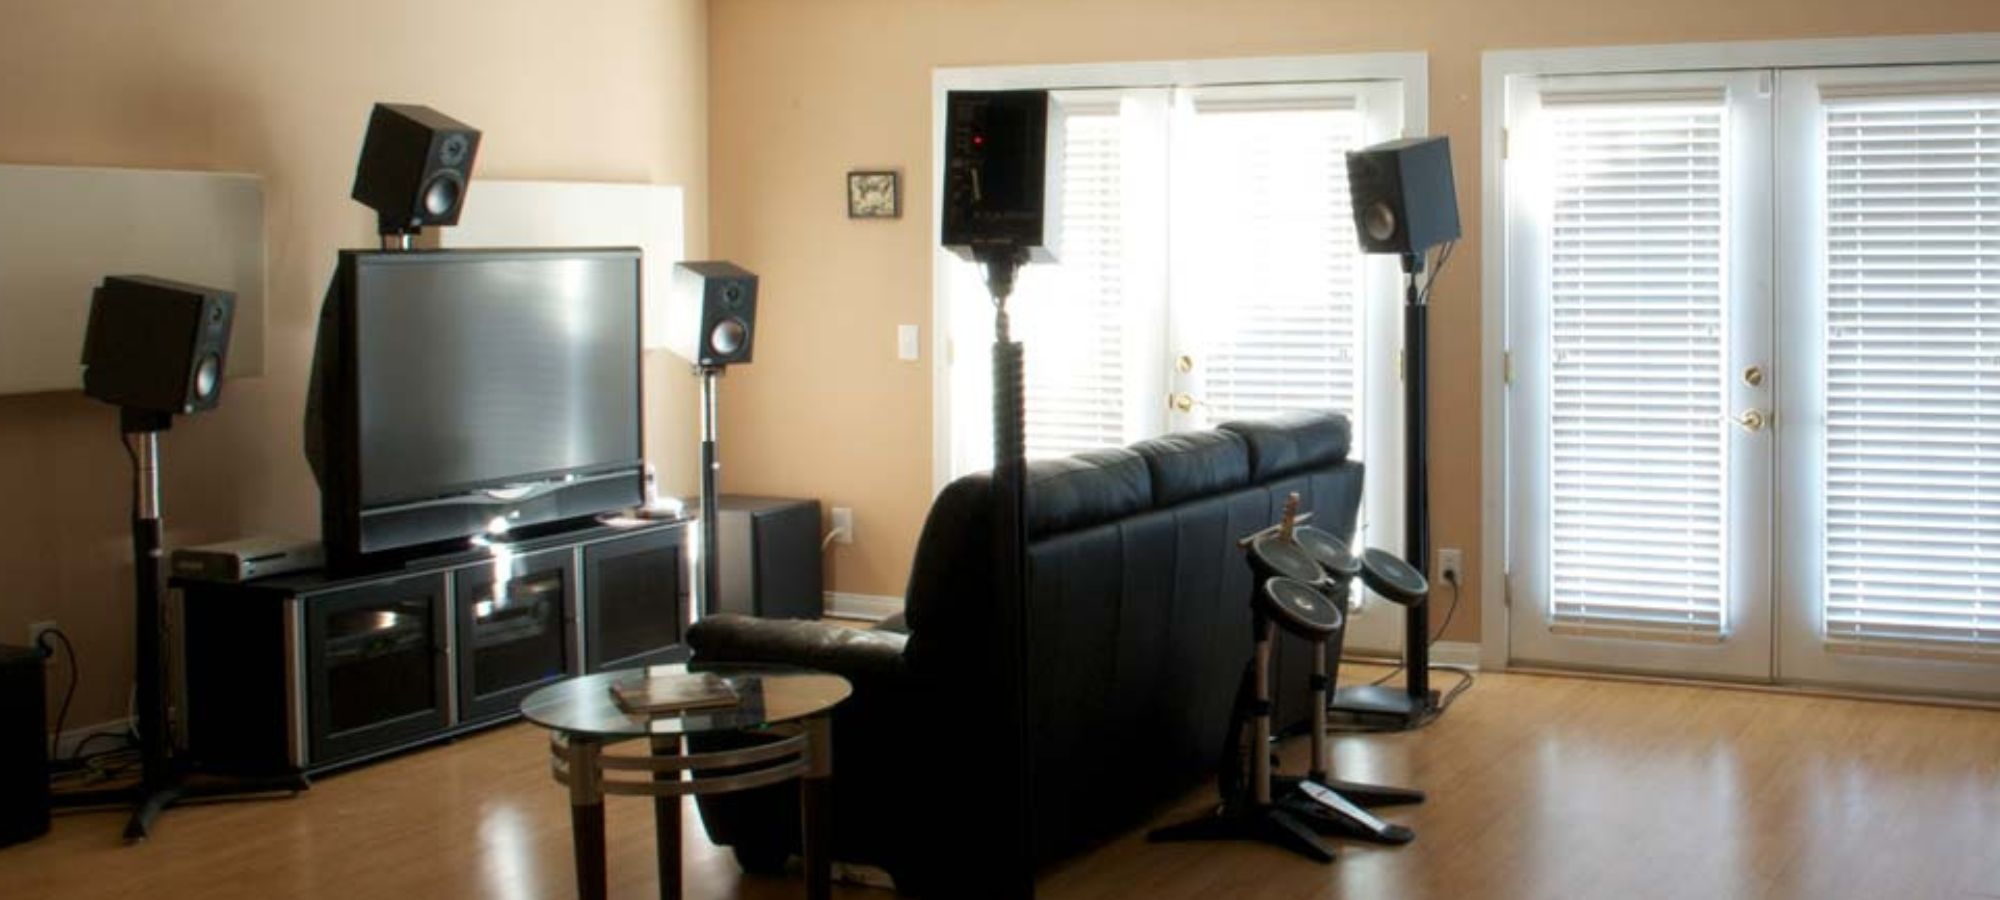
- Choose the right location: Find an appropriate location in your room to position the speakers. The front left and right speakers should be placed equidistant from the television or projector screen, forming an angle of approximately 45 degrees with the central listening position. The center speaker should be placed just above or below the screen, facing directly towards the listener. The rear left and right speakers should be positioned to the sides or slightly behind the listening area. The subwoofer can be placed anywhere in the room, as its low-frequency sounds are non-directional.
- Connect the speakers: Use the appropriate audio cables to connect each speaker to the corresponding output on the amplifier or AV receiver. Ensure that the connections are secure and properly matched (e.g., red to red, black to black).
- Position the subwoofer: If your subwoofer is passive (requires external amplification), connect it to the amplifier or receiver using an appropriate subwoofer cable. If it is an active subwoofer (has built-in amplification), connect it to the power source and the subwoofer output on the amplifier or receiver. Experiment with different subwoofer locations in the room to find the position that produces the best bass response.
- Connect the audio sources: Connect the audio sources, such as a Blu-ray player, gaming console, or media streaming device, to the input ports on the amplifier or receiver. Use HDMI, optical, coaxial, or analog cables depending on the available options.
- Configure the amplifier or receiver: Access the settings menu on your amplifier or receiver to configure it for a 5.1 Surround Sound setup. Ensure that the audio output is set to “5.1” or “Surround Sound.” Adjust any other relevant settings, such as crossover frequencies, speaker distances, and channel levels, to optimize the audio performance.
Once you have completed these setup steps, you are ready to move on to the speaker testing phase. In the next sections, we will guide you through the process of checking speaker connections, adjusting audio settings, and conducting specific speaker tests to ensure that your 5.1 Surround Sound system is working flawlessly.
Checking Speaker Connections
Ensuring that the speaker connections are secure and properly set up is crucial for the optimal performance of your 5.1 Surround Sound system. Here’s how to check the speaker connections:
- Visual inspection: Start by visually inspecting each speaker connection. Ensure that all cables are properly plugged into their corresponding speaker terminals and that there are no loose connections.
- Audio test signal: Many AV receivers or amplifiers have a built-in audio test signal that can help you identify issues with speaker connections. Access the audio test signal from the settings menu of your device.
- Speaker balance test: Play the audio test signal and adjust the speaker balance settings on your amplifier or receiver. This will allow you to isolate and test each individual speaker channel. Ensure that the audio is coming from the correct speaker location (front left, front right, center, rear left, rear right, or subwoofer).
- Volume level test: Adjust the volume level for each speaker channel to make sure they are balanced. You should hear an equal volume from each speaker when playing the audio test signal.
If you notice any issues during the speaker connection check, make sure to recheck the cables and connections and ensure they are properly connected. If necessary, replace any faulty cables or connectors. It’s also a good idea to refer to the user manual for your specific amplifier or receiver for any troubleshooting steps related to speaker connections.
Once you have verified that all speaker connections are secure and working properly, you can proceed to adjust the audio settings in order to optimize the performance of your 5.1 Surround Sound system.
Adjusting Audio Settings
To achieve the best sound quality and ensure an immersive audio experience, it is important to properly adjust the audio settings of your 5.1 Surround Sound system. Here are the essential audio settings to consider:
- Crossover frequency: The crossover frequency determines the point at which low-frequency sounds are redirected from the main speakers to the subwoofer. Adjust the crossover frequency setting in your amplifier or receiver to find the optimal balance between the main speakers and the subwoofer. This will help avoid overlapping frequencies and deliver a cleaner and more balanced sound.
- Speaker distance: The speaker distance setting allows you to define the physical distance between each speaker and your listening position. Input the accurate distance information for each speaker in your amplifier or receiver to ensure that audio delays are correctly compensated. This will result in better sound synchronization and a more coherent surround sound experience.
- Channel levels: Adjusting the channel levels involves fine-tuning the individual volume levels of each speaker to achieve a well-balanced soundstage. Use a test tone or audio calibration system, if available, to help you set the levels correctly. Listen for a seamless, harmonious blend of all the speakers, without any one overpowering the others.
- Room correction: Many modern amplifiers or receivers offer room correction features that automatically adjust audio settings to optimize sound quality based on your room’s acoustics. Use the built-in room correction functionality, if available, to further enhance the audio performance of your 5.1 Surround Sound system. Follow the instructions provided by the manufacturer to properly calibrate the system with the help of a microphone and the room correction software.
- Sound modes: Experiment with different sound modes on your amplifier or receiver to find the one that suits your preferences and the content you are consuming. Whether it’s a movie, music, or gaming, the sound modes can enhance specific audio elements and provide a more immersive experience. Choose modes that simulate virtual surround sound or enhance the bass response based on your preferences.
Take the time to explore and adjust these audio settings to match your listening environment and personal preferences. Each adjustment will bring you a step closer to achieving the optimal sound quality from your 5.1 Surround Sound system.
Now that you have set up and adjusted the audio settings, it’s time to proceed with testing the individual speakers in your system to ensure they are functioning correctly. We will cover the testing process for each speaker in the following sections.
Testing the Front Left and Right Speakers
The front left and right speakers are the main sources of audio in your 5.1 Surround Sound system. They handle most of the sound content, including dialogue, music, and sound effects. Testing these speakers will help ensure proper positioning and optimal sound performance. Here’s how you can test them:
- Playing stereo content: Start by playing stereo content, such as music or a stereo audio track. Position yourself in the central listening area and pay close attention to the sound coming from the front left and right speakers. The audio should be well-balanced and immersive, with clear vocals and instruments properly separated.
- Panning test: Find a panning audio test track that moves sound from the left to the right speaker and vice versa. Listen carefully as the sound travels between the front left and right speakers. The movement should be smooth and consistent, with no distortions or dropouts. This will ensure that the speakers are properly positioned and that there is no audio imbalance.
- Channel test: Use a channel test track that plays audio individually through each speaker. Listen specifically to the front left and right speakers, making sure that the audio is crisp, clear, and accurately positioned. If there are any issues, such as low volume, distortion, or missing audio, check the connections and adjust the speaker levels in your amplifier or receiver settings.
By thoroughly testing the front left and right speakers, you can ensure that they are correctly positioned, properly connected, and delivering the desired audio performance. Once you are satisfied with the results, you can proceed to test the center speaker, which plays a vital role in dialogue reproduction.
Testing the Center Speaker
The center speaker in a 5.1 Surround Sound system is responsible for reproducing dialogue and vocals, making it a crucial component for a balanced and immersive audio experience. Testing the center speaker will help ensure that it is functioning properly and accurately reproducing sound. Here’s how you can test it:
- Dialogues and vocals: Play content that contains dialogues or vocals, such as a movie or TV show. Focus on the center speaker and listen for clear and intelligible speech. Dialogues should be well-balanced and easily distinguishable, without any muffled or distorted sound.
- Panning test: Use a panning audio test track that moves sound from the left or right speaker to the center speaker. Pay attention to how the sound transitions from the left or right to the center and ensure that there are no sudden drops or inconsistencies. The transition should feel smooth and seamless, enhancing the overall surround sound experience.
- Channel test: Use a channel test track that plays audio specifically through the center speaker. This will allow you to isolate and focus on the performance of the center speaker. Listen for any anomalies, such as low volume, distortion, or lack of clarity. Adjust the speaker level in your amplifier or receiver settings if necessary.
By testing the center speaker, you can ensure that it accurately reproduces dialogues and vocals, creating a realistic and immersive audio experience. If you encounter any issues during the testing process, check the connections and adjust the speaker level settings to optimize the performance of the center speaker.
With the center speaker successfully tested, it’s time to move on to testing the rear left and right speakers, which play a crucial role in creating a sense of depth and immersion in surround sound setups.
Testing the Rear Left and Right Speakers
The rear left and right speakers in a 5.1 Surround Sound system are responsible for creating a sense of depth and immersiveness by reproducing ambient sounds, background effects, and surround audio. Testing these speakers will help ensure their proper positioning and optimal performance. Here’s how you can test them:
- Ambient sound test: Play content that contains ambient sounds, such as a nature documentary or a scene with background noise. Position yourself in the central listening area and focus on the rear left and right speakers. The ambient sounds should feel immersive, as if they are coming from behind you, creating a realistic and enveloping audio experience.
- Sound localization: Use audio tracks specifically designed for sound localization, where sounds move around the listener. Listen carefully as the sound travels from one side to the other and behind you. The rear left and right speakers should accurately reproduce the sounds, creating a seamless and immersive soundstage.
- Channel test: Similar to the previous speaker tests, use specific channel test tracks that play audio individually through the rear left and right speakers. Listen for any anomalies, such as distortion, low volume, or missing audio. If necessary, adjust the speaker levels in your amplifier or receiver settings to ensure a balanced and cohesive surround sound experience.
By meticulously testing the rear left and right speakers, you can confirm that they are positioned correctly and accurately reproducing surround audio, enhancing the overall immersion and depth of your audio setup. If any issues arise during the testing process, review the connections and adjust the speaker levels as needed.
With the rear left and right speakers successfully tested, it’s time to focus on the subwoofer, which adds depth and impact to low-frequency sounds in your surround sound system.
Testing the Subwoofer
The subwoofer in a 5.1 Surround Sound system plays a crucial role in delivering powerful and impactful low-frequency sounds. Testing the subwoofer will help ensure that it is properly connected and producing deep bass that enhances the overall audio experience. Here’s how you can test it:
- Bass-heavy content: Play content that contains prominent low-frequency sounds, such as a bass-heavy music track or a movie scene with rumbling explosions. Listen for the deep bass response coming from the subwoofer. The bass should be rich, full-bodied, and well-integrated with the rest of the audio, without overpowering or distorting the other frequencies.
- Low-frequency effects: Utilize dedicated low-frequency effect (LFE) test tracks or movie scenes with intense and dynamic action sequences. Pay attention to how the subwoofer handles explosive impacts, rumbling engines, or thunderous sound effects. The subwoofer should deliver a deep, rumbling bass that adds a realistic and immersive element to the audio.
- Balance with other speakers: Ensure that the subwoofer’s bass output is balanced with the rest of the speakers in your system. Adjust the subwoofer level in your amplifier or receiver settings to achieve a seamless and cohesive soundstage, where the bass blends harmoniously with the other speakers.
- Frequency response: If available, use a frequency response test to measure and analyze the subwoofer’s performance across various frequencies. Aim for a flat and consistent response, without any significant dips or peaks, to ensure accurate bass reproduction.
By thoroughly testing the subwoofer, you can confirm that it is producing the desired deep bass and harmonizing with the rest of your 5.1 Surround Sound system. Adjust the subwoofer level and settings as necessary to achieve the optimal balance and impact.
With all the speakers tested, it’s time to finalize the sound check and ensure that your 5.1 Surround Sound system is delivering the best audio performance possible.
Finalizing Sound Check
After testing each individual speaker and verifying their performance, it’s time to finalize the sound check for your 5.1 Surround Sound system. Here are the last steps to ensure optimal audio performance:
- Overall balance: Listen to various audio content, including movies, music, and games, to assess the overall balance of your surround sound system. Pay attention to the dialogue clarity, immersive surround effects, and the impact of low-frequency sounds. Adjust the volume levels of individual speakers if needed to achieve a harmonious balance throughout.
- Room acoustics: Consider the specific acoustics of your room and make any necessary adjustments to optimize sound quality. Experiment with speaker placement, use acoustic treatment like curtains or rugs to reduce echo or reflections, and tweak the room equalization settings on your amplifier or receiver if available.
- Fine-tuning: Fine-tune the settings on your amplifier or receiver based on your personal preferences. Experiment with sound modes, equalizer settings, or other audio enhancement features to find the combination that suits your listening tastes and the content you enjoy.
- Revisit the tests: Periodically revisit the individual speaker tests to ensure that the speakers are still performing optimally. Over time, cables may become loose or speakers may require recalibration. Regularly checking and maintaining your surround sound system will help ensure long-lasting audio enjoyment.
By finalizing the sound check, you can have confidence that your 5.1 Surround Sound system is delivering the best audio experience possible. Remember to periodically check and fine-tune your system to keep it performing at its peak.
Congratulations! You have successfully tested and optimized your 5.1 Surround Sound system. Now, immerse yourself in the full audio experience and enjoy your favorite movies, music, and games with enhanced audio quality and immersive surround sound.
Conclusion
Testing your 5.1 Surround Sound system is essential to ensure that it is functioning optimally and delivering an immersive audio experience. By understanding the basics of surround sound technology, setting up the system correctly, and checking speaker connections, you lay the foundation for a successful sound check.
Adjusting audio settings, testing each speaker individually, and fine-tuning the system are critical steps in optimizing the sound performance. Testing the front left and right speakers ensures the balance of audio, while the center speaker focuses on clear dialogues and vocals. The rear left and right speakers enhance the depth and immersion of surround sound, and the subwoofer adds powerful low-frequency impact.
Throughout the sound check process, it’s important to listen for a balanced soundstage, accurate positioning of sounds, and harmonious integration of all speakers. Additionally, considering room acoustics and personal preferences for sound customization further enhances the audio experience.
Regularly revisiting the tests and maintaining your surround sound system will ensure long-term satisfaction and optimal audio performance.
With your sound check complete, you can now sit back, relax, and immerse yourself in the world of rich, immersive audio that a 5.1 Surround Sound system provides. Enjoy an enhanced audio experience with movies, music, and games, as every detail comes to life, surrounding you with captivating sound.