Home>Devices & Equipment>Subwoofer>How Do You Connect A Subwoofer
Subwoofer
How Do You Connect A Subwoofer
Published: January 22, 2024
Learn how to connect a subwoofer to your audio system and enhance your listening experience with our step-by-step guide. Discover the best way to optimize the bass with ease.
(Many of the links in this article redirect to a specific reviewed product. Your purchase of these products through affiliate links helps to generate commission for AudioLover.com, at no extra cost. Learn more)
Table of Contents
Introduction
Subwoofers play a crucial role in enhancing the audio experience by delivering deep and powerful bass. Whether you are a music enthusiast, a movie lover, or a gamer, a subwoofer can take your audio setup to the next level. However, connecting a subwoofer to your audio system may seem like a daunting task, especially if you are not familiar with the different types of connections available.
In this article, we will walk you through the process of connecting a subwoofer, exploring the various connection methods, and providing tips and troubleshooting advice along the way. By the end, you will have a better understanding of how to connect a subwoofer and make the most out of your audio setup.
Before we dive into the details, let’s briefly discuss what a subwoofer is and why it is an essential component of any audio system.
Understanding Subwoofers
A subwoofer is a specialized speaker designed to reproduce low-frequency sounds, primarily bass. Unlike regular speakers that focus on mid-range and high frequencies, subwoofers are dedicated to delivering deep, rumbling bass that can be felt as much as it is heard. These low-frequency sounds add a sense of depth, richness, and impact to music, movies, and games, providing a more immersive and captivating audio experience.
Subwoofers come in various sizes, from compact models to large, floor-standing units. They are typically powered by an internal amplifier to handle the demanding power requirements of low-frequency reproduction. Some subwoofers even feature advanced technologies like bass reflex ports or built-in equalizers to further enhance the bass response.
Now that we have a basic understanding of subwoofers and their importance, let’s explore the different types of connections you can use to integrate a subwoofer into your audio system.
Understanding Subwoofers
A subwoofer is a specialized speaker designed to reproduce low-frequency sounds, primarily bass. Unlike regular speakers that focus on mid-range and high frequencies, subwoofers are dedicated to delivering deep, rumbling bass that can be felt as much as it is heard. These low-frequency sounds add a sense of depth, richness, and impact to music, movies, and games, providing a more immersive and captivating audio experience.
Subwoofers come in various sizes, from compact models to large, floor-standing units. The size of a subwoofer’s driver typically ranges from 8 inches to 18 inches or more. Larger drivers generally produce deeper bass frequencies with more power, making them ideal for home theater setups or music enthusiasts who desire ground-shaking bass.
In addition to driver size, subwoofers may also have additional features that enhance their performance. These can include dual drivers for increased output, downward-firing designs that produce more floor-shaking bass, or front-firing designs that allow for easy placement in any room.
Subwoofers are typically powered by an internal amplifier, which provides the necessary power to reproduce low-frequency sounds accurately. The amplifier is specially designed to handle the demanding power requirements of low-frequency reproduction without distortion. Many subwoofers come with adjustable settings for volume, crossover frequency, and phase, allowing you to fine-tune the bass response to your liking and integrate it seamlessly with your existing audio system.
When selecting a subwoofer, it is important to consider the size of your room and your listening preferences. Larger rooms may benefit from larger subwoofers, while smaller rooms may require more compact models. It is also worth noting that different subwoofers have different frequency response capabilities. Some subwoofers can reach frequencies as low as 20 Hz or even lower, while others may have a higher limit.
Now that we have a better understanding of what subwoofers are and how they work, let’s explore the different types of connections you can use to integrate a subwoofer into your audio system.
Types of Subwoofer Connections
When it comes to connecting a subwoofer to your audio system, there are a few common methods you can choose from. The type of connection you use will depend on the inputs and outputs available on your subwoofer and audio system.
- Connecting a Subwoofer using Speaker Wire: This is one of the most common methods for connecting a subwoofer. It involves using speaker wire to connect the subwoofer’s speaker-level inputs to the speaker outputs on your amplifier or receiver. This method allows the subwoofer to receive both the audio signal and power from the amplifier.
- Connecting a Subwoofer using RCA Cables: Many subwoofers feature RCA input jacks, which are commonly found on amplifiers and receivers. This method requires using an RCA cable to connect the subwoofer’s RCA input to the corresponding subwoofer output on your audio system. This connection method is ideal for situations where you want to have more control over the subwoofer’s settings and volume.
- Connecting a Subwoofer Wirelessly: Some subwoofers offer wireless connectivity options, allowing you to connect them to your audio system without the need for physical cables. This method involves pairing the subwoofer with a wireless transmitter that connects to your amplifier or receiver. While wireless connections can be convenient, keep in mind that they may introduce some latency, which can affect the synchronization between the audio and video components of your system.
Before selecting a connection method, it is important to consider the capabilities and compatibility of both your subwoofer and audio system. Ensure that the inputs and outputs on both devices match and support the type of connection you intend to use.
Now that we have explored the different types of subwoofer connections, let’s dive into the step-by-step process of connecting a subwoofer using the most common methods.
Connecting a Subwoofer using Speaker Wire
Connecting a subwoofer using speaker wire is a straightforward and commonly used method. This method allows the subwoofer to receive both the audio signal and power from the amplifier or receiver.
Here are the steps to connect a subwoofer using speaker wire:
- Identify the speaker-level inputs and outputs on both the subwoofer and the amplifier or receiver. The subwoofer’s speaker-level inputs are typically labeled “Speaker In” or “High-Level In,” while the speaker outputs on the amplifier or receiver are labeled “Speaker Out.”
- Measure the distance between the subwoofer and the amplifier or receiver. Cut the speaker wire to the appropriate length, ensuring that it is long enough to reach both devices comfortably.
- Strip about half an inch of insulation from each end of the speaker wire. This will expose the inner conductors.
- Insert one end of the speaker wire into the positive (+) terminal of the subwoofer’s speaker-level input and tighten the terminal. The positive terminal is usually indicated by a red color or a “+” symbol.
- Insert the other end of the speaker wire into the positive (+) speaker output terminal on the amplifier or receiver and tighten the terminal.
- Repeat steps 4 and 5 for the negative (-) terminal. The negative terminal is usually indicated by a black color or a “-” symbol.
- Double-check all the connections to ensure they are secure and firmly tightened.
- Turn on your audio system and play a test track or movie with deep bass. Adjust the subwoofer settings on the amplifier or receiver to achieve the desired balance between the subwoofer and the other speakers.
- Enjoy the powerful and enhanced bass performance of your subwoofer!
Remember to refer to the user manual provided with your specific subwoofer and amplifier or receiver for any additional instructions or specific requirements. Following these steps will ensure a successful connection between your subwoofer and audio system using speaker wire.
In the next section, we will explore how to connect a subwoofer using RCA cables, which provides a different method of integration with your audio system.
Connecting a Subwoofer using RCA Cables
Connecting a subwoofer using RCA cables is another popular method that provides more control over the subwoofer’s settings and volume. Many subwoofers and audio systems come equipped with RCA input and output jacks, making this connection type widely compatible.
Follow these steps to connect a subwoofer using RCA cables:
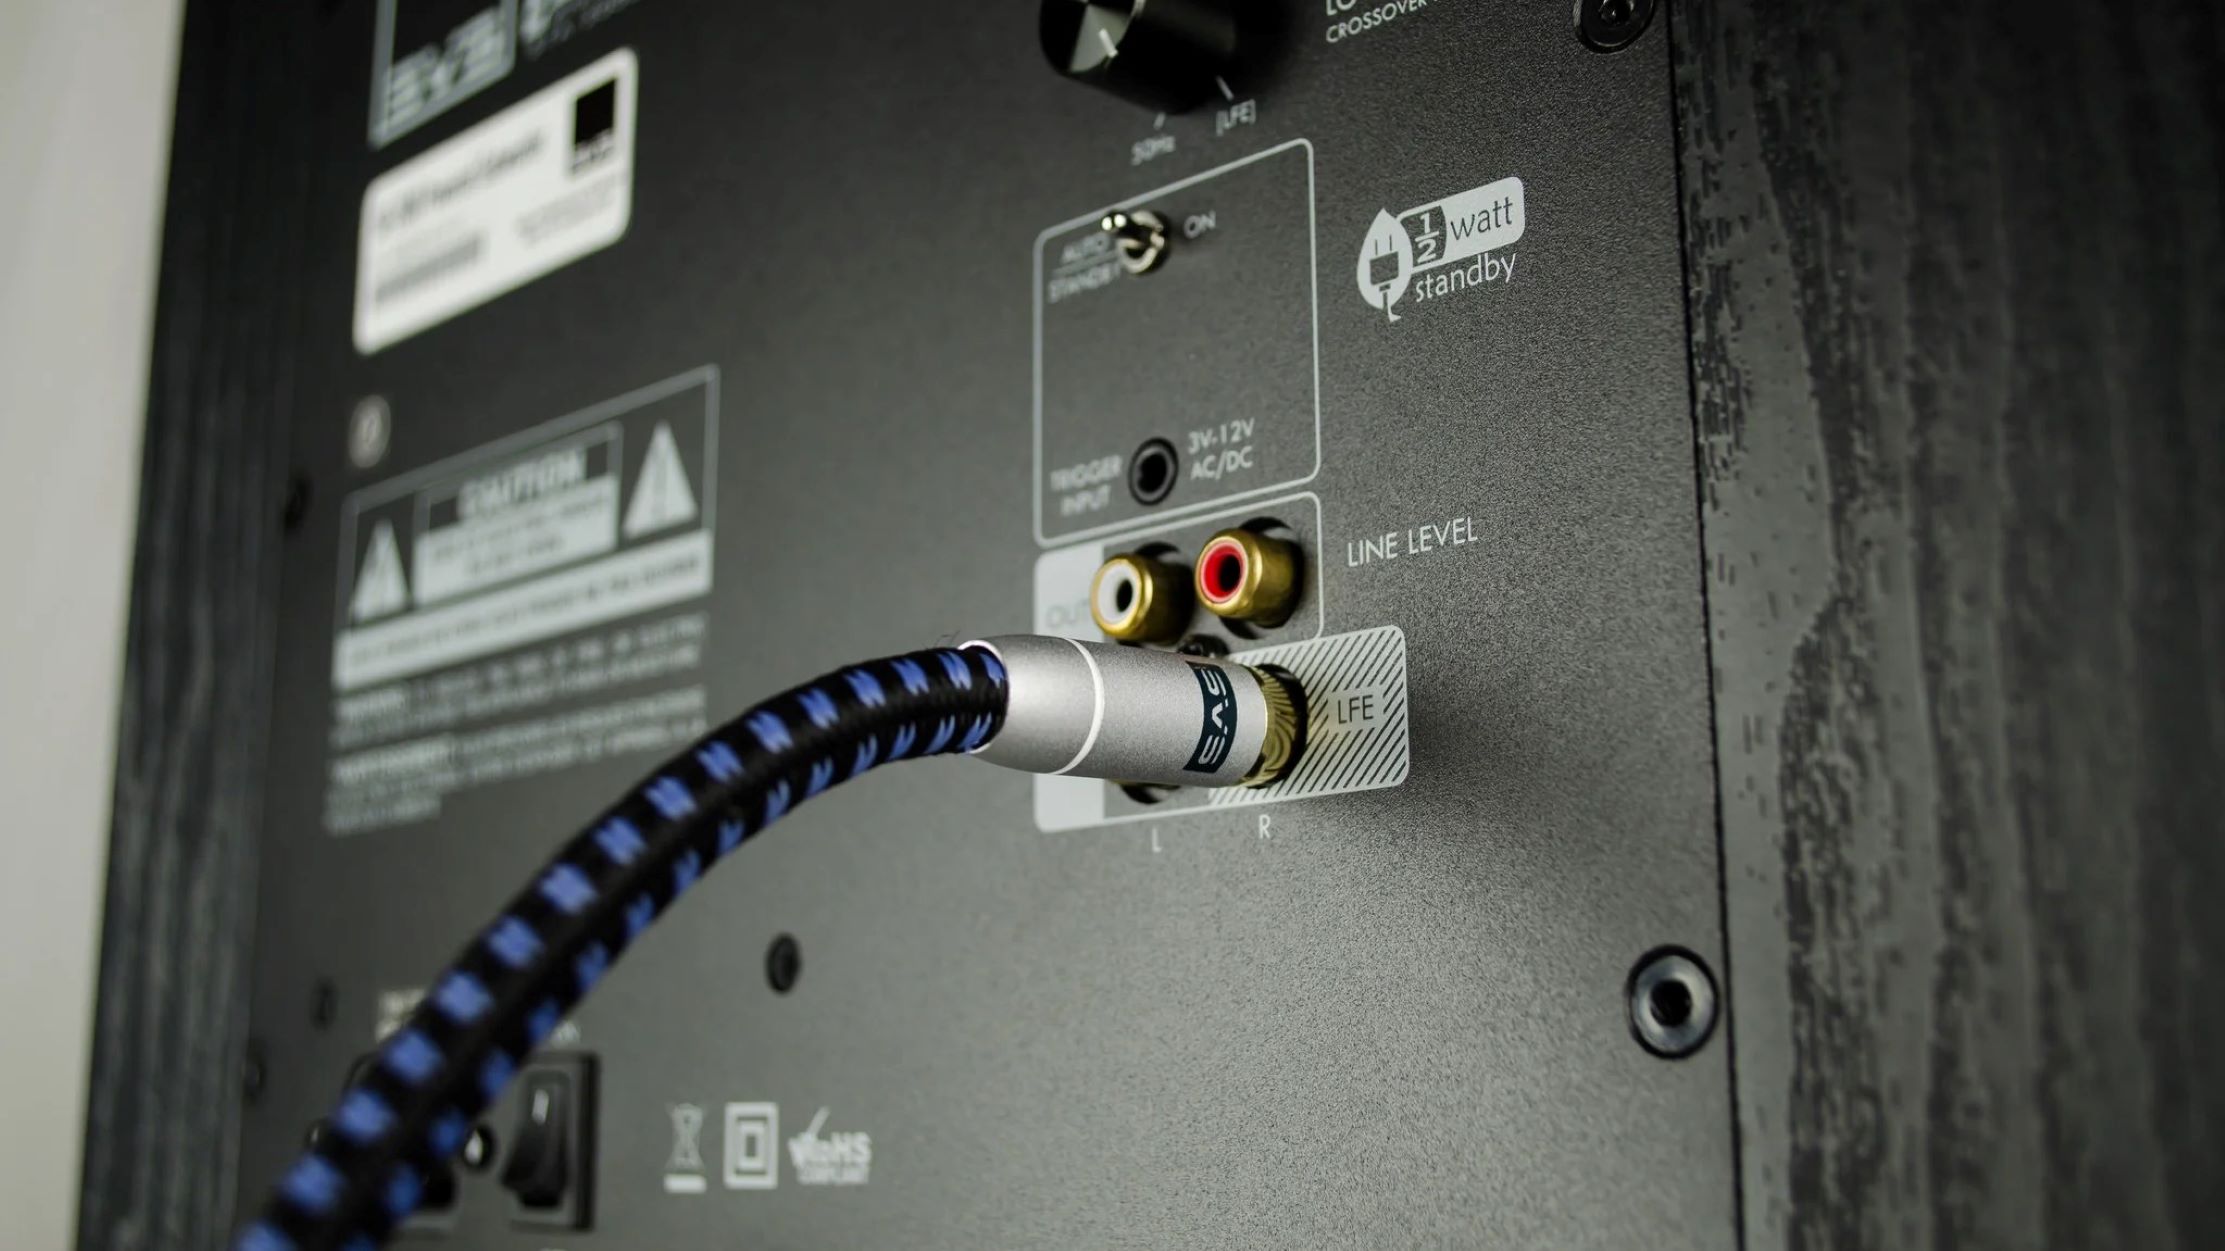
- Locate the RCA input jack on the subwoofer. It is usually labeled as “Sub In” or “LFE In”.
- Insert one end of an RCA cable into the corresponding RCA output jack on your amplifier or receiver. Most amplifiers and receivers have a dedicated subwoofer output labeled as “Sub Out” or “LFE Out”.
- Connect the other end of the RCA cable to the RCA input jack on the subwoofer.
- Ensure that the connections are secure by gently twisting the RCA plugs until they fit snugly into the jacks.
- If your subwoofer has both left and right channel inputs, repeat steps 2-4 for the second RCA cable.
- Turn on your audio system and play a track or movie with deep bass. Adjust the subwoofer’s volume and other settings, such as crossover frequency and phase, according to your preference and the specifications provided in the user manual.
- Enjoy the enhanced bass response and immersive audio experience delivered by your connected subwoofer!
It is important to note that some audio systems may require additional configurations or adjustments to enable the RCA output for the subwoofer. Consult the user manual of your amplifier or receiver to ensure proper setup and compatibility.
Using RCA cables simplifies the connection process and allows for more precise control over the subwoofer’s volume and settings. This method is especially beneficial when integrating a subwoofer into a home theater setup or when using a dedicated subwoofer output on your audio system.
In the next section, we will explore wireless connection options for those who prefer a cable-free setup.
Connecting a Subwoofer Wirelessly
Wireless subwoofer connections offer convenience and flexibility, eliminating the need for physical cables. This method is ideal for those who desire a clean and clutter-free setup or have difficulty running cables across the room.
To connect a subwoofer wirelessly, follow these steps:
- Check if your subwoofer and audio system support wireless connectivity. Not all subwoofers and audio systems have built-in wireless capabilities, so ensure that both devices are compatible.
- If your subwoofer has a wireless connection feature, it will typically come with a wireless transmitter. Connect the wireless transmitter to the audio system’s subwoofer output using an appropriate cable, such as an RCA or 3.5mm audio cable.
- Power on the subwoofer and the wireless transmitter.
- Follow the specific instructions provided with your wireless subwoofer and transmitter to pair them. This typically involves pressing a pairing button or following a pairing sequence.
- Once the subwoofer and wireless transmitter are successfully paired, the audio system will detect the wireless subwoofer as an additional audio output option.
- Select the wireless subwoofer option in the audio system’s settings menu.
- Ensure that the wireless subwoofer is receiving power and positioned within the recommended range of the wireless transmitter to maintain a stable connection.
- Adjust the subwoofer’s volume and other settings as desired.
- Test the subwoofer’s performance by playing audio content with deep bass, and make any necessary adjustments to achieve the desired sound balance.
- Enjoy the freedom and flexibility of a wire-free subwoofer setup!
It is important to note that wireless subwoofer connections may introduce some latency, which can cause a slight delay in the audio. This latency can affect the synchronization between the audio and video components of your system. However, this delay is usually minimal and may not be noticeable in most cases.
Wireless subwoofer connections provide a convenient and hassle-free solution for integrating a subwoofer into your audio system without the need for physical cables. Enjoy the enhanced bass performance while maintaining a clean and organized setup.
In the next section, we will explore how to optimize the settings on your subwoofer for the best audio experience.
Adjusting Subwoofer Settings
Once you have successfully connected your subwoofer to your audio system, it’s important to fine-tune the settings to optimize its performance and ensure a balanced audio experience. Adjusting the subwoofer settings allows you to tailor the bass response to your liking and integrate it seamlessly with your existing speakers.
Here are some key settings to consider when adjusting your subwoofer:
- Volume: The subwoofer volume control allows you to adjust the level of bass output. Start by setting the volume to the midpoint and then fine-tune it according to your listening preferences. Be mindful of not overpowering the other speakers in your system.
- Crossover frequency: The crossover frequency determines the point at which the subwoofer takes over the bass frequencies from the other speakers. Set the crossover frequency to a level that complements and blends well with your main speakers. Typically, a frequency between 80Hz and 120Hz is a good starting point.
- Phase: The phase control allows you to adjust the timing of the subwoofer’s sound wave in relation to the main speakers. Experiment with the phase settings to achieve the best possible integration between the subwoofer and your speakers. It is recommended to start with the 0-degree setting and make subtle adjustments as needed.
- Equalizer (EQ) settings: Some subwoofers come with built-in equalizer settings that allow you to shape the bass response even further. Depending on your preferences and the acoustic characteristics of your room, you can adjust the EQ settings to enhance specific frequencies or compensate for any room-induced resonances. Take the time to experiment with different EQ settings to find the optimal balance.
- Room placement: The placement of your subwoofer within the room can significantly impact its performance. Experiment with different positions to find the optimal placement that minimizes standing waves and maximizes bass response. Consider placing the subwoofer near a corner or wall for better low-frequency reinforcement.
Always refer to your subwoofer’s user manual for specific instructions on adjusting these settings. Every subwoofer model is unique, and the recommended settings may vary.
Once you have adjusted the subwoofer settings to your liking, sit back, relax, and enjoy the enhanced audio experience with deep, rich bass that complements your favorite music, movies, and games.
In the next section, we will provide some troubleshooting tips to help you address any issues you may encounter with your subwoofer setup.
Troubleshooting and Tips
While connecting and adjusting a subwoofer is generally straightforward, you may encounter some issues or challenges along the way. Here are some troubleshooting tips to help you address common problems and ensure optimal performance:
- No sound from the subwoofer: Double-check all connections and ensure that the subwoofer is powered on. Verify that the volume level is appropriately adjusted and that the crossover frequency is set correctly. Additionally, ensure that your audio system is configured to output the bass frequencies to the subwoofer.
- Weak or distorted bass: If the bass output seems weak or distorted, check the volume level of the subwoofer and adjust it accordingly. Ensure that the subwoofer is positioned in an optimal location within the room and experiment with different placements to achieve the best bass response. You may also need to adjust the crossover frequency and phase settings for better integration with your speakers.
- Intermittent connectivity issues: If you’re using wireless connectivity, ensure that the subwoofer and wireless transmitter are within the recommended range of each other. Check that there are no physical obstructions blocking the signal. If the issue persists, try re-pairing the wireless connection or using a wired connection if available.
- Excessive vibrations or rattling: If the subwoofer is causing excessive vibrations or rattling, it may be due to its placement or incorrect settings. Try moving the subwoofer to a different location or using additional padding or isolation devices to reduce vibrations. Adjust the volume and crossover settings to find a balance that eliminates distortion without compromising the desired bass response.
- Room acoustics: Keep in mind that the acoustic characteristics of your room can significantly impact the performance of your subwoofer. Consider using bass traps or acoustic panels to minimize unwanted resonances or echoes. The strategic placement of furniture and curtains can also help in absorbing and diffusing sound waves for better overall audio quality.
Remember, troubleshooting audio issues may require some experimentation and adjustments. It’s essential to have patience and be willing to try different solutions to achieve the desired results. If problems persist, referring to the user manual or seeking assistance from the manufacturer’s customer support can be helpful.
Now that you have some troubleshooting tips at your disposal, you can address any issues that may arise and make the most out of your subwoofer setup.
Lastly, let’s summarize the information we’ve covered in this article.
Conclusion
Connecting a subwoofer to your audio system doesn’t have to be complicated. With the various connection options available, you can integrate a subwoofer seamlessly and enhance your audio experience with deep, powerful bass.
In this article, we discussed the different types of subwoofer connections, including using speaker wire, RCA cables, and wireless connectivity. We provided step-by-step instructions for each method, allowing you to choose the one that suits your setup and preferences.
We also explored the importance of understanding subwoofers and their role in reproducing low-frequency sounds. We discussed the various features and considerations when selecting a subwoofer, such as driver size, amplifier power, and frequency response capabilities.
Adjusting subwoofer settings is crucial to achieving optimal performance. We covered essential settings like volume, crossover frequency, phase, and equalizer options, enabling you to fine-tune the bass response according to your liking and room acoustics.
Throughout the article, we provided troubleshooting tips to help you address common issues that may arise. Whether it’s dealing with connectivity problems, weak bass, or excessive vibrations, these tips can help you troubleshoot and optimize your subwoofer setup.
By following the guidance and tips provided in this article, you can confidently connect and adjust your subwoofer to elevate your audio experience. Whether you enjoy music, movies, or gaming, the deep and immersive bass delivered by a well-integrated subwoofer will bring your audio to life.
Remember, each subwoofer and audio system may have its own unique features and specifications, so it’s always important to consult the user manuals for specific instructions tailored to your equipment.
So go ahead, connect that subwoofer, fine-tune the settings, and immerse yourself in a world of thunderous and captivating bass!