Home>Devices & Equipment>Subwoofer>How To Connect A Subwoofer To A Vintage Receiver
Subwoofer
How To Connect A Subwoofer To A Vintage Receiver
Modified: January 22, 2024
Learn how to easily connect a subwoofer to your vintage receiver and enhance your audio experience. Find step-by-step instructions and tips for optimal sound quality.
(Many of the links in this article redirect to a specific reviewed product. Your purchase of these products through affiliate links helps to generate commission for AudioLover.com, at no extra cost. Learn more)
Table of Contents
- Introduction
- Step 1: Check Compatibility
- Step 2: Gather Required Cables and Equipment
- Step 3: Locate the Subwoofer Output on the Vintage Receiver
- Step 4: Connect the Subwoofer Cable to the Vintage Receiver
- Step 5: Connect the Subwoofer Cable to the Subwoofer
- Step 6: Adjust Subwoofer Settings
- Step 7: Test the Connection
- Conclusion
Introduction
Welcome to the world of deep bass and immersive audio experiences. If you’re a music lover, home theater enthusiast, or audiophile, you know the importance of a good subwoofer. Having a subwoofer connected to your audio setup can greatly enhance the quality and impact of low-frequency sounds, allowing you to feel the rumble of explosions, the thumping bass of your favorite music, and the depth of cinematic sound effects.
But what if you have a vintage receiver? Don’t worry, you can still enjoy the benefits of a subwoofer with your old-school audio equipment. Connecting a subwoofer to a vintage receiver might seem like a daunting task, but with the right knowledge and equipment, you can easily achieve the desired setup.
In this article, we’ll guide you through the process of connecting a subwoofer to a vintage receiver step by step. Whether you have a classic stereo receiver or a vintage surround sound receiver, we’ll cover everything you need to know to transform your audio setup into a powerhouse of low-end frequencies.
Before we dive into the details, it’s essential to note that the specific steps may vary depending on your vintage receiver model and the type of subwoofer you have. However, this guide will provide you with a general understanding of the process and equip you with the knowledge necessary to adapt the instructions to your specific setup.
So, let’s get started and unleash the full potential of your vintage receiver with a subwoofer that will rock your world!
Step 1: Check Compatibility
Before you begin connecting a subwoofer to your vintage receiver, it’s important to ensure compatibility between the two. There are a few factors you need to consider:
- Frequency Response: Check the frequency response specifications of your vintage receiver. Make sure it has a subwoofer output or a dedicated low-frequency channel that can handle the desired range of bass frequencies.
- Power Requirements: Determine the power capabilities of your vintage receiver and ensure that they are compatible with the power requirements of your subwoofer. It’s important to match the power output of the receiver with the power handling capabilities of the subwoofer to avoid any damage to the equipment.
- Connectivity Options: Assess the connectivity options available on both your vintage receiver and the subwoofer. Check if they have compatible input/output ports and if you have the necessary cables or adapters to make the connection.
If you’re unsure about any of these compatibility factors or need assistance in determining them, consult the user manuals of your vintage receiver and subwoofer or reach out to the manufacturers for guidance.
Once you have confirmed compatibility, you can proceed to the next steps of connecting your subwoofer to your vintage receiver and immerse yourself in the deep, rich bass that will take your audio experience to new heights.
Step 2: Gather Required Cables and Equipment
Now that you have confirmed the compatibility of your vintage receiver and subwoofer, it’s time to gather the necessary cables and equipment for the connection. Here’s what you’ll need:
- Subwoofer Cable: This cable is crucial for connecting the subwoofer to your vintage receiver. It’s typically a single RCA cable with color-coded red and white connectors. Make sure the length of the cable is sufficient to reach from the subwoofer output on the receiver to the input on the subwoofer.
- Cable Adapters (if needed): Depending on the specific connection ports available on your vintage receiver and subwoofer, you may require cable adapters. For example, if your vintage receiver has a different type of output port and your subwoofer has a different type of input port, you may need RCA-to-XLR or RCA-to-3.5mm adapters to make them compatible.
- Power Cable: If your subwoofer requires a power source, ensure that you have the appropriate power cable to connect it to an electrical outlet.
- Additional Cables (optional): Depending on your specific setup, you may need additional cables such as HDMI or optical cables if you want to connect your vintage receiver to other audio/video devices like a TV or Blu-ray player. These cables are not essential for connecting the subwoofer, but they can enhance your overall audio experience.
Make sure to check the user manuals of your vintage receiver and subwoofer to verify the specific cable and equipment requirements for your setup. Additionally, ensure that all the cables and equipment are in good working condition to optimize the audio connection.
With the required cables and equipment in hand, you’re now ready to move on to the next step and start connecting your subwoofer to your vintage receiver.
Step 3: Locate the Subwoofer Output on the Vintage Receiver
Before you can connect your subwoofer, you need to locate the subwoofer output on your vintage receiver. The location of this output may vary depending on the model and make of your receiver, so refer to the user manual for specific instructions. Here are some general guidelines:
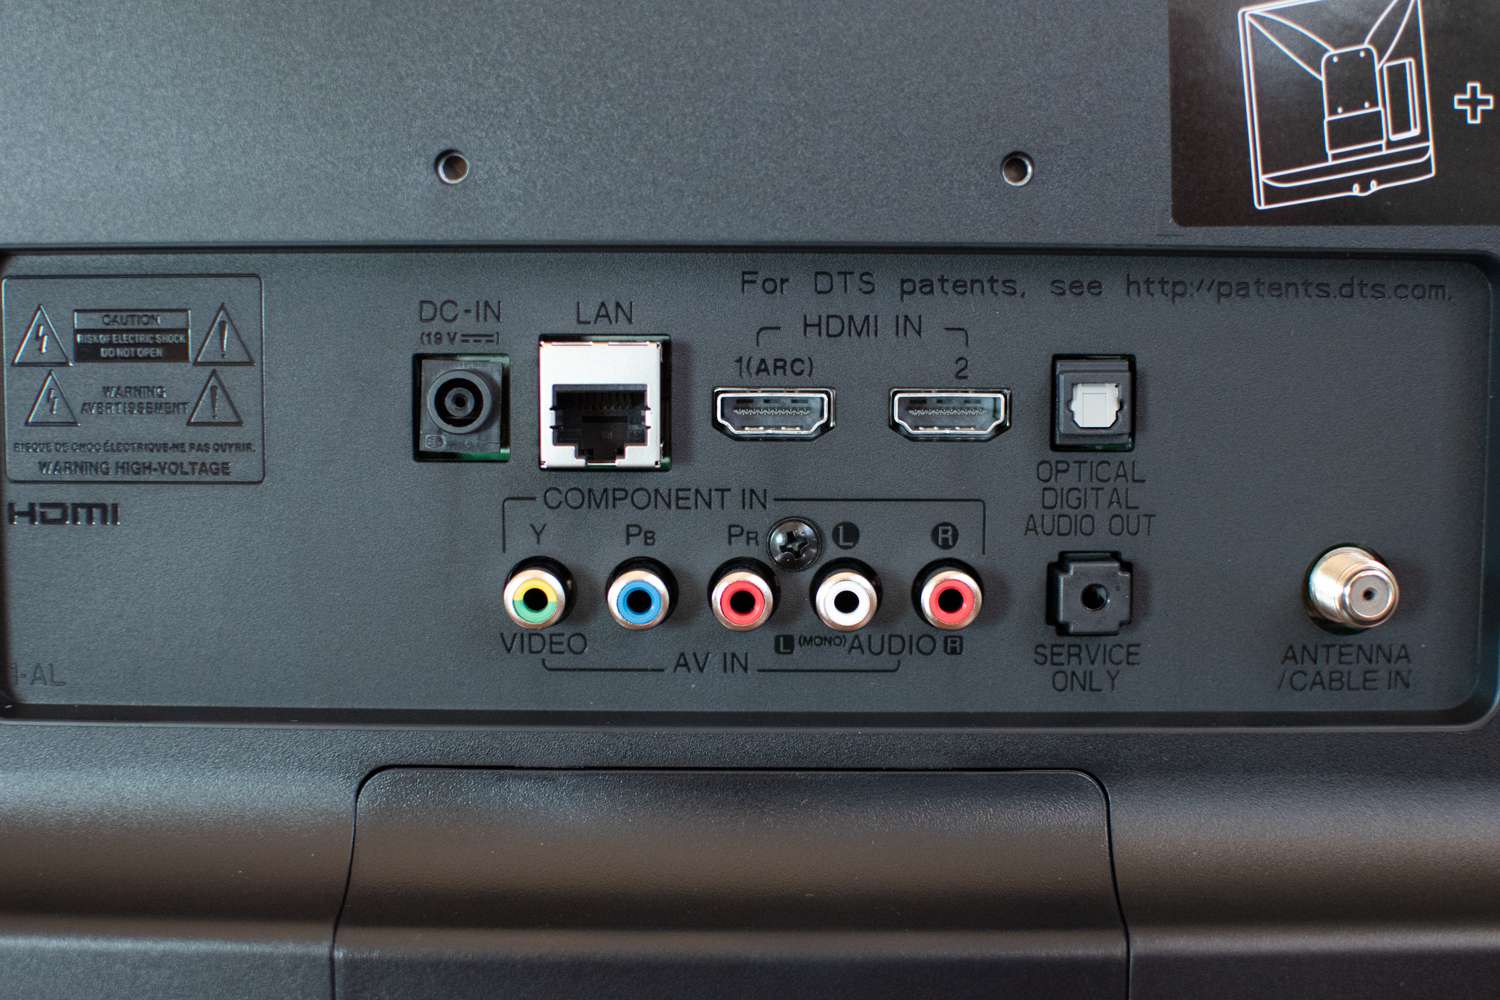
- Inspect the back panel of your vintage receiver. Look for a labeled output specifically for subwoofers. It’s usually denoted as “Sub Out” or “LFE Out” (Low-Frequency Effects).
- If your vintage receiver doesn’t have a dedicated subwoofer output, look for a preamp output or a “Line Out” that you can use as a workaround. These outputs can still be connected to the subwoofer input but may require additional adjustments in the settings.
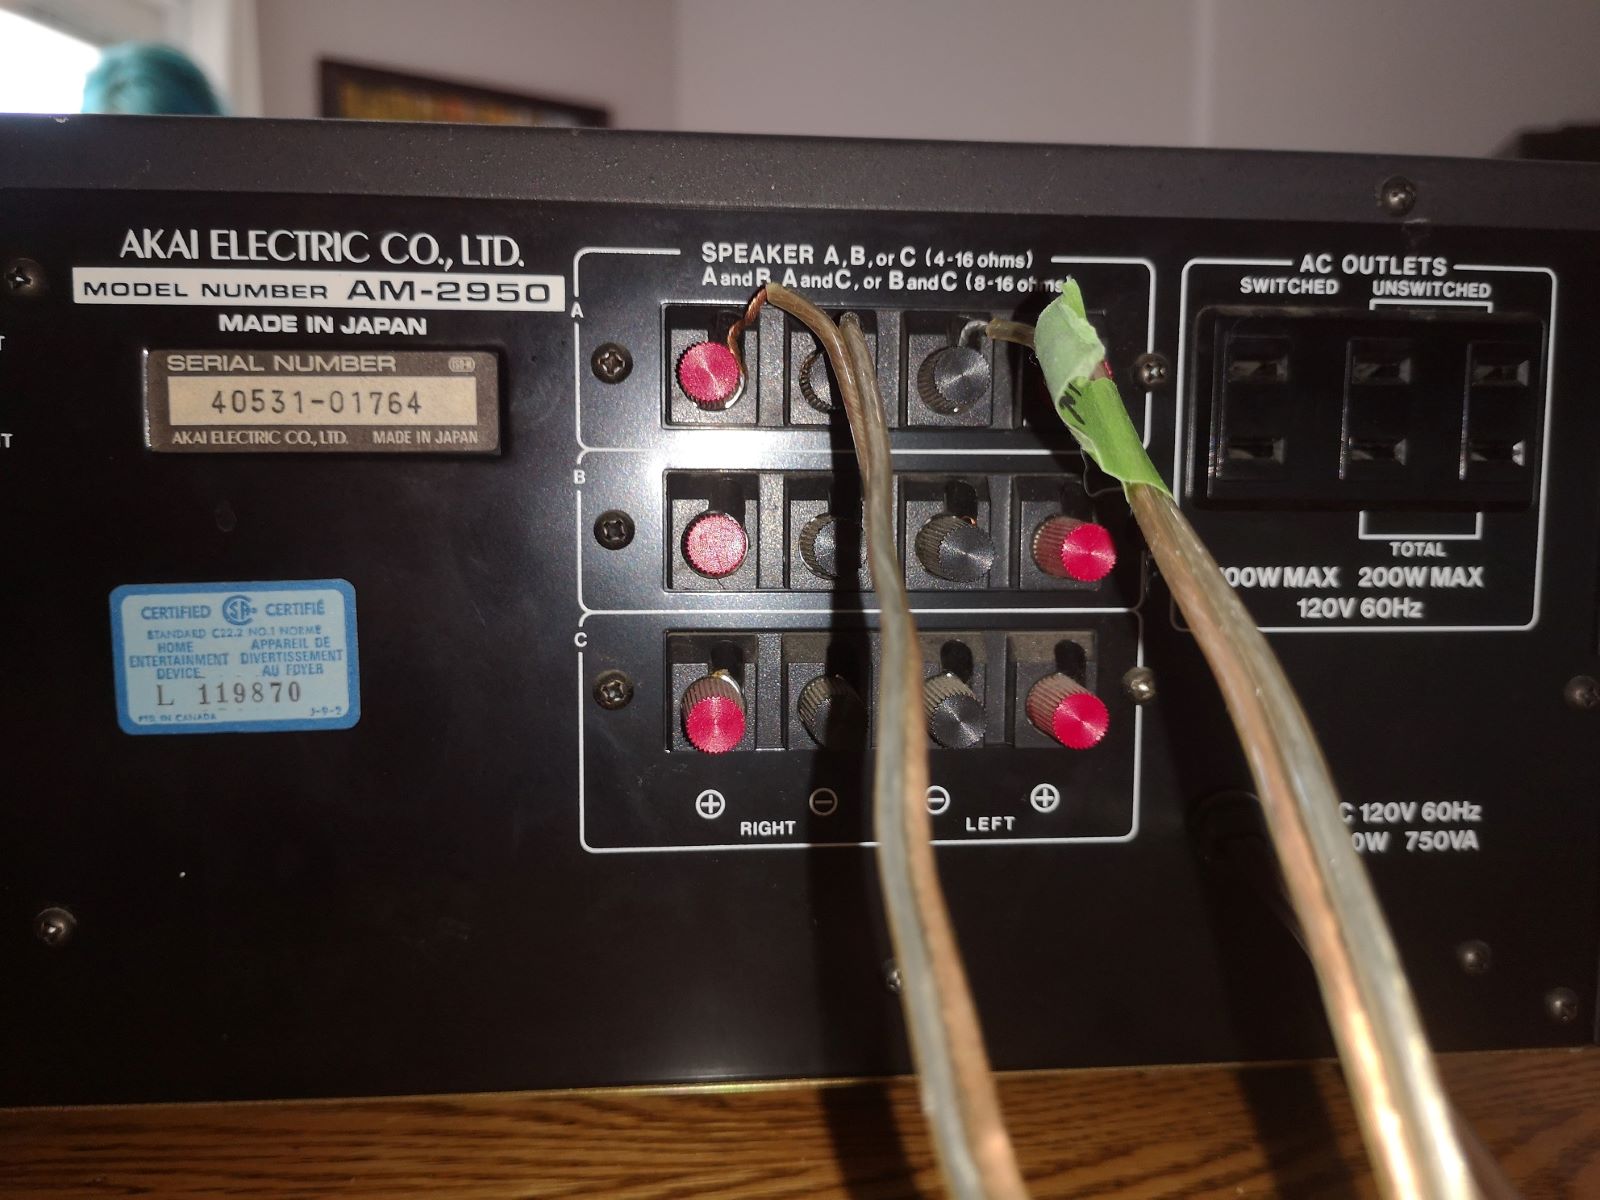
- In case you’re dealing with a vintage receiver that doesn’t have any specific subwoofer output or preamp output, you can connect the subwoofer using the speaker terminals. However, this method may require additional wiring configurations, so proceed with caution or consult a professional if needed.
Once you have located the subwoofer output on your vintage receiver, take note of its exact location for the next step of the connection process. Remember, every vintage receiver may have unique features, so familiarize yourself with the layout and options available on your specific model.
Now that you’ve identified the subwoofer output on your vintage receiver, it’s time to proceed to the next step and connect the subwoofer cable.
Step 4: Connect the Subwoofer Cable to the Vintage Receiver
With the subwoofer output on your vintage receiver identified, it’s time to connect the subwoofer cable. Follow these steps:
- Ensure that your vintage receiver is powered off and unplugged from the electrical outlet for safety.
- Take one end of the subwoofer cable, typically the end with the RCA connectors, and plug it into the subwoofer output of your vintage receiver.
- If your vintage receiver has red and white subwoofer output jacks, match the red connector on the subwoofer cable with the red subwoofer output jack and the white connector with the white subwoofer output jack.
- If your vintage receiver has a single subwoofer output jack, simply plug the RCA connector into the designated output jack.
- Ensure that the connection is secure by gently pushing the connectors in until they click into place.
Once you have successfully connected the subwoofer cable to the vintage receiver, you can proceed to the next step and connect the other end of the cable to the subwoofer itself.
Note: If your vintage receiver does not have a dedicated subwoofer output, refer to the manual or consult the manufacturer for alternative connection options.
Next up, we’ll guide you through connecting the subwoofer cable to the subwoofer, so let’s move on to the next step.
Step 5: Connect the Subwoofer Cable to the Subwoofer
Now that you have connected one end of the subwoofer cable to the vintage receiver, it’s time to connect the other end to the subwoofer itself. Follow these steps:
- Locate the subwoofer input on your subwoofer. It is usually labeled as “Sub In” or “LFE In”.
- Take the other end of the subwoofer cable, with the RCA connectors, and plug it into the subwoofer input.
- If your subwoofer has red and white subwoofer input jacks, connect the red connector of the cable to the red subwoofer input jack and the white connector to the white subwoofer input jack.
- If your subwoofer has a single subwoofer input jack, simply plug the RCA connector into the designated input jack.
- Ensure that the connection is secure by gently pushing the connectors in until they click into place.
Once you have successfully connected the subwoofer cable to the subwoofer, you are one step closer to enjoying the enhanced audio experience offered by the deep bass capabilities of the subwoofer.
With the cable securely connected, you can now proceed to adjust the subwoofer settings to optimize the performance and integration of the subwoofer with your vintage receiver.
Next, we’ll guide you through the process of adjusting the subwoofer settings, so let’s move on to the next step.
Step 6: Adjust Subwoofer Settings
After connecting the subwoofer cable to both the vintage receiver and the subwoofer, it’s time to fine-tune the subwoofer settings to achieve optimal audio performance. Here’s how:
- Refer to the user manual of your subwoofer to locate the controls and settings available.
- Adjust the crossover frequency: The crossover frequency determines the point at which your vintage receiver will start sending low-frequency signals to the subwoofer. Set the crossover frequency according to your preferences and the specifications of your speakers.
- Control the subwoofer volume: Use the volume control on your subwoofer to adjust the level of bass output. Start with a moderate volume and make adjustments as needed, considering the size of your room and personal listening preferences.
- Configure phase settings: Some subwoofers offer phase adjustment options. Experiment with different phase settings to optimize the integration of the subwoofer with your vintage receiver and speakers. Consult the manual for guidance on finding the best phase setting.
- Test and refine: Play various audio sources with a good range of low frequencies to test the subwoofer’s performance. Make adjustments to the settings as necessary to achieve the desired balance and impact in the sound.
It’s worth noting that the specific settings and options may vary depending on the subwoofer model you have. Take the time to familiarize yourself with the capabilities of your subwoofer and experiment with different settings to achieve the best audio experience.
Once you have adjusted the subwoofer settings to your liking, you’re almost ready to enjoy the deep bass and immersive audio that your vintage receiver and subwoofer combination can provide. Before that, however, there’s one more step to ensure that everything is working as expected.
Let’s move on to the next step to test the subwoofer connection and ensure it is functioning correctly.
Step 7: Test the Connection
With everything set up and adjusted, it’s time to test the connection between your vintage receiver and the subwoofer. Follow these steps to ensure everything is working correctly:
- Power on your vintage receiver and the subwoofer.
- Play audio content that includes low-frequency sounds, such as a movie with impactful sound effects or a bass-heavy song.
- Gradually increase the volume to a comfortable level and listen for the presence of deep, resonant bass coming from the subwoofer.
- If you don’t hear any bass or are unsatisfied with the sound, double-check all connections, including the subwoofer cable, and ensure the subwoofer’s power is on.
- Make any necessary adjustments to the subwoofer settings, such as the volume or crossover frequency, to achieve the desired sound balance. Refer to the user manual for specific guidance.
During the testing phase, pay attention to any distortion, muddiness, or overpowering bass. Fine-tuning the settings and experimenting with different audio sources can help you achieve the best possible sound quality.
If you encounter any difficulties or are unable to resolve any issues, consult the user manuals of both your vintage receiver and the subwoofer, or reach out to the manufacturers for additional support. They can provide specific troubleshooting steps based on your equipment.
Once you are satisfied with the performance and sound quality of your subwoofer, sit back, relax, and enjoy the immersive audio experience that your vintage receiver and subwoofer combination brings to your favorite movies, music, and games.
Congratulations! You have successfully connected and tested your subwoofer to your vintage receiver, enhancing your audio setup and bringing your entertainment to a whole new level.
Enjoy the deep and powerful bass that takes your audio experience to new depths!
Conclusion
Connecting a subwoofer to a vintage receiver might seem like a challenging task, but with the right knowledge and equipment, it’s a straightforward process that can greatly enhance your audio experience. By following the steps outlined in this guide, you can bring the deep, rumbling bass into your vintage audio setup and enjoy the full range of low-frequency sounds.
We began by ensuring compatibility between your vintage receiver and subwoofer, checking factors such as frequency response, power requirements, and connectivity options. Then, we guided you in gathering the necessary cables and equipment, including the subwoofer cable and any required adapters.
Next, we covered the steps to locate the subwoofer output on your vintage receiver and how to connect the subwoofer cable to both the receiver and the subwoofer itself. With the physical connections established, we moved on to adjusting the subwoofer settings, including the crossover frequency, volume, and phase, to optimize the performance and integration with your vintage receiver.
Finally, we emphasized the importance of testing the connection by playing audio content with low-frequency sounds, making any necessary adjustments, and troubleshooting any issues that may arise.
With your subwoofer successfully connected and tested, you can now revel in the immersive audio experience that your vintage receiver and subwoofer combination offers. The deep bass will bring your music, movies, and games to life, adding a new dimension of realism and impact.
Remember to refer to the user manuals of your vintage receiver and subwoofer for specific instructions and recommendations, as each model may have unique features and requirements.
Now, sit back, relax, and enjoy the incredible audio quality that your vintage receiver and subwoofer setup brings to your entertainment space. Feel the rumble, hear the impact, and immerse yourself in a world of rich, deep bass.