Reggae
How To Make Reggae In Ableton
Modified: March 5, 2024
Discover how to create authentic Reggae music in Ableton with our step-by-step tutorial. Learn the essential techniques and sound design tricks to master the genre.
(Many of the links in this article redirect to a specific reviewed product. Your purchase of these products through affiliate links helps to generate commission for AudioLover.com, at no extra cost. Learn more)
Table of Contents
- Introduction
- Setting Up Ableton for Reggae Production
- Creating a Reggae Rhythm Section
- Crafting Authentic Reggae Basslines
- Layering Drums and Percussion in Reggae
- Capturing the Reggae Guitar Sound
- Adding Horn Sections to Enhance Reggae Tracks
- Mixing Techniques for Reggae Music Production
- Applying Dub Effects in Ableton Live
- Conclusion
Introduction
Welcome to the world of reggae music! With its laid-back rhythms, infectious melodies, and meaningful lyrics, reggae has captivated audiences worldwide for decades. Originating in Jamaica in the 1960s, reggae has become a genre that embodies peace, love, and unity.
Whether you’re a fan of Bob Marley and the Wailers, Peter Tosh, or Toots and the Maytals, or you’re looking to create your own reggae tracks, this article will guide you through the process of making reggae music in Ableton Live.
Ableton Live, a popular digital audio workstation (DAW), provides musicians and producers with a versatile platform to create, arrange, and mix music. With its intuitive interface and powerful tools, Ableton Live is an excellent choice for crafting authentic reggae tracks.
In this article, we’ll explore various aspects of reggae music production in Ableton Live. We’ll discuss how to set up Ableton Live for reggae production, create a reggae rhythm section, craft authentic reggae basslines, layer drums and percussion, capture the reggae guitar sound, add horn sections to enhance your tracks, apply mixing techniques specific to reggae, and even incorporate dub effects.
Whether you’re a beginner producer or an experienced musician, this article will provide you with the knowledge and techniques to produce compelling reggae music in Ableton Live. So, grab your favorite headphones or turn up those speakers, and let’s dive into the world of reggae music production.
Setting Up Ableton for Reggae Production
Before diving into the creative process of producing reggae music in Ableton Live, it’s essential to set up your workspace and tools properly. Here are some steps to get you started:
- Organizing your project: Create a new project in Ableton Live and give it a meaningful name. Set up a folder structure to keep your project files organized.
- Choosing the right tempo and key: Reggae music is characterized by its relaxed tempo and distinctive grooves. The typical tempo for reggae tracks ranges from 70 BPM to 90 BPM. Experiment with different tempos to find the one that suits your desired vibe. Additionally, choose a key that complements the mood of your track.
- Selecting reggae-specific instruments: Ableton Live offers a wide range of instruments and sample libraries that can help you achieve an authentic reggae sound. Look for instruments that emulate reggae staples such as the classic Hammond organ, funky clavinet, and warm analog synthesizers.
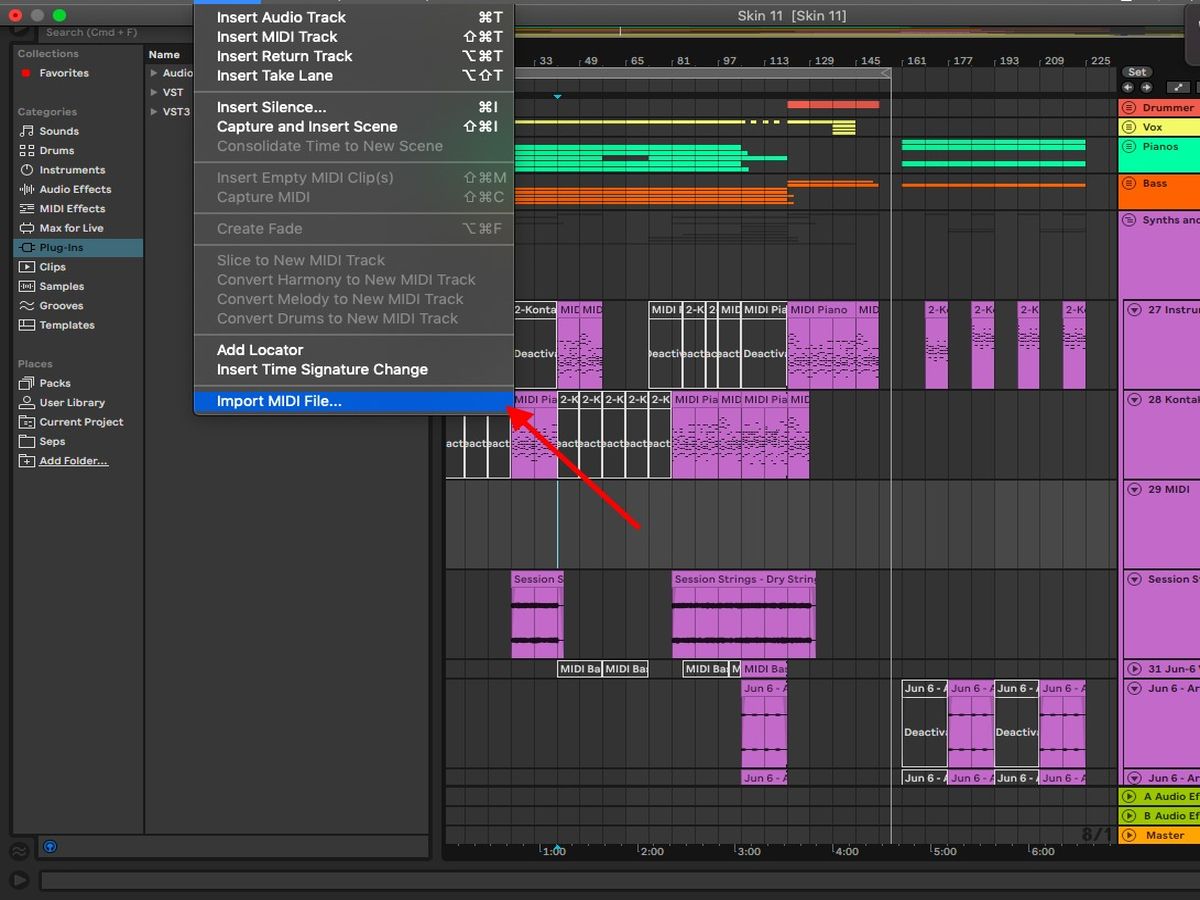
- Setting up a reggae drum kit: Create a new MIDI track and load a drum rack in Ableton Live. Choose drum samples that emulate the sound of classic reggae drum kits. Snappy snares, tight hi-hats, and deep kick drums are essential for capturing the rhythm and groove of reggae.
- Configuring audio and MIDI settings: Ensure that your audio and MIDI settings are properly configured in Ableton Live. Set your audio interface’s sample rate and buffer size according to your system’s capabilities and your desired quality and latency settings. Make sure your MIDI controllers are properly connected and configured.
By following these steps, you’ll have a solid foundation for your reggae production in Ableton Live. Having an organized workspace and the right tools will allow you to focus on the creative aspects of making reggae music without any technical distractions. Now that you’re set up and ready to go, let’s move on to the next step: creating a reggae rhythm section.
Creating a Reggae Rhythm Section
The rhythm section is the heartbeat of reggae music, providing the foundation for the rest of the instruments and vocals to groove to. To create an authentic reggae rhythm section in Ableton Live, follow these steps:
- Adding a bassline: Reggae basslines are known for their melodic yet driving nature. Use a virtual instrument or plugin in Ableton Live to play the bassline. Aim for deep and prominent bass tones that lock in with the drums and provide a solid foundation for the rest of the music.
- Creating skanking guitar rhythms: The skank guitar is a signature element in reggae music, providing the characteristic rhythmic chops and accents. Use a guitar plugin or a sampled guitar sound to create skanking guitar patterns. Strum chords on the off-beat to achieve the classic reggae skank sound.
- Adding keyboard riffs: Classic reggae tracks often feature keyboard riffs played on instruments like the Hammond organ or the clavinet. Use Ableton Live’s instruments or sample packs to add catchy and melodic keyboard riffs to your reggae production.
- Incorporating percussion elements: Percussion instruments such as congas, shakers, and tambourines add depth and texture to the reggae rhythm section. Use Ableton Live’s percussion samples or record your own to enhance the groove and give your track an organic feel.
As you create the reggae rhythm section, it’s important to pay attention to the rhythmic interplay between the different elements. Emphasize the syncopated off-beats and the “one drop” rhythm that is characteristic of reggae. Experiment with different rhythms and patterns to find the groove that suits your track.
Once you’ve created the reggae rhythm section, you’ll have a solid foundation for your reggae production in Ableton Live. The bassline, skank guitar, keyboard riffs, and percussion elements will work together to create a compelling rhythm that sets the stage for the rest of your track.
Now that you have a groove going, it’s time to focus on the details. In the next section, we’ll discuss how to craft authentic reggae basslines that complement the rhythm section and enhance the overall feel of your reggae track.
Crafting Authentic Reggae Basslines
The bassline is a crucial element in reggae music, driving the rhythm and providing depth and groove to the overall sound. To craft authentic reggae basslines in Ableton Live, follow these steps:
- Finding the right tone: Start by choosing a bass sound that fits the reggae aesthetic. Look for warm and deep bass tones that have a strong presence in the low frequencies. Experiment with different bass instruments or plugins to find the perfect tone for your track.
- Emphasizing the root notes: Reggae basslines often emphasize the root notes of the chords being played in the rhythm section. Focus on playing the root notes in a rhythmic and consistent manner to anchor the harmonic structure of the track.
- Incorporating melodic variations: While reggae basslines may primarily focus on the root notes, there is room for melodic variations to add interest and movement. Experiment with slides, hammer-ons, pull-offs, and other techniques to create melodic phrases that enhance the overall groove.
- Playing syncopated rhythms: Reggae is known for its syncopated rhythms and accents. Play with rhythmic variations, adding occasional ghost notes or syncopated hits in between the main beats. This will add a sense of groove and dynamics to your bassline.
- Locking in with the drums: The bass and drums form the backbone of the reggae rhythm section, so it’s important for them to work together seamlessly. Pay attention to the interaction between the bassline and the drum patterns, making sure they complement each other and create a tight and cohesive groove.
Remember that reggae basslines are often repetitive and hypnotic, providing a solid foundation for the other instruments and vocals to shine. However, that doesn’t mean they have to be monotonous – feel free to introduce variations and subtle improvisations to keep the listener engaged.
By following these guidelines and experimenting with different techniques, you’ll be able to craft authentic and compelling reggae basslines in Ableton Live. The bassline will anchor your track, giving it the distinct reggae groove that is synonymous with the genre.
With the rhythm section and bassline locked in, your reggae production in Ableton Live is well on its way. In the next section, we’ll explore the process of layering drums and percussion to enhance the rhythmic texture of your reggae track.
Layering Drums and Percussion in Reggae
Drums and percussion play a vital role in creating the infectious and lively rhythms of reggae music. Layering different drum elements and percussion instruments can add depth, texture, and complexity to your reggae tracks. Here’s how to effectively layer drums and percussion in Ableton Live:
- Create a foundation with the kick and snare: Start by laying down a solid kick drum and snare drum pattern. The kick drum provides the heartbeat of the rhythm, while the snare drum adds a punchy and syncopated accent on the two and four beats.
- Add secondary percussion: Layer in secondary percussion instruments such as tambourines, shakers, and cowbells to enhance the groove and add extra texture. These instruments often play on the off-beats, providing a syncopated and lively feel.
- Incorporate live drum samples: To give your reggae tracks an authentic and organic sound, consider incorporating real drum samples or recordings. This could include live drum loops or samples that capture the natural nuances and dynamics of a drummer’s performance.
- Experiment with different drum patterns: Reggae music allows for a variety of drum patterns, so don’t be afraid to experiment. Try variations of the classic one-drop drum pattern, explore different hi-hat or ride cymbal patterns, and incorporate fills or rolls to add excitement and energy to your tracks.
- Layer percussion loops: To add complexity and variation, layer in percussion loops that complement the drum patterns. Look for loops that feature congas, bongos, or other ethnic percussion instruments to give your reggae tracks an authentic and immersive feel.
When layering drums and percussion, the key is to maintain balance and clarity. Pay attention to the frequency range of each instrument and ensure that they don’t overpower each other. Use EQ and volume adjustments to create separation and ensure that each element can be heard clearly in the mix.
By layering drums and percussion effectively, you can create a rich and vibrant rhythm section that forms the backbone of your reggae productions. The combination of strong kick and snare patterns, secondary percussion accents, live drum samples, and layered loops will bring your reggae tracks to life.
With the rhythm section, bassline, and layered drums and percussion in place, your reggae production in Ableton Live is taking shape. In the next section, we’ll explore how to capture the unique guitar sound that is synonymous with reggae music.
Capturing the Reggae Guitar Sound
The guitar is a fundamental element in reggae music, adding texture, melody, and a distinctive skanking rhythm. To capture the authentic reggae guitar sound in your Ableton Live productions, follow these steps:
- Selecting the right guitar tone: Choose a guitar tone that suits the reggae genre. Opt for clean or slightly overdriven tones with warm and rounded characteristics. Consider using a clean amp simulator or a guitar plugin with suitable presets to achieve the desired sound.
- Playing the skanking rhythm: The skank guitar rhythm is one of the defining elements of reggae music. It typically emphasizes the off-beats, creating a syncopated and driving feel. Experiment with playing chords on the off-beat and muting the strings to achieve the characteristic skank sound.
- Adding melodic embellishments: In addition to the rhythm, the reggae guitar often incorporates melodic elements and riffs. Explore incorporating slides, bends, and subtle phrasing variations to add depth and interest to your guitar parts. Focus on creating catchy and memorable melodies that complement the overall reggae vibe.
- Layering multiple guitar tracks: To create a richer and fuller reggae guitar sound, consider layering multiple guitar tracks. This can include playing the skank rhythm on one track and adding melodic embellishments on another. Experiment with different voicings and inversions to add complexity and depth to the overall guitar sound.
- Utilizing reggae-specific guitar techniques: Reggae guitarists often incorporate specific techniques, such as palm muting, staccato chords, and palm scratch strumming. Familiarize yourself with these techniques and incorporate them into your guitar playing to achieve an authentic reggae sound.
When mixing the reggae guitar sound, be mindful of its place in the overall mix. Reggae guitars are often upfront and prominent, but they should still blend well with the other instruments. Use EQ to shape the guitar’s frequency response, adding brightness and warmth where necessary. Apply compression to control dynamics and add sustain, and consider using subtle reverb or delay to add depth and create a sense of space.
By following these steps and experimenting with different guitar techniques and tones, you’ll be able to capture the unique reggae guitar sound in your Ableton Live productions. The skanking rhythm, melodic embellishments, and layered guitar tracks will add an unmistakable reggae flavor to your tracks.
With the rhythm section, bassline, layered drums and percussion, and the capturing of the reggae guitar sound, your reggae production in Ableton Live is well underway. In the next section, we’ll explore the role of horn sections and how they can enhance your reggae tracks.
Adding Horn Sections to Enhance Reggae Tracks
Horn sections are an iconic element of reggae music, adding a lively and vibrant sound to the genre. To enhance your reggae tracks in Ableton Live, consider incorporating horn sections using the following techniques:
- Selecting the right horn instruments: Choose virtual instruments or sample libraries that accurately emulate the sounds of brass instruments, such as trumpets, trombones, and saxophones. Look for instruments with a bright and punchy tone that can cut through the mix.
- Arranging horn parts: Craft horn arrangements that complement the existing musical elements in your track. Consider adding stabs, chords, sustained notes, and melodic lines that accentuate key moments and enhance the overall groove. Arrange the horn parts in tight harmony or counterpoint to create a rich and full sound.
- Layering multiple horn tracks: To achieve a fuller and more impactful horn section, layer multiple tracks with different brass instruments. Experiment with harmonizing the melodies, creating unison sections, or even incorporating call-and-response interactions between the different horns.
- Emphasizing the off-beats: Reggae music relies heavily on syncopation, and the horn section is no exception. Focus on accentuating the off-beats in your horn arrangements to create a rhythmic and dynamic feel. This will contribute to the overall groove and energy of the track.
- Effects and processing: Experiment with adding effects and processing to the horn sections to enhance their sound. Consider applying subtle reverb or delay to add depth, compression to control dynamics, and EQ to shape the tone. Don’t over-process the horns, but rather aim for a natural and balanced sound.
When mixing the horn section, ensure that the instruments blend well with the rest of the track. Pay attention to the balance between the horn section and the other elements, such as the rhythm section and vocals. Use panning, EQ, and volume adjustments to create space and clarity in the mix.
By incorporating horn sections in your reggae tracks, you can add a layer of excitement and flavor that will elevate the overall sound. The bright and vibrant tones of the brass instruments, combined with rhythmic accents and harmonies, will bring a dynamic and captivating presence to your reggae productions.
With the rhythm section, bassline, layered drums and percussion, reggae guitar sound, and the addition of horn sections, your reggae production in Ableton Live is coming together. In the next section, we’ll explore mixing techniques specific to reggae music to ensure that your tracks sound polished and professional.
Mixing Techniques for Reggae Music Production
Mixing is an essential step in the production process that can take your reggae tracks to the next level. Here are some mixing techniques specific to reggae music that will help you achieve a polished and professional sound in Ableton Live:
- Balance the levels: Start by setting the balance between all the elements of your track. Ensure that the vocals, instruments, and drums are well-balanced and sit together in the mix. Pay attention to the level of the bassline, which should be prominent enough to drive the rhythm without overpowering other instruments.
- Panning and stereo imaging: Use panning creatively to create a sense of space in your mix. Consider panning instruments like guitars, keyboards, and horns to different positions in the stereo field. This will help create a wider and more immersive listening experience.
- Add depth with reverb and delay: Use reverb and delay to add depth and space to your mix. Apply them subtly to simulate natural room ambience or to create a sense of distance between instruments. Experiment with different settings and decay times to find the right balance for each element.
- Equalization (EQ): Use EQ to shape the frequency response of each instrument, ensuring that they have their own space in the mix. Pay attention to the low-end to prevent muddiness and to the high-end to add brightness and clarity. Tame any harsh frequencies that may be present and boost the frequencies that bring out the character of each instrument.
- Compression and dynamics: Use compression to control the dynamics of individual tracks or groups of instruments. This will help even out the levels and add sustain to instruments if desired. Be mindful not to over-compress and lose the natural dynamics of the music.
- Stereo bus processing: Apply processing on the stereo bus to glue your mix together. Use gentle compression and EQ to enhance the overall balance and cohesion of the mix. Consider adding a subtle mastering limiter to control peaks and ensure the track is at an appropriate volume.
Take breaks and reference your mix on different playback systems to ensure that it translates well across different platforms. Trust your ears and make adjustments as needed to achieve the best possible mix for your reggae production.
Remember, mixing is an art form, and it takes time and practice to develop your skills. The most important thing is to trust your ears and make decisions that serve the overall musicality of the track.
By implementing these mixing techniques specific to reggae music, you’ll be able to achieve a professional and polished sound in your reggae productions in Ableton Live.
With the rhythm section, bassline, layered drums and percussion, reggae guitar sound, horn sections, and applied mixing techniques, your reggae production in Ableton Live is now ready to be showcased. In the next section, we’ll explore the fascinating world of dub effects and how they can take your reggae tracks to new heights.
Applying Dub Effects in Ableton Live
Dub effects are an integral part of reggae music, adding depth, space, and a unique sonic character to the tracks. Ableton Live provides various tools and techniques to apply dub effects to your reggae productions. Here’s how you can incorporate dub effects in Ableton Live:
- Delay and echo effects: Use Ableton Live’s built-in delay and echo plugins to create rhythmic and repetitive echoes. Experiment with different delay times, feedback settings, and filtering to achieve the desired effect. Apply the delay effect to instruments like guitars, vocals, and percussion to create a dub-inspired sound.
- Reverb and space effects: Add reverb to create an expansive and atmospheric sound. Experiment with different reverb settings – from short and subtle to long and spacious – to create depth and ambience in your mix. Apply reverb to instruments and vocals to give them a sense of space and enhance the overall immersive experience.
- Spring and plate reverbs: Emulate the classic sound of vintage spring and plate reverbs using Ableton Live’s plugins or third-party options. These reverbs have a distinctive character associated with reggae and can help create a vintage and nostalgic vibe in your tracks.
- Filter and modulation effects: Harness Ableton Live’s filter and modulation effects to shape and modulate the sound. Use filters to create sweeping and evolving textures, and apply modulation effects like chorus, flanger, or phaser to add movement and dimension to your instruments and vocals.
- Dub-style tape saturation and distortion: Experiment with tape saturation and distortion plugins to add warmth, grit, and character to your mix. These effects can simulate the sounds of analog tape machines and vintage equipment, imparting a vintage and analog feel to your reggae productions.
- Automation for dub effects: Utilize automation to create dynamic and evolving dub effects. Automate parameters like delay time, send levels, filter cutoff, and feedback to introduce movement and variation in your mix. This can add a live and improvisational feel to your reggae tracks.
Remember that dub effects are meant to be used creatively and sparingly. Apply them at key moments to emphasize certain sections, transitions, or solos. Use your ears and intuition to strike the right balance between the original sound and the desired effect.
By incorporating these dub effects techniques in Ableton Live, you can add an extra layer of creativity and experimentation to your reggae productions. The possibilities are endless, allowing you to achieve that authentic and immersive dub sound.
With the rhythm section, bassline, layered drums and percussion, reggae guitar sound, horn sections, applied mixing techniques, and dub effects, your reggae production in Ableton Live is now complete. So, sit back, relax, and enjoy the captivating sounds of your reggae masterpiece.
Conclusion
Congratulations! You’ve now explored the world of reggae music production in Ableton Live. From setting up your workspace to crafting authentic reggae elements and applying mixing techniques, you’ve learned how to create compelling reggae tracks that capture the essence of this beloved genre.
Reggae music is all about the rhythm, with its infectious grooves and melodic arrangements. By focusing on the rhythm section, crafting authentic basslines, layering drums and percussion, capturing the reggae guitar sound, adding horn sections, and applying dub effects, you’ve equipped yourself with the tools to create immersive and captivating reggae productions.
Throughout this journey, remember to trust your ears and embrace your creativity. Experiment with different techniques, incorporate your own artistic touch, and let the music guide you. Reggae is a genre that invites improvisation and open expression.
As you refine your skills in Ableton Live, continue to listen to and draw inspiration from the rich history of reggae music. Study the works of legendary artists, listen to their arrangements and production techniques, and use them as a foundation for your own creations.
Lastly, don’t be afraid to share your reggae productions with others. Whether it’s performing them live, releasing them on digital platforms, or simply sharing them with friends and fellow musicians, your music has the power to uplift and inspire others.
So, go forth and continue your journey as a reggae music producer in Ableton Live. Explore new sounds, push boundaries, and strive to create music that resonates with people around the world. Reggae music has a universal appeal, and with your passion and expertise, you can contribute to the ongoing legacy of this timeless genre.