Home>Instruments>Synthesizer>How To Add A Soundtrack To Musescore Synthesizer
Synthesizer
How To Add A Soundtrack To Musescore Synthesizer
Modified: January 22, 2024
Learn how to add a soundtrack to Musescore Synthesizer and enhance your music with the power of a synthesizer. Step-by-step guide to make your compositions come alive.
(Many of the links in this article redirect to a specific reviewed product. Your purchase of these products through affiliate links helps to generate commission for AudioLover.com, at no extra cost. Learn more)
Table of Contents
Introduction
Welcome to the world of Musescore, a powerful notation software that allows you to create and edit musical scores. One of the standout features of Musescore is its built-in Synthesizer, which enables you to add a soundtrack to your compositions, bringing them to life with realistic instrument sounds. Whether you’re a composer, arranger, or just a music enthusiast looking to enhance your listening experience, adding a soundtrack to Musescore will take your creations to the next level.
In this article, we’ll take you through the step-by-step process of adding a soundtrack to Musescore Synthesizer. We’ll cover everything from downloading and installing Musescore to selecting a soundtrack and adjusting the settings for the perfect sound. By the end of this tutorial, you’ll be able to seamlessly integrate a soundtrack into your Musescore scores and enjoy the full musical experience.
Before we dive into the details, let’s take a moment to appreciate how a soundtrack can enhance your compositions. Imagine a heartfelt piano piece resonating with the warmth and depth of a grand piano, or an orchestral arrangement painting vivid musical landscapes. By adding a soundtrack to your Musescore scores, you can transform them into immersive and captivating musical journeys.
Whether you’re composing a film score, creating an original piece, or arranging a popular song, the Musescore Synthesizer offers a vast array of instrument sounds to choose from. With a few simple clicks, you can select the perfect sound to match your musical vision.
So, if you’re ready to delve into the world of Musescore Synthesizer and unlock the full potential of your compositions, let’s get started with the first step: downloading and installing Musescore.
Step 1: Downloading and Installing Musescore
The first step in adding a soundtrack to Musescore is to download and install the software on your computer. Musescore is available for free and is compatible with Windows, Mac, and Linux operating systems.
To begin, open your preferred web browser and navigate to the official Musescore website. Once there, locate the download section and click on the appropriate version of Musescore for your operating system. The website will automatically detect your operating system, ensuring that you download the correct version.
After clicking the download button, the installation file will begin to download. Once the download is complete, locate the file on your computer and double-click to start the installation process. Follow the on-screen instructions to install Musescore onto your system.
During the installation, you may be prompted to choose additional optional components, such as soundfonts or additional plugins. Soundfonts are files that contain the samples used by the Synthesizer to produce the instrument sounds. You can choose to install these components if you want to expand your sound library, but they are not necessary to begin adding a soundtrack to Musescore.
Once the installation is complete, launch Musescore from your computer’s applications or programs menu. Congratulations! You now have Musescore installed and ready to use.
Before we move on to the next step, let’s take a moment to familiarize ourselves with the Musescore interface. When you open Musescore, you’ll be greeted by the start screen, which offers options to create a new score, open an existing score, or browse the Musescore community for scores shared by other users. To start adding a soundtrack, either create a new score or open an existing one.
Now that Musescore is installed and you’re familiar with the interface, it’s time to move on to Step 2: Opening Musescore Synthesizer.
Step 2: Opening Musescore Synthesizer
After launching Musescore and opening a score, it’s time to navigate to the Synthesizer window, where you can access and customize the instrument sounds.
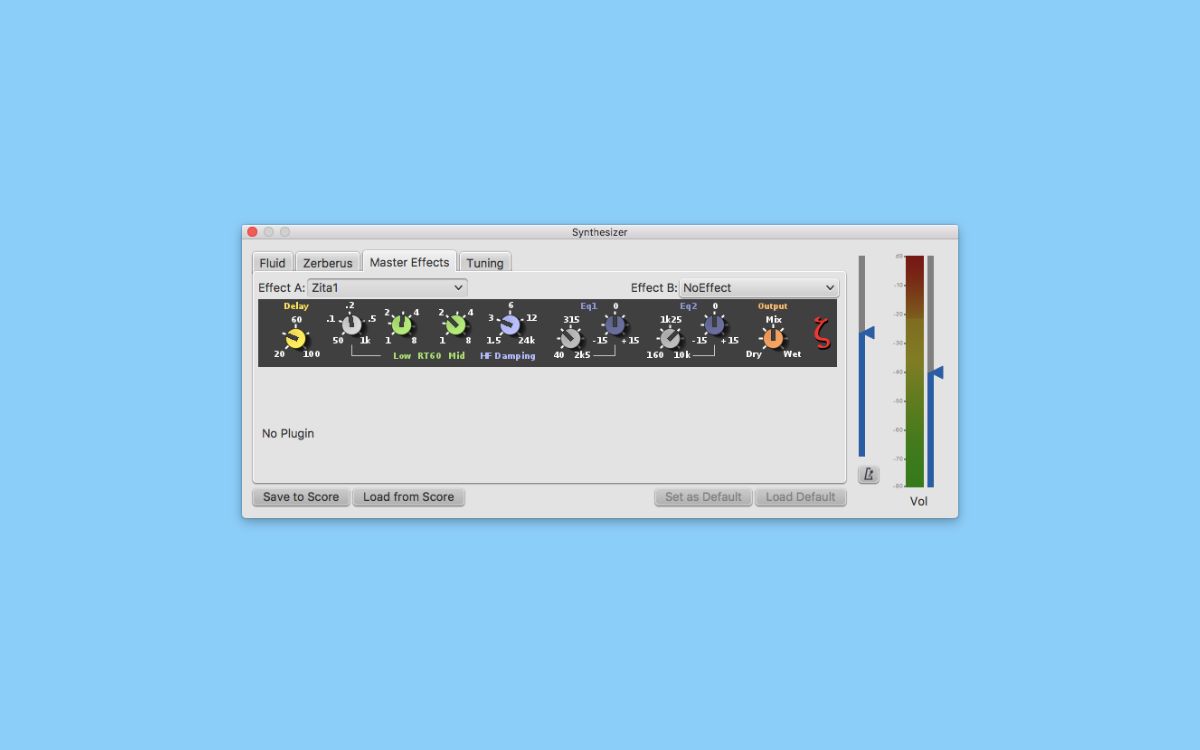
To open the Musescore Synthesizer, look for the toolbar at the top of the Musescore window. Locate the “View” menu and click on it. In the dropdown menu that appears, select “Synthesizer” (or press the shortcut key “F10” on your keyboard).
Once you click on “Synthesizer,” a new window will open, displaying the Synthesizer interface. In this window, you’ll find various tabs and options that allow you to control and adjust the instrument sounds in your score.
The Synthesizer window is divided into several sections. The first section is the “Instruments” tab, which lists all the instruments in your score. You can expand each instrument to access specific settings such as volume, panning, and modulation.
The second section is the “Mixer” tab. Here, you can adjust the volume, panning, and other parameters for each individual instrument or section in your score. This is particularly useful if you want to fine-tune the balance and blend of the different instrument sounds.
The third section is the “Soundfonts” tab. Soundfonts allow you to change the default instrument sounds provided by Musescore and use custom soundfonts instead. This tab lets you add and manage different soundfonts, giving you the flexibility to experiment with different instrument samples and textures.
Now that you have accessed the Musescore Synthesizer, you’re ready to proceed to the next step: selecting a soundtrack for your score. In the next section, we’ll explore how to choose the perfect sound to accompany your musical composition.
Step 3: Selecting a Soundtrack
Now that you have the Musescore Synthesizer open, it’s time to select a soundtrack to add to your score. The soundtrack will determine the instrument sounds that will accompany your composition.
In the “Instruments” tab of the Synthesizer window, you’ll see a list of all the instruments in your score. To select an instrument for the soundtrack, simply click on the instrument name. This will open a drop-down menu with a variety of instrument options to choose from.
Musescore provides a wide array of instrument sounds, ranging from orchestral instruments like strings, brass, and woodwinds to pianos, guitars, drums, and more. You can browse through the different categories and subcategories to find the instrument that suits your composition.
When selecting an instrument, consider the mood and style of your composition. For example, if you’re composing a romantic piece, you might choose a lush string ensemble or a melodic piano sound. If you’re working on an upbeat pop arrangement, you might opt for a punchy drum kit and a lively electric guitar.
As you explore the instrument options, keep in mind that each instrument has its own unique sound settings. These settings allow you to customize parameters like volume, expression, reverb, and more, giving you the ability to shape the sound to your liking.
If you’re looking for even more customization options, you can also explore the “Soundfonts” tab in the Synthesizer window. Soundfonts are external instrument libraries that can be used to expand the range of available instrument sounds in Musescore. By adding and selecting different soundfonts, you can access a broader palette of instrument choices.
Once you’ve selected an instrument or combination of instruments for your soundtrack, it’s time to move on to the next step: adding the soundtrack to your Musescore score. In the following section, we’ll guide you through the process of integrating the selected instrument sounds into your composition.
Step 4: Adding the Soundtrack to the Musescore Score
With the instrument sounds selected for your soundtrack, it’s time to add them to your Musescore score. This step involves assigning the chosen instruments to the respective staves in your composition.
To begin, make sure you have your score open in Musescore. Locate the staves or staff lines in your score where you want the soundtrack to be added. Each staff represents a musical part or instrument.
In the Synthesizer window, navigate to the “Instruments” tab. Here, you’ll see a list of all the instruments in your score. To assign an instrument to a specific staff, simply click on the instrument name and choose the desired instrument from the drop-down menu.
If your score already has instruments assigned to the staves, you can replace them by selecting a different instrument from the drop-down menu. Alternatively, you can keep the existing instruments and add layers of additional instrument sounds for a richer and more complex musical texture.
As you assign instruments to the staves, you can also control the volume and other parameters specific to each instrument. Adjusting these settings allows you to balance the sound levels and create a desired mix within your score.
Once you have assigned the instruments to the staves in your score, take a moment to listen to how they sound together. You can do this by using the play button in the toolbar or by pressing the spacebar on your keyboard. This will play your score with the added soundtrack, giving you a preview of how it will sound.
As you listen, if you feel that certain instruments are too loud or too soft, or if you want to fine-tune any other aspects of the sound, you can go back to the Synthesizer window and adjust the instrument settings in the “Instruments” or “Mixer” tab accordingly.
With the soundtrack now seamlessly integrated into your Musescore score, you’re ready to move on to the next step: adjusting the soundtrack settings. In the following section, we’ll explore how you can further refine the instrument sounds to achieve the desired musical expression.
Step 5: Adjusting Soundtrack Settings
Now that you have added the soundtrack to your Musescore score, it’s time to fine-tune and adjust the settings to achieve the desired sound. The Musescore Synthesizer provides a variety of options to customize the instrument sounds and overall playback.
First, let’s explore the “Instruments” tab in the Synthesizer window. Here, you can adjust settings specific to each instrument, such as volume, panning, and expression. Adjusting the volume allows you to balance the sound levels between different instruments, ensuring a harmonious blend. Panning allows you to position the sound in the stereo field, creating a sense of spatial depth. Expression controls elements like dynamics, articulations, and vibrato, enabling you to infuse the performance with nuance and emotion.
In addition to the instrument-specific settings, you can also use the “Mixer” tab to further refine the overall sound mix. In this tab, you can adjust the volume, panning, and other parameters for each individual instrument or section in your score. This gives you greater control over the overall balance and blend of the instrument sounds, ensuring that each part is heard at the desired level.
Furthermore, the Synthesizer window provides access to effects such as reverb and chorus through the “FX” tab. These effects can add depth, ambiance, and richness to the sound, enhancing the realism of the instrument sounds. Experiment with the effects settings to find the right amount of ambiance and spatialization that complements your composition.
It’s also worth mentioning that Musescore allows you to apply different soundfonts to your soundtrack through the “Soundfonts” tab. This opens up a world of possibilities to explore different instrument samples and textures. You can add and manage various soundfonts and select the most suitable ones for your composition, expanding your sonic palette even further.
As you make adjustments to the soundtrack settings, take the time to listen to your score and make any necessary changes. Remember that the goal is to achieve a balanced and expressive sound that enhances the overall musical experience.
Once you are satisfied with the adjustments you have made to the soundtrack settings, you’re ready for the final step: playing your score with the added soundtrack. In the next section, we’ll guide you through the process of playing your composition and experiencing the full musical impact of the soundtrack.
Step 6: Playing the Score with the Added Soundtrack
Now that you have added the soundtrack and adjusted the settings to your liking, it’s time to experience the full musical impact of your composition by playing the score with the added soundtrack.
To play your score in Musescore, you can use the play button located in the toolbar or simply press the spacebar on your keyboard. This will start the playback and allow you to listen to your composition in real-time.
As the score plays, listen attentively to how the added soundtrack blends with your musical arrangement. Pay attention to the dynamics, the interactions between the different instrument sounds, and the overall balance of the mix.
If you notice any issues or areas of improvement, you can always go back to the Synthesizer window and make further adjustments to the sound settings. Fine-tuning the volume levels, the panning, the expression, and other parameters can help you achieve the desired musical expression and enhance the impact of your composition.
Listening to your score with the added soundtrack also allows you to hear how different instrument combinations and soundfonts work together. Take note of the textures and layers created by the various instrument sounds, and determine if any changes are needed to better convey the intended musical ideas.
During playback, you can also use the playback controls in Musescore to pause, rewind, or skip to specific sections of your score. This allows you to analyze and evaluate the soundtrack in different musical contexts and make any necessary adjustments for a more cohesive and polished composition.
Remember that playing your score with the added soundtrack is an essential step in the composition process. It helps you assess the overall musicality, ensure the desired emotions are conveyed, and refine the soundtrack to achieve your artistic vision.
Once you are fully satisfied with the sound and musicality of your composition, it’s time to save your work and share it with others. Musescore provides options to export your score in various formats, including audio files, sheet music, and even MIDI files, allowing you to distribute your masterpiece and let others experience your music.
With the final step complete, you have successfully added a soundtrack to your Musescore composition. You’ve learned how to select instruments, adjust settings, and play your score with the added soundtrack, bringing your musical vision to life in an immersive and captivating way.
Now it’s time to continue exploring the possibilities of Musescore and unleashing your creativity in future compositions. Happy composing!
Conclusion
Adding a soundtrack to your Musescore composition is a powerful way to enhance your musical creations and bring them to life. The Musescore Synthesizer provides a wide range of instrument sounds and customization options, allowing you to create compelling and immersive musical experiences.
In this article, we’ve walked you through the step-by-step process of downloading and installing Musescore, opening the Synthesizer, selecting a soundtrack, adding it to your score, adjusting the sound settings, and finally, playing your composition with the added soundtrack.
By following these steps, you have gained the ability to create expressive and professional-sounding scores that truly showcase your musical ideas. The flexibility of the Musescore Synthesizer gives you the freedom to experiment with different instrument sounds, tailor the mix to your liking, and add your personal touch to each composition.
Remember to listen to your score as you make changes, evaluating the blend of instrument sounds and adjusting the settings as needed. It’s a process of refinement and artistic expression that can elevate your compositions to new heights.
As you continue to explore the possibilities of Musescore, don’t hesitate to experiment, try different instrument combinations, and explore soundfonts to further expand your sonic palette.
Lastly, don’t forget to save and share your compositions once you’ve achieved your desired sound. Sharing your musical creations with the world is an exciting way to connect with other musicians, receive feedback, and inspire others through your unique artistic voice.
Now that you have mastered the art of adding a soundtrack to Musescore, embrace your creativity, and continue composing beautiful and captivating music.