Home>Production & Technology>Metronome>How To Adjust Metronome Musescore
Metronome
How To Adjust Metronome Musescore
Published: January 13, 2024
Learn how to adjust the metronome in Musescore and improve your musical timing. Find step-by-step instructions and tips for using the metronome feature.
(Many of the links in this article redirect to a specific reviewed product. Your purchase of these products through affiliate links helps to generate commission for AudioLover.com, at no extra cost. Learn more)
Table of Contents
Introduction
Welcome to the world of music, where rhythm and timing play a vital role in creating beautiful melodies. Whether you are a beginner musician or an experienced composer, mastering the art of keeping time is essential. This is where a metronome comes into play.
A metronome is a device that produces regular, precise beats to help musicians maintain a steady tempo while practicing or performing. It acts as a musical guide, providing a consistent pulse that keeps everyone in sync. While there are various types of metronomes available, one popular option among musicians is the Metronome feature in MuseScore.
MuseScore is a powerful and intuitive music notation software that offers a wide range of tools for musicians and composers. In addition to its notation capabilities, MuseScore includes a built-in Metronome feature that allows you to adjust the beats per minute (BPM), select a time signature, and even customize the metronome sound.
In this article, we will explore how to adjust the Metronome in MuseScore, enabling you to fine-tune the rhythmic foundation of your compositions. Whether you want a slow, soothing tempo or a fast-paced beat, MuseScore’s Metronome feature has got you covered.
Step 1: Opening MuseScore
The first step in adjusting the Metronome in MuseScore is to open the software on your computer. If you haven’t installed MuseScore yet, you can download it from the official website and follow the installation instructions specific to your operating system.
Once MuseScore is installed, locate the program icon on your desktop or in your applications folder and double-click to launch it. MuseScore has a user-friendly interface, making it easy to navigate and access its various features.
Once the program is open, you will be greeted with the MuseScore start center. From here, you can choose to create a new score, open an existing score, or access recent scores. Select the option that is most relevant to your needs.
If you are starting a new composition, you can click on “Create new score” to begin a fresh project. MuseScore provides a range of templates and options to help you get started, such as choosing the instrument, key signature, and time signature.
If you already have a score that you want to work with, click on “Open score” and navigate to the location where your score is saved on your computer. Select the file and click “Open” to load it into MuseScore.
Once you have your score open in MuseScore, you are ready to move on to the next step of adjusting the Metronome settings.
Step 2: Accessing the Metronome Settings
Now that you have MuseScore open and your score loaded, it’s time to access the Metronome settings. MuseScore makes it easy to adjust the Metronome to fit your desired tempo and time signature.
To access the Metronome settings, look for the toolbar at the top of the MuseScore window. Among the various icons and options, you will find the Metronome icon. It resembles a small clock or metronome symbol. Click on this icon to open the Metronome settings window.
Alternatively, you can access the Metronome settings by going to the “View” menu at the top of the MuseScore window and selecting “Metronome” from the dropdown menu. This will open the Metronome settings window as well.
Once the Metronome settings window is open, you will see several options for customizing the Metronome. This includes the Beats per Minute (BPM), the time signature, and the metronome sound.
Adjusting the Beats per Minute: The BPM determines the speed or tempo of the Metronome. You can increase or decrease the value by using the up and down arrows or by manually typing in the desired BPM. Experiment with different BPM settings to find the tempo that suits your composition.
Selecting the Time Signature: MuseScore allows you to choose from a variety of time signatures, such as 4/4, 3/4, 6/8, and more. The time signature determines the number of beats in each measure and the note value that represents one beat. Select the appropriate time signature for your piece.
Customizing the Metronome Sound: MuseScore offers different sound options for the Metronome, allowing you to choose the sound that resonates with you the most. You can listen to the sound samples by clicking on the play button next to each option. Select the sound that complements your composition.
Once you have adjusted the Metronome settings to your liking, you’re ready to move on to the next step of applying and saving the settings.
Step 3: Adjusting the Beats per Minute (BPM)
After accessing the Metronome settings in MuseScore, you can fine-tune the tempo of your composition by adjusting the Beats per Minute (BPM). The BPM determines the speed at which the metronome will click or beep, providing a consistent rhythm to guide your playing.
To adjust the BPM, locate the field labeled “Beats per Minute” in the Metronome settings window. You will typically find this field next to a numerical value indicating the current BPM.
There are a few different ways you can modify the BPM value:
- Using the Up and Down Arrows: You can increase or decrease the BPM by clicking on the up or down arrows next to the numerical field. Each click will adjust the BPM by a small increment, allowing you to fine-tune the tempo.
- Manually Typing the BPM: If you have a specific BPM in mind, you can directly type it into the numerical field. Simply click on the field and enter the desired BPM using your keyboard. This method is useful if you already know the tempo you want for your composition.
- Using the Slider: Some versions of MuseScore may include a slider next to the numerical field. You can drag the slider left or right to increase or decrease the BPM. This method provides a visual representation of the tempo, making it easy to adjust.
As you modify the BPM value, listen to how it affects the metronome sound. A higher BPM will result in a faster tempo, while a lower BPM will slow it down. Experiment with different BPM settings to find the ideal tempo that suits your composition.
It’s important to note that the appropriate BPM will vary depending on the piece of music and the desired effect. For example, a gentle ballad might have a slower BPM, while an energetic dance piece may have a faster BPM.
Take your time to find the perfect tempo that enhances the mood and feel of your composition. Once you have adjusted the BPM to your satisfaction, you’re ready to move on to the next step of selecting the time signature.
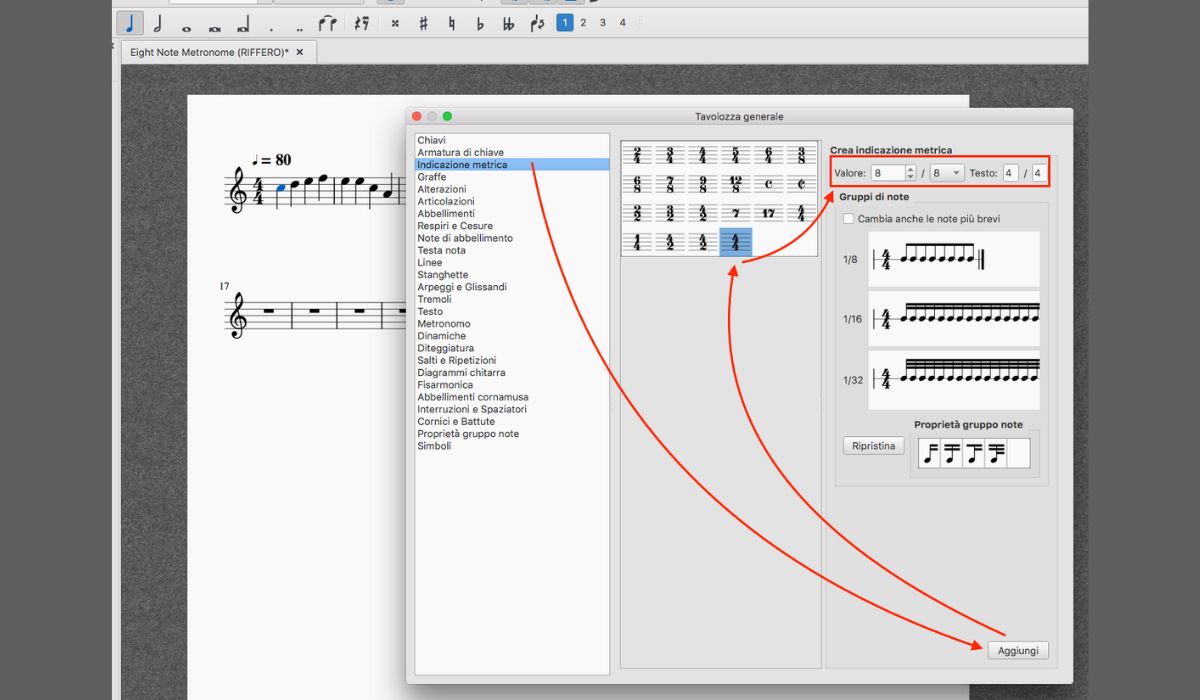
Step 4: Selecting the Time Signature
After adjusting the Beats per Minute (BPM) in MuseScore’s Metronome settings, the next step is to select the appropriate time signature for your composition. The time signature determines the number of beats in each measure and the note value that represents one beat, giving your music a rhythmic structure.
To choose the time signature, look for the relevant option in the Metronome settings window. Typically, there will be a dropdown menu or a field where you can select the desired time signature.
MuseScore offers a variety of commonly used time signatures, such as 4/4, 3/4, 6/8, and more. The first number in the time signature indicates the number of beats per measure, while the second number represents the note value that receives one beat.
Here are a few examples of common time signatures:
- 4/4 Time Signature: This is the most common time signature and is often referred to as “common time.” It has four beats per measure, and a quarter note represents one beat. It gives a balanced and regular rhythm to your music.
- 3/4 Time Signature: This time signature has three beats per measure, and a quarter note represents one beat. It is commonly used in waltzes and gives a lilting, dance-like feel to your composition.
- 6/8 Time Signature: This time signature has six beats per measure, and an eighth note represents one beat. It is commonly used in upbeat and fast-paced music, giving a lively and energetic feel to your composition.
Select the time signature that best fits the rhythm and feel of your composition. If you’re unsure which time signature to choose, consider the musical style and mood you want to convey. Experiment with different time signatures to find the one that complements your music.
It’s important to note that you can change the time signature throughout your composition to add variety and create different rhythmic patterns. MuseScore allows you to insert time signature changes at different points in your score, giving you flexibility in expressing your musical ideas.
Once you have selected the appropriate time signature, you’re ready to move on to the next step of customizing the metronome sound to enhance your composition.
Step 5: Customizing the Metronome Sound
In addition to adjusting the Beats per Minute (BPM) and selecting the time signature, MuseScore allows you to customize the sound of the metronome. This feature gives you the flexibility to choose a metronome sound that complements your composition.
To customize the metronome sound in MuseScore, locate the options related to sound in the Metronome settings window. Depending on the version of MuseScore you are using, these options may appear as a dropdown menu or a selection of checkboxes.
MuseScore typically offers a range of sound options for the metronome, including various clicks, beeps, or even different musical instruments. Here are some common metronome sound options:
- Click: This is a simple, sharp sound that simulates the sound of a traditional metronome. It provides a clear and concise auditory cue for the beats.
- Beep: This option produces a short, electronic beep sound for each beat. It is a more modern and versatile choice, suitable for a wide range of musical styles.
- Instrument Sounds: Some versions of MuseScore offer the option to use instrument sounds for the metronome. This allows you to select a specific instrument, such as a piano or a drum, to provide a more melodic or rhythmic metronome experience.
Click on each sound option to preview the sound. MuseScore usually includes a play button or a sample sound next to each option, allowing you to listen before making a selection.
Choose the metronome sound that best complements your composition and enhances the overall musical experience. Consider the style, genre, and mood of your piece when making your selection. It’s important to find a metronome sound that blends well with your music without overpowering it.
Feel free to experiment with different metronome sounds to find the one that resonates with you the most. Remember, the metronome sound can have a significant impact on your playing and interpretation of the music, so take your time to find the perfect fit.
Once you have customized the metronome sound to your liking, you’re ready to move on to the final step of saving and applying the Metronome settings to your composition.
Step 6: Saving and Applying Metronome Settings
After adjusting the Beats per Minute (BPM), selecting the time signature, and customizing the metronome sound in MuseScore, it’s important to save and apply these settings to your composition. This ensures that your desired metronome settings are consistently used whenever you play or practice your music.
To save and apply the Metronome settings in MuseScore, you can follow these steps:
- Once you have adjusted the Metronome settings to your liking, look for a “Save” or “Apply” button within the Metronome settings window. Click on this button to save your changes.
- After saving the settings, the Metronome settings window will typically close automatically. If it doesn’t, you can manually close the window by clicking the “Close” or “X” button.
- The Metronome settings you’ve chosen are now applied to your composition. Whenever you play or listen to your music using MuseScore, the metronome will follow the adjusted BPM, time signature, and sound preferences you set.
- If you want to make further adjustments to the Metronome settings at any time, simply follow the steps mentioned earlier to re-access the Metronome settings window. You can modify the BPM, time signature, or metronome sound as needed.
It’s worth noting that saving the Metronome settings within MuseScore is specific to the score you are working on. Each MuseScore score can have its own unique Metronome settings, allowing you to tailor the metronome experience for different compositions or arrangements.
Remember to save your MuseScore score regularly to ensure that your Metronome settings are preserved. This way, when you reopen the score in the future, your desired metronome settings will be ready for you to use.
With the Metronome settings saved and applied, you can now confidently practice or perform your composition with the guidance of the metronome. The consistent tempo and rhythmic structure provided by the metronome will help you maintain precision and develop a solid sense of timing in your music.
By adjusting the BPM, selecting the time signature, and customizing the metronome sound, you have successfully tailored the Metronome settings in MuseScore to suit your musical needs. Enjoy the journey of creating and perfecting your compositions with the help of the MuseScore Metronome feature!
Conclusion
Mastering rhythm and timing is crucial for any musician, and the Metronome feature in MuseScore provides a valuable tool to help you achieve this. In this article, we explored how to adjust the Metronome settings in MuseScore, allowing you to fine-tune the tempo, time signature, and metronome sound to suit your composition.
Starting with opening MuseScore and accessing the Metronome settings, we then delved into adjusting the Beats per Minute (BPM) to set the desired tempo of your music. We also discussed how to select the appropriate time signature, which provides a rhythmic structure for your composition.
Furthermore, we explored the option to customize the metronome sound, giving you the freedom to choose a sound that complements your music and enhances the overall experience. By providing various sound options, MuseScore allows you to personalize the metronome to suit different musical styles and genres.
Finally, we highlighted the importance of saving and applying the Metronome settings to your composition, ensuring that your desired metronome settings are consistently used whenever you play or practice your music in MuseScore.
With the knowledge gained from this article, you can confidently utilize the Metronome feature in MuseScore to practice with precision, maintain a steady tempo, and develop a strong sense of rhythm. Whether you’re a beginner learning the basics of timing or an experienced musician looking to refine your skills, the Metronome in MuseScore is a valuable tool that will support your musical journey.
So, go ahead and explore the Metronome settings in MuseScore. Experiment with different tempos, time signatures, and metronome sounds to find the perfect blend that brings your compositions to life. Happy composing and practicing!