Home>Production & Technology>Soundtrack>How To Add A Soundtrack To IMovie
Soundtrack
How To Add A Soundtrack To IMovie
Published: February 18, 2024
Learn how to easily add a soundtrack to your iMovie project and enhance your videos with the perfect music. Follow these simple steps to elevate your video creations.
(Many of the links in this article redirect to a specific reviewed product. Your purchase of these products through affiliate links helps to generate commission for AudioLover.com, at no extra cost. Learn more)
Table of Contents
Introduction
Adding a soundtrack to your iMovie project can elevate the overall viewing experience by evoking emotions, setting the tone, and enhancing the storytelling. Whether you're creating a captivating travel montage, a heartwarming family video, or a professional presentation, the right soundtrack can make a significant difference. iMovie, a user-friendly video editing software, offers a seamless process for incorporating soundtracks into your projects. In this guide, we will explore the step-by-step process of adding a soundtrack to your iMovie creation, allowing you to infuse your videos with the perfect musical accompaniment.
By incorporating a carefully selected soundtrack, you can engage your audience on a deeper level, guiding their emotions and enhancing the impact of your visual storytelling. From upbeat tunes that infuse energy into your project to poignant melodies that tug at the heartstrings, the soundtrack sets the mood and complements the narrative. With iMovie's intuitive interface, you can effortlessly integrate the perfect soundtrack, transforming your videos into captivating works of art.
Whether you're a seasoned filmmaker or a novice video creator, the ability to add a soundtrack to your iMovie project opens up a world of creative possibilities. Throughout this guide, we will walk you through each step, providing clear instructions and valuable tips to ensure that your soundtrack seamlessly aligns with your visual content. By the end of this tutorial, you'll be equipped with the knowledge and skills to expertly incorporate soundtracks into your iMovie projects, leaving a lasting impression on your audience. Let's embark on this journey to enhance your videos with the power of music.
Step 1: Open iMovie
To begin the process of adding a soundtrack to your iMovie project, the first step is to open the iMovie application on your device. Whether you’re using a Mac computer, an iPhone, or an iPad, iMovie provides a user-friendly platform for editing and enhancing your videos. Locate the iMovie icon in your applications folder or on your device’s home screen, and click or tap to open the application.
Upon launching iMovie, you’ll be greeted by a welcoming interface that offers a range of options for creating and editing videos. If you’re starting a new project, you can select the “Create New” or “New Project” option to initiate a fresh video editing session. For those who wish to add a soundtrack to an existing project, simply open the project within the iMovie interface to proceed to the next steps.
iMovie’s intuitive design and layout make it easy for users to navigate through the various features and tools. The application’s user-friendly approach ensures that both beginners and experienced video editors can seamlessly access the necessary functions for enhancing their projects. As you embark on this journey to incorporate a soundtrack into your iMovie creation, the process begins with the simple yet crucial step of opening the iMovie application.
With iMovie now open and ready for your creative input, you’re one step closer to infusing your videos with the perfect musical accompaniment. The next steps will guide you through the process of importing media, selecting a soundtrack, and fine-tuning its placement and duration within your project. Let’s continue on this exciting journey to elevate your videos with the power of music.
Step 2: Import Media
Once you have opened iMovie and initiated a new project or accessed an existing one, the next step is to import the media files that you intend to include in your video. Whether it’s video clips, photos, or audio files, iMovie allows you to seamlessly integrate various forms of media to craft a compelling visual story.
To import media into your iMovie project, navigate to the “Import Media” or “Import” option within the application’s interface. This function enables you to browse through your device’s storage and select the specific files that you wish to incorporate into your project. Whether you’re sourcing media from your device’s internal storage, an external drive, or cloud storage, iMovie provides flexibility in accessing your content.
Upon selecting the desired media files, iMovie facilitates a smooth import process, seamlessly integrating the chosen content into your project’s timeline. This allows you to arrange and edit the imported media to align with your storytelling vision. Whether you’re assembling a sequence of video clips, adding captivating photos, or incorporating audio elements, iMovie’s import functionality streamlines the process, ensuring that your creative vision comes to life.
As you import the essential media elements into your iMovie project, consider the narrative flow and the emotional impact you aim to achieve. Each piece of media contributes to the overall storytelling experience, and by thoughtfully selecting and importing them into iMovie, you lay the foundation for a captivating and cohesive visual narrative.
With the media now seamlessly integrated into your iMovie project, you’re ready to embark on the next steps, which involve selecting and adding the perfect soundtrack to complement your visual content. The upcoming sections will guide you through the process of incorporating a soundtrack and fine-tuning its placement within your project, allowing you to create a harmonious blend of visuals and music that captivate your audience.
Step 3: Add Soundtrack
With your media imported and your project taking shape, it’s time to add a soundtrack that complements and enhances the visual storytelling. iMovie offers a diverse library of soundtracks and allows you to import your own music to personalize your project further.
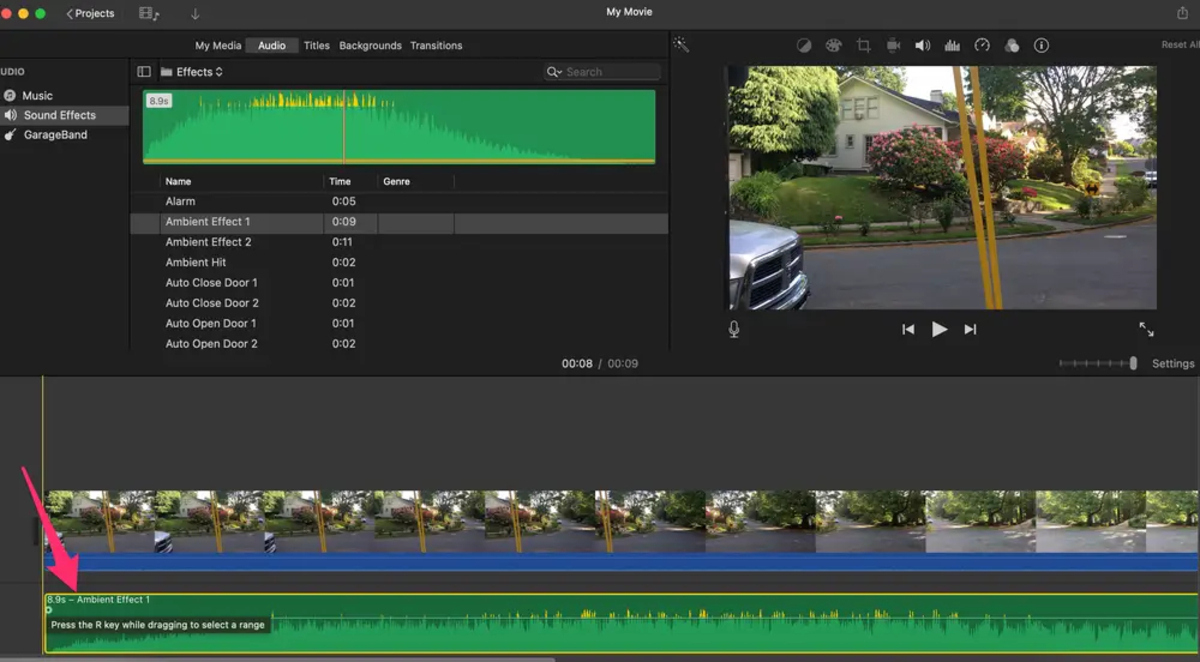
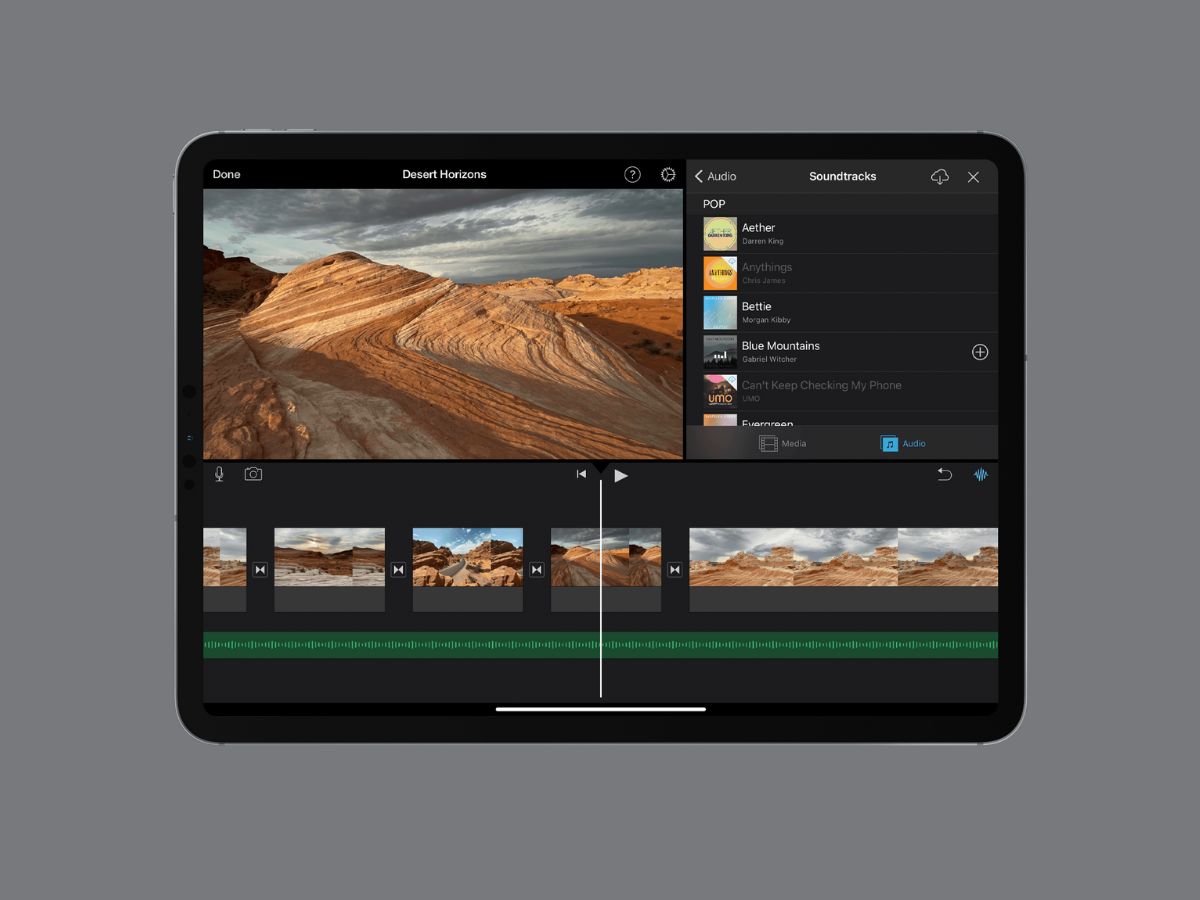
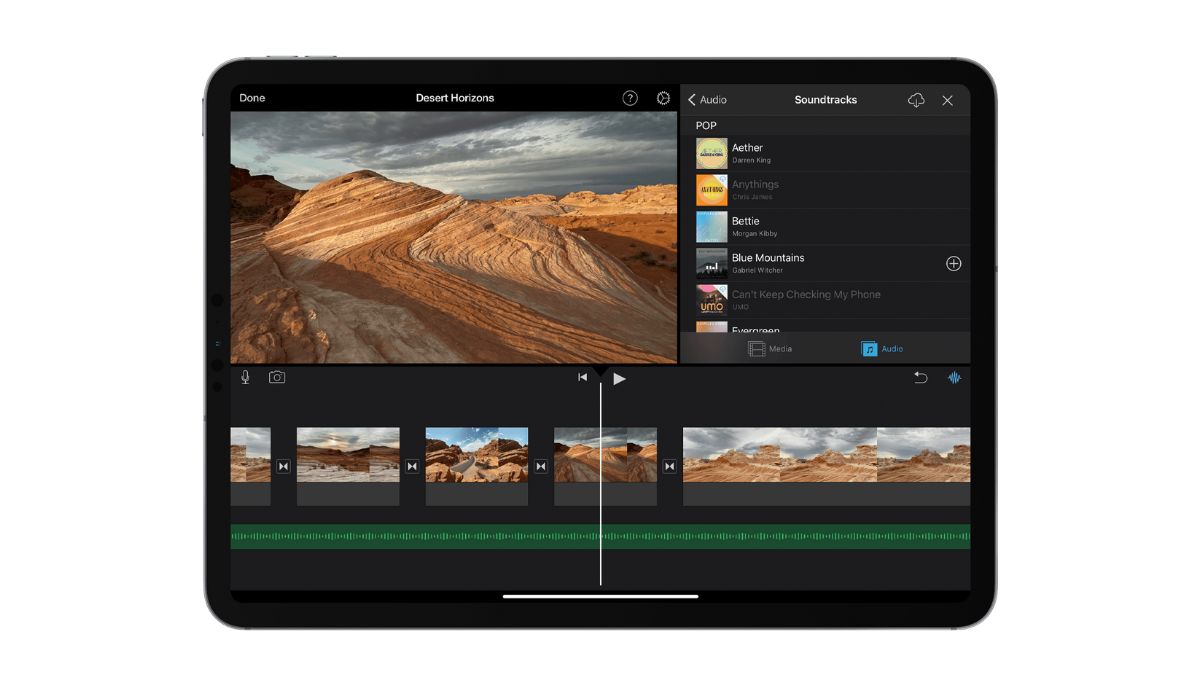
To add a soundtrack from iMovie’s built-in library, navigate to the “Audio” or “Soundtracks” section within the application. Here, you’ll find a collection of pre-installed soundtracks, sorted by mood, genre, and other categories. Browse through the available options to select a soundtrack that aligns with the tone and emotion you wish to convey in your video.
If you prefer to use your own music or sound clips, iMovie enables you to import these files from your device’s storage. By selecting the “Import” or “Add Music” option, you can seamlessly integrate your personalized soundtracks into your project, adding a unique touch to your video creation.
As you explore the soundtrack options and make your selection, consider the pacing, mood, and narrative of your video. The soundtrack serves as a powerful tool to evoke emotions, guide the audience’s experience, and elevate the overall impact of your visual storytelling. Whether you opt for a lively, upbeat track to infuse energy into your project or a poignant melody to convey heartfelt emotions, the soundtrack plays a pivotal role in shaping the viewer’s perception.
Once you’ve chosen the perfect soundtrack for your project, iMovie allows you to seamlessly add it to your timeline, aligning it with the visual elements to create a harmonious blend of audio and video. With the soundtrack now integrated into your project, you’re one step closer to delivering a captivating viewing experience that resonates with your audience on a deeper level.
As we proceed to the next step, you’ll have the opportunity to fine-tune and adjust the soundtrack to align perfectly with your visual content, ensuring a seamless and impactful fusion of music and storytelling. Let’s delve into the process of refining and optimizing the soundtrack within your iMovie project, allowing you to craft a compelling audio-visual narrative.
Step 4: Adjust Soundtrack
With the soundtrack seamlessly integrated into your iMovie project, it’s time to fine-tune and adjust its placement and characteristics to align perfectly with your visual storytelling. iMovie provides a range of tools and features that allow you to customize and optimize the soundtrack, ensuring that it enhances the overall viewing experience.
One of the key aspects of adjusting the soundtrack is aligning it with the narrative flow and emotional beats of your video. By trimming and rearranging the soundtrack within the timeline, you can synchronize the music with specific scenes, transitions, and impactful moments, creating a seamless fusion of audio and visual elements.
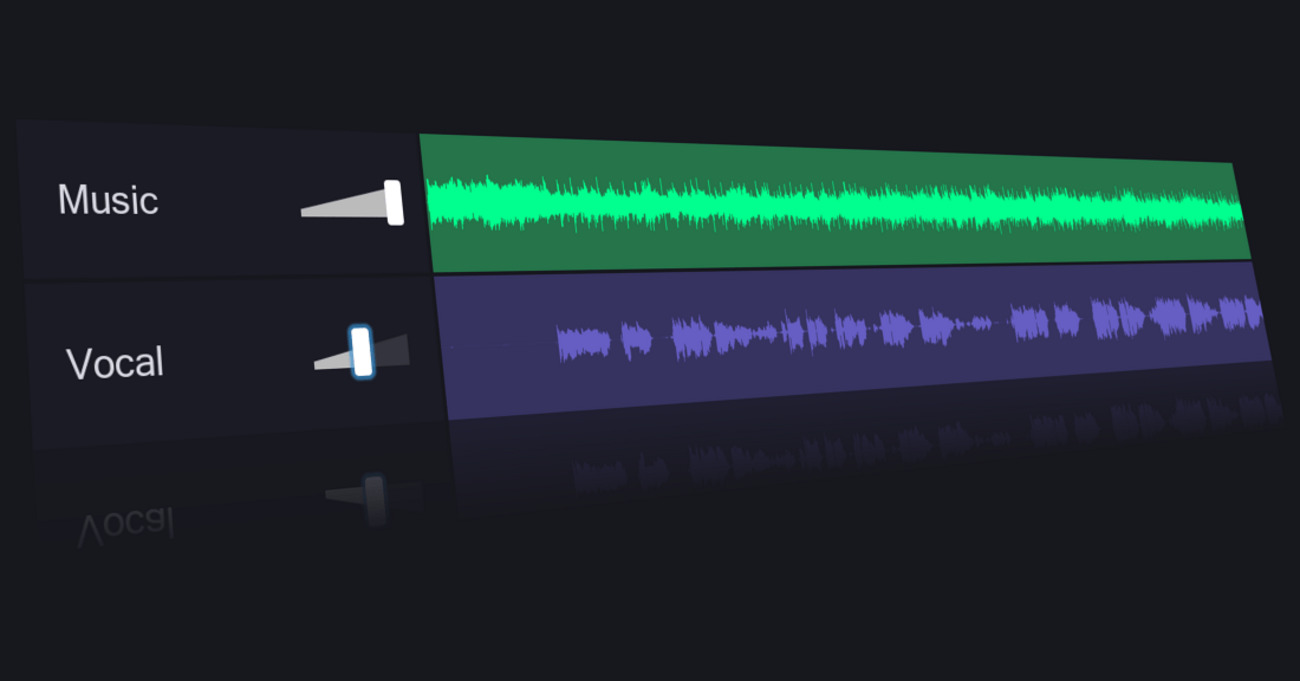
iMovie’s intuitive editing interface empowers you to adjust the volume levels of the soundtrack, ensuring that it complements the dialogue and other audio elements within your video. By balancing the audio components, you can create a cohesive and immersive auditory experience for your audience.
Additionally, iMovie offers features that enable you to apply audio effects and enhancements to the soundtrack. Whether it’s adding fades, adjusting the equalization, or incorporating audio filters, these tools allow you to refine the sonic characteristics of the soundtrack, further elevating its impact on the viewer.
As you fine-tune the soundtrack, consider the pacing, mood shifts, and emotional nuances within your video. The soundtrack should seamlessly adapt to the evolving narrative, enhancing the audience’s engagement and emotional resonance throughout the viewing experience.
By leveraging iMovie’s editing capabilities to adjust and optimize the soundtrack, you can ensure that the audio elements harmoniously complement the visual storytelling, resulting in a cohesive and impactful viewing experience. With the soundtrack now finely tuned to align with your video’s narrative and emotional dynamics, you’re ready to proceed to the final steps of refining your project and preparing it for sharing with your audience.
As we move forward, we’ll explore the process of exporting your iMovie project, allowing you to share your expertly crafted video creation with the world. Let’s delve into the final steps of preparing your project for distribution and celebrating the culmination of your creative endeavor.
Step 5: Export the Project
With your iMovie project now complete, it’s time to prepare it for sharing with your audience. The process of exporting your project from iMovie ensures that it is ready to be viewed on various platforms and devices, allowing you to showcase your creative work to the world.
To export your project, navigate to the “File” or “Share” option within the iMovie interface. Here, you’ll find a range of export settings and formats to choose from, catering to different viewing preferences and distribution platforms. Whether you intend to share your video on social media, upload it to a video hosting platform, or save it for personal viewing, iMovie offers versatile export options to suit your needs.
Before exporting your project, consider the optimal resolution and file format for your intended audience and viewing platform. iMovie provides settings that allow you to customize the video quality, ensuring that your project is presented in the best possible format for your viewers to enjoy.
As part of the export process, you can also incorporate title screens, credits, and other introductory or concluding elements to enrich the viewing experience. iMovie’s features empower you to add professional touches to your project, creating a polished and engaging presentation for your audience.
Once you’ve selected the export settings and personalized the presentation of your project, iMovie initiates the export process, generating the final video file that encapsulates your creative vision. Depending on the length and complexity of your project, the export process may take some time to complete, ensuring that your video is meticulously crafted and ready for viewing.
Upon the completion of the export, your iMovie project is transformed into a standalone video file, ready to be shared, viewed, and appreciated by your audience. Whether it’s a personal project, a professional presentation, or a creative endeavor, the export process marks the culmination of your efforts, allowing you to showcase your video creation to the world.
With the video now exported and prepared for distribution, you’ve successfully navigated the process of adding a soundtrack to your iMovie project, refining the audio-visual narrative to captivate and resonate with your audience. As you embark on sharing your expertly crafted video creation, take pride in the journey you’ve undertaken to infuse your project with the power of music and storytelling.