Home>Production & Technology>Composer>How To Use Avid Media Composer
Composer
How To Use Avid Media Composer
Modified: January 22, 2024
Learn how to effectively use Avid Media Composer as a composer. Elevate your editing skills and create professional-quality videos.
(Many of the links in this article redirect to a specific reviewed product. Your purchase of these products through affiliate links helps to generate commission for AudioLover.com, at no extra cost. Learn more)
Table of Contents
What is Avid Media Composer?
Avid Media Composer is a professional video editing software widely used in the film, television, and video production industries. It is known for its robust feature set, versatility, and reliability, making it the go-to choice for many editors and post-production professionals.
Media Composer offers a comprehensive set of tools and capabilities that allow editors to handle all aspects of the editing process, from importing and organizing media to advanced editing techniques and final project delivery. Whether you’re working on a short film, a documentary, or a feature-length movie, Media Composer provides the tools necessary to bring your vision to life.
One of the standout features of Avid Media Composer is its ability to handle large projects with ease. It is capable of handling high-resolution footage, multi-camera editing, and complex visual effects, giving editors the flexibility to work on projects of any scale.
With its intuitive user interface, Media Composer ensures a smooth and efficient editing workflow. Editors have access to a wide range of editing tools, including trim modes, timeline editing, and real-time effects. The software also supports advanced features such as frame-accurate audio editing, multi-layered timelines, and collaboration tools that enable multiple editors to work on the same project simultaneously.
Media Composer seamlessly integrates with other Avid tools and solutions, allowing for a streamlined editing and post-production process. For example, it can easily exchange media files with Avid Pro Tools, the industry-standard audio editing software, facilitating efficient audio post-production workflows.
Furthermore, Media Composer offers compatibility with a wide range of camera formats, making it easy to work with footage from various sources. Whether you’re shooting on set with a professional cinema camera or using a DSLR for a small-scale production, Media Composer ensures a seamless import and editing process.
Overall, Avid Media Composer is a powerful and versatile video editing software that provides editors with the necessary tools to create professional-quality content. Its wide adoption in the industry and continuous development by Avid make it a reliable choice for video editing professionals across the globe.
System Requirements
Before installing Avid Media Composer, it is essential to check if your system meets the minimum requirements to ensure smooth and optimal performance. Here are the system requirements for running Avid Media Composer:
- Operating System: Avid Media Composer is compatible with both Windows and macOS. The specific versions supported may vary, so it’s important to check the Avid website for the latest information. Ensure that your operating system is up to date with the necessary patches and updates.
- Processor: A multi-core processor is recommended for running Media Composer efficiently. The exact specifications will depend on the version of Media Composer and the complexity of your projects. A faster processor will result in smoother playback and faster rendering times.
- RAM: Media Composer is a resource-intensive software, so having an ample amount of RAM is crucial. The minimum recommended RAM is 8GB, but for better performance, it is advisable to have 16GB or more. Larger projects or working with high-resolution footage may require even more RAM.
- Graphics card: Avid Media Composer utilizes the GPU for real-time effects and playback. It is recommended to have a dedicated graphics card with at least 2GB of VRAM. Check the Avid website for the list of supported graphics cards for optimal performance.
- Hard Drive: A fast and reliable hard drive is necessary for storing and managing media files. It is recommended to have a solid-state drive (SSD) for better performance, especially for working with high-resolution footage. Additionally, having sufficient storage space to accommodate your projects is essential.
- Monitor: Avid Media Composer supports a wide range of monitors and resolutions. Ensure that your monitor has accurate color representation and supports the resolution you plan to work with. A larger display with a higher resolution will provide more screen real estate for efficient editing.
It is important to note that these requirements are the minimum specifications. For optimal performance, especially when working with complex projects or high-resolution footage, it is recommended to exceed the minimum requirements. Additionally, keep in mind that these system requirements may change with each new version of Avid Media Composer, so always check the official Avid website for the most up-to-date information.
Installation
Installing Avid Media Composer is a straightforward process. Follow these steps to install the software on your computer:
- Download: Visit the official Avid website and navigate to the Media Composer page. Click on the “Download” button to access the installer file. Choose the appropriate version for your operating system.
- Run the Installer: Once the installer file is downloaded, double-click on it to run the installer. Follow the on-screen prompts to begin the installation process.
- Accept License Agreement: Read and accept the license agreement to proceed with the installation. It is important to carefully review the terms and conditions.
- Select Installation Options: During the installation, you may be prompted to select certain installation options. Choose the desired options based on your preferences and requirements. This may include selecting additional language support or additional components.
- Choose Installation Location: Select the directory where you want to install Avid Media Composer. You may choose the default location or specify a custom location on your system.
- Start Installation: Once you have made all the necessary selections, click on the “Install” button to start the installation process. The progress bar will show the installation status.
- Registration and Activation: After the installation is complete, you may be prompted to register and activate your copy of Media Composer. Follow the instructions provided and provide any necessary information to complete the registration process.
- Finish: Once the installation and activation are successfully completed, you can launch Avid Media Composer and start using the software.
It is important to note that some steps may vary depending on the version of Avid Media Composer and the operating system you are using. Always refer to the installation guide provided by Avid or check the official Avid website for any specific instructions or updates.
Additionally, it is recommended to have a stable internet connection during the installation process for any necessary updates or activation requirements. Also, make sure to have your Avid account credentials available for registration and activation purposes.
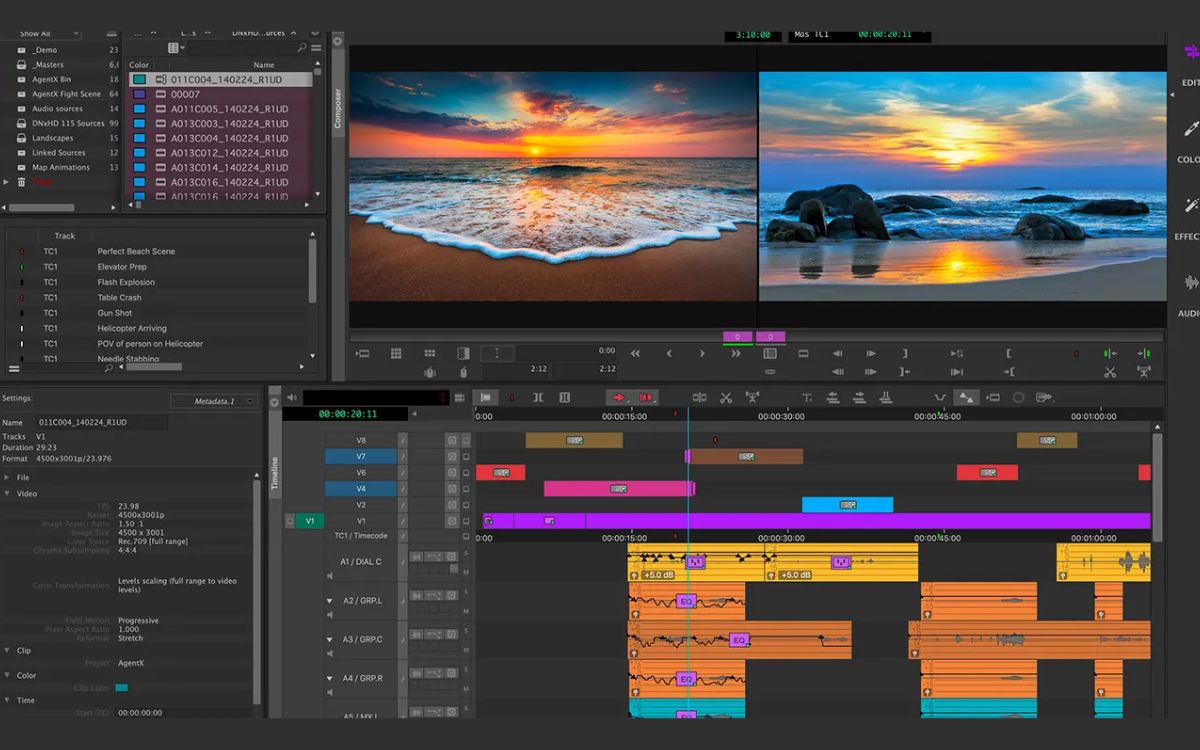
User Interface
The user interface of Avid Media Composer is designed to provide editors with a streamlined and efficient editing experience. Understanding the various elements of the user interface is essential to navigate through the software and make the most of its powerful features. Here is an overview of the key components of the Media Composer user interface:
- Project Window: The Project Window is where you manage your media and projects. It allows you to create and organize bins to store your media files, sequences, and other assets. You can also access important project settings and metadata information from this window.
- Composer Window: The Composer Window is where you perform most of your editing tasks. It consists of multiple tabs, such as the Timeline, Monitor, and Effect Editor. The Timeline tab displays your sequence and allows you to make edits, add effects, and manipulate audio. The Monitor tab provides a preview of your footage and can be used for frame-accurate editing and color correction.
- Tool Palette: The Tool Palette contains various tools and options that you can use to perform different editing tasks. These tools include the trim tool, the splice tool, and the segment mode tool, among others. You can select the desired tool from the Tool Palette according to your editing needs.
- Timeline: The Timeline is where you assemble your video and audio clips to create your sequence. It displays your entire project timeline and allows you to arrange and manipulate your clips, add transitions, and apply effects. You can also adjust clip properties, such as duration and position, directly from the Timeline.
- Bin Window: The Bin Window is where you organize and manage your media files. It allows you to create bins and sub-bins to categorize your clips, sequences, and other assets. You can preview and select media files from the Bin Window and drag them onto the Timeline for editing.
- Command Palette: The Command Palette provides quick access to commonly used commands and functions in Media Composer. It allows you to assign keyboard shortcuts to specific commands and customize the layout of the user interface according to your preferences.
These are just some of the key elements of the Avid Media Composer user interface. The software offers a wide range of customization options, allowing you to personalize your workspace to suit your workflow. As you become more familiar with the software, you will discover additional features and shortcuts that can further enhance your editing experience.
It is important to note that the user interface may vary slightly depending on the version of Avid Media Composer and the specific configuration of your workspace. However, the fundamental elements and concepts remain consistent across versions, providing a familiar editing environment for users.
Importing Media
Importing media into Avid Media Composer is a simple process that allows you to bring your video and audio files into your project for editing. Here’s a step-by-step guide on how to import media into Media Composer:
- Create a new project: Before importing media, you need to create a new project in Media Composer. Go to the Project Window and click on the “New Project” button. Provide a name and location for your project, and set the desired project settings.
- Open the Bin Window: Once your project is created, open the Bin Window from the Window menu. This is where you’ll organize your imported media.
- Import media files: In the Bin Window, click on the “Import” button or go to File > Import to open the Import dialog. Locate the video or audio files you want to import, select them, and click “Open.” Alternatively, you can also drag and drop media files directly into the Bin Window.
- Set import options: After selecting the media files, the Import dialog will display import options. Here, you can choose how Media Composer handles the media files during import. You can select options like creating new clips, linking to the files, consolidating the media, or transcoding to a different format. Adjust the settings according to your needs and click “OK” to start the import process.
- Organize imported media: Once the import process is complete, the imported media files will appear as clips in the Bin Window. You can organize them into different bins or sub-bins for easier management. You can also add additional metadata and markers to your clips for better organization and searching.
It is important to note that Avid Media Composer supports a wide range of media formats, including common video formats like MP4, MOV, and AVI, as well as various audio formats. However, it is always recommended to check the official Avid website for the list of supported formats and any specific considerations.
When importing media, it is a good practice to keep your media files organized in a dedicated media folder on your system. This helps maintain a clean project structure and allows for easier backup and archival of your media assets.
By following these steps, you can easily import media into Avid Media Composer and begin the editing process. Remember that understanding the different import options can help you make the best choices for managing your media files and optimizing your editing workflow.
Organizing and Managing Media
Organizing and managing media is a crucial step in the post-production process, ensuring that your media files are structured and easily accessible during editing in Avid Media Composer. Here are some essential techniques for organizing and managing your media:
- Create Bins: Bins are containers that help you organize and categorize your media files. Create bins based on specific criteria such as scene, shot type, or location. You can create sub-bins within bins to further organize your media.
- Use Descriptive Metadata: Media Composer allows you to add metadata to your media files, providing essential information about the content. This can include details such as actors, locations, or keywords. Adding descriptive metadata makes it easier to search and locate specific clips during the editing process.
- Add Markers: Markers are annotations added to clips or sequences that highlight specific points of interest. Use markers to identify important moments, scene changes, or editing notes. They provide a visual reference and improve efficiency when collaborating with other editors.
- Utilize Metadata Views: Media Composer provides customizable metadata views that allow you to choose the specific metadata fields you want to display and edit. Customize the metadata view to include the most relevant information for your project, enhancing your organization process.
- Offline/Online Workflows: In some cases, working with high-resolution media files can be resource-intensive. To optimize your editing workflow, you can work with lower-resolution proxy files in the offline stage and relink to full-resolution files during the online stage. This allows for smoother playback and faster editing while preserving the quality for final delivery.
- Backup and Archive: Regularly create backups of your media files to ensure that your work is protected. Backing up your project files and media to an external hard drive or cloud storage helps safeguard against potential data loss. Additionally, consider archiving completed projects to free up storage space and maintain long-term accessibility.
- Delete Unused Media: As your project progresses, it’s essential to review and remove any unused or unnecessary media files. This helps streamline your project and ensures that you are working with only the relevant files.
By employing these techniques, you can effectively organize and manage your media assets in Avid Media Composer. A well-structured and properly labeled media library enhances your editing workflow and enables you to find and utilize your media efficiently.
Editing Basics
Mastering the basics of editing in Avid Media Composer is essential for creating seamless and engaging videos. Whether you’re a beginner or an experienced editor, understanding the fundamental editing techniques can greatly enhance your workflow. Here are some key editing basics in Avid Media Composer:
- Timeline Editing: The timeline is where you assemble your video clips to create your sequence. You can drag and drop clips from the bin onto the timeline, arrange them in the desired order, and trim their in and out points to create precise edits. Use the overwrite and splice editing modes to add or replace clips in the timeline.
- Trimming: Trimming allows you to refine the duration and position of your clips in the timeline. Media Composer provides various trimming tools, such as the Ripple Trim and the Slip Trim, which let you make adjustments without affecting the overall sequence duration.
- Transitions: Transitions are used to create smooth visual effects between two clips. Media Composer offers a wide range of transitions, including cross dissolve, wipes, and fades. You can easily add transitions to your clips in the timeline using the effects palette.
- Keyboard Shortcuts: Avid Media Composer provides a comprehensive set of keyboard shortcuts to speed up your editing process. Familiarize yourself with commonly used shortcuts, such as ripple trim, insert edit, and play/pause, to work more efficiently. You can customize the keyboard layout to match your preferences.
- Adding Effects: Media Composer allows you to apply various effects to your clips to enhance the visual appeal. Use the effects palette to access a wide range of effects, such as color correction, image stabilization, and titling. Experiment with different effects to achieve the desired look and feel of your video.
- Audio Editing: Alongside video editing, Media Composer offers powerful audio editing capabilities. You can adjust audio levels, apply EQ and audio effects, and sync audio with video clips. Utilize the audio mixer to control and balance the audio elements in your project.
- Working with Multiple Cameras: Media Composer supports multi-camera editing, allowing you to synchronize and switch between multiple camera angles. This feature is particularly useful when working on projects with different camera perspectives, such as interviews, live performances, or sporting events.
As you become more comfortable with these editing basics in Avid Media Composer, you’ll discover additional techniques and shortcuts that enhance your workflow and creativity. Continuously practicing and exploring the software’s features will help you become a more proficient editor.
Remember, editing is a creative process, so don’t be afraid to experiment and explore different techniques to bring your storytelling to life. With time and practice, you’ll develop your own editing style and master the art of creating compelling videos.
Advanced Editing Techniques
Beyond the basics, Avid Media Composer offers a range of advanced editing techniques to take your video editing skills to the next level. These techniques allow you to add complexity, creativity, and finesse to your projects. Here are some advanced editing techniques in Avid Media Composer:
- Multi-camera Editing: Media Composer offers powerful multi-camera editing capabilities, allowing you to work with multiple camera angles simultaneously. Sync and align multiple camera angles, switch between them in real-time, and easily create multicam sequences for a seamless editing experience.
- Dynamic Trimming: Dynamic Trimming is a feature of Media Composer that enables you to make trim adjustments during playback. This allows you to fine-tune edits and make precise timing adjustments on the fly, enhancing your editing efficiency and accuracy.
- Match Frame: The Match Frame feature allows you to quickly locate the source clip of a selected frame in the timeline. It is particularly useful when you want to make changes to a specific part of a clip or when you need to access the source material for further editing or manipulation.
- Script-based Editing: Media Composer integrates powerful script-syncing capabilities, enabling you to align your video clips with an imported script. Use the ScriptSync feature to automatically sync your footage with the corresponding script, making it easier to find specific lines or moments for editing.
- Segment Mode Editing: Segment mode editing is a versatile feature that allows you to perform complex editing tasks directly on the timeline. You can move, trim, and adjust segments of clips independently, creating precise and intricate edits without affecting the overall sequence.
- Keyframing: Keyframing is the process of creating animation or changes over time by setting keyframes at specific points. In Media Composer, you can keyframe various parameters, such as video effects, audio levels, and motion effects, to add dynamic and expressive visuals to your videos.
- Color Correction: Media Composer includes advanced color correction tools, allowing you to enhance and refine the color and tone of your footage. Use the color correction effects, scopes, and grading tools to achieve the desired cinematic look or to ensure consistency across shots.
These advanced editing techniques in Avid Media Composer open up a world of creative possibilities, enabling you to elevate the storytelling and visual appeal of your videos. As you gain more experience and confidence, don’t hesitate to explore these techniques and experiment with different styles and approaches.
Remember, the key to mastering these advanced techniques is practice and experimentation. Take the time to familiarize yourself with each feature, explore tutorials and resources, and push the boundaries of your creativity.
Applying Effects and Transitions
Avid Media Composer provides a wide array of effects and transitions to enhance the visual appeal and storytelling of your videos. Whether you want to add stylistic flair or create smooth transitions between clips, knowing how to apply effects and transitions is essential. Here’s a guide on applying effects and transitions in Avid Media Composer:
- Effects Palette: Open the Effects Palette to access a comprehensive collection of video and audio effects. You can find various categories, including color correction, image manipulation, title effects, and more. Browse through the available effects and select the one you want to apply.
- Drag and Drop: To apply an effect to a clip in the timeline, simply drag and drop the effect from the Effects Palette onto the desired clip. The effect will be automatically applied, and you can adjust its parameters in the Effect Editor window.
- Effect Editor: The Effect Editor provides a dedicated interface for customizing and fine-tuning effects applied to clips. Use the Effect Editor to modify parameters such as opacity, speed, size, position, and more. You can keyframe these parameters to create dynamic changes over time.
- Keyframing: Keyframing allows you to create animation or changes in an effect over time by setting keyframes at different points. In the Effect Editor, you can set keyframes for individual parameters and adjust their values at specific points on the timeline. This gives you precise control over how the effect evolves and changes throughout the duration of the clip.
- Transitions: Transitions are used to smoothly blend two clips together, creating a seamless visual change between them. Avid Media Composer offers a wide range of transitions, including dissolves, wipes, fades, and more. To apply a transition, simply drag and drop it between two adjacent clips in the timeline.
- Adjusting Transition Duration: Once a transition is applied, you can adjust its duration in the timeline. Drag the edges of the transition to make it shorter or longer, modifying how long the blend between the two clips occurs.
- Customizing Transitions: Media Composer allows you to customize transitions further by adjusting their properties and parameters. Use the Effect Editor to modify settings like direction, speed, shape, and more to create unique and personalized transitions for your project.
Experimentation and creativity play a significant role in applying effects and transitions in Avid Media Composer. Don’t be afraid to mix and match effects, apply multiple effects to a single clip, or combine different transitions for stunning visual impact.
It is important to strike a balance between creative expression and usage of effects and transitions. Avoid overusing effects that may distract from the story or undermine the overall quality of the video. Use effects and transitions purposefully to enhance the narrative and engage your audience.
By mastering the art of applying effects and transitions in Avid Media Composer, you can add polish, professionalism, and visual interest to your projects, taking them to the next level.
Color Correction
Color correction is a critical step in the post-production process that helps enhance the visual appeal and storytelling of your videos. Avid Media Composer provides powerful color correction tools that allow you to manipulate and refine the color and tone of your footage. Here’s a guide on color correction in Avid Media Composer:
- Color Correction Effects: Media Composer offers a range of color correction effects that can be applied to individual clips or entire sequences. These effects allow you to adjust parameters such as brightness, contrast, saturation, hue, and more. Use these effects to improve the overall look and consistency of your footage.
- Scopes: Avid Media Composer includes various scopes, such as waveform monitors, vectorscopes, and histograms. Scopes help you analyze and measure the color and exposure levels in your footage. By using the scopes, you can ensure accurate color representation and balanced exposure.
- Primary Color Correction: Primary color correction involves adjusting the overall color balance and exposure of your footage. Use the Lift, Gamma, and Gain controls to fine-tune the shadows, midtones, and highlights of your clips. This provides a solid foundation for further color grading.
- Secondary Color Correction: Secondary color correction allows you to isolate and manipulate specific colors or regions within a clip. Avid Media Composer offers powerful tools like the Color Key and Color Isolation to target and adjust specific colors. This is particularly useful for tasks such as color matching, selective color grading, or changing the hue of specific elements.
- Color Wheels and Curves: Avid Media Composer provides color wheels and curves to perform advanced color correction. The color wheels allow you to adjust the color balance by manipulating the shadows, midtones, and highlights individually. The curves tool gives you precise control over the tonal range and helps to fine-tune the color response of your footage.
- Automatic Color Correction: Media Composer also offers automatic color correction tools such as Auto Balance and Auto Contrast. These features analyze your footage and automatically adjust the color balance and exposure levels based on predefined algorithms. While convenient, manual control often offers better results for complex projects.
- Keyframing and Match Color: Keyframing allows you to create dynamic changes in color over time by setting keyframes. This can be useful for correcting exposure fluctuations or creating artistic color transitions. Additionally, the Match Color feature enables you to match the color and tonal characteristics of one clip to another, ensuring consistency between shots.
When applying color correction, it’s important to maintain a consistent and coherent look throughout your project. Ensure that the colors accurately represent the intended mood and enhance the storytelling. Regularly reference reference material, such as color grading charts, to maintain accuracy and consistency.
Color correction is both a technical and creative process, and it requires careful attention to detail. Experiment with different techniques and explore the vast possibilities within Avid Media Composer to achieve the desired look and feel for your videos.
Remember, color correction is subjective, and there is no one “correct” way to do it. Trust your creative instincts and make adjustments that best serve your project’s vision and aesthetic.
Audio Editing
Audio editing plays a crucial role in creating a professional and immersive viewing experience. Avid Media Composer offers a range of powerful audio editing tools to enhance the quality and impact of your videos. Here’s a guide on audio editing in Avid Media Composer:
- Audio Tracks: Avid Media Composer allows you to work with multiple audio tracks, giving you flexibility in arranging and editing your project’s audio elements. You can add, delete, and rearrange audio tracks to suit your editing needs.
- Importing and Syncing Audio: Import your audio files into Avid Media Composer just like video files. You can easily sync audio clips with video clips using features such as autosync or manually sync them in the timeline. Ensure proper alignment between audio and video to maintain synchronization.
- Level Adjustments: Use the audio mixer in Avid Media Composer to adjust the levels of individual audio tracks or specific sections of your timeline. This allows you to balance the audio elements and ensure clarity and consistency in the overall sound mix of your project.
- Audio Effects: Avid Media Composer offers a variety of audio effects that can enhance the quality and creativity of your audio. Apply effects such as EQ, reverb, compression, and noise reduction to improve the clarity, depth, and overall sound characteristics of your audio clips.
- Audio Transitions: Smoothly transition between audio clips using audio transitions. Avid Media Composer provides options like crossfades and audio dissolves to blend audio seamlessly and create a natural flow between different audio elements.
- Ducking: Ducking is the process of reducing the volume of background audio when there is dialogue or narration happening. Utilize the audio keyframing feature to dynamically adjust the volume levels of certain audio clips, ensuring that the dialogue or narration remains clear and prominent.
- Audio Keyframing: Keyframing allows you to create dynamic changes in audio levels over time. Use this feature to adjust the volume, panning, or effects parameters of specific clips or sections of your timeline. Keyframing can help you create smooth transitions, fades, or emphasis on specific audio moments.
- Audio Mixing: Mixing is the process of combining and balancing all the audio elements in your project for a cohesive and immersive sound experience. Use the audio mixer to adjust the relative levels, EQ, and panning of audio tracks, ensuring they work together harmoniously.
- Exporting Audio: Avid Media Composer allows you to export your audio tracks separately or as part of the final video export. You can choose to export audio in various formats, depending on your project requirements.
Remember, audio plays a significant role in creating an emotional connection and enhancing the overall quality of your videos. Take the time to carefully edit and mix your audio elements to ensure a polished and professional result.
Experiment with different audio effects, transitions, and keyframing techniques in Avid Media Composer to create unique and engaging audio experiences for your viewers. Regularly refer to reference material or seek feedback from others to refine your audio editing skills and deliver exceptional sound in your projects.
Exporting and Sharing Projects
Once you have completed the editing process in Avid Media Composer, it’s time to export and share your projects with others. Avid Media Composer provides a range of options for exporting and sharing your final video creations. Here’s a guide on how to export and share your projects:
- Sequence Export: To export a sequence, ensure that the sequence you want to export is selected in the timeline. Then, go to File > Export > Media. In the Export Settings window, choose the desired export format, resolution, and other parameters. Lastly, select the desired destination folder and click on the “Export” button to begin the export process.
- Export Presets: Avid Media Composer offers export presets that simplify the export process. Presets are pre-configured settings optimized for specific delivery platforms or formats. You can select a preset that matches the requirements of your intended output, such as social media platforms, broadcast standards, or web distribution.
- Media Compression: When exporting, you may need to compress your video files to reduce their size while maintaining quality. Avid Media Composer allows you to adjust compression settings according to your needs, providing control over file size, bitrate, codec, and other parameters.
- Sharing to Online Platforms: Avid Media Composer offers direct integration with online platforms such as YouTube, Vimeo, and Facebook. After exporting your video, you can use the built-in sharing features to upload your project directly to these platforms. This simplifies the process of sharing your videos with a broader audience.
- DVD and Blu-ray Authoring: If you need to create physical media copies of your project, Avid Media Composer offers DVD and Blu-ray authoring capabilities. You can export your project in the required format, then use third-party DVD or Blu-ray authoring software to create menus, chapters, and custom navigation for the discs.
- Backup and Archive: Before sharing or exporting your project, it’s crucial to create backups and archives to protect your work. Make copies of your project files, media assets, and any associated metadata. Store these backups safely on external drives or cloud storage to ensure the integrity and accessibility of your project in the future.
When exporting and sharing your projects, consider the specific requirements of your intended audience and platforms. These requirements may include aspect ratios, resolution, video codecs, and audio formats. Familiarize yourself with the delivery specifications of your target destination to optimize the playback experience and maintain the quality of your videos.
It’s worth noting that Avid Media Composer provides extensive export options and flexibility, allowing you to fine-tune the export settings based on your project’s specific needs. Take the time to experiment and test different export settings to achieve the desired video quality and file size.
By following these guidelines, you can confidently export and share your projects, ensuring that your hard work and creativity reach the intended audience in the best possible form.
Troubleshooting and Tips
While working with Avid Media Composer, you may encounter occasional challenges or seek ways to optimize your editing experience. Here are some troubleshooting tips and valuable suggestions to overcome common issues and make the most of Avid Media Composer:
- Optimize System Performance: Avid Media Composer is a resource-intensive software, so ensure that your computer meets the recommended system requirements. Close unnecessary background applications and regularly update your operating system and drivers to maintain stability and performance.
- Manage Media and Project Files: Organize your media files and project files in a structured manner. Create separate folders for different projects, and regularly back up your files to prevent any loss of data. Utilize the Media Tool in Avid Media Composer to manage and relink media files as needed.
- Save and Incrementally Backup: Save your work frequently while editing to avoid losing any progress. Additionally, create incremental backups of your projects to ensure you have multiple versions in case of any issues or mistakes. This provides an additional layer of security and allows you to revert to a previous version if necessary.
- Expand Your Shortcut Knowledge: Mastering keyboard shortcuts can significantly improve your editing speed and efficiency in Avid Media Composer. Take the time to learn and practice commonly used shortcuts, and customize the keyboard layout to suit your preferences.
- Clear Unused Media Caches: Over time, Avid Media Composer accumulates temporary and cache files, which can impact system performance and storage space. Regularly clear these unused media caches using the Media Composer settings or by manually deleting cache files from your computer.
- Seek Community Resources: Avid Media Composer has a vast community of users and resources available to provide guidance and support. Explore online forums, video tutorials, and official Avid resources to expand your knowledge, troubleshoot issues, and stay updated on the latest features and techniques.
- Collaborate Effectively: If you are working in a team, Avid Media Composer offers collaboration tools to streamline the editing process. Utilize features like bin sharing, project locking, and versioning to ensure smooth collaboration and avoid conflicts when multiple editors are working on the same project simultaneously.
- Experiment and Explore: Avid Media Composer is a powerful editing software with numerous features and capabilities. Don’t be afraid to experiment, try new techniques, and explore different creative possibilities. Pushing the boundaries of your editing skills will help you grow as an editor and unlock your artistic vision.
Remember, troubleshooting issues and optimizing your editing workflow is a continuous process. Stay updated with the latest software updates and releases from Avid and maintain a curious mindset to embrace new workflows and techniques as they emerge.
By following these troubleshooting tips and incorporating them into your editing routine, you can overcome challenges, maximize efficiency, and create high-quality videos with Avid Media Composer.