Home>Production & Technology>Cover Song>How To Record Cover Song On Computer
Cover Song
How To Record Cover Song On Computer
Modified: February 20, 2024
Learn how to easily record a cover song on your computer with step-by-step instructions. Create your own versions of popular songs!
(Many of the links in this article redirect to a specific reviewed product. Your purchase of these products through affiliate links helps to generate commission for AudioLover.com, at no extra cost. Learn more)
Table of Contents
- Introduction
- Choosing the Right Equipment
- Setting Up the Recording Software
- Preparing Your Instrument and Microphone
- Selecting a Suitable Recording Space
- Adjusting the Input Levels and Settings
- Recording Your Cover Song
- Editing and Mixing Your Recording
- Adding Effects and Enhancements
- Exporting and Saving Your Cover Song
- Tips for a Professional-Sounding Cover Song
- Conclusion
Introduction
Cover songs have become incredibly popular in the digital age, with musicians and artists showcasing their own unique interpretations of well-known songs. Whether you’re a budding musician looking to share your talent or simply want to create a memorable rendition of your favorite song, recording a cover song on your computer is a convenient and cost-effective option.
Recording a cover song allows you to put your own creative spin on a well-known track, showcasing your vocal prowess or instrumental skills. It also provides an opportunity to connect with an audience who may already be familiar with the original version. With the right equipment and knowledge, you can create a professional-sounding cover song right from the comfort of your own home.
In this article, we will guide you through the process of recording a cover song on your computer. We will discuss the equipment you need, the software required, as well as provide step-by-step instructions on recording, editing, and enhancing your cover song. Whether you’re a novice musician or have some recording experience, this comprehensive guide will help you achieve the best possible results.
Before we dive into the technical details, it’s important to note that recording a cover song involves respecting copyright laws. Make sure to obtain the necessary permissions or licenses to distribute your cover song if you plan on sharing it publicly. Now, let’s get started on your journey to creating a memorable cover song!
Choosing the Right Equipment
When it comes to recording a cover song on your computer, having the right equipment is crucial to achieving a high-quality result. While you don’t need to break the bank, investing in a few key pieces of equipment can greatly improve the overall sound and production value of your recording. Here are some essential items to consider:
- Microphone: A good-quality microphone is essential for capturing clear vocals or instrument sounds. Condenser microphones are commonly used for recording cover songs due to their sensitivity and accuracy. USB microphones offer a convenient plug-and-play option for computer recording.
- Audio Interface: An audio interface serves as the bridge between your microphone and computer. It converts analog audio signals into digital data that your computer can process. Look for an audio interface with good preamps and low latency for a cleaner and more responsive recording.
- Headphones: A pair of studio-quality headphones is crucial for monitoring your recording in detail. Look for headphones that provide accurate sound reproduction and a comfortable fit.
- Pop Filter and Reflection Shield: To improve the clarity of your vocals, consider using a pop filter to reduce plosive sounds and a reflection shield to minimize room reflections and echo.
- Instrument Cables: If you plan on recording instruments such as guitars or keyboards, make sure to have high-quality instrument cables to connect them to your audio interface.
Additionally, you’ll need a computer with sufficient processing power, RAM, and storage space to handle the recording and editing process. It’s also essential to have a reliable digital audio workstation (DAW) software installed on your computer. There are plenty of options available, both free and paid, offering various features and capabilities.
Before purchasing any equipment, it’s worth researching and reading reviews to find the best products for your budget and specific recording needs. Consider your recording environment, the type of cover songs you plan to record, and your budget when making equipment decisions.
Once you’ve acquired the necessary equipment, it’s time to set up the recording software on your computer. In the next section, we will guide you through the process of setting up your recording software and preparing your instrument and microphone for recording.
Setting Up the Recording Software
Before you can start recording your cover song, you need to set up and configure your recording software. The recording software, also known as a digital audio workstation (DAW), is where you will be able to record, edit, and mix your cover song. Here are the steps to set up your recording software:
- Choose a DAW: There are various DAW options available, such as Pro Tools, Logic Pro, Ableton Live, FL Studio, and Reaper. Research and choose the one that best suits your needs, budget, and level of expertise. Some DAWs offer free trials, which can be a great way to determine which one works best for you.
- Install the Software: Once you’ve selected your DAW, download and install it on your computer following the provided instructions. Ensure your computer meets the minimum system requirements for the software.
- Audio Device Setup: Open the DAW and navigate to the audio device settings. Select your audio interface from the available options. Make sure the sample rate and buffer size are set appropriately for your recording needs. Lower buffer sizes reduce latency but may require more processing power.
- Input and Output Configuration: Configure the input and output settings in your DAW. Assign the correct input from your audio interface for recording vocals or instruments. Set the output to your headphones or monitor speakers for playback and monitoring purposes.
- MIDI Setup (Optional): If you plan on incorporating MIDI instruments into your cover song, connect your MIDI controller to your computer and configure the MIDI settings in your DAW. This will allow you to record and control virtual instruments.
- Create Project and Tracks: Once your DAW is set up, create a new project and set the project location and save preferences. Create a new track for recording your cover song. Depending on your setup, you may need separate tracks for vocals and each instrument.
With your recording software properly set up, you are ready to move on to preparing your instrument and microphone for recording. In the next section, we will guide you through the process of ensuring your instrument and microphone are ready to produce the best possible sound for your cover song.
Preparing Your Instrument and Microphone
Before you start recording your cover song, it’s important to properly prepare your instrument and microphone to ensure optimal sound quality. Here are some steps to follow:
- Instrument Maintenance: If you’re recording an instrument such as a guitar or piano, make sure it’s well-maintained. Clean the strings, check for any loose parts or rattling sounds, and tune it properly. This will help ensure a clean and accurate sound.
- Microphone Placement: Position your microphone correctly for the best sound capture. For vocals, place the microphone at a comfortable height and distance, typically around 6 to 8 inches (15 to 20 centimeters) away from your mouth. Experiment with mic placement to find the sweet spot that captures your voice clearly without excessive proximity effect or plosive sounds.
- Instrument Mic Placement: If you’re recording an instrument, such as an acoustic guitar or drums, experiment with microphone placement to find the best position that captures the desired sound. Consider factors like the instrument’s sound projection and tonal balance.
- Room Acoustics: Take into account the acoustics of the room where you’re recording. If the room is too reverberant or has excessive background noise, consider using acoustic treatment or recording in a different space. Additionally, placing some acoustic panels or baffles around the microphone can help minimize unwanted reflections and echoes.
- Microphone and Instrument Settings: Adjust any necessary settings on your microphone and instrument to achieve the desired sound. This includes settings such as EQ (equalization), gain, and volume levels. Experiment with different settings to find the best balance and tone.
- Monitor Your Performance: Use your headphones and monitor speakers to listen to your performance while recording. This will help you evaluate the sound and make any necessary adjustments or corrections. Pay attention to intonation, timing, and dynamics to ensure a polished performance.
By properly preparing your instrument and microphone, you can ensure that you capture the best possible sound quality during the recording process. Once everything is set up and ready to go, it’s time to move on to selecting a suitable recording space. We’ll explore this topic in the next section.
Selecting a Suitable Recording Space
The choice of recording space can greatly impact the overall sound quality and ambiance of your cover song. Here are some considerations when selecting a suitable recording space:
- Avoid Noisy Environments: Choose a quiet space with minimal background noise. This includes avoiding areas near busy roads, loud appliances, or other sources of disturbance. External noise can be picked up by your microphone and degrade the quality of your recording.
- Room Size and Acoustics: The size and acoustics of the room can affect the sound of your recording. Larger rooms tend to have more natural reverb, while smaller rooms can create a more intimate and controlled sound. Experiment with different spaces to find one that suits the style of your cover song.
- Avoid Hard Surfaces: Rooms with hard and reflective surfaces, such as tile or glass, can create unwanted echoes and reverberations in your recording. If possible, choose a space with some soft furnishings or consider using acoustic treatment like curtains, rugs, or foam panels to absorb reflections.
- Soundproofing: If you have access to a soundproofed room, it can greatly reduce external noise and prevent sound leakage. However, if soundproofing is not possible, consider recording during periods of minimal noise or using portable sound barriers to minimize unwanted sound intrusion.
- Natural Lighting: While not directly related to sound quality, natural lighting can create a more pleasant recording environment. Choose a space with ample natural light or use artificial lighting to create a comfortable and visually appealing setting.
When setting up your recording space, consider the practicality and convenience of the location as well. Ensure that you have enough space to comfortably set up your equipment and move around during the recording process. Additionally, keep in mind factors like ventilation, temperature control, and the availability of power outlets.
Remember, it’s important to strike a balance between achieving the desired sound and working with the available resources. Don’t be afraid to experiment with different recording spaces to find the one that best suits your needs and enhances the overall quality of your cover song.
Now that you’ve selected a suitable recording space, it’s time to fine-tune the input levels and settings to ensure optimal recording quality. We’ll discuss this in the next section.
Adjusting the Input Levels and Settings
Properly adjusting the input levels and settings of your recording equipment is crucial to achieving a clean and balanced sound for your cover song. Here’s how you can adjust the input levels and settings:
- Microphone Gain: Begin by setting the microphone gain on your audio interface or preamp. Start with a low gain setting and gradually increase it until your recording levels are adequate. Avoid setting the gain too high, as it can lead to distortion or clipping. Monitor your levels on the recording software to ensure they are within a healthy range.
- Input Sensitivity: Adjust the input sensitivity on your audio interface or within the recording software. This setting determines how sensitive the microphone is to sound. Fine-tune this setting to capture the desired level of detail from your vocals or instrument.
- Input Panning: If you’re using multiple microphones or recording different instruments, consider panning them in the stereo field. This allows you to position each input within the stereo spectrum, providing a more immersive and balanced sound.
- MIDI Channel Assignment (Optional): If you’re using MIDI instruments, assign each instrument to a different MIDI channel within your recording software. This allows you to have separate control over each instrument’s volume, pan, and other settings during the mixing process.
- Metronome and Click Track: If your cover song requires precise timing or you want to ensure a consistent tempo, use the metronome or click track feature in your recording software. This will help you stay in sync while recording and make editing and synchronization easier later on.
While adjusting the input levels and settings, it’s essential to monitor your recording levels and make sure they are neither too low nor too high. Aim for a healthy signal level where the loudest parts of your performance don’t cause clipping or distortion. Keep an eye on the meters in your recording software and make adjustments as needed.
Once you’ve adjusted the input levels and settings, you’re ready to hit the record button and start capturing your cover song. In the next section, we’ll guide you through the process of recording your cover song and capturing your best performance.
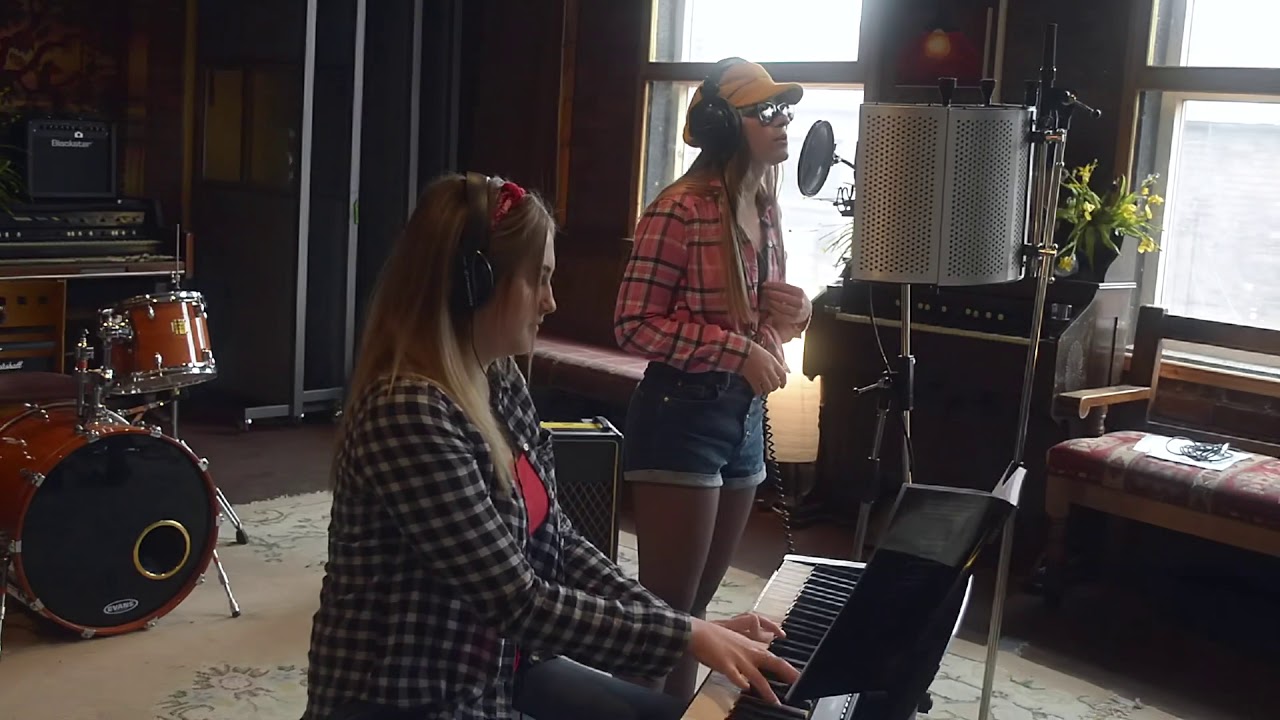
Recording Your Cover Song
With your equipment set up and input levels adjusted, it’s time to start recording your cover song. Follow these steps to ensure a smooth and successful recording session:
- Prepare Yourself: Take a few moments to warm up your voice or instrument, stretch, and get into the right mindset for recording. Relax and focus on delivering your best performance.
- Set the Playback Parameters: Set the desired playback parameters, such as the tempo, click track, or backing track, in your recording software. This will help you stay on beat and maintain consistency throughout your cover song.
- Record Multiple Takes: It’s always a good idea to record multiple takes of your cover song. This will give you options during the editing and mixing process and allow you to choose the best performance. Take breaks between takes to rest your voice or instrument and maintain your energy and focus.
- Focus on Expression and Dynamics: Pay attention to the emotional delivery and dynamics of your performance. Experiment with different vocal techniques, dynamics, and phrasing to add your unique touch to the cover song. Allow yourself to express the emotions and intentions behind the lyrics and melody.
- Monitor Your Performance: Continuously monitor and listen to your performance through headphones or monitor speakers while recording. This will allow you to make real-time adjustments, correct any mistakes, and ensure a polished and cohesive performance.
- Take Breaks: Recording sessions can be physically and mentally demanding. Take short breaks between takes to rest and prevent fatigue. Hydrate yourself and relax to maintain a consistent and energized performance.
- Experiment and Have Fun: Don’t be afraid to experiment and try different ideas during the recording process. Allow yourself to be creative and explore different vocal or instrumental techniques. Remember, the goal is not just to replicate the original song, but to bring your own interpretation and style to it.
After completing your recording session, take the time to listen back to your takes and evaluate which performances you are most satisfied with. In the next section, we’ll discuss how to edit and mix your recording to create a polished cover song.
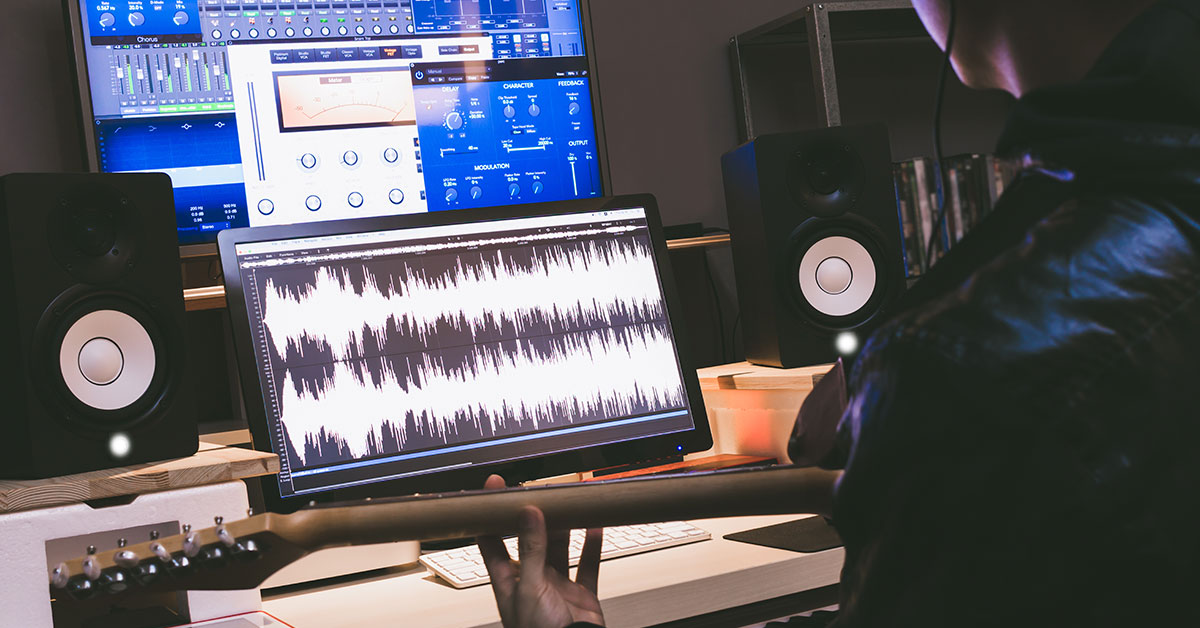
Editing and Mixing Your Recording
Once you have completed the recording phase of your cover song, it’s time to dive into the editing and mixing process. This stage is crucial for refining your performance, ensuring a balanced mix, and creating a polished final product. Here are the steps to edit and mix your recording:
- Import and Organize: Import your recorded tracks into your recording software and organize them in the project timeline. Label each track accordingly (e.g., vocals, guitar, drums) for easy identification.
- Trim and Arrange: Trim unnecessary sections and arrange the recorded tracks to match the structure of the cover song. Cut out any mistakes or undesired parts to create a cohesive and precise performance.
- Timing and Pitch Corrections: Use the editing tools in your recording software to make timing and pitch corrections if needed. This can involve nudging or quantizing notes to align with the desired rhythm and using pitch correction tools sparingly to correct pitch inaccuracies.
- Balance the Mix: Adjust the volume levels of each track to create a balanced mix. Pay attention to the relative levels of vocals and instruments to ensure one does not overpower the other. Use automation to add dynamics and create smooth transitions between sections.
- EQ and Compression: Apply EQ (equalization) to shape the tonal balance of each track. Use compression to control the dynamic range and ensure a more consistent and polished sound. Experiment with different settings to achieve the desired tonal characteristics and balance within the mix.
- Add Effects: Enhance your cover song by adding effects such as reverb, delay, or chorus. These effects can add depth, space, and texture to your recording. Use them subtly and tastefully to enhance the performance without overpowering it.
- Spatial Placement: Use panning and stereo imaging techniques to position each track within the stereo field. This creates separation and depth in the mix, enhancing the overall listening experience.
- Mix Bus Processing: Apply mix bus processing such as mastering EQ, compression, and subtle saturation to the entire mix. This helps to glue the elements together, add warmth, and achieve a more cohesive and professional sound.
During the editing and mixing process, it’s essential to continuously listen back to your mix and make adjustments as needed. Take breaks to refresh your ears and gain a fresh perspective. Don’t be afraid to experiment and trust your ears to create a mix that highlights the best elements of your cover song.
Once you’re satisfied with the editing and mixing, it’s time to move on to the final stage—adding effects and enhancements to elevate the overall production quality. We’ll explore this topic in the next section.
Adding Effects and Enhancements
Adding effects and enhancements to your cover song can take it to the next level and add a professional polish to the final production. Here are some key steps to consider when adding effects and enhancements:
- Reverb and Delay: Apply reverb to create a sense of space and depth in your mix. Experiment with different types of reverb to find one that suits the style and mood of your cover song. Use delay sparingly to add rhythmic interest and create a sense of width.
- Modulation Effects: Modulation effects like chorus, flanger, and phaser can add movement and texture to your cover song. Apply them subtly to enhance the sound of specific instruments or vocals.
- Pitch Correction and Harmonies: If you want to recreate layered harmonies or add vocal effects, use pitch correction tools and pitch-shifting plugins to achieve the desired effect. Experiment with different settings to create lush harmonies or unique vocal textures.
- Doubling and Layering: Consider doubling or layering specific vocal parts or instrument lines to add thickness and richness to your cover song. This technique can create a more captivating and dynamic sound.
- Automation: Utilize automation to add movement and variation throughout your cover song. Adjust parameters such as volume, panning, and effect settings to create dynamic builds, enhance certain sections, and bring focus to different elements.
- Stereo Imaging: Use stereo imaging techniques to widen or narrow the stereo field of specific elements in your mix. This can add depth and separation, making your cover song sound more immersive and spacious.
- Mastering: The final step in the process is mastering, which involves fine-tuning the overall sound of your cover song. This includes applying the necessary EQ, compression, and limiting to optimize the mix for various playback systems and achieve a balanced and polished final product.
As you apply effects and enhancements, ensure that they serve the overall vision of your cover song. Avoid overusing effects, as they can distract from the essence of the original song or your performance. Always keep the focus on enhancing and complementing the core elements of your cover.
Lastly, when adding effects and enhancements, it can be helpful to reference professional recordings in the same genre or style. This will give you a reference point and help you achieve a similar sonic quality in your own production.
Once you’re satisfied with the effects and enhancements, it’s time to export and save your cover song. We’ll discuss this final step in the next section.
Exporting and Saving Your Cover Song
After all the hard work you’ve put into recording, editing, mixing, and adding effects to your cover song, it’s time to finalize the project by exporting and saving your work. Here’s how to export and save your cover song:
- Review and Fine-Tune: Before exporting, take some time to listen to your cover song in its entirety. Make any final adjustments or tweaks to the mix or any individual tracks if necessary. This is your last chance to ensure the final product meets your expectations.
- Choose the File Format: Determine the appropriate file format for your cover song based on your intended use. The most common formats for audio files are WAV and MP3. WAV files offer high-quality, lossless audio, while MP3 files are compressed and suitable for online streaming or sharing.
- Set the Sample Rate and Bit Depth: Set the desired sample rate and bit depth for your exported file. The standard sample rate is 44.1 kHz, and the bit depth is typically 16-bit or 24-bit. Higher bit depths provide more dynamic range but also result in larger file sizes.
- Configure the Export Settings: Configure the export settings in your recording software. Confirm that all necessary tracks are included in the export and that any selected effects or enhancements are applied to the final mix. Double-check the export parameters, such as the file destination, file name, and file format.
- Export the Cover Song: Start the export process and wait for your recording software to generate the final audio file. Depending on the length and complexity of your cover song, the rendering process may take some time. Make sure to avoid interrupting or closing the software until the export is complete.
- Save Your Project: After exporting your cover song, it’s crucial to save your project files in their current state. This allows you to revisit and make any necessary changes or adjustments in the future. Maintain an organized folder structure to store all relevant project files, including audio files, MIDI data, and any other associated assets.
Once you have exported and saved your cover song, take the time to listen to the final audio file to ensure it sounds as expected. Test it on different playback devices to ensure compatibility and quality. Now, you can share your cover song with the world by uploading it to music platforms, social media, or simply enjoying it as a personal achievement.
Remember, the process of recording cover songs is both a creative and technical endeavor. Embrace the learning curve, experiment with different techniques, and continue refining your skills. With practice and dedication, you can create cover songs that showcase your unique artistry and captivate listeners.
Congratulations on completing your cover song! Now, go forth and share your musical talents with the world!
Tips for a Professional-Sounding Cover Song
Creating a professional-sounding cover song involves attention to detail and careful execution. Here are some tips to help elevate the quality of your cover song:
- Select the Right Song: Choose a song that suits your vocal range and musical style. Select a song that you connect with emotionally and can deliver with authenticity.
- Listen and Analyze: Study the original version of the song and dissect its arrangement, instrumentation, and production. Pay attention to the nuances and details that make the song memorable.
- Put Your Unique Spin: Aim to bring your own interpretation and style to the cover song. Add your musical personality through vocal variations, rearrangements, or instrument choices.
- Pay Attention to Timing and Feel: Focus on the timing and feel of the song. Capture the groove and rhythm accurately to ensure a cohesive and engaging performance.
- Practice and Rehearse: Dedicate ample time to practice and rehearse your cover song. Familiarize yourself with the lyrics, melodies, and instrumental parts to ensure a confident and technically sound performance.
- Pay Attention to Vocal Technique: Work on your vocal technique, including breath control, pitch accuracy, and dynamics. Consider taking vocal lessons or seeking guidance from a vocal coach to enhance your vocal skills.
- Experiment with Instrumentation: If you’re instrumentalists, consider adding unique instrumentations or arrangements to give your cover song a fresh and distinctive sound.
- Invest in Quality Recording Equipment: Although you don’t need expensive gear, investing in good-quality recording equipment can significantly improve the sound quality of your cover song.
- Focus on Sound Mixing: Pay attention to sound mixing techniques to ensure a balanced and cohesive mix. Use EQ, compression, and effects judiciously to enhance the individual tracks and create a harmonious blend.
- Continuous Learning: Keep improving your skills and knowledge by learning about recording techniques, production methods, and mixing/mastering processes. Stay up-to-date with advancements in technology and production trends.
Remember, creating a professional-sounding cover song takes time, practice, and a commitment to continuous improvement. Be patient with yourself and enjoy the creative journey. Each cover song you record is an opportunity to refine your skills and showcase your talents.
Embrace these tips and techniques to create cover songs that captivate and resonate with listeners. Whether you’re sharing them online or performing live, your professional-sounding cover songs will leave a lasting impression.
Now, armed with these tips, go ahead and create cover songs that truly shine!
Conclusion
Recording a cover song on your computer is an exciting and fulfilling endeavor. It allows you to showcase your talents, put your own twist on popular songs, and connect with an audience who appreciates familiar melodies. By following the steps outlined in this comprehensive guide, you can achieve a professional-sounding cover song right from the comfort of your own home.
From choosing the right equipment to setting up your recording software, preparing your instrument and microphone, selecting a suitable recording space, adjusting input levels and settings, recording your performance, editing and mixing the tracks, adding effects and enhancements, and finally exporting and saving your cover song, each step plays a crucial role in the overall success of your production.
Remember to take your time and pay attention to detail throughout the entire process. Continuously strive for improvement and never hesitate to experiment and be creative with your cover song interpretations. The more you practice and refine your skills, the better your recordings will become.
Whether you’re a beginner musician or have some experience in recording, don’t be afraid to embrace the learning curve and seek guidance from resources like this guide. With time and dedication, you can create cover songs that not only pay homage to the originals but also showcase your unique artistry and style.
Now, armed with the knowledge and insights from this guide, it’s time to unleash your creativity, put your skills to the test, and start recording your own captivating cover songs. Share them with the world and let your unique musical voice be heard!