Home>Production & Technology>Music Video>How To Post Music Video On Instagram Story
Music Video
How To Post Music Video On Instagram Story
Published: November 18, 2023
Learn how to share your favorite music videos on Instagram Stories with our step-by-step guide. Enhance your Story game with captivating Music Videos!
(Many of the links in this article redirect to a specific reviewed product. Your purchase of these products through affiliate links helps to generate commission for AudioLover.com, at no extra cost. Learn more)
Table of Contents
- Introduction
- Step 1: Prepare your music video
- Step 2: Convert video to Instagram Story format
- Step 3: Upload music video to Instagram Story
- Step 4: Add music and stickers to your music video
- Step 5: Customize your music video with text and drawings
- Step 6: Share your music video on Instagram Story
- Conclusion
Introduction
Music videos have become a powerful medium for artists to express their creativity and connect with fans on a deeper level. With the rise of social media platforms, music videos can now reach a wider audience and make a lasting impact. One such platform is Instagram, which allows users to post short video clips on their Stories – a feature that has gained immense popularity.
Posting a music video on your Instagram Story can be a great way to engage your followers and share your latest work. It not only gives your fans a glimpse into your creative process, but also helps to build anticipation and generate buzz around your music.
In this article, we will walk you through the step-by-step process of posting a music video on your Instagram Story. From preparing your video to adding stickers and text, we will cover everything you need to know to create an engaging and eye-catching Instagram Story.
So, whether you are a musician, a video producer, or just someone looking to share their favorite music videos, get ready to dive into the world of Instagram Stories and learn how to make your music videos shine!
Step 1: Prepare your music video
Before you can post your music video on Instagram Story, you need to ensure that it is properly prepared and optimized for the platform. Here are a few key steps to follow:
- Select the right clip: Choose a segment of your music video that is visually captivating and can capture the attention of your audience in the short span of an Instagram Story. Consider the mood, energy, and storyline of your video when making your selection.
- Trim and edit: Use video editing software or apps to trim and edit your music video clip if necessary. This will help you refine the timing, remove any unnecessary parts, and make the clip more engaging.
- Optimize for mobile: Instagram is primarily a mobile platform, so ensure that your music video is optimized for mobile viewing. Check the dimensions and aspect ratio of your video to ensure it fits well on the Instagram Story screen.
- Add subtitles: Consider adding subtitles to your music video, especially if there are lyrics or important messages that you want your audience to grasp. Subtitles can make your video more accessible and engaging for viewers.
- Adjust audio levels: Pay attention to the audio levels in your music video. Make sure the music is clear and balanced with any accompanying vocals or sound effects. You want your viewers to have the best possible audio experience.
- Save in a compatible format: Finally, save your music video in a compatible format that can be easily uploaded to Instagram. Popular video formats like MP4 or MOV are usually recommended.
By following these steps, you can ensure that your music video is well-prepared and optimized for uploading to Instagram Story. With a visually appealing and well-edited clip, you’ll be ready to make a strong impression on your followers.
Step 2: Convert video to Instagram Story format
Once you have prepared your music video, the next step is to convert it to the appropriate format for Instagram Story. Instagram has specific requirements for videos posted on Stories, so it’s important to ensure your video meets those criteria. Here’s how:
- Check the video duration: Instagram Stories have a maximum duration of 15 seconds per clip. If your music video exceeds this limit, you will need to trim it down or divide it into multiple clips.
- Adjust the video dimensions: Instagram Story videos should have a resolution of 1080 x 1920 pixels. If your video doesn’t match this size, you can use video editing software or apps to resize it accordingly.
- Convert the video file: Instagram supports a variety of video file formats, including MP4 and MOV. If your video is in a different format, you can use online video converters or video editing software to convert it to a compatible format.
- Compress the video: To ensure smooth playback and faster upload times, it’s recommended to compress your video file. You can use video compression tools or apps to reduce the file size without compromising the quality too much.
- Save the video: Once you have made the necessary adjustments and conversions, save the video in the appropriate format. Make sure the file is named appropriately and ready for uploading to Instagram.
By following these steps, you can convert your music video into the required format for Instagram Story. It’s important to adhere to the platform’s guidelines to ensure your video is displayed properly and accessible to your audience. Once your video is in the right format, you can proceed to the next step of uploading it to your Instagram Story.
Step 3: Upload music video to Instagram Story
Now that your music video is properly formatted, it’s time to upload it to your Instagram Story and share it with your followers. Follow these steps to get your music video on Instagram Story:
- Open the Instagram app: Launch the Instagram app on your mobile device and ensure that you are logged into your account.
- Access the camera: Tap on the camera icon in the top-left corner of the screen or swipe right from your feed to open the camera interface for creating Stories.
- Choose the video from your library: Swipe up or tap on the gallery icon in the bottom-left corner to access your device’s media library. Select the music video that you want to upload from your saved files.
- Adjust the video placement: Instagram Story videos are displayed in a vertical format. You can pinch and zoom to adjust the video’s placement and size on the screen.
- Add filters or effects (optional): Instagram Story offers a variety of filters and effects to enhance the visual appeal of your music video. Experiment with different options to find the look that best suits your video.
- Tap on “Your Story” to upload: Once you are satisfied with the video and any added filters, tap on the “Your Story” button at the bottom of the screen to upload your music video to your Instagram Story.
- Share your Story: After uploading your music video, it will be visible on your Instagram Story for 24 hours. Your followers will be able to view it by tapping on your profile picture located at the top of their feed.
You can also choose to share your music video with specific friends or followers by using the “Send To” feature on Instagram Story. This allows you to send your video directly to individual users or select groups.
With these steps, you can easily upload your music video to Instagram Story and share it with your audience. Remember to add captions, hashtags, and location tags to increase the reach and engagement of your Story. Now that your video is live, it’s time to make it even more engaging by adding music and stickers in the next step!
Step 4: Add music and stickers to your music video
Once you have uploaded your music video to Instagram Story, you can enhance it further by adding music and stickers. This will make your video more interactive, engaging, and visually appealing. Follow these steps to add music and stickers to your music video:
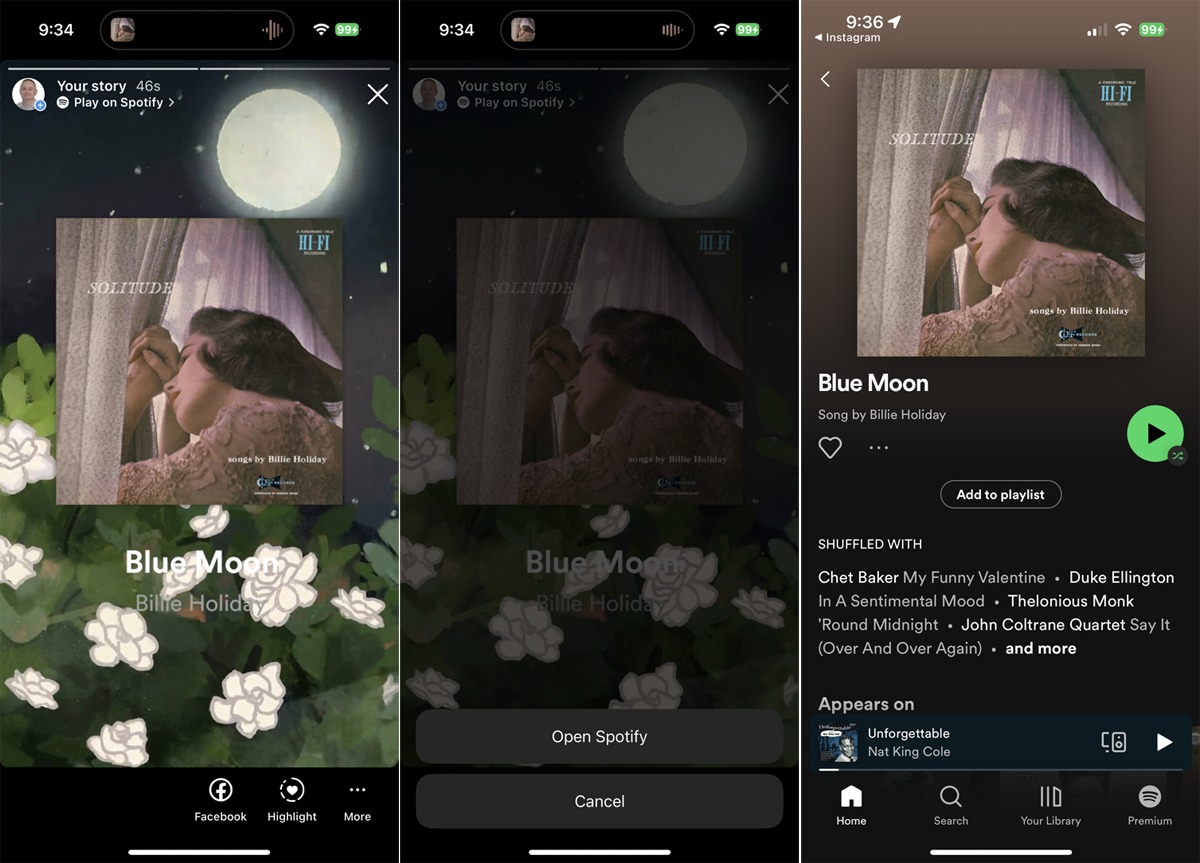
- Add music: Instagram provides a wide selection of music to choose from. Tap on the sticker icon at the top of the Story editing screen, then select the “Music” option. Search for the desired song and choose the specific portion you want to add to your music video.
- Resize and reposition the music sticker: After adding the music, you can resize and reposition the sticker on the video. Simply pinch or use your fingers to adjust the size and drag it to the desired location.
- Add additional stickers: In addition to music, Instagram offers various stickers that can be added to your music video. These include GIFs, emojis, location tags, polls, countdowns, and more. Tap on the sticker icon again, then choose the desired sticker and place it on your video.
- Customize stickers: Once you’ve added a sticker, you can customize it. Tap on the sticker to access options like changing its color, size, orientation, and more. This allows you to match the aesthetic and style of your music video.
- Explore augmented reality (AR) effects: Instagram also offers a range of AR effects that can be added to your video. These can transform your music video by adding special effects, filters, and animations. Browse through the available effects and choose the ones that enhance your video’s visual appeal.
- Experiment with text: Alongside stickers, Instagram allows you to add text to your music video. This can be used to display lyrics, captions, or any other desired text. Choose from a variety of fonts, colors, and styles to make your text visually appealing and cohesive with your video.
By adding music and stickers to your music video, you can make it more dynamic and captivating. This will not only grab the attention of your viewers but also provide them with an interactive and entertaining experience while watching your Instagram Story.
Once you have customized your music video with music, stickers, and text, it’s time to move on to the next step, where you’ll learn how to further personalize it by adding text and drawings.
Step 5: Customize your music video with text and drawings
To make your music video on Instagram Story even more personalized and engaging, you can add text and drawings to it. Adding text and drawings allows you to convey additional messages, highlight important elements, and add creative touches. Here’s how you can customize your music video with text and drawings:
- Add text: Tap on the sticker icon once again and choose the “Text” option. Type in the desired text, such as lyrics, captions, or quotes, and place it on your video. You can customize the font, color, size, and position of the text to fit your video’s aesthetic.
- Draw on your video: Instagram also provides a drawing tool that allows you to add doodles or sketches directly on your music video. Tap on the drawing pen icon and select the desired color and brush size. Then, use your finger or a stylus to draw on the video. This can be a great way to add artistic flair or highlight specific elements.
- Use eraser and undo: If you make a mistake while drawing, don’t worry! Instagram’s drawing tool also includes an eraser and an undo button. Simply select the eraser to remove any unwanted marks or use the undo button to revert to the previous step.
- Layer text and drawings: You can layer text and drawings on top of each other to create interesting visual effects. Experiment with different combinations and placements to find the right balance for your music video.
- Consider animation: Instagram offers animation effects for text and drawings. Explore these effects to make your text or drawings appear or disappear in a fluid and eye-catching manner. This can add an extra touch of creativity to your video.
- Save your customization: Once you are satisfied with your text and drawings, tap on the “Done” or “Save” button to save your customized music video on Instagram Story.
Customizing your music video with text and drawings allows you to inject your unique style and creativity into your Instagram Story. It helps you tell a more compelling story and connect with your audience on a deeper level.
With a personalized and visually appealing music video, you are now ready to share it on your Instagram Story and create a lasting impression. In the next step, you will learn how to share your music video effectively.
Step 6: Share your music video on Instagram Story
After customizing your music video to perfection, it’s time to share it with your followers on Instagram Story. Sharing your music video effectively can help you maximize its reach and engagement. Follow these steps to share your music video on Instagram Story:
- Preview your video: Before sharing your music video, take a moment to preview it and ensure that everything looks and sounds as intended. Check for any errors or inconsistencies that need to be fixed.
- Add relevant hashtags: Including relevant hashtags in your Instagram Story can increase its visibility and reach. Add hashtags that are related to your music genre, the theme of your video, or any special events or campaigns you’re promoting.
- Tag relevant accounts: If your music video features collaborations or features other artists, make sure to tag their Instagram accounts in your Story. This increases their visibility and can potentially lead to more engagement and exposure for your video.
- Share to your Story: Once you are satisfied with your music video and its accompanying elements, tap on the “Your Story” button to share it. This will make your music video visible to all your followers for the next 24 hours.
- Engage with your audience: After posting your music video, make sure to engage with your audience by responding to comments and DMs. Show appreciation for their support and provide additional context or insights about the video if needed.
- Save your Story: If you want to keep a permanent copy of your music video on Instagram, you can save it to your device. Simply tap on the three-dot menu icon at the bottom right corner of your Story and select the “Save” option.
Sharing your music video on Instagram Story allows you to connect with your followers in a more dynamic and engaging way. It’s also a great opportunity to build excitement around your music and generate buzz for future projects.
Remember to analyze the performance of your Instagram Story using the built-in analytics provided by Instagram. This will help you understand how your music video is resonating with your audience and guide your future content strategy.
Now that you’ve successfully shared your music video on Instagram Story, continue to create high-quality content and explore other creative ways to engage your audience. Keep experimenting, learning, and growing as an artist!
Conclusion
Posting a music video on your Instagram Story is an effective way to engage your followers, share your artistry, and generate excitement around your music. By following the step-by-step process outlined in this article, you can confidently navigate the process of posting a music video on Instagram Story.
Starting with the preparation of your music video, ensure that it is trimmed, optimized for mobile viewing, and saved in a compatible format. Once you have converted your video to Instagram Story format, upload it to your Story, making adjustments to placement and adding filters or effects if desired.
Don’t forget to enhance your music video by adding music and stickers that complement the overall vibe and message. Customize it further by incorporating text and drawings, allowing your creativity to shine through. When you’re satisfied with the final result, share your music video on your Instagram Story and consider adding relevant hashtags and tagging relevant accounts to increase its visibility.
Engaging with your audience is crucial, so take the time to respond to comments and messages. Analyzing the performance of your Instagram Story using the platform’s built-in analytics will provide insights into the impact of your music video and guide future content strategies.
Remember, Instagram Story provides a powerful platform to connect with your audience and showcase your artistry. Use this opportunity to captivate your followers and create a lasting impression. So, harness your creativity, share your music videos, and let your artistic voice shine on Instagram Story!